dairy free

Dairy-free Roasted Pepper Soup

Anyone who reads my posts knows that on New Year’s Eve we feast on hors d’oeuvre throughout the day — no real sit-down dinner. Dessert is later in the evening.

But my cousins sleep over for a couple of days and that means real meals too.

On one of the nights they are with us I usually serve either Rack of Lamb or Rib Roast — the dinner we used to eat on New Year’s Eve long ago before we decided on the nibble fest.

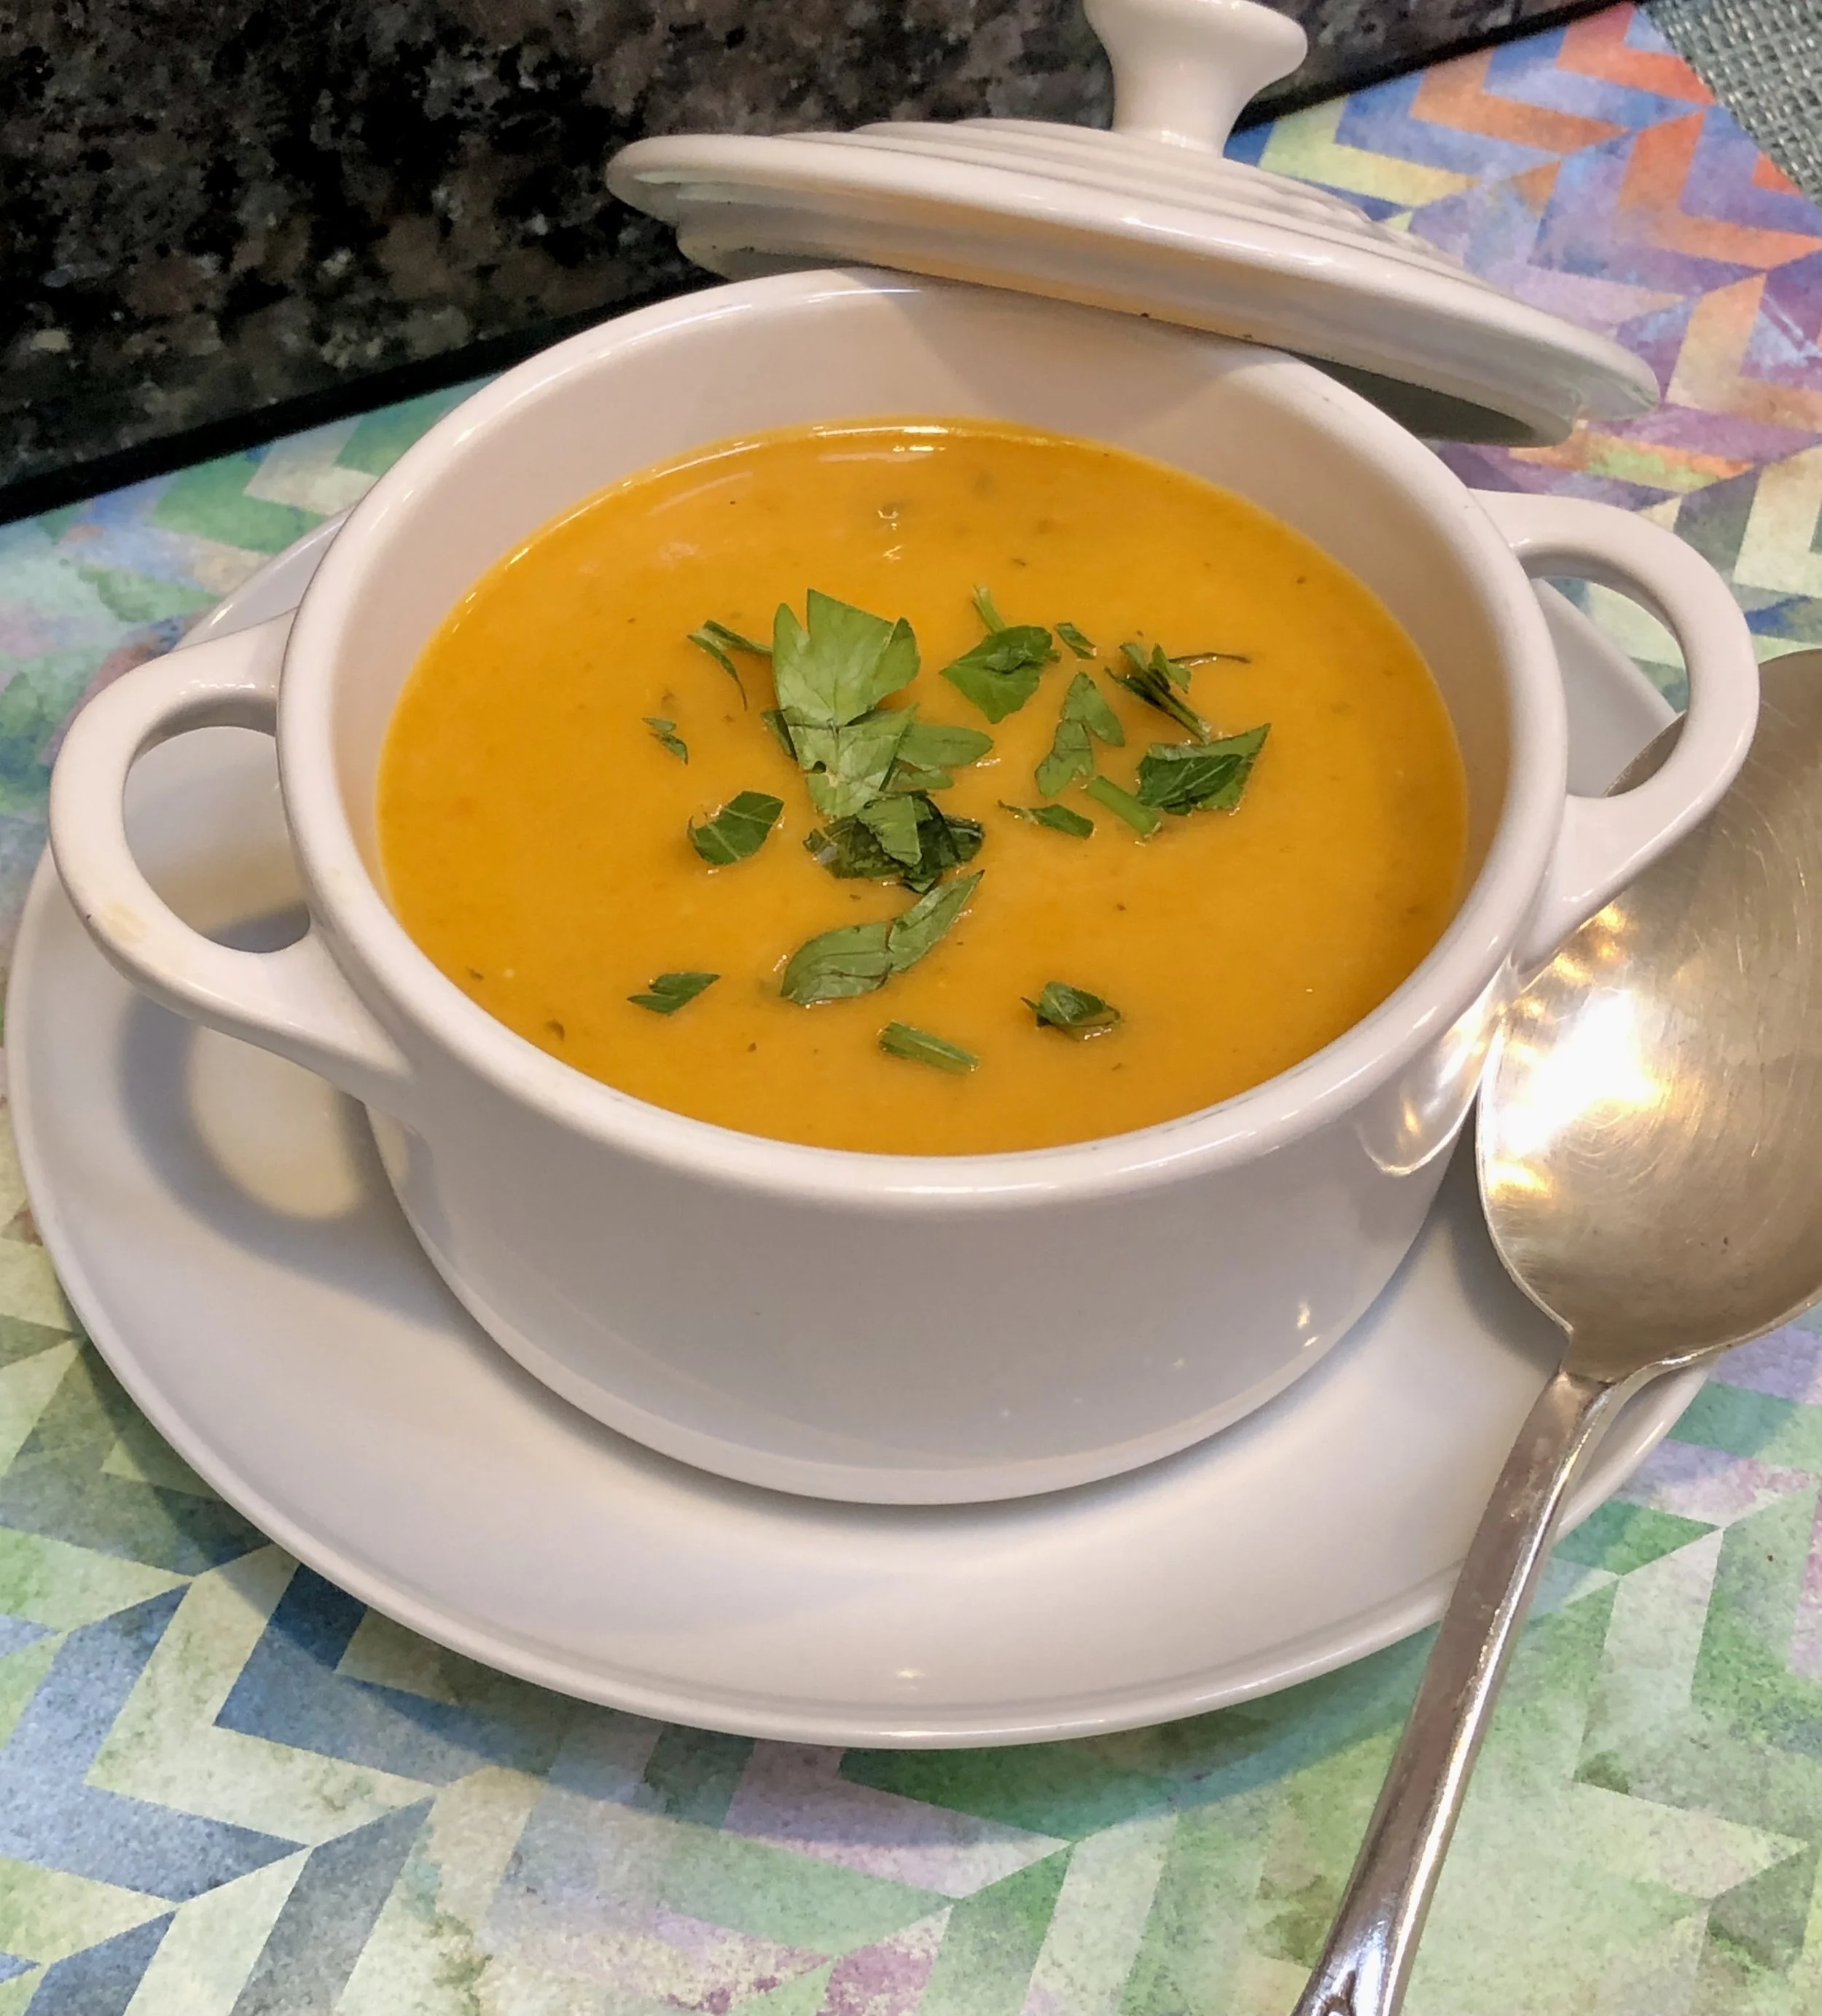
For starters? This soup. Light enough to precede a heavy meat meal and colorful enough for a celebration. Bonus: you can make this a few days ahead!

ROASTED RED PEPPER SOUP

  • 4 sweet red, orange and/or yellow bell peppers

  • 2 tablespoons olive oil

  • 4 medium scallions, chopped

  • 2 carrots, chopped

  • 1 large clove garlic, chopped

  • 2 tablespoons chopped fresh parsley plus more for garnish if desired

  • 1 teaspoon chopped fresh thyme leaves

  • 6 tablespoons raw white rice

  • 5 cups vegetable stock

  • 1-1/2 teaspoons salt or to taste

  • freshly ground black pepper

  • 3/4 to 1 cup non-dairy milk, optional

Preheat the broiler. Place the peppers under the broiler, about 4-6" away from the heat. Broil for 2-3 minutes, until the skin has blistered. Turn the peppers and repeat this process until the entire surface is blistered and lightly charred. Remove the peppers and place them in a paper bag or wrap in aluminum foil. Let rest at least 10 minutes. Remove the peppers from the bag, peel off the skin and discard the stem and the seeds. Cut the peppers into pieces and set aside. 

Heat the olive oil in a large saucepan over medium heat. Add the scallions, carrots, garlic, parsley and thyme. Cook, stirring occasionally for 3-4 minutes or until the vegetables have softened slightly. Stir in the rice. Add the peppers and stock. Season to taste with salt and pepper. Bring the mixture to a boil, lower the heat and cook at a simmer for 25 minutes. Add non-dairy milk if desired. Puree in a food processor or blender. Serve hot or chilled.

Makes 6 servings

Lemon Aquafaba Bread

fullsizeoutput_9516.jpeg

At this particular time, when we are going through a world-wide crisis, a terrifying pandemic, it can be therapeutic for many of us to cook and bake.

I am one of those people.

I have plenty of ingredients to cook with because over the years I’ve learned to keep shelf-stable foods on hand in case I can’t shop: ingredients such as canned beans, rice, frozen veggies, dried fruit, canned or packaged milk, and so on.

Equally important for me is — don’t waste food (I’ve talked about that often). I believe that it is important to use all resources — “food forage” as my colleague Susan Barocas calls it. Don’t throw out any ingredient that’s useable, including leftovers.

With all this in mind I offer this lemon bread.

I have lots of lemons in my crisper because of an article I am writing. I’ve developed the recipe for that, so I need to make use of the extra lemons.

I also needed to do something with the liquid leftover from a can of chick peas that I opened for a salad. Chick pea liquid is incredibly useful.

In case you aren’t familiar with this leftover liquid (also from canned beans), it is called aquafaba and it can be used in place of eggs. That makes it an ideal ingredient for vegans and anyone who is allergic to or otherwise can’t eat eggs.

When you beat chick pea liquid with a whisk, it traps air like eggs do, so baked goods have both structure and also a light, tender crumb.

I am trying not to use too many fresh eggs that I might need for meals, so I used the aquafaba instead to make this lemon bread.

Dee-lish!

To get the most out of the liquid in a can of chick peas, be sure to scrape the residue at the bottom of the can. For best results, reduce the liquid slowly over medium-low heat until it becomes the consistency of egg white. Use about 3 tablespoons of the liquid in place of each egg. 

For another delicious recipe (carrot bread) using aquafaba, click here.

Lemon Aquafaba Bread

  • 6 tablespoons aquafaba

  • 4 tablespoons coconut oil

  • 3/4 cup sugar

  • 1 tablespoon finely grated fresh lemon peel

  • 2 cups all-purpose flour

  • 2-1/2 teaspoons baking powder

  • 3/4 teaspoon salt

  • 1 cup coconut milk

  • 1/4 cup fresh lemon juice

  • 1-1/2 tablespoons sugar

Preheat the oven to 350 degrees. Grease a 9”x5”x3” loaf pan. If the aquafaba seems thin, boil it for a few minutes to thicken slightly to the consistency of egg white. Set aside to cool. In the bowl of an electric mixer, beat the coconut oil and 3/4 cup sugar at medium speed for 1-2 minutes or until well combined. Add the lemon peel and aquafaba and blend them in. Mix the flour, baking powder and salt in a small bowl. Add the dry ingredients to the creamed mixture in thirds, alternating with the coconut milk. Beat to blend the ingredients to a smooth, even batter. Spoon the batter into the prepared pan. Bake for 50-55 minutes or until a cake tester inserted into the center comes out clean. While the bread is baking, combine the lemon juice and 1-1/2 tablespoons sugar in a small saucepan and cook over medium heat for 1-2 minutes or until the sugar has dissolved. When the bread comes out of the oven, pour the lemon juice mixture on top. Cool the bread in the pan for 10 minutes. Invert onto a cake rack to cool completely.

Makes one bread

Banana Oat Marble Bread

fullsizeoutput_9fac.jpeg

So, okay, as usual — the family was here for Mother’s Day. I bought a ton of fruit. All gone.

EXCEPT for a few bananas.

And so: Banana Bread. This one with oats and chocolate. It’s moist and gently sweet. Could do as dessert or just with some coffee as a snack. A little nosh.

Freezable too.

Banana Oat Marble Bread

  • 6 ounces semisweet chocolate

  • 1-1/2 cups all-purpose flour

  • 1/2 cup quick oats

  • 1/2 teaspoon baking powder

  • 1/2 teaspoon cinnamon

  • 1/2 teaspoon salt

  • 3/4 cup sugar

  • 1/2 cup vegetable oil

  • 2 large eggs

  • 3 medium very ripe bananas

  • 1/4 cup fruit juice such as mango, orange or apple

  • 1 teaspoon vanilla extract

Preheat the oven to 350 degrees. Grease a 9”x5”x3” loaf pan.

Melt the chocolate and set it aside. Mix the flour, oats, baking powder, cinnamon and salt in a bowl and set it aside. Beat the sugar and vegetable oil with a handheld or electric mixer set at medium speed for 2-3 minutes or until the mixture is light and fluffy. Add the eggs one at a time, beating after each addition. Mash the bananas and add them to the sugar mixture. Beat thoroughly until the ingredients are well blended. Add the flour mixture and beat for 1-2 minutes to blend the ingredients thoroughly. Stir in the juice and vanilla extract. Pour the batter into the prepared pan. Spoon the melted chocolate on top and use a knife to swirl the chocolate into the banana batter. Bake for 1 hour or until a cake tester inserted into the center comes out clean. Cool the bread in the pan 15 minutes. Remove the bread from the pan and let it cool on a cake rack.

 Makes one bread serving 10-12

Grilled Corn Salad

fullsizeoutput_85e6.jpeg

Now's about the time of year when local corn is at its best. So of course, while corn-on-the-cob is always a good bet, there are reasons to cut the kernels off the cob too:

  • your child or grandchild wears braces
  • your parent or grandparent wears dentures
  • you hate the mess and fussiness of eating corn-on-the-cob
  • you've had your fill of corn-on-the-cob
  • you want a pretty dish to go with whatever else you're serving

Here's what to do: salad. Like this easy one:

Grilled Corn Salad

  • 2 cups grilled or otherwise cooked corn kernels (about 2 large ears of corn)*
  • 1 cup cut up grape or cherry tomatoes
  • 1/4 cup chopped red onion
  • 3 tablespoons chopped fresh parsley
  • 1 teaspoon fresh thyme leaves
  • 1 teaspoon chopped chili pepper, optional
  • 2 tablespoons olive oil
  • 2 tablespoons white wine vinegar
  • salt and freshly ground black pepper to taste

Place the corn kernels, tomatoes, red onion, parsley, thyme and chili pepper, if used, in a bowl and toss the ingredients to distribute them evenly. Pour in the olive oil and toss the ingredients to coat them with the oil. Pour in the wine vinegar and toss. Sprinkle with salt and pepper, toss and let stand for about 15 minutes before serving.

*You can also use raw corn kernels

Makes 4-6 servings

Banana Applesauce Cupcakes

fullsizeoutput_82d2.jpeg

One of the greatest pleasures in life is cooking with children.

Children are enthusiastic, creative and joyful abut anything they've cooked or baked.

These cupcakes are a melange of my grandchildren's ideas about what to make for dessert. It had to be dairy free. We had a few bananas and some leftover applesauce that we wanted to use.

The cupcakes were yummy. Even the adults thought so.

Decorations, including the one lone banana slice in the center, by the kids, of course, .


Banana Applesauce cupcakes

  • 2 cups all-purpose flour
  • 1 teaspoon baking soda
  • 1/2 teaspoon baking powder
  • 1/2 teaspoon salt
  • 1 teaspoon cinnamon
  • 1 cup sugar
  • 1/4 cup vegetable oil
  • 1/4 cup applesauce
  • 2 large eggs
  • 3 very ripe bananas, mashed
  • 1/4 cup apple juice
  • 1 teaspoon vanilla extract

Preheat the oven to 350 degrees. Lightly grease 12 muffin tins. In a small bowl, combine the flour, baking soda, baking powder, salt and cinnamon and whisk the ingredients to blend them thoroughly. Place the sugar, vegetable oil and applesauce in the bowl of an electric mixer. Beat the ingredients at medium speed for 3-4 minutes or until well blended. Add the eggs and beat them in. Add the bananas, apple juice and vanilla extract and beat at medium speed for about 2 minutes or until well blended. Spoon equal quantities of batter into the muffin tins. Bake for about 20 minutes or until a cake tester inserted into the center comes out clean. 

Makes 12

frosting

  • 1 cup margarine, shortening or mix of coconut oil and margarine 
  • 1-1/2 cups confectioners' sugar
  • 1 teaspoon vanilla extract
  • apple juice as necessary

Place the margarine, confectioners' sugar and vanilla extract in a bowl (or use an electric mixer) and beat with a hand mixer at medium speed for 2-3 minutes or until well blended and creamy. If the mixture seems too thick to spread as frosting, mix in a teaspoon or two of apple juice.

Makes enough for 12 cupcakes


Herb Roasted Potatoes

American politics is driving me crazy!

And I know, based on everything I've been reading for months and on conversations I've had with a zillion people, that a lot of other people feel the same way.

Therapists have been extra busy since November 2016.

This is the kind of stress that -- for me -- only a potato can help. Potatoes are my main comfort food. 

But what kind? 

Maybe homemade potato chips?

Only if you feel like frying food.

Warm weather's here so maybe potato salad

Not if you're in the mood for something hot and crunchy.

So -- it's time for these lemony-roasted potato chunks, which are crispy, tangy and satisfying. You can prepare them ahead and pop them in the oven just before you want to serve dinner (and also keep them nicely in a warm oven).

Lemon-Dill Roasted Potatoes

  • 2 pounds Yukon Gold or all-purpose potatoes
  • 2 tablespoons olive oil
  • 2 tablespoons lemon juice
  • 2 cloves garlic, finely chopped
  • 2 tablespoons chopped fresh dlll
  • 1 teaspoon finely grated lemon peel
  • salt and freshly ground black pepper to taste

Preheat the oven to 400 degrees. Line a cookie sheet with parchment paper. Peel the potatoes and cut them into small chunks. Place the potatoes in a bowl. Add the olive oil and toss to coat the chunks. Add the lemon juice, garlic, dill and lemon peel. Sprinkle with salt and pepper. Toss the ingredients to coat the potato chunks evenly. Place the pieces in a single layer on the parchment paper. Bake for 50-60 minutes, turning the pieces occasionally, or until the pieces are crispy.

Makes 4-6 servings


Banana Crunch Cake

fullsizeoutput_89cd.jpeg

I am always amazed at the amount of fruit that I buy -- and that is consumed -- when my children and grandkids come. Quarts of berries of all kinds. Mangoes, pineapples, grapes and kiwi fruit. In season, also stone fruit such as peaches, fresh apricots, plums and so on.

Plus oranges, clementines, grapefruit.

Apples of course.

And bananas. Lots of bananas.

Usually I am left with nothing, which is why I am always amazed, just at the sheer quantity of what has been eaten.

And I am not complaining at the lack of leftovers! Eating fruit is a good thing. Glad my family is good with that.

IF and when I have leftover bananas I use them for banana bread or cake. I have so many different recipes it's difficult to choose one or another, so I often come up with something new.

Like this. The crunchy crust gets it one step beyond homey, making this suitable for company.


Banana Crunch Cake

Crust:

  • 1 cup crushed raisin bran or similar flakes
  • 1 cup quick oats
  • 1/4 cup brown sugar
  • 1 teaspoon cinnamon
  • 6 tablespoons liquid coconut oil (or use melted butter)

Combine the cereal, oats, brown sugar and cinnamon in a bowl. Pour in the coconut oil and mix until the dry ingredients are thoroughly coated. Set aside. 

Cake:

  • 1-2/3 cups all-purpose flour
  • 1 teaspoon salt
  • 1 teaspoon baking powder
  • 1/2 teaspoon baking soda
  • 1/2 cup vegetable shortening
  • 1 cup sugar
  • 2 large eggs
  • 3 mashed bananas
  • 1/4 cup water
  • 1 teaspoon lemon juice
  • 1 teaspoon vanilla extract

Preheat the oven to 350 degrees. Lightly grease a 9-inch square baking pan. Make the crust and set it aside. Mix the flour, salt, baking powder and baking soda together in a small bowl. In the bowl of an electric mixer, beat the vegetable shortening and sugar together at medium speed for 2-3 minutes or until creamy and well blended. Add the eggs and bananas and beat the ingredients for another 2-3 minutes or until thoroughly blended. Mix the water and lemon juice together. Add the flour mixture alternating with the lemon-water and blend in ingredients thoroughly. Stir in the vanilla extract. Spoon the batter into the prepared pan. Cover the top evenly with the crust mixture. Bake for 22-25 minutes or until a cake tester inserted into the center comes out clean.

Makes 12-16 servings


Pumpkin Raisin Muffins

_DSC9757.jpg

A few days ago someone on social media alerted the world to Oscar Mayer Pumpkin Spice Bologna.

No.

Just no. Just absolutely no.

Pumpkin spice doesn't belong in bologna. It doesn't even belong in the same sentence.

In fact, there is way too much "pumpkin spice" out there, in everything. 

However, pumpkin spice in muffins is a pretty good idea. It is pumpkin season, after all. And spices such as cinnamon, nutmeg and allspice do give the batter a welcome warmth and fragrance.

So, instead of even thinking about that terrible idea of pumpkin spice bologna, try these muffins, which are quite wonderful.

Btw, there really is no such thing as Oscar Mayer Pumpkin Spice Bologna. It's baloney! Watch out for the real #fakenews. (http://www.wusa9.com/news/local/verify/verify-pumpkin-spice-products-whats-real-and-whats-not/481457725)


Pumpkin Raisin Muffins

  • 1-1/2 cups all-purpose flour
  • 1 teaspoon baking soda
  • 1 teaspoon baking powder
  • 1/2 teaspoon salt
  • 1 teaspoon ground cinnamon
  • 1/2 teaspoon ground nutmeg
  • 1/4 teaspoon ground allspice
  • 2/3 cup sugar
  • 2 large eggs
  • 1/2 cup vegetable oil
  • 1-1/4 cups mashed pumpkin
  • 1/2 cup golden raisins

 Preheat the oven to 350 degrees. Grease 10 muffin tins. Mix the flour, baking soda, baking powder, salt, cinnamon, nutmeg and allspice together into a bowl. Beat the sugar, eggs, vegetable oil and mashed pumpkin together in an electric mixer set at medium for 2-3 minutes or until thoroughly blended and smooth. Add the flour mixture and beat at low speed for one minute to blend ingredients. Fold in the raisins. Pour the batter into the prepared tins. Bake for about 20 minutes or until a cake tester inserted into the center comes out clean.

Makes 10


Ah! Summer Blueberries!

_DSC9863.jpg

It's impossible to lose weight during the summer. Not when there is so much glorious fruit around and it tastes so good just out-of-hand but SO SO delicious in crisps, pies, muffins, galettes and quickbreads.

Like this blueberry bread. Spiked with orange.

A nice snack all by itself. Sliced for sandwiches smeared with cream cheese. Dessert when topped with ice cream.

Blueberry Bread

  • 2 cups all-purpose flour
  • 1 cup sugar
  • 1-1/2 teaspoons baking powder
  • 1/2 teaspoon baking soda
  • 1 teaspoon salt
  • 2 teaspoons grated fresh orange peel
  • 1 teaspoon vanilla extract
  • 1/4 cup coconut oil
  • 1 large egg
  • 3/4 cup orange juice
  • 1 cup fresh blueberries

Preheat the oven to 350 degrees. Lightly grease a 9”x5” loaf pan. Mix the flour, sugar, baking powder, baking soda, salt, orange peel and vanilla powder together into a bowl. Add the coconut oil in chunks and cut it into the dry ingredients with your fingers or a pastry blender. If you use an electric mixer, set it at low-medium speed. In a second bowl, beat the egg and orange juice together until well blended (if you use vanilla extract, add it here). Add to the flour mixture and stir to blend ingredients. Fold in the blueberries. Pour the batter into the prepared pan. Bake for 55-60 minutes or until a cake tester inserted into the center comes out clean.

Makes one loaf

My Bat Mitzvah Chocolate Cake

fullsizeoutput_8490.jpeg

Today is the anniversary of my Bat Mitzvah. It took place a LONG time ago! In the 1950s to tell you the truth.

Back in the day Bat Mitzvahs were not such a thing. In fact, I was the first girl from our newly established synagogue to reach this momentous occasion.

I have to confess, our rabbi mentioned the notion when we first joined the synagogue and I told my parents I wanted to learn some Hebrew and prayers and do whatever I had to, not so much because I had any particular religious feelings, nor was it because I wanted a big party -- the big themed events we see today didn't exist back then -- but because my two older brothers had Bar Mitzvahs and I couldn't understand why a girl wouldn't be treated equally.

My mother always said that when I was born I came out a feminist.

Still am. (So was she.)

Girls are equal to boys, women to men. Let's not even contest that one.

Still, my brothers did have a Saturday Shabbat service Bar Mitzvah and I was only allowed to have one on Friday night. I was content with that, it was a start.

We had a small party at home. I was allowed to invite one friend, and of course my family was there -- aunts, uncles, cousins, including my cousin Leslie, who, to this day, is like a sister.

I remember my dress: white with red and black lines. 

I don't remember what my Mother made for food.

But I do remember dessert. Because I made it: a dark chocolate cake with fudge frosting.

I didn't keep the recipe. I don't actually know whose recipe I used. I just remember what it looked like and that it tasted fabulous and that I made the cake for my own Bat Mitzvah.

So today I celebrate with Chocolate Cake. This one is a riff on the famous Hershey Black Cake with a few changes to make it dairy-free, less sweet and more to my tastes (you can change the frosting to dairy using 12 tablespoons of butter in place of the coconut milk and coconut oil). 

This is a good cake for a festive occasion, even one's own Bat Mitzvah.

Black Chocolate Cake

  • 1 tablespoon lemon juice
  • water
  • 1-1/2 cups all-purpose flour
  • 1 cup unsweetened cocoa
  • 1-1/2 cups sugar
  • 2 teaspoons baking soda
  • 1 teaspoon baking powder
  • 1 teaspoon salt
  • 2 large eggs
  • 1 cup strong, cooled coffee
  • 1/2 cup vegetable oil
  • 2 teaspoons vanilla extract
  • frosting

Preheat the oven to 350 degrees. Lightly grease 3 9-inch cake pans. Pour the lemon juice into a liquid (pitcher) measuring cup and add enough water to measure one cup. Set aside. Place the flour, cocoa, sugar, baking soda, baking powder and salt in the bowl of an electric mixer and mix at low speed to combine the ingredients. Add the eggs, the lemon-water, coffee, vegetable oil and vanilla extract and beat the ingredients at medium speed for 2-3 minutes, scraping down the sides of the bowl occasionally, or until well combined and smooth. Pour equal amounts of the batter into the prepared pans. Bake for 22-25 minutes or until a cake tester inserted into the center comes out clean. Let cool for 10 minutes. Invert the layers onto a cake rack to cool completely. Frost and serve.

Makes 8-10 servings

Frosting

  • 1-1/2 cups dairy-free semisweet chocolate chips
  • 6 tablespoons coconut milk
  • 6 tablespoons coconut oil
  • 1-1/2 teaspoons vanilla extract
  • 1/4 cup confectioners’ sugar
  • pinch of salt

Place the chocolate chips, coconut milk and coconut oil in a saucepan and place over medium heat. Cook, stirring, for 2-3 minutes or until the chips have melted and the mixture is smooth and uniform. Remove the pan from the heat and whisk in the vanilla extract, confectioners’ sugar and salt. Let cool, whisking the ingredients occasionally. Refrigerate until firm enough to be spreadable.