dairy-free

Irish Apple Cake

I make apple cake a lot. Jewish Apple Cake. German Apple Cake. French Apple Cake. My Aunt Beck’s Apple Cake.

All good. Which one I bake depends on my mood, the season, the ingredients I have on hand, whether or not I want a cake with dairy. Or not.

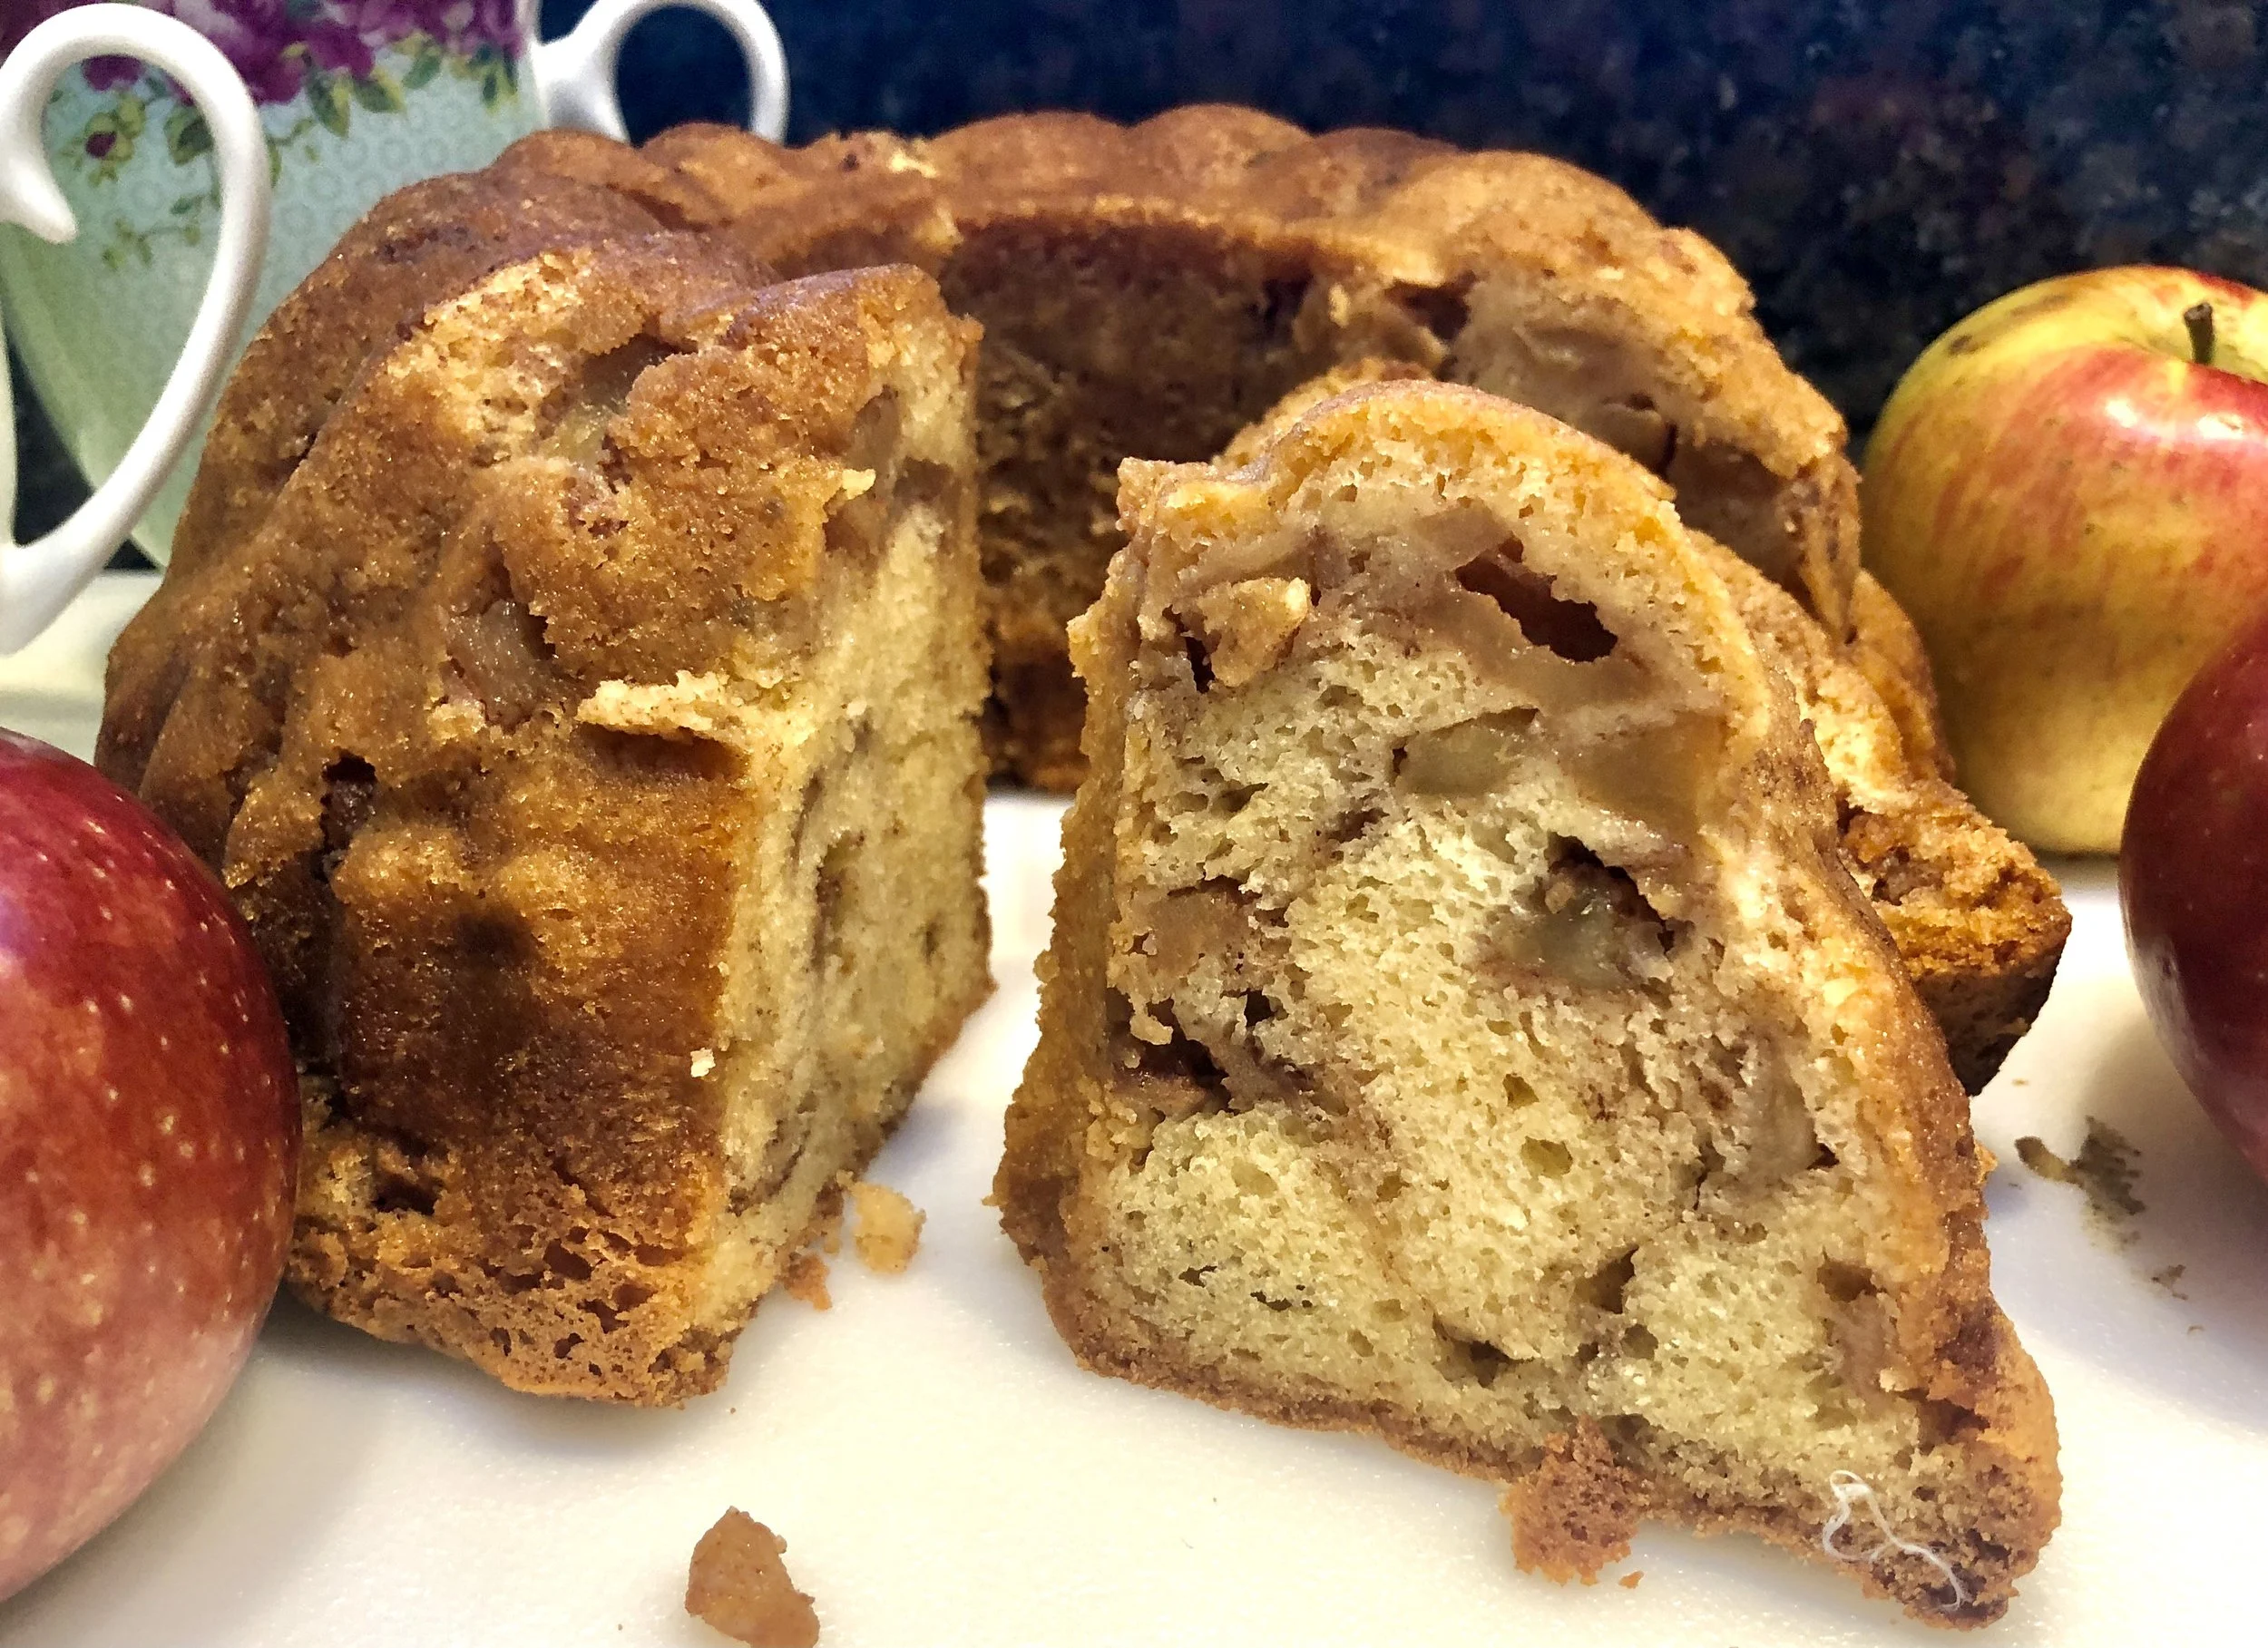
This week my choice is Irish Apple Cake. St. Patrick’s Day is coming soon and even though I am not Irish, that’s always such a happy day all around, so why not celebrate with cake?

So, Irish Apple Cake on the menu.

Irish Apple Cake

  • 3 cups all-purpose flour

  • 2 tablespoons baking powder

  • 1 teaspoon salt

  • 3 large, tart apples, peeled and chopped

  • 1/4 cup sugar

  • 1-1/2 teaspoons cinnamon

  • 1 cup vegetable oil

  • 4 large eggs

  • 1-1/4 cups sugar

  • 1/3 cup orange juice

  • 1 teaspoon vanilla extract

Preheat the oven to 350 degrees. Lightly grease a bundt pan. Mix the flour, baking powder and salt together in a bowl and set aside. Mix the apples, 1/4 cup sugar and cinnamon together in a bowl and set aside. Place the vegetable oil and eggs in the bowl of an electric mixer. Beat at medium speed for about 3 minutes, or until thoroughly blended. Add the 1-1/4 cups sugar and beat for another 2 minutes or until thoroughly blended. Add the orange juice and vanilla extract and beat for another minute. Add the flour mixture and beat for another minute or until the batter is smooth and uniform. Spoon about 1/3 of the batter into the prepared bundt pan. Add 1/2 the apple mixture. Cover with another 1/3 of the batter, top with remaining apples and cover with remaining batter. Bake for 60-70 minutes or until a cake tester inserted into the center comes out clean. Let cool in the pan for 15 minutes. Invert onto a cake rack to cool completely.

Makes 12-16 servings

Cranberry-Oat-Chocolate Chip Bars

Back in the day — before emailing — I hand-delivered hard copy of the food articles I wrote to the editors of the various media I wrote for (I snail-mailed copy to the people who were further away). After some years I would deliver (or send) “floppy discs.”

Of course that ended long ago and with it, the hundreds of cookies I baked, packed, decorated and delivered to the various newsrooms during the year-end holiday season.

Today? I still bake cookies — not as many! — because I always think of the end of the calendar year as cookie season. Christmas cookies. Hanukkah cookies. New Year cookies. Kwanzaa cookies. I give a lot away to friends but there’s always a load left for us in my freezer.

Whatever you want to celebrate, cookies always win.

Like these Cranberry-Oat bars. Bonus: they’re egg-free, dairy-free and gluten-free.

Happy Everything.

Cranberry-Oat-Chocolate Chip Honey Bars

  • 2 cups rolled oats

  • 1/2 cup chopped almonds

  • 6 tablespoons vegetable oil

  • 1/2 cup honey

  • 1/3 cup maple syrup

  • 1/4 cup brown sugar

  • 1/2 teaspoon salt

  • 1 teaspoon ground cinnamon

  • 1 cup dried cranberries

  • 3/4 cup chocolate chips

Preheat the oven to 350 degrees. Lightly grease a 9-inch square cake pan, line the pan with parchment paper, leaving an overhang (to pull the cookies out after baking) of about 3-inches on each side. Lightly grease the paper. Place the oats and almonds on a cookie sheet and bake for 4-5 minutes, stirring once or twice, or until the oats and almonds are lightly toasted and aromatic. Remove from the oven. In a medium saucepan, combine the vegetable oil, honey, maple syrup, brown sugar and salt and cook, stirring frequently for 2-3 minutes or until hot and smooth. Remove the pan from the heat and stir in the oat mixture. Stir in the cinnamon and cranberries. Let cool. Stir in the chocolate chips. Spoon the mixture into the prepared pan. Bake for 25-30 minutes or until lightly browned. Let cool. Remove by pulling the overhanging paper. Lift out, place on a cutting board and cut into 16-24 pieces.

Makes 16-24 cookies


Banana Applesauce Muffins

Banana Applesauce Muffins

Banana Applesauce Muffins

We were thrilled, LUCKY, this year to be able to have a real Seder with most (9) of our immediate family (and Elijah for a moment or two of course).

The adults were all vaccinated and the kids had quarantined, so we felt safe. It was glorious. Our youngest grandchild was reluctant to ask the four questions so we all asked because, why not!

I tried out a new charoset which my family declared was “the one!”

I actually ran out of fresh horseradish for the first time ever!

As usual I had bought a ton of fruit because my grandkids are huge fans. But as usual, there were leftover bananas — but only two! And this year there was also some leftover homemade applesauce.

So, after the holiday I revised one of my banana muffin recipes to accommodate what I had. The result: moist, tender, not too sweet Banana-Applesauce Muffins. These are plain but you could add blueberries, chocolate chips, a swirl of melted chocolate, chopped nuts and so on.

Banana Applesauce Muffins

  • 1-1/2 cups all-purpose flour

  • 1 teaspoon baking soda

  • 1 teaspoon baking powder

  • 1/2 teaspoon salt

  • 1/2 teaspoon cinnamon

  • 6 tablespoons vegetable oil

  • 1/3 cup sugar

  • 1 large egg

  • 2 bananas, mashed

  • 1/2 cup applesauce

  • 1 teaspoon vanilla extract

Preheat the oven to 400 degrees. Lightly grease 10 muffin cups. Mix the flour, baking soda, baking powder, salt and cinnamon together in a bowl. In the bowl of an electric mixer (or use a hand mixer) beat the vegetable oil and sugar together on medium speed for about 2 minutes or until well combined. Add the egg and beat it in until thoroughly combined. Add the mashed bananas, applesauce and vanilla extract and beat for another minute or until the ingredients are well blended. Spoon equal amounts of the batter into the prepared muffin cups. Bake for 18-20 minutes, or until a cake tester inserted into center of muffin comes out clean.

Makes 10

Squash Bread with Cranberries

fullsizeoutput_9f01.jpeg

I’m thinking about Thanksgiving even though this year we won’t have our usual family get-together. We all know why. We’re just waiting this whole Covid era out. Then we will have a proper holiday celebration.

But I am roasting a turkey because roasted turkey is one of my favorite things to eat. Unfortunately my daughter, our family carver, won’t be around to slice her perfect slices.

I’m also making my usual baked cranberries, sweet potato casserole and a green vegetable, probably Brussels sprouts.

Not sure I’ll bother with stuffing.

But definitely making this squash bread with fresh cranberries, because it’s rich and gently seasoned and not-too-sweet so it’s perfect with dinner, but also is a good snack or breakfast treat the day after.

Dessert? Probably baked apples.

Squash Bread with Cranberries

  • 2 cups all-purpose flour

  • 1 teaspoon baking soda

  • 1/2 teaspoon baking powder

  • 1/2 teaspoon salt

  • 1 teaspoon ground cinnamon

  • 1/2 teaspoon grated nutmeg

  • 1/2 teaspoon ground ginger

  • 1/8 teaspoon ground cloves

  • 3/4 cup brown sugar

  • 6 tablespoons vegetable oil

  • 2 large eggs

  • 1 cup mashed cooked winter squash (such as butternut, acorn, kuri)

  • 3/4 cup fresh cranberries

  • 1/3 cup water

  • 1 tablespoon lemon juice

  • 1 teaspoon vanilla extract

Preheat the oven to 350 degrees. Grease a 9”x5”x3” loaf pan. Mix the flour, baking soda, baking powder, salt, cinnamon, nutmeg, ginger and cloves in a bowl and set it aside. Beat the brown sugar and vegetable oil with a handheld or electric mixer set at medium speed for 2-3 minutes or until the mixture is well blended. Add the eggs one at a time, beating after each addition. Add the squash and cranberries and beat the mixture to blend the ingredients thoroughly. Add the flour mixture, stirring only enough to blend in the dry ingredients. Mix the water and lemon juice and add it to the batter with the vanilla extract. Stir to blend the ingredients. Pour the batter into the prepared pan and bake for 50-55 minutes or until a cake tester inserted into the center comes out clean. Cool the bread in the pan 15 minutes, then invert onto a cake rack to cool completely.

Makes one loaf. 


Beet Salad with Pepitas

fullsizeoutput_b38f.jpeg

Lucky me!

My entire Rosh Hashanah celebration has changed for the better. I thought it would just be Ed and me, attending Zoom services and sharing a meal for two.

But my kids and grandkids are coming too! We will watch outdoors on the patio. And be together —- sort of — for a meal! Each family will have a separate place to eat.

I can’t tell you how thrilled I am, even though it won’t be normal and we can’t hug and kiss. But it’s something. And I am grateful.

Instead of the chicken dish I was planning to make, it’s going to be food for a family, not just the two of us: brisket (I was finally able to get one) and a turkey breast plus several sides, including this beet salad, which I can make in advance and scatter with seeds at the last minute.

This is better than the original plan. For sure.

Beet Salad with Pepitas

  • 3 large beets, trimmed

  • 3 scallions, chopped (or one large shallot or 1/3-1/2 cup chopped red onion)

  • 2 tablespoons olive oil

  • 3 tablespoons orange juice

  • 2 tablespoons chopped fresh mint

  • 1 teaspoon grated fresh orange peel

  • salt to taste

  • 2 tablespoons toasted pepitas

Preheat the oven to 425 degrees. Scrub the beets and wrap them tightly in aluminum foil. Roast until tender, about 45-75 minutes, depending on size. Unwrap the beets and when they are cool enough to handle, peel them. Cut the beets into bite size pieces. Place the beet chunks in a bowl. Add the scallions, olive oil, orange juice, mint and orange peel. Toss ingredients. Sprinkle with salt. Let rest for at least 15 minutes before serving. Sprinkle with pepitas. Serve at room temperature. 

Makes 4-6 servings


Mashed Potatoes, Two Ways (dairy-free and dairy-loaded)

fullsizeoutput_82a2.jpeg

In our nuclear family of 11, there are the pro-potato people and the no-potato people.

I am a top level pro-potato person.

And as you can see from the photos, so are two of my grand daughters, who helped me make some mashed potatoes for dinner a while ago.

The recipe we made was a butter-cream-cheese-sour-cream indulgence. (It could be a meal in itself!) But we’ve also made dairy-free versions. Pro-potato people like it all ways.

Are mashed potatoes on your menu for Thanksgiving? If so — or any other time — check out both recipes, dairy-loaded and dairy-free.

dairy-loaded Mashed Potatoes

  • 2 pounds boiling potatoes (such as Yukon Gold)

  • 4 tablespoons butter, cut into chunks

  • 4 tablespoons cream cheese, cut into chunks

  • 1/2 cup dairy sour cream

  • 1/4 cup warm milk, approximately

  • salt and freshly ground black pepper to taste

Peel the potatoes and cut them into chunks. Cook them in lightly salted simmering water for about 20 minutes or until tender. Drain and return the potatoes to the pan. Cook briefly over low heat to evaporate the excess moisture. Mash the potatoes with a ricer or potato masher. Add the butter and cream cheese and mash them in thoroughly until the butter and cheese are completely blended in. Add the sour cream and blend in thoroughly. Mix in enough milk for desired consistency. Season to taste with salt and pepper.

Makes 6 servings


DAIRY-FREE Mashed Potatoes

  • 5 medium all-purpose potatoes such as Yukon Gold

  • 1/4 cup olive oil

  • 1 small onion, chopped

  • 1 large clove garlic, chopped

  • 3 tablespoons lemon juice

  • 3 tablespoons chicken or vegetable stock

  • salt to taste

  • pinch or two of cayenne pepper

  • 3 tablespoons fresh bread crumbs

Preheat the oven to 400 degrees. Peel the potatoes, cut them into chunks and cook them in lightly salted water for about 15 minutes, or until they are fork tender. While the potatoes are cooking, heat the olive oil in a sauté pan and add the onion. Cook, stirring occasionally, for about 3 minutes, then add the garlic. Cook for another 1-2 minutes, or until the vegetables are beginning to brown. Set aside. Drain the potatoes and mash them with a ricer or potato masher until the lumps have disappeared. Add the vegetables and olive oil and stir them in gently. Stir in the lemon juice, stock, salt and the cayenne pepper. Place the mixture in a baking dish. Sprinkle with the bread crumbs. Bake for 10-15 minutes or until the top is crispy and brown.

Makes 6 servings

Roasted Bell Pepper Soup

fullsizeoutput_9534.jpeg

I’ve lived most of my life in Connecticut and so I am used to cold winters, snow and all that comes with it. I don’t mind really. I actually love the change of seasons and think it makes life more interesting.

But it’s those first days of chill that take some getting used to as we transition from summer’s heat and the gradual change of temperature when autumn comes..

Those are soup days.

I recently made this Roasted Red Pepper soup. It’s exactly what’s needed when the weather turns.

Also makes a good first course for Thanksgiving dinner.

Roasted Red Pepper Soup

  • 5-6 sweet red, orange and/or yellow bell peppers

  • 2 tablespoons olive oil

  • 1 small onion, chopped

  • 1 carrot, chopped

  • 1 stalk celery, chopped

  • 1 tablespoon freshly minced parsley plus more for garnish if desired

  • 1/3 cup raw white rice

  • 5 cups vegetable stock (or chicken stock)

  • 1-1/2 teaspoon salt or to taste

  • freshly ground black pepper

Preheat the broiler. Place the peppers under the broiler, about 4-6" away from the heat. Broil for 2-3 minutes, until the skin has blistered. Turn the peppers and repeat this process until the entire surface is blistered and lightly charred. Remove the peppers and place them in a paper bag. Let rest at least 10 minutes. Remove the peppers from the bag, peel off the skin and discard the stem and the seeds. Cut the peppers into pieces. 

Heat the olive oil in a large saucepan over medium heat. Add the onion, carrot, celery and parsley. Cook, stirring occasionally for 3-4 minutes or until the vegetables have softened. Stir in the rice. Add the peppers and stock. Season to taste with salt and pepper. Bring the mixture to a boil, lower the heat and cook at a simmer for 25 minutes. Puree in a food processor or blender.

Makes 6 servings

Banana Bread with Ginger and Cranberries

I wish some publisher would contact me about doing a Banana Bread Cookbook. Because I have enough good recipes to fill a book.
Well, banana breads and also cakes, muffins and so on.
I don’t actually eat any of this stuff because I am allergic …

I wish some publisher would contact me about doing a Banana Bread Cookbook. Because I have enough good recipes to fill a book.

Well, banana breads and also cakes, muffins and so on.

I don’t actually eat any of this stuff because I am allergic to bananas, but I always buy bananas because I like how they smell and also because my husband says he is going to eat them but then never does. Or he eats one and I’m left with 4 or 5 more.

I do have tasters though. They tell me whether the recipe is good. And I give whatever banana baked thing I’ve made away to cancer patients and their caregivers at Stamford Hospital at our every-two-week Tea sponsored by the local Hadassah group. I’ve been getting great reviews from everyone.

The one I sent this week is a dairy-free version, made with Earth Balance Buttery Spread and Oat milk (you could substitute coconut milk and, if there’s no nut allergy, almond milk).

I made this cake two ways, once plain and once with dried cranberries and chopped crystallized ginger. Everyone preferred the second one. Here’s the recipe:


Banana Bread with Ginger and Cranberries

2-1/2 cups all-purpose flour

1 teaspoon salt

1-1/2 teaspoons ground ginger

2 teaspoons baking soda

3/4 cup Earth Balance buttery spread

1/4 cup coconut oil

1-1/2 cups sugar

4 medium very ripe bananas, mashed

3 large eggs, slightly beaten

1/2 cup oat milk

1/2 cup dried cranberries

1/4 cup chopped crystallized ginger

Preheat the oven to 350 degrees. Grease and flour a 10-cup bundt pan. Mix the flour, salt, ginger and baking soda together in a bowl. In the bowl of an electric mixer set at medium speed, beat the buttery spread, coconut oil and sugar until well blended. Add the bananas and blend in thoroughly. Add the eggs and beat well. Stir in the oat milk and blend thoroughly. Add the flour mixture and beat until the batter is well blended. Fold in the cranberries and crystallized ginger. Pour into the prepared pan and bake for about one hour or until a cake tester inserted into the center comes out clean. Remove from the oven and let cool in the pan for 15 minutes. Remove to a cake rack to cool completely. Makes one bread, serving 16-18

Herb and Chorizo Gougeres

My mother always said “don’t try out new recipes on guests.” Because what if the recipe doesn’t work or we don’t like it and so on and so on and then there might be nothing to eat.
Well, first, there is never nothing to…

My mother always said “don’t try out new recipes on guests.” Because what if the recipe doesn’t work or we don’t like it and so on and so on and then there might be nothing to eat.

Well, first, there is never nothing to eat at my house. Because my mother’s other advice (shown by example) was to have a freezer full of food “just in case.”

Second, because I like to try new recipes and who else could I try them on if not for the people who dine at my table?

Usually what I do when I have a dinner party is to make one new dish. All my friends know there will be some experiment or other for them to taste and comment about.

But next Sunday I am having lots of people over to celebrate the birth of our granddaughter Carina (I am a little slow, she is now 7 months old) and several of the dishes I will be serving are experiments.

Only I took my mother’s advice. I tried them out first so I know they work.

One of the hors d’oeuvre I worked on was gougeres, the wonderful, crispy baked French cheese puffs. I’ve made them a zillion times, so no problem there. 

But I needed to make them dairy-free.

How do you make gougeres without butter and cheese?

I substituted Earth Balance buttery sticks for the butter. And instead of mixing in grated cheese I added finely chopped chorizo sausage (I used Jack’s Gourmet), which gave the puffs the characteristic tangy taste needed for a good gougere.

Voila! Followed my mom’s advice and have plenty in the freezer just in case.

Here’s the recipe:

Herb and Chorizo Gougeres 

1 cup water

1/4 pound (1/2 cup) Earth Balance Buttery Spread, cut into chunks

1 cup all-purpose flour

3/4 teaspoon salt

4 large eggs

2 tablespoons chopped fresh mixed herbs

1/2 cup finely chopped chorizo (one Jack’s Gourmet chorizo)

pinch cayenne pepper

Preheat the oven to 400 degrees. Place the water and Earth Balance in a saucepan over medium heat. When the Earth Balance has melted, add the flour and salt all at once. Stir vigorously with a wooden spoon until the mixture is well blended and begins to come away from the sides of the pan. Remove the pan from the heat and let cool for 2-3 minutes. Beat in the eggs one at a time, blending well after each addition. Add the herbs, chorizo and cayenne pepper and blend them in thoroughly. Lightly grease and flour a baking sheet. Drop 1-inch mounds of dough from a teaspoon onto the sheet. Leave space between the mounds for the puffs to rise. Bake for 20 minutes or until the puffs are lightly brown and crispy. Lower the heat to 300 degrees and bake for another 5-6 minutes. Turn off the heat but leave the puffs in the oven for 3-4 minutes. Serve hot or at room temperature. Makes about 60

Nutmeg Whiskey Cake

Yesterday, when I wrote about spice blends and gave a recipe for Baharat, a specialty from the Middle East, I said that I usually buy pre-ground spices and mix them, rather than grind my own.

Well, I realized that’s not quite the case. There are certain spices that I never buy pre-ground because as soon as you grind them they start to deteriorate and lose flavor.

Like nutmeg.

I never buy ground nutmeg. By the time you get it in the tin it is a mere shadow of itself and never gives you that rich, heady, mysterious quality that you get from freshly grated nutmeg. Neither the fragrance or the flavor is right.

Take this tip: buy a nutmeg grater and grate your own nutmeg. There are cheap, old fashioned ones (see the first photo) and fancier ones that work more or less like peppermills (second photo).

I buy nutmegs by the bag. The whole ones last forever I think. Every time I need nutmeg for a recipe I grate it just when it’s called for in the instructions. Most of the time you just need a little bit of it to bring out the flavor of a dish, so it’s not as if you will have to spend oodles of time grinding. It’s worth doing and even a tiny grating or two makes an enormous difference to foods as different as macaroni and cheese, gingerbread and squash soup.

Although most of the time you only use a grating or two of nutmeg, there are recipes where it plays a prominent role. This Whiskey Cake, for example. It’s a nice snack, tea bread type of cake that you’re supposed to eat plain, but you could certainly dress it up with fresh berries and whipped cream or a scoop of ice cream or Creme Anglaise sauce.

Nutmeg Whiskey Cake

2 cups all-purpose flour

1 teaspoon baking soda

1 teaspoon grated fresh nutmeg

1/2 teaspoon ground cinnamon

1/8 teaspoon ground allspice or cloves

1/2 teaspoon salt

1/2 cup Earth Balance buttery spread (or butter)

3/4 cup packed brown sugar

3 large eggs, separated

1/2 cup whiskey

1/3 cup coconut milk (or regular milk)

1 cup finely chopped nuts

1/4 cup sugar

Preheat the oven to 350 degrees. Lightly grease a 9”x5”x3” loaf pan. Sift the flour, baking soda, nutmeg, cinnamon, allspice and salt into a bowl. Set aside. Place the spread or butter and brown sugar in the bowl of an electric mixer and mix at medium speed for 2-3 minutes or until creamy and well blended. Add the egg yolks, one at a time, beating after each addition. Combine 1/3 cup of the whiskey with the milk and add this liquid to the brown sugar mixture alternating with the flour mixture and continue to blend the ingredients at medium speed until the batter is smooth, creamy and well blended. Stir in the nuts. In another bowl, beat the egg whites at medium speed until they are foamy. While still beating, gradually add the sugar and continue to beat until the mixture is glossy and stands in stiff peaks. Fold the beaten whites into the batter. Pour the batter into the prepared pan. Bake for 50-55 minutes or until a cake tester inserted into the center comes out clean. Remove the cake from the oven and brush the top with the remaining whiskey. Let the cake cool in the pan for 10 minutes, then invert onto a cake rack to cool completely. Makes one loaf