dairy

Charoset Ice Cream

Several years ago I created this recipe for charoset ice cream for an article in the Jewish Week Food & Wine (which, I am sad to say, no longer has a regular food/recipe column).

Back then (2015), Ben & Jerry’s had created a charoset flavored ice cream that was all the rage — but it was only available in Israel.

The mere mention of charoset ice cream piqued my interest. So I got to work and created my own version.

I have never tasted theirs. Don’t need to. This version is quite wonderfully delicious.
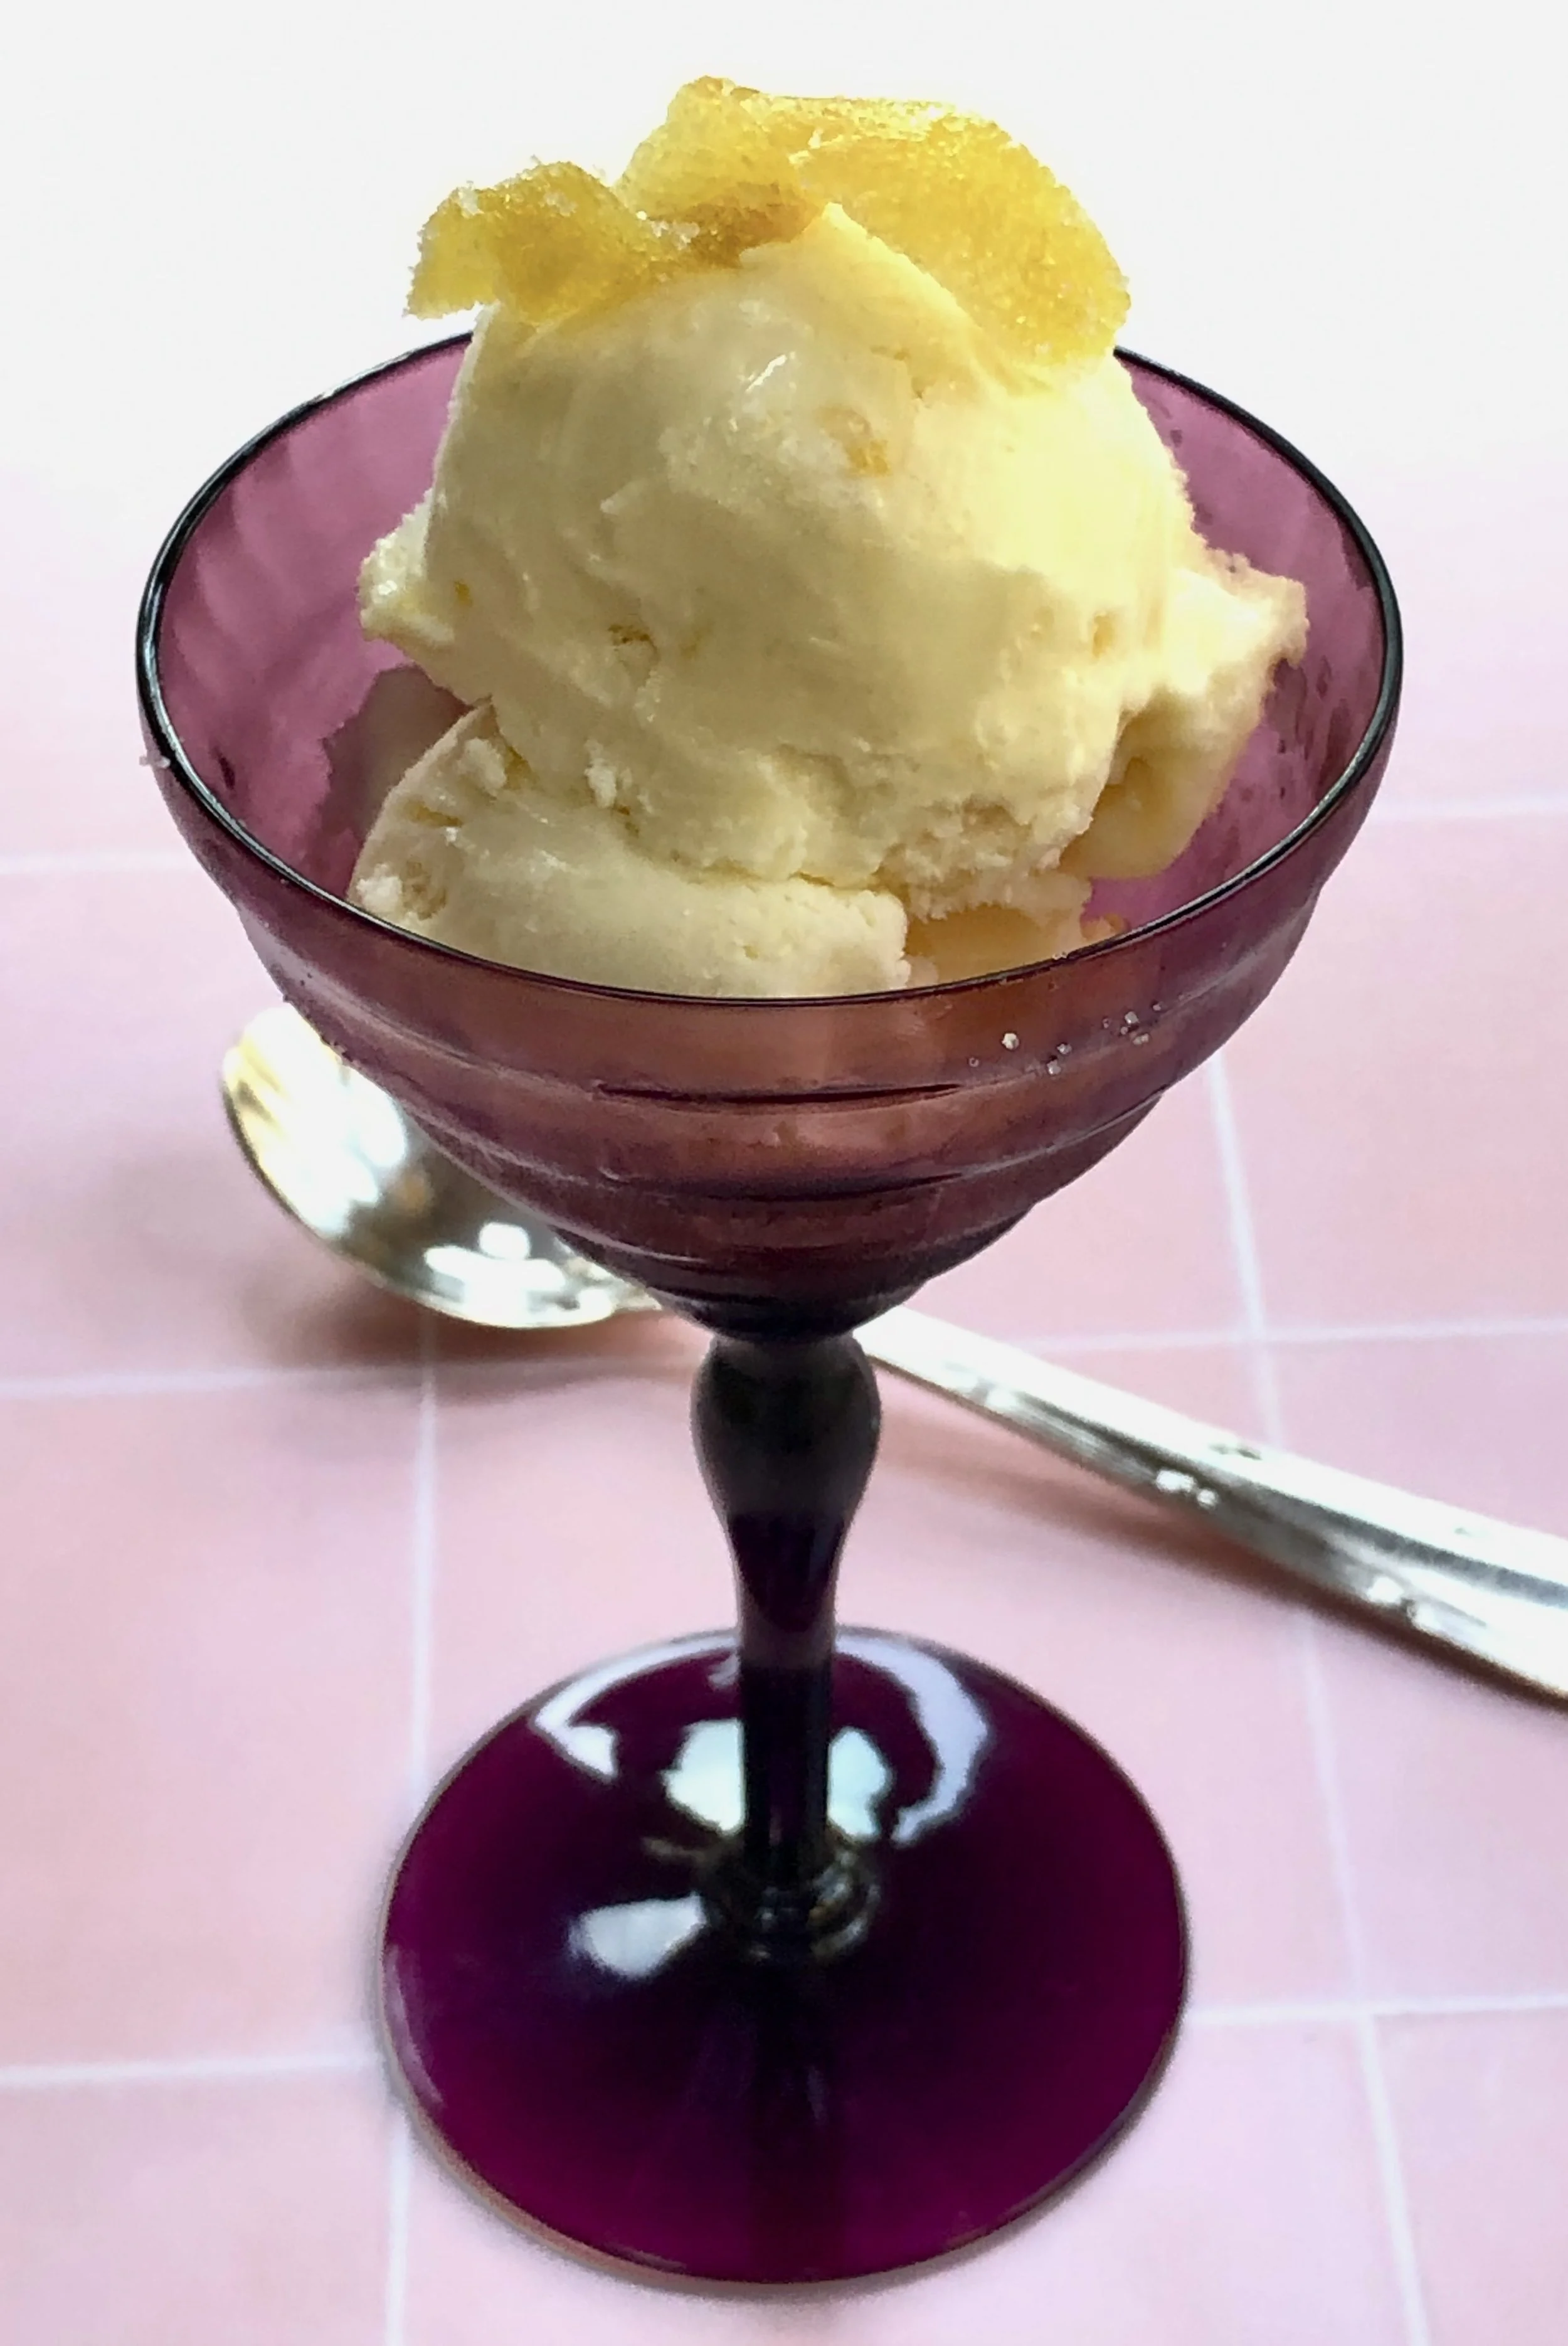
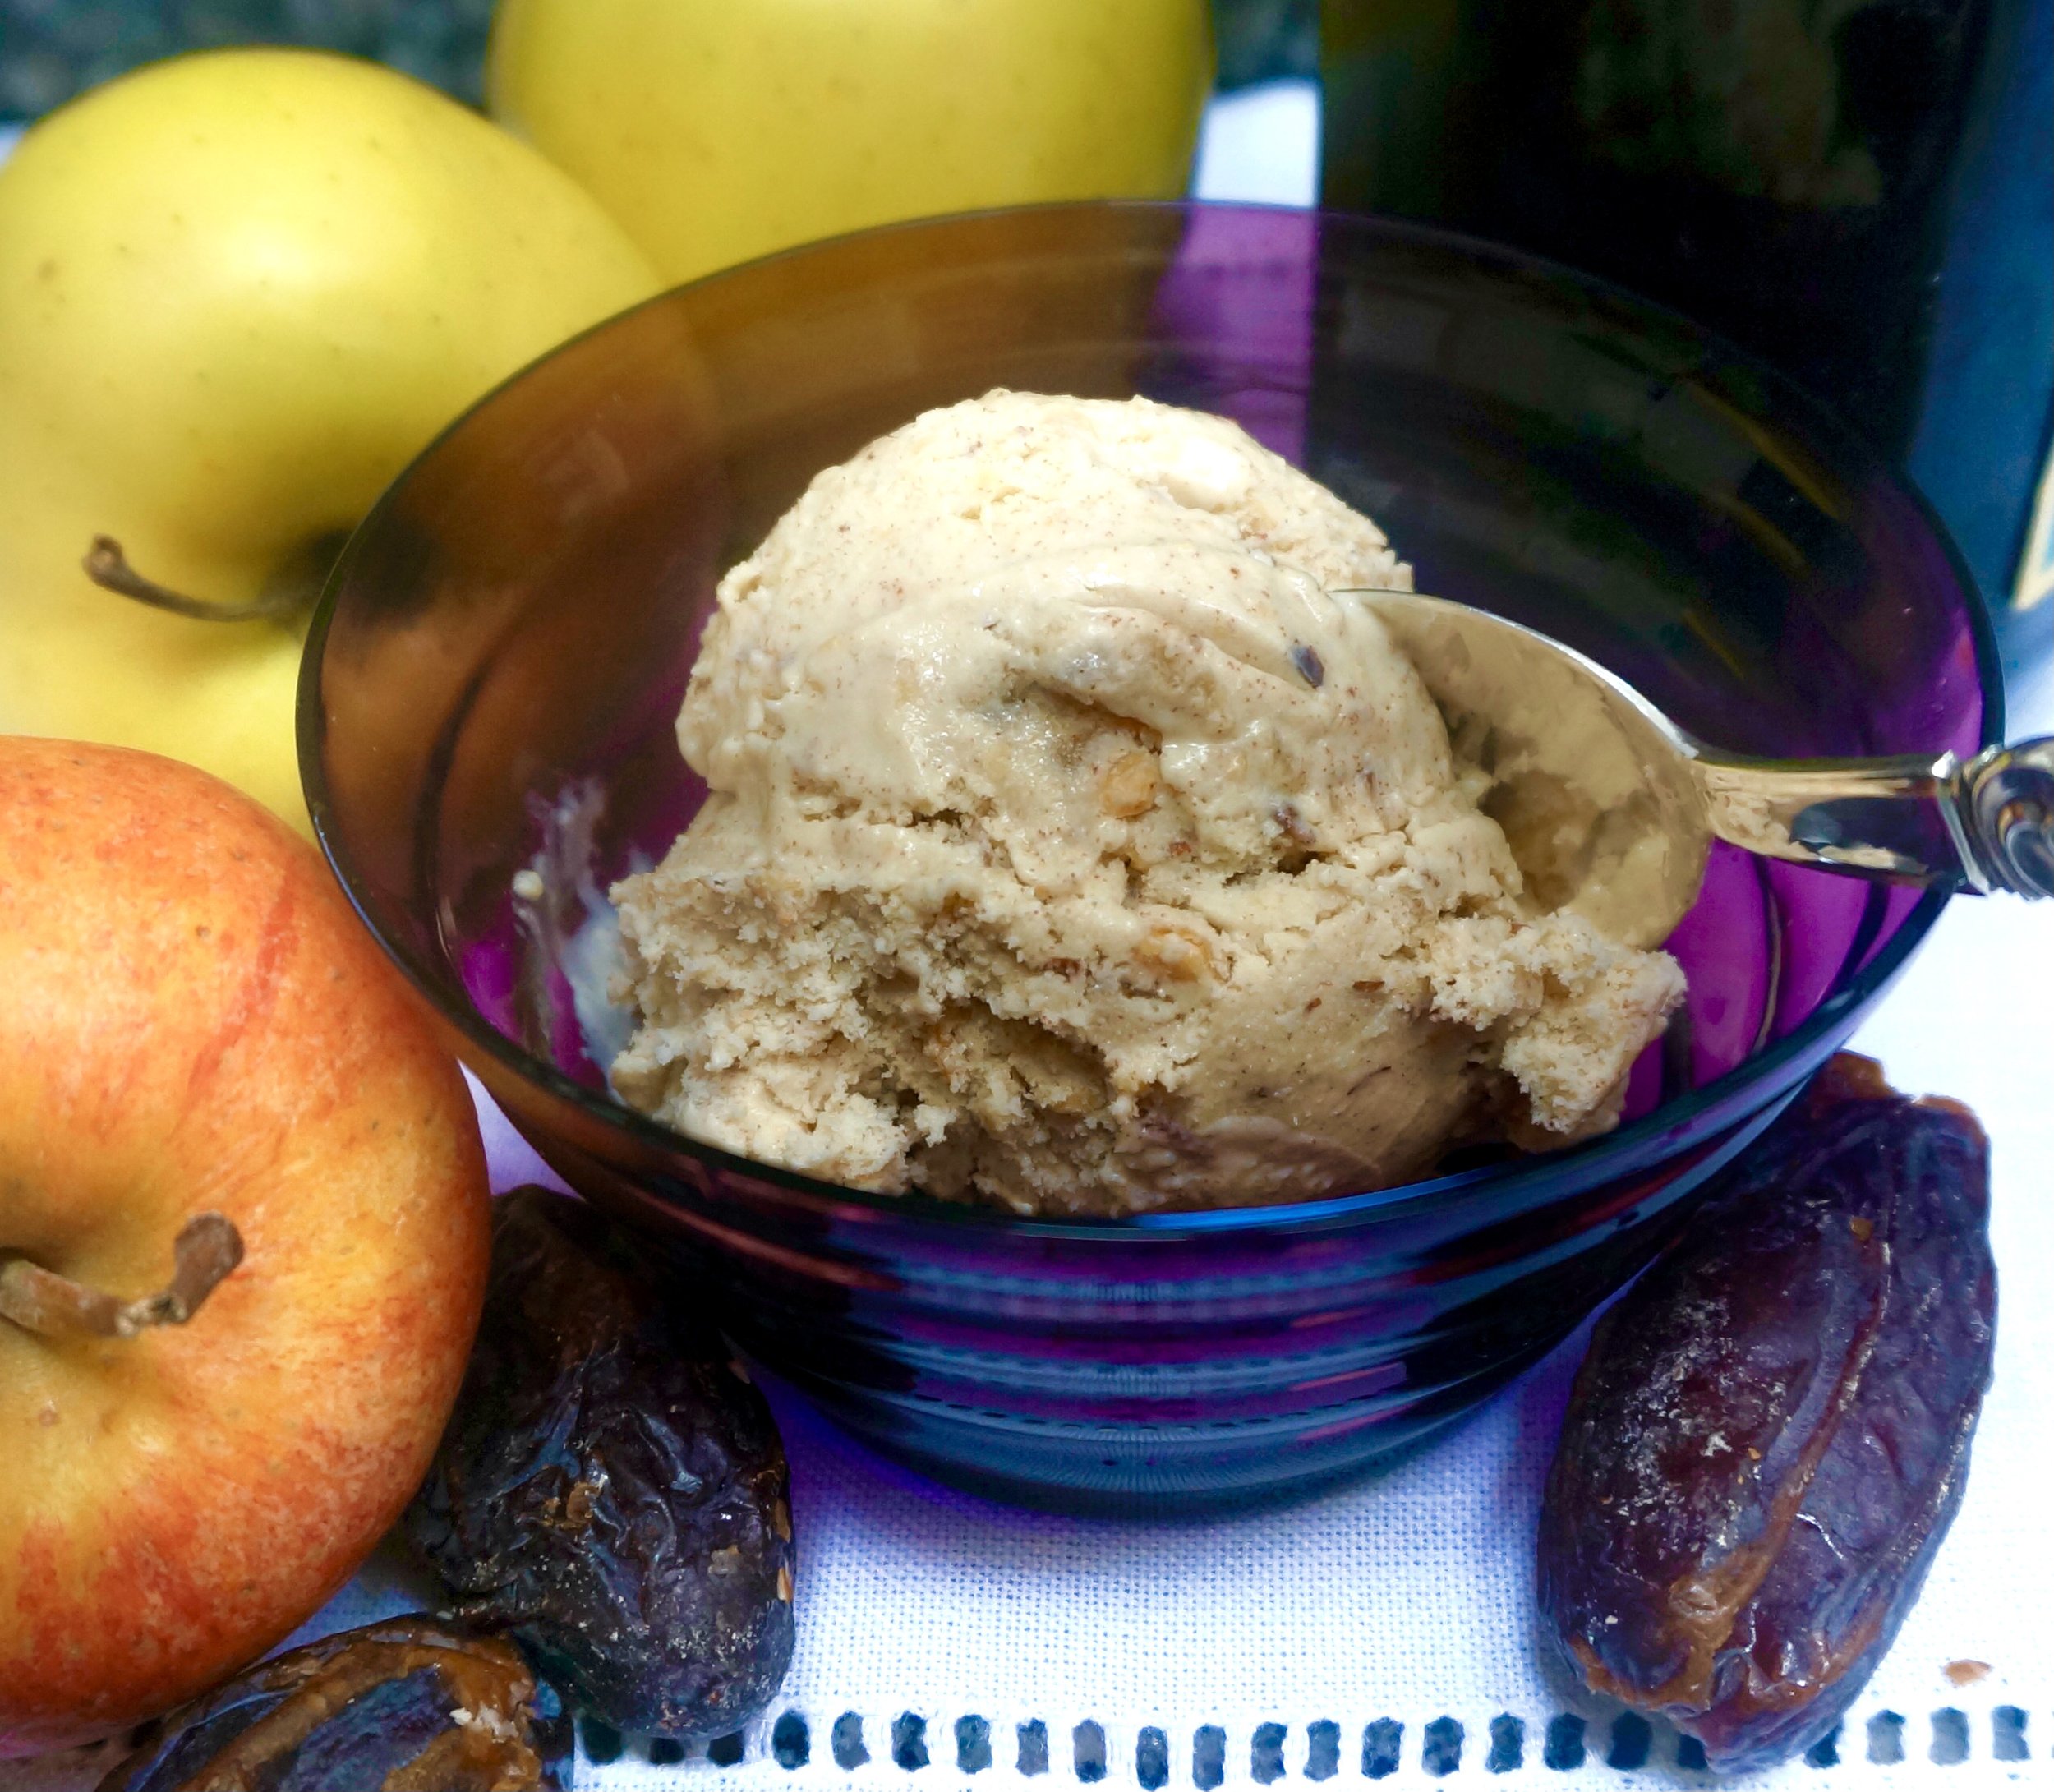
Charoset Ice Cream 

  • 1 tablespoon butter

  • 3 tablespoons brown sugar

  • 6 dates, preferably medjool, pitted and chopped

  • 2 small Golden Delicious or other sweet apples, peeled and chopped

  • 1/4 teaspoon cinnamon

  • 1/4 cup sweet Passover wine

  • 3 cups half and half, light cream or whipping cream

  • 1/2 cup sugar

  • 3 large egg yolks

  • 1/8 teaspoon salt

  • 1/3 cup chopped nuts, optional

Heat the butter in a saucepan over medium heat. When the butter has melted and looks foamy, add the brown sugar and mix it in. Add the dates and apples and stir the ingredients to distribute them evenly. Sprinkle in the cinnamon. Pour in the wine. Bring the liquid to a boil. Cover the pan, lower the heat and cook for 25-30 minutes or until the fruit is soft. Mash the fruit to make the mixture pasty and set it aside.  

While the fruit is cooking, heat 2 cups of the cream over medium heat until bubbles appear around the edges of the pan. In the bowl of an electric mixer, beat the sugar, the egg yolks and salt at medium speed for 3-5 minutes or until light and thick. Gradually add the heated cream and mix the ingredients completely. Return the mixture to the saucepan and cook over medium heat, stirring constantly, for 5-6 minutes or until thickened enough to coat the back of a spoon. Pour in the remaining cream and blend it in thoroughly. Stir in the fruit mixture. Refrigerate until cold (at least 45 minutes). Freeze in an ice cream freezer according to manufacturer’

Makes about 6 cups

Pizza for Pi Day

Pizza with Spinach, Tomatoes and Cheese

It’s Pi Day so I could easily have posted a photo and recipe for apple streusel pie or lemon meringue. Both are delicious desserts.

Of course a savory pie would do too: Chicken Pot Pie maybe?

But I’m more in the mood for pizza pie, so here’s any easy one (using a store bought crust):

Pizza with Spinach tomatoes and cheese 

  • 1 pizza crust (about 10-inches)

  • 2 tablespoons olive oil

  • 1 large garlic clove, minced

  • 1 bunch fresh spinach, washed and dried (about 6 ounces)

  • 2 medium plum tomatoes, sliced

  • 4 ounces mozzarella cheese, shredded or chopped

  • 2 tablespoons freshly grated Parmesan cheese

  • 1/2 teaspoon dried oregano

Preheat the oven to 450°F. Place the crust on a pizza stone or lightly oiled pizza pan or parchment-lined cookie sheet. Heat 1-1/2 tablespoons olive oil in a sauté pan over medium heat. Add the garlic and cook briefly. Add the spinach and cook for 3–5 minutes or until wilted and all the liquid has evaporated from the pan. If necessary, press the spinach in a sieve to extract liquid. Spread the spinach evenly on top of the crust. Place the tomato slices on top. Sprinkle with the mozzarella cheese. Sprinkle with Parmesan cheese and oregano. Drizzle with remaining half tablespoon olive oil. Bake for 10-13 minutes or until the cheese has melted and the crust is beginning to brown.

 Makes 2 servings

Chocolate Yogurt Bread

A few days ago @DanaLShrager (@JewishCooking Facebook group) asked for ideas — other than hamantashen — about what might make good mishloach manot for Purim. My suggestions included muffins, quickbreads and other homemade food goodies.

Like this chocolate bread. It’s rich and tender because it’s made with yogurt. It’s also easy to prepare and can be wrapped nicely to give away as a gift. You can add raisins or chopped nuts, or even leave out the chips. For sure, it’s a winner for Purim or any time.

Chocolate Yogurt Bread

  • 2 ounces unsweetened chocolate

  • 1-3/4 cups all-purpose flour

  • 1-1/2 teaspoons baking soda

  • 1 teaspoon salt

  • 1-1/4 cups sugar

  • 1/3 cup vegetable shortening

  • 2 large eggs

  • 2 teaspoons vanilla extract

  • 1-1/2 cups plain yogurt

  • 1/2 cup chocolate chips, optional

Preheat the oven to 350 degrees. Grease a 9”x5” loaf pan. Melt the chocolate and set it aside to cool. Mix the flour, baking soda and salt together and set it aside. In the bowl of an electric mixer set at medium, cream the sugar and shortening together. Add the eggs and vanilla extract and beat the mixture until it is smooth and creamy. Add the flour mixture, alternating with the yogurt. Stir in the chocolate and mix until ingredients are well blended. Stir in the chips, if used. Pour the batter into the loaf pan. Bake for 50-55 minutes or until a cake tester inserted into the center comes out clean. Cool in the pan for about 10 minutes, then invert onto a rack to cool completely. Makes one bread

Blueberry Buttermilk/Yogurt Muffin

It’s not exactly blueberry season here. In fact it’s gloomy and a big rain and windstorm is likely. And I do have some blueberries that aren’t exactly perfect summer blueberries. So I decided to use them to make some blueberry muffins, which are exactly perfect and also cheerful looking enough to brighten my morning.

I usually have buttermilk in my house because I like to bake with it. I also have a canister of buttermilk powder just in case….. however, if you don’t have buttermilk you can use plain kefir or yogurt (stir it to loosen it a bit) or use 1 tablespoon lemon juice plus enough milk to equal one cup and let it stand for 5 minutes. 

Brighten your day with these:

BLUEBERRY MUFFINS

  • 4 tablespoons butter

  • 1-3/4 cups all-purpose flour

  • 1/4 cup sugar

  • 1-1/2 teaspoons baking powder

  • 1/2 teaspoon baking soda

  • 3/4 teaspoon salt

  • 1 tablespoon grated fresh orange zest

  • 1 cup buttermilk or 1-1/4 cups plain yogurt, stirred

  • 1 large egg

  • 3/4 teaspoon vanilla extract

  • 1 cup fresh blueberries

Preheat the oven to 400 degrees. Place 10 muffin liners inside a muffin pan or lightly grease the hollows. Melt the butter and set it aside. In a bowl mix the flour, sugar, baking powder, baking soda, salt and orange zest. In a second bowl, mix the buttermilk, egg and vanilla extract. Pour the liquid ingredients plus the melted butter into the flour mixture and stir only to blend ingredients (do not mix vigorously). Fold in the berries. Drop the batter in equal amounts into the prepared muffin tin cups (the number will depend on the size of the muffins) to about 2/3 filled. Bake for 22-26 minutes, depending on size, or until a cake tester inserted into the center comes out clean.

Makes 10

Spinach Pie

Every Hanukkah in our family, we retell the story of Judith, who played a major role in the Maccabees’ victory some 2000 years ago. According to the story, Judith visited Holofernes, a general in the enemy camp; he fell in love with her and asked her to dine with him.

During the meal Judith gave him great quantities of cheese, which made him very thirsty! To quench his thirst he drank so much wine that he fell asleep and Judith cut off his head with his own sword.

Thus was she able to get word to the Maccabees about the best time to strike.

Note: there are dozens of artworks depicting the event, including this well-known painting which hangs in the Uffizi gallery.

Since that fateful victory we have been making merry every year with an 8 day Hanukkah celebration.

Our celebrations are known to include latkes!

But did you know that the first “traditional” Hanukkah ingredient was cheese!

And that’s because of Judith.

Long ago it was Cheese Latkes that Jewish cooks prepared for Hanukkah.

But so many people couldn’t afford cheese so they substituted potato. Not bad, that.

Still. I always serve something made with cheese, every Hanukkah.

This year, how about this Cheese-loaded Spinach Pie to to remember the brave, intrepid Judith?

Cheese Loaded Spinach PIE

  •  1 tablespoon butter

  • 1/4 cup chopped red onion

  • 6 ounces fresh spinach

  • 1 partially baked 9-inch pie crust

  • 3-4 ounces grated Swiss cheese

  • 4 large eggs

  • 2 cups half and half cream

  • salt and pepper to taste

Preheat the oven to 375 degrees. Heat the butter in a sauté pan over medium heat. When the butter has melted and looks foamy, add the red onion and cook for 1-2 minutes to soften it slightly. Add the spinach and cook for another 2-3 minutes or until the spinach is completely wilted. If there is liquid in the pan, continue to cook until the spinach is dry (alternatively, place in a strainer and press out the excess liquid). Place the spinach inside the partially baked pie crust. Sprinkle the cheese on top. Beat the eggs and cream together with salt and pepper to taste. Pour over the ingredients in the pie crust. Bake for 40-45 minutes or until golden brown and set.

Makes 6-8 servings

Zucchini Latkes with Cheese

Anyone who knows me knows that the humble potato is my favorite food, so of course I am going to make potato latkes for Hanukkah!

But, ya know …. it’s a long, delicious holiday, so there’s time for zucchini latkes too. The recipe here includes cheese, because on Hanukkah I like to prepare food with cheese in honor of Judith, heroine of Hanukkah! You can read about it here.

Of course you can make these latkes without the cheese. They’re delicious either way.

Zucchini Latkes with Cheese

  • 2 medium zucchini (10-12 ounces each)

  • 1/2 teaspoon salt

  • 1/2 cup chopped red onion

  • 1/2 cup crumbled feta cheese

  • 2 large eggs

  • 1/2 cup plain bread crumbs, approximately (Matzo meal also fine)

  • vegetable oil for frying

Shred the zucchini in a food processor (or grate by hand). Place the shreds in a bowl, sprinkle with salt, toss the shreds and let rest for 10-12 minutes. Squeeze the shreds to extract as much liquid as possible. Return the shreds to the bowl. Add the onion, cheese and eggs and mix the ingredients. Add the bread crumbs and mix thoroughly. If the mixture seems too loose or soft, add another tablespoon or two (different bread crumbs absorb liquid/moisture differently). Heat about 1/8-inch vegetable oil in a large sauté pan over medium-high heat. Spoon portions of the mixture into the pan to make latkes about 2-inches in diameter. Leave some space between each one. Cook for 2-3 minutes per side or until crispy and golden brown. Remove to paper towels to drain. Repeat with the remaining zucchini mixture. Serve with dairy sour cream or plain yogurt or mashed avocado.

Makes about 12

Lemon Ice Cream

I realize this is not the usual time of year for ice cream recipes. But I just had to complete my story about what I did with the two lemons that ripened on my indoor lemon tree.

I already told you that I used the peel to make candied lemon peel using Tori Avey’s recipe.

There was just enough juice to make lemon ice cream. I love lemon anything. My grandkids joke about the lemon drops I always have on hand. I once had frozen lemon yogurt and loved it. But I’d never tried lemon ice cream. So, that’s what I decided to make.

If you’re a lemon fan like I am — the is a big WINNER!

Lemon Ice Cream

  • 2-1/2 cups half and half cream

  • 2 teaspoons grated lemon zest

  • 3/4 cup sugar

  • 1/4 teaspoon salt

  • 3 large egg yolks

  • 1/2 cup lemon juice

  • 1 teaspoon vanilla extract

Heat 1-1/2 cups of the cream with the lemon zest in a saucepan over medium heat until bubbles appear around the edges of the pan. In the bowl of an electric mixer, beat the sugar, salt and egg yolks at medium speed for 3-5 minutes or until light and thick. Gradually add the heated cream and mix the ingredients. Return the mixture to the saucepan and cook over medium heat, stirring constantly, for 5-6 minutes or until thickened enough to coat the back of a spoon. Pour in the lemon juice and remaining cream and blend it in thoroughly. Pour into a container and refrigerate until cold. Stir in the vanilla extract. Freeze in an ice cream freezer according to manufacturer’s directions.

Makes about 5 cups

Vegetarian Stuffed Red Pepper Halves

Sukkot, which begins at sunset September 29th, is a harvest holiday, which means that in addition to all the ritual and religions traditions, there’s lots of food, especially stuffed foods which are proof of the harvest bounty of fruits and vegetables.

Like stuffed peppers.

I have made stuffed peppers many times for Sukkot, but in recent years have found it easier to cut them into halves. The halves are still filled, but easier to cook and to eat. They are also easier to tote to a Sukkah.

This is one of the versions that my family has loved. I’ve made it with both Israeli and Moroccan couscous and also with rice and barley. The point is to include a starchy pasta or whole grain.

Btw, I cut the peppers in the middle, into top and bottom halves but obviously you can cut them from the stem down and have two top-and-bottom halves.

Vegetarian Stuffed Red Pepper Halves

  • 4 red bell peppers

  • 1/2 cup couscous (or use rice, barley, etc.)

  • 2 tablespoons olive oil

  • 1 medium onion, chopped

  • 2 cups halved cherry or grape tomatoes

  • 1 cup thawed frozen peas

  • 2 beaten eggs

  • 1 cup shredded mozzarella cheese

  • 3 tablespoons grated Parmesan cheese

Preheat the oven broiler. Cut the peppers in half. Discard the stems and seeds. Place the pepper halves, skin side up, on a parchment paper lined baking sheet. Broil the pepper halves for 4-5 minutes or until the skin darkens and blisters. Remove the peppers, wrap them in foil or place them in a bag and let them cool. When cool, remove the skin and place the pepper halves, hollow side up, on a parchment paper lined baking sheet. Set aside. Turn the oven to 425F.

Cook the couscous. Place the cooked couscous in a bowl and set aside. Heat the olive oil in a saute pan over medium heat. Add the onion and cook 2-3 minutes. Add the cherry tomatoes and peas and cook 1-2 minutes. Remove from the heat and add to the cooked couscous. Pour the eggs into the pan and cook, stirring, until the eggs are set. Place them on a cutting bord and chop them into small pieces. Add them to the couscous. Spoon equal amounts of the couscous mixture inside the pepper halves. Sprinkle with equal amounts of mozzarella cheese, then sprinkle with Parmesan cheese. Bake for 12-13 minutes or until the cheese has melted and begins to turn golden brown.

Makes 4-8 servings


The Easiest Eggplant Parmesan Ever

It’s that time of year, when my garden has produced just about all it’s going to. Some leaves and stems are already wilting and yellowing.

We’ve been feasting on tomatoes and eggplants.

I’ve made my annual hoard of pepper jam.

I’ll make tomato chutney with some of the dark green tomatoes (and let the ones that have a vague pink color ripen on the vine for a few days).

Last night I made Eggplant Parmesan with one of the gorgeous eggplants and San Marzano tomatoes I planted this year. It was the easiest version I’ve ever prepared.

Also the most delicious.

And light — I roast the eggplant slices rather than bread and fry them.

Do you think this was so good because the produce was fresh from my garden?

Maybe. But I think this recipe — so easy and so simple — would also be wondrous with store-bought stuff.

THE EASIEST EGGPLANT PARMESAN EVER

  • 1 medium eggplant

  • salt

  • 4 tablespoons olive oil, approximately

  • 1 onion, chopped

  • 1 large clove garlic, chopped

  • 8-10 plum tomatoes, sliced

  • 1 tablespoon chopped fresh basil

  • 1 cup ricotta cheese

  • 1-1/2 cups shredded mozzarella cheese

  • 2 tablespoons grated Parmesan

Preheat the oven to 400 degrees. Slice the eggplant about 1/8-inch thick, sprinkle with salt and let rest for 20-30 minutes. Wipe the eggplant slices dry and place them on a parchment-lined baking sheet. Brush each side of each slice of eggplant with a film of olive oil (you will need about 2 tablespoons of oil). Roast the slices for about 15 minutes, turning them once, or until they are softened. Remove from the oven. While the eggplant is roasting, heat 2 tablespoons of olive oil in a saute pan over medium heat. Add the onion and cook, stirring occasionally, for about 3 minutes, or until softened. Add the garlic and cook for another minute. Add the tomatoes and basil and cook, stirring occasionally, for 2-3 minutes, or until the tomatoes have softened. Place the eggplant slices on the bottom of a baking dish (overlap the slices slightly). Spread the ricotta cheese on top of the eggplant slices. Spoon the cooked tomato mixture over the cheese. Cover with the mozzarella cheese, then sprinkle with the Parmesan cheese. Bake for 20-25 minutes or until the cheese has melted and is beginning to turn lightly brown.

Makes 4 servings


Fig, Cheese and Caramelized Onion Pizza

Can you tell I bought a truckload of fresh figs this week?

This is my third recipe so far — I can’t resist fresh figs when I first see them in the market. So, we’ve had two versions of salad (with figs of course) and one pizza — I’ve made this pizza numerous times since I first posted about it last year.

One of us, as usual, added some fresh arugula on top and one of passed on that.

Fig, Caramelized Onion and Cheese Pizza

  • 2 tablespoons olive oil

  • 1 large onion, sliced

  • 1 tablespoon Balsamic vinegar

  • cornmeal

  • about 15 ounces of pizza dough

  • 3/4 cup ricotta cheese

  • 5-6 fresh figs, cut into quarters

  • 2/3 cup mozzarella cheese

  • 2 tablespoons Parmesan cheese (or 1/3-1/2 cup crumbled blue type cheese)

  • arugula, optional

  • Balsamic vinegar, optional

Preheat the oven to 450F. Preheat a pizza stone if you have one. Heat the olive oil in a saute pan over low-medium heat. Add the onions and cook for 15-18 minutes, stirring frequently or until the onions and beginning to turn golden. Add the Balsamic vinegar, stir and cook another 10 minutes or until the onions are soft, well glazed and golden brown. Set aside. Place some cornmeal on a board or on parchment paper and stretch/roll the dough into a circle (Mine was 12-inches but you can make it 11-13-inches depending on how thick you like the crust.) Spoon the ricotta cheese evenly over the dough surface, leaving about 1/2-inch at the edge. Cover the ricotta cheese with the onions. Top with the quartered figs, placing them evenly round the surface. Scatter the mozzarella cheese over the top, then the Parmesan or blue cheese. If you have a pizza stone transfer the pizza to the stone using a pizza peel; or, transfer to a large baking sheet with the parchment paper underneath. Bake for 15-20 minutes or until the crust is crispy and browned to taste and the cheese is melted and bubbly.

Makes one large pizza