meatless monday

Chicken Soup Burgers

My daughters are not big meat eaters, so when they were young kids and still living at home,  I never made stuff like roast beef or beef stew or meatloaf. They just didn't want any of it.

They didn't even eat hamburgers.

We were basically a chicken and turkey family (including chicken and turkey burgers).

Also, I would make burgers out of all the vegetables I used for chicken soup, which I cooked more often than almost everything.

That was a kid favorite. They still talk about those burgers.

Recently I made some chicken soup because, well, it's been rainy and gloomy in my part of the world and soup is like magic to help get you in a good mood. I used the leftover vegetables for burgers, just for the two of us. Fabulous not-quite-meatless dinner. Of course you can make this a vegetarian meal with regular cooked vegetables not from soup!


CHICKEN SOUP BURGERS

  • 8 cooked carrots, cut up

  • 6 stalks cooked celery, cut up

  • 2 cooked parsnips, cut up

  • 1 large cooked onion, cut up

  • some sprigs of cooked dill

  • 1 large egg

  • 1/2 cup matzo meal

  • salt and freshly ground black pepper to taste

  • vegetable oil

Place the cooked vegetables and dill in a food processor and pulse to combine them and chop them into very fine pieces. Spoon the contents into a bowl. Add the egg, matzo meal and some salt and pepper to taste. Mix thoroughly to combine the ingredients evenly. Shape portions of the mixture into patties about 1/2-inch thick. Heat about 1/4-inch vegetable oil in a saute pan over medium-high heat. When the oil is hot enough to make a crumb sizzle, add the patties, a few at a time, leaving space between them in the pan. Do not crowd the pan. Fry the patties for about 3 minutes per side or until golden brown and crispy. Drain on paper towels. 

Makes about 12


Roasted Plum Tomatoes

_DSC9730.jpg

When it's really really cold outside, (like it is where I live) I think of soup and make a pot or two

But I also dream about summer and sunshine and the garden fresh tomatoes you can only get at the end of August.

Winter tomatoes are not good. Not for salad anyway. They're typically too hard and the flesh is usually too dry.

But a good tomato taste does come out when you cook them, especially if you use Roma (plum) tomatoes. Use them for sauce for spaghetti or in ShakshukaBraise them with string beans as a side dish.

Roasted tomatoes are also flavorful, even if you use winter tomatoes. This dish couldn't be simpler. It goes with any meat protein and also as part of a meatless Monday meal. 

CRISPED ROASTED TOMATOES

  • 4 large plum tomatoes
  • 1 tablespoon olive oil
  • 1 teaspoon Dijon mustard
  • 2 teaspoons chopped fresh herbs
  • 2 tablespoons dry bread crumbs
  • cayenne pepper, optional

Preheat the oven to 450 degrees. Cut the tomatoes in half lengthwise and place them cut side up in an ovenproof pan. Mix the olive oil and Dijon mustard and brush this evenly over the tops of the tomatoes. Sprinkle with the herbs and breadcrumbs. Dust lightly with a pinch of cayenne pepper for more flavor. Roast for 20-25 minutes or until the tops are crispy.

Makes 4 servings

The Silver Platter Simple Elegance Cookbook

The older I get, the easier my recipes become. Years ago I was willing to trek through a 3-pager with multiple steps. I made dishes such as French Onion Soup only after preparing my own stock. I was willing to put together a long-winded recipe for Paris-Brest.

No longer. I don't have the time, energy or patience -- and will leave those wonderful, worthy chores to younger folks. These days I create recipes that are simple, flavorful and interesting, but without taking shortcuts that would detract from the food.

I also appreciate when other people share the same ideals, which is why I love "The Silver Platter Simple Elegance," a new cookbook from the kitchen of Daniella Silver, with tips and notes from Norene Gilletz, renowned food blogger, cookbook author and matriarch of kosher cooking.

This is not merely a book where you can pick up a good recipe or two. Every recipe is approachable, using ingredients that even novice cooks will find familiar, with selections that are perfect for everyday cooking and many that are suitable for entertaining: Zucchini Dill Soup and Flaked Quinoa Schnitzel and Mustard-and-Garlic Roasted Potatoes and Granola Ice Cream Cake are just a few, glorious but easy finds that will make your family happy at dinnertime.

There's more: at the bottom of each recipe are tips from the master, Norene Gilletz, on such topics as what equipment is best to use, what can be done ahead, what substitutions are appropriate, how to make an everyday dish more company-friendly, and so on. 

The photos are gorgeous too.

The first recipe that caught my eye is the one for Candied Cauliflower. Can you imagine such a thing?! With but 5 ingredients (not including salt and pepper), this sounded too fabulous to miss, and it was every bit as delicious as it looks on the page. (And includes tips on buying cauliflower and nut-seed substitutions.)

Next, the Mango Wild Rice, because I love any dish with mango in it. This recipe is fairly simple, colorful, flavorful and with the bonus that you can cook it ahead. One of Norene's tips is to substitute dried apricots for the dried mango, but I used fresh mango instead. The recipe is versatile too!

Taste for yourself: Here are the two recipes I found particularly worthy. The recipes and photos are reproduced from The Silver Platter Simple Elegance by Daniella Silver with Norene Gilletz, with permission from the copyright holders. ArtScroll/Mesorah Publications, LTD.

Another thought -- this book make a delicious Hanukkah gift for someone who likes to cook.


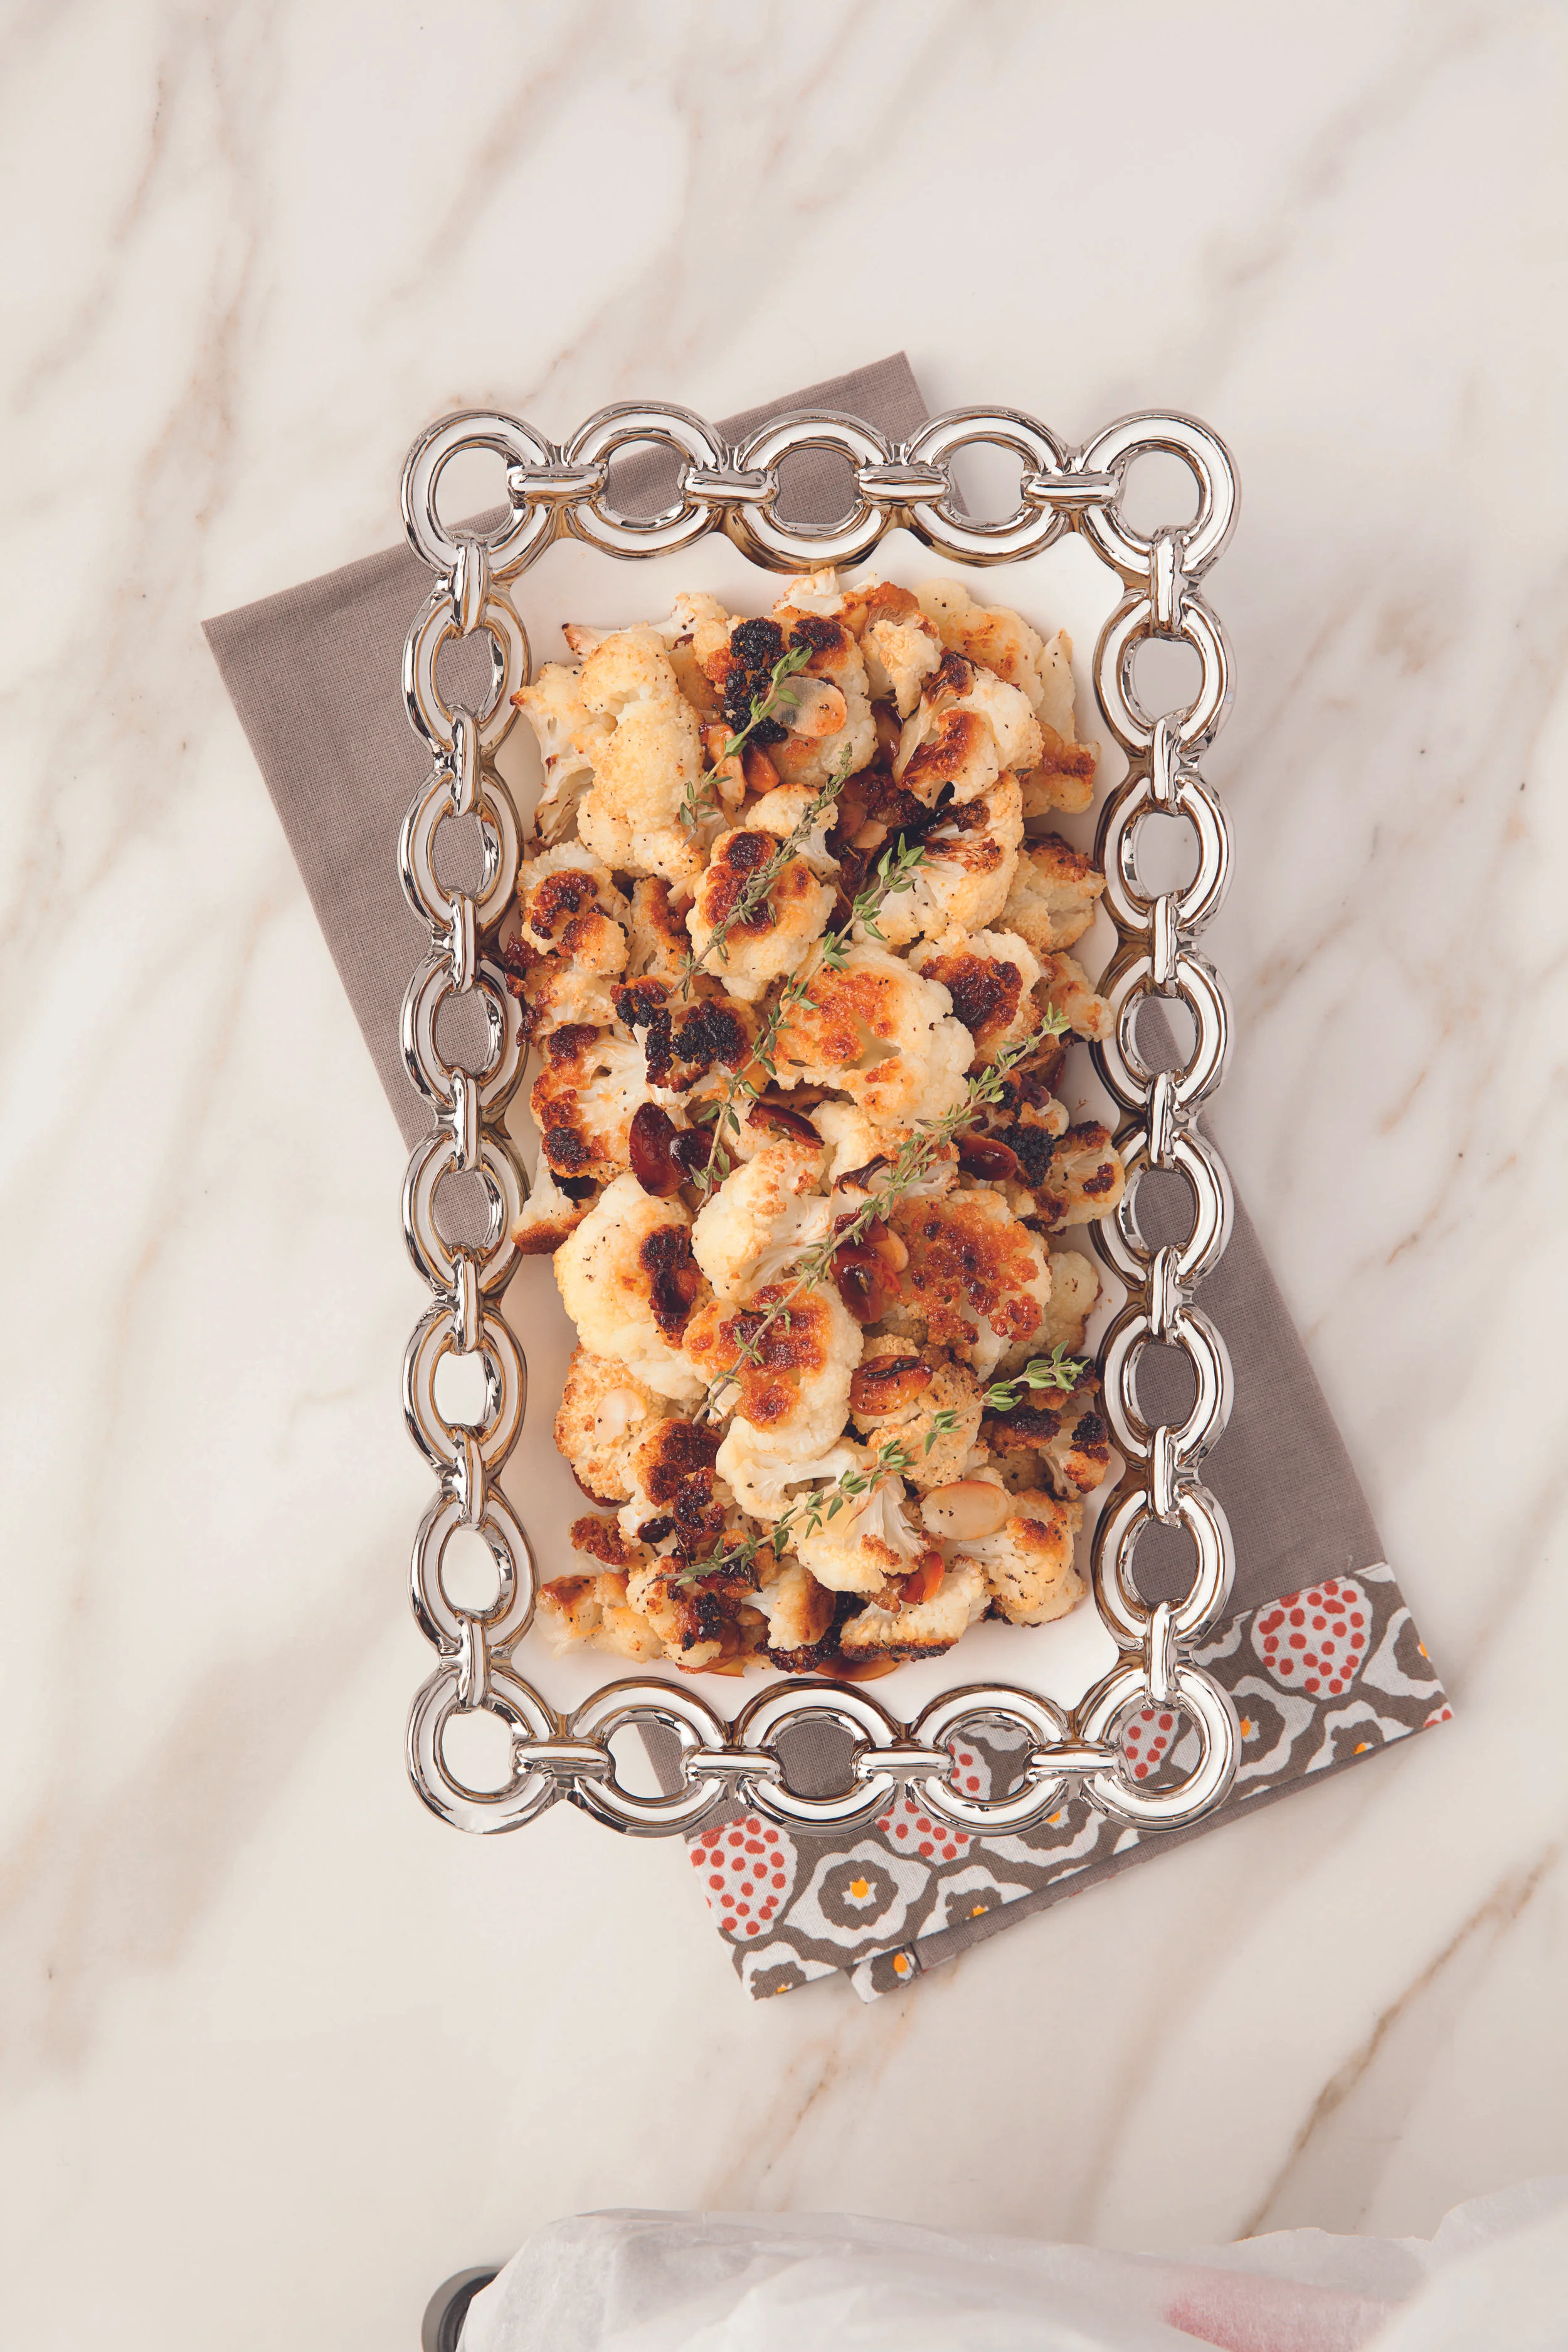
CANDIED CAULIFLOWER WITH ALMONDS

pareve, Passover, gluten-free, do not freeze, yields 6 servings


Candied cauliflower, drizzled with honey and thyme and topped with sliced almonds, is a beautiful dish that will keep your guests coming back for more. I suggest you double the recipe!


Ingredients

  • 1 large cauliflower, trimmed

  • kosher salt

  • freshly ground black pepper

  • 1 Tbsp minced fresh thyme leaves

  • 2 Tbsp olive oil

  • 3 Tbsp honey

  • ½ cup sliced almonds

  • thyme sprigs, for garnish


Method


1.  Preheat oven to 400°F. Line a rimmed baking sheet with parchment paper.

2.  Cut cauliflower into 2-inch florets. Transfer to prepared baking sheet. 

3.  Sprinkle florets with salt, pepper, and thyme. Drizzle with oil and honey. Top with sliced almonds. Rub all over to coat evenly. (Can be prepared up to this point and refrigerated.)

 4.  Bake, uncovered, for 35-40 minutes, or until cauliflower is golden brown and tender. Serve immediately.


Norene’s Notes:


Variation: Use pecan pieces or coarsely chopped cashews instead of almonds. If you have a nut allergy, substitute pumpkin seeds.


Hot Stuff: Don’t worry about the almonds burning. The steam created during cooking prevents that from happening. If your oven is on the hot side, you may prefer to stir in the almonds during the last 15 minutes of baking.


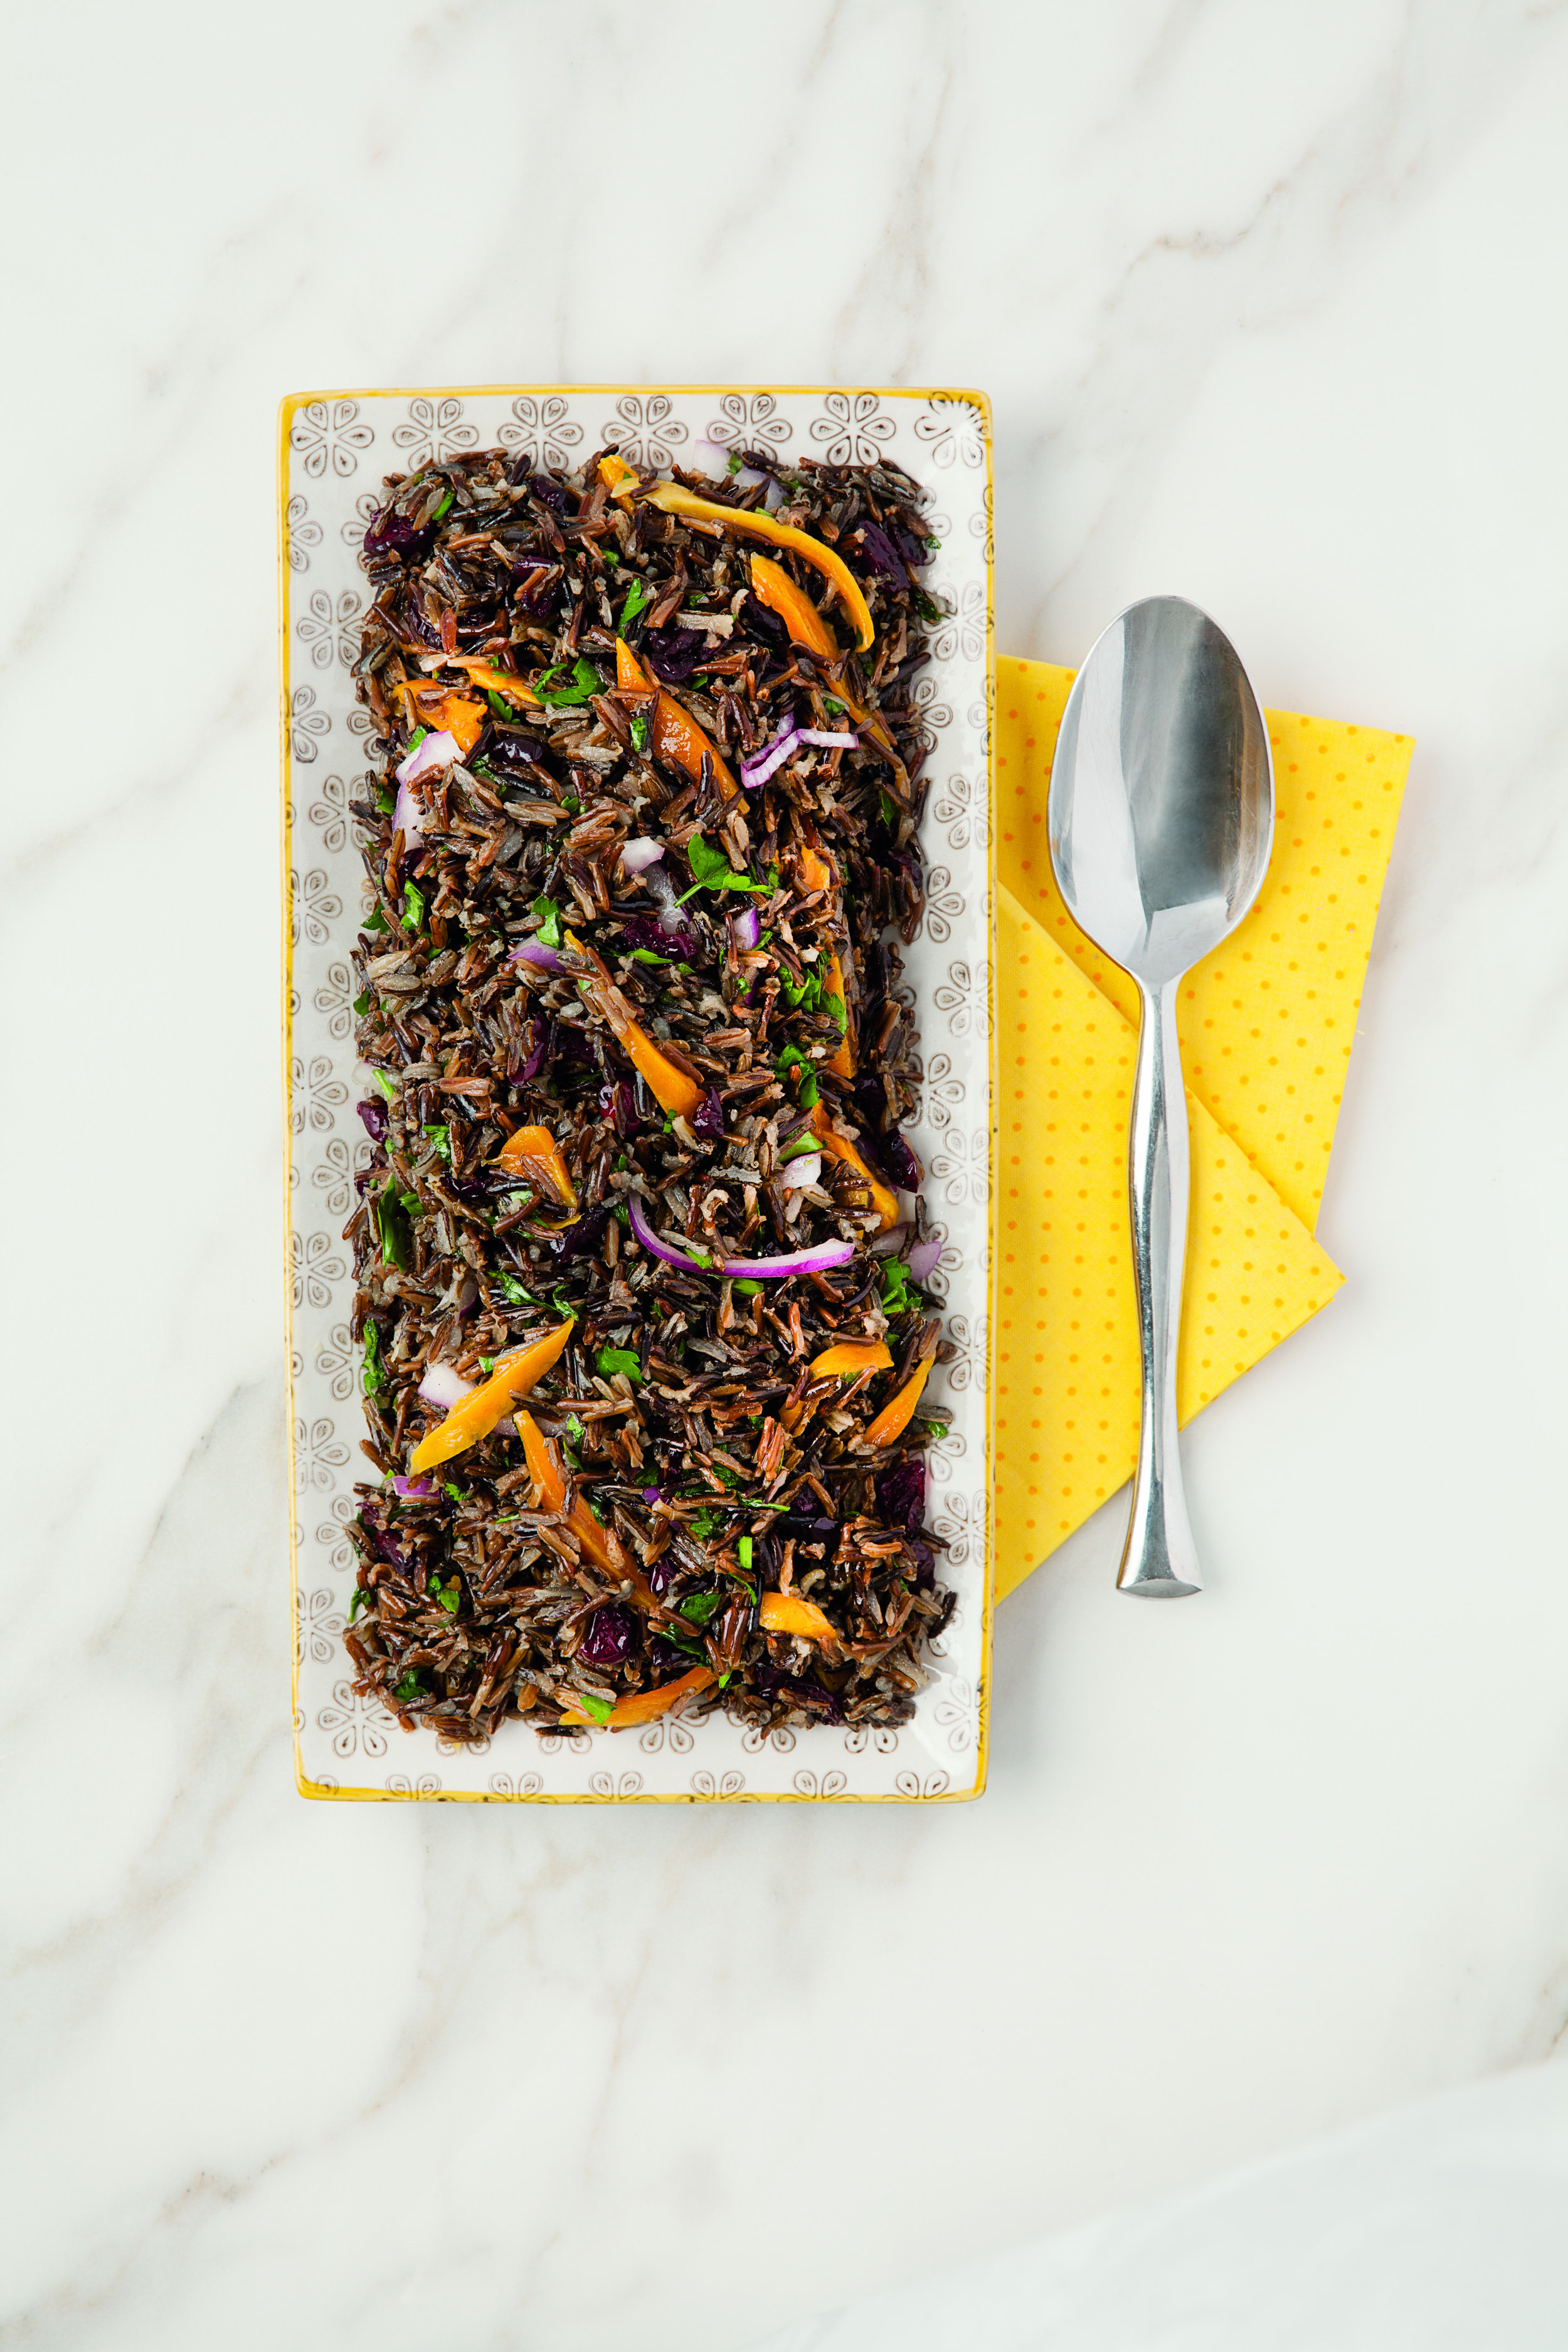
WILD RICE WITH DRIED MANGO & RED ONION

pareve, gluten-free, freezes well, yields 8 servings


My three girls are in love with mango, and this wild rice dish has become their latest obsession. The nutty flavor of wild rice is a perfect match for sweet mango and red onion. The dried mango plumps up a bit when marinated in the dressing, adding some softness to the texture of this dish.


Ingredients

  •  
  • 4 cups water
  • 1½ cups wild rice, rinsed and drained
  • 1 tsp kosher salt
  • ½ medium red onion, quartered and thinly sliced
  • 12 dried mango slices, thinly sliced into strips
  • ¾ cup dried cranberries
  • 3 Tbsp extra virgin olive oil
  • ⅓ cup orange or mango juice
  • 3 Tbsp honey
  • ½ cup chopped fresh parsley
  • kosher salt
  • freshly ground black pepper


Method


1.  Bring water to a boil in a medium saucepan over high heat. Add rice and salt; cover. Reduce heat; simmer for about 45 minutes, or until the grains split and burst. Remove from heat; let stand, covered, for 10 minutes. Drain, if necessary. Transfer to a large bowl; let cool.

2.  Add onion, dried mangoes, and cranberries. Stir in oil, orange juice, honey, parsley, salt, and pepper. Toss to combine. Adjust seasonings to taste. Serve chilled or at room temperature.


Norene’s Notes:


Variation: Since wild rice is fairly expensive, you can use ¾ cup wild rice and ¾ cup whole grain brown rice — their cooking time is about the same.

No dried mango? Substitute dried apricots.

Wild rice is gluten-free, fiber-packed, and high in protein and B vitamins. Elegance in health!

An easy way to cut dried mango is to use kitchen scissors.  


Child’s Play: How a Young Cook Makes a Perfect Meal for Meatless Monday

And so, another generation of passionate, creative cooks.

Recently I spent some memorable time with one of my grand daughters. She cooked almost an entire dinner for herself and siblings as I watched. I encouraged her to use her judgment about flavors and amounts. She was thoughtful, asked questions and was unafraid to follow her senses and taste buds rather than someone else's recipe.

At each step of the way she got off the stool she needed to reach the pan so she could write down what she did.

In the end: Rice and Beans with Roasted Brussels Sprouts for 4.

First, I must say, she knew to wash her hands before cooking. She also used disposable gloves when she tossed the Brussels sprouts in olive oil.

I watched her pour olive oil into the pan and toss a bit of chopped onion in to see if it sizzled because I had told her that's when the oil was hot enough for the rest.

She added chopped onions and made a decision about how much was enough. About 1/4 cup.

I told her how to rinse the beans, and why, and watched her do it.

She added the beans and some crushed tomatoes and when she said she didn't think it was tomatoey enough I encouraged her to add more. And she did.

She wondered about spices. I suggested either chili powder or cumin and she asked "why not both?"

Indeed. I told her to add both, starting with 1/2 teaspoon each.

When she tasted she said it needed more chili powder. And added some. And salt. To her taste.

As the beans cooked, she cut the Brussels sprouts, placed them on a baking tray, tossed them with olive oil, sprinkled them with salt and placed them in the oven.

The only thing I cooked was the rice. 

Everyone gobbled up this magnificent feast. The perfect meal for a meatless Monday or whenever you have yen for a scrumptious vegetarian dinner.

I left smiling. Still am.


RICE AND BEANS 

1 cup brown rice

1-3/4 cups water

2 tablespoons olive oil

1/4 cup chopped onion

1 15-ounce can black beans, rinsed and drained

1-1/2 cups canned crushed tomatoes

1 teaspoon chili powder

1/2 teaspoon ground cumin

salt to taste


Place the rice and water in a saucepan over high heat. Bring the water to a boil, turn the heat to low, cover the pan and cook for about 35 minutes or until the grains are tender and all the liquid has been absorbed. While the rice is cooking, pour the olive oil into a saute pan over medium heat. Add the onion and cook, stirring occasionally, for 2-3 minutes. Add the beans, tomatoes, chili powder, cumin and salt. Stir to distribute the ingredients evenly. Cook for 8-10 minutes. Spoon the rice onto plates; top with some of the rice and beans. 

Makes 4 servings

GIANT Knish

Anyone who reads this blog knows that potatoes are my go-to comfort food. My magic medicine for when I'm stressed out.

So I'm definitely going to need something potato tonight when Ed and I have our debate-watch group over. (By the time this election is over my potato consumption for the year will be way over the limit.)

So I made a stuffed potato roll. Actually mashed potatoes with caramelized onions wrapped inside puff pastry.

Actually, a giant knish.

And guess what!? This dish is absolutely perfect for my Vegetarian Break-the-Fast, so I made one for that occasion too!

And also guess what!? It's also perfect for Meatless Monday. And also for Sukkot, when it is traditional to serve stuffed foods.

All in all, this is a big, big winner for whenever. Really. Whenever.


Giant Knish

  • 3 pounds all-purpose potatoes
  • 4 tablespoons olive oil
  • 1 large sliced onion
  • 1 large egg
  • 1 teaspoon salt or to taste
  • freshly ground black pepper to taste
  • 2 sheets frozen parve puff pastry

Preheat the oven to 375 degrees. Lightly grease a flat baking sheet. Peel the potatoes, cut them into chunks and boil them in lightly salted water for about 15 minutes, or until they are cooked through. Drain the potatoes and return them to the pan. Add 2 tablespoons of the olive oil and mash the potatoes until they are fluffy. While the potatoes are cooking, heat the remaining 2 tablespoons olive oil in a sauté pan over medium heat. Add the onion and cook for 12-15 minutes or until lightly browned. Add the onions to the potatoes. Add the egg, salt and pepper and stir gently to mix ingredients. Let cool. Using one sheet of puff pastry at a time, roll the dough slightly thinner. Place half the potato filling down the center of the dough, using up the middle 1/3 of the dough and leaving a one-inch margin at both of the short ends. Enclose the filling: place one side of the dough over the filling, then place the other side of the dough over the filling. Press the short ends to enclose the filling at the top and bottom. Place the roll, seam side down, on the prepared baking sheet. Refrigerate for about 30 minutes or until the dough feels cool and firm. Bake for 30-35 minutes, or until golden brown. Cut with a serrated knife. 


Makes 2 rolls, each serving 6 people


Fried Green Tomatoes

IMG_0006.jpg

I go out to my garden now and it's still warm, like summer. But the leaves on big maple trees in the back are starting to turn and I can see the vague copper tips. It's that transition season when you want to grab the last of summer but your head understands that autumn is coming.

I've picked dozens of luscious tomatoes in the last few weeks, but there are still some green ones hanging on the vines. Do I wait for them to ripen and have the last few precious bites?

What if there's a sudden frost! That happened to me last year and all my tomatoes were ruined.

Here's what to do: use some green tomatoes and leave just a few to ripen and hope for the best.

In the past I've baked green tomato pie, fried green tomato slices, baked green tomato slices, made green tomato pickles and cut green tomatoes into different kinds of chutney.

This year I decided to pack them into a sandwich.

Dee-lish.

Fried Green Tomato, Roasted Red Pepper and Cheese Sandwich

  • 2 medium red bell peppers
  • 2 teaspoons olive oil
  • 1/3 cup all-purpose flour
  • salt and freshly ground black pepper, to taste
  • 2 large eggs, beaten with one teaspoon water
  • 3/4 cup plain bread crumbs
  • 12-16 slices green tomato (about 1/2-inch thick)
  • 4 Portuguese rolls, sliced
  • vegetable oil
  • 1/2 cup mayonnaise
  • 2 tablespoons chopped fresh basil
  • 2 cups shredded mozzarella cheese

Preheat the oven broiler or outdoor grill with the rack about 4 inches from the heat source. Remove the stem and seeds from the bell peppers and cut them into quarters. Brush the pepper pieces with the olive oil. Broil the pepper pieces, turning them occasionally, for 8–10 minutes or until charred. Remove the pieces to a plate. When cool, peel off the skin.

Preheat the oven to 300 degrees. Mix the flour with some salt and pepper in a shallow dish. Place the beaten eggs in another dish. Place the breadcrumbs in a third dish. Coat the tomato slices with flour. Shake off the excess. Dip the coated slices in the beaten eggs, covering the slices completely. Coat the slices with the breadcrumbs. Place the tomato slices on a cookie sheet or baking rack to air dry for at least 15 minutes. Heat about 1/4-inch vegetable oil in a large sauté pan over medium-high heat. Fry the tomatoes for 2-3 minutes per side or until golden brown. Drain on paper towels.

Place the rolls in the oven to warm them up for about 4-5 minutes. Remove the rolls from the oven. While the rolls are warming, mix the mayonnaise and basil together. Spread equal amounts of the mayonnaise on the bottoms of each of the rolls. Top each with 3-4 tomato slices. Top each with two roasted pepper quarters. Top each with equal amounts of the cheese. Finally, cover with the top of the roll. Place back in the oven for a minute or so to slightly melt the cheese and serve.


Makes 4 sandwiches

Bubbe and Me in the Kitchen

photo by Evi Abeler

photo by Evi Abeler

Although my Mom was the one who taught me how to cook and who encouraged me to expand my recipe repertoire, I post a lot about the dishes my grandma cooked. My mom's food was thoroughly up-to-date and wonderful, but my grandma made the old-fashioned, old-world Ashkenazi favorites that I loved (still love!) so much. 

And so, when I got hold of Miri Rotkovitz's new cookbook, "Bubbe and Me in the Kitchen," I felt right at home. I understood immediately that for Miri, whose recipes are geared to mostly modern food that today's kosher home cooks prefer, she keeps a special place within her heart and soul for her bubbe, for the foods her bubbe cooked and the words of wisdom, culinary and otherwise, that her bubbe gave to her. Like how bubbe taught her that using spices could "bump up the flavor and stamp a personal signature on favorite dishes." That slicing apples rather than chopping them would result in a more flavorful Apple Cake.  

The book is filled with some of her bubbe's recipes, culled from a collection of index cards and clippings, plus an occasional recipe from other kosher food writers (including me) and mostly, Miri's own contemporary creations and riffs on traditional dishes. There are so many fabulous recipes, I don't even know where to begin cooking them. Shall it be the chapter on Grains, with the Forbidden Rice Salad with Mango and Ginger Vinaigrette? Or the Mezze/Snack chapter that includes Nori and Smoked Salmon "Petits Fours?"

I love meatless meals, so actually, it's the Kasha Varnishkes with Ratatouille for me. This is the kind of dish that brings together traditional and contemporary, that makes a standard side dish into a full meal.

This book is a winner and a keeper. Not simply for the wonderful kosher recipes, but also for all the extras: notes on pantry items, information about what kosher means today in terms of global ingredients and healthy eating, and because of the charming narrative and headnotes that lets us hear bubbe's voice, translated by a loving grand daughter.

Here's that recipe, so fine for a meatless Monday (but really, anytime).

Kasha Varnishkes with Ratatouille

SERVES 4 TO 6 | PAREVE 

Prep time: 25 minutes Cook time: 45 minutes

 FOR THE RATATOUILLE

  • 3 tablespoons extra-virgin olive oil

  • 1 large onion, peeled and chopped

  • 3 large garlic cloves, chopped

  • 1medium eggplant, cut into 1-inch pieces

  • 1 large red bell pepper, cored and chopped

  • 1 medium zucchini, trimmed and cut into 1-inch pieces

  • 2 medium tomatoes, seeded and cut into 1-inch pieces

  • 2 tablespoons tomato paste or tomato sauce

  • Generous pinch dried thyme

  • 2 tablespoons thinly sliced fresh basil leaves, plus extra for garnish

  • Sea salt or kosher salt

  • Freshly ground black pepper

FOR THE KASHA VARNISHKES

  • 4 tablespoons extra-virgin olive oil or canola oil, divided

  • 1 large onion, peeled and finely chopped

  • 1 pound bowtie (farfalle) noodles

  • 1 large egg

  • 1 cup kasha (medium granulation) 2 cups water or vegetable stock

  • 1 teaspoon salt

  • ¼ teaspoon freshly ground black pepper

MAKE THE RATATOUILLE:  Preheat the oven to 400°F. Warm the oil in a Dutch oven or ovenproof covered chef’s pan set over medium heat. Add the chopped onion and sauté  until it softens and begins to turn translucent, about 5 minutes. Add the garlic and sauté 1 minute more.

Add the chopped eggplant and cook, stirring frequently, until it begins to soften, about 5 minutes. Add the red peppers, sauté for 2 minutes, then add the zucchini, stirring occasionally, until the zucchini softens, about 3 minutes more. Stir in the tomatoes, tomato paste (or sauce) and thyme.

Cover the pan and place in the preheated oven. Bake for 30 minutes, stirring after 15 minutes. The vegetables should be saucy and tender, yet still mostly hold their shape. Remove from the oven, stir in the basil, and season with salt and pepper. Set aside.

MAKE THE KASHA VARNISHKES: While the ratatouille is baking, set a large pot of water to boil for the pasta. In a chef’s pan or large skillet, heat 2 tablespoons of oil over medium-high heat. Add the onions and sauté until they turn soft and translucent, about 5 minutes. Reduce the heat and cook, stirring occasionally, until the onions start to caramelize, about 10 minutes more. Remove from the heat and set aside.

In the meantime, when the pasta water comes to a boil, stir in the bowties and cook until al dente, about 10 to 11 minutes. Drain and transfer the pasta to a large serving bowl.

In a small bowl, beat the egg. Add the kasha and stir well to coat the kasha grains. Transfer the onions from the chef’s pan to the serving bowl with the pasta. Return the pan to the stove top and place over medium heat. Add the kasha and cook, stirring constantly, until the egg dries and the kasha separates into individual grains, about 3 minutes.

Add the water or stock to the kasha and bring to a boil. Reduce the heat, cover, and simmer until the liquid is absorbed, about 10 minutes.

When the kasha is cooked, add to the bowl with the bowties and onion. Drizzle with 2 table- spoons of oil and stir well to combine. Spoon into shallow bowls and top with the ratatouille. Garnish with additional basil.

STORAGE: Store the ratatouille and the kasha varnishkes in separate covered containers in the refrigerator. The ratatouille will keep for 4 to 5 days, the kasha for 2 to 3 days. You can also freeze both dishes in freezer-safe containers

Roasted Cauliflower Steaks with Garlic, Sea Salt and Lime

_DSC9908.jpg

Recently, Faye Levy, noted cookbook author and food writer, wrote a piece for the Jerusalem Post about Cara Mangini, the "Vegetable Butcher." She also posted about it on Facebook. Then she asked if anyone else prepared "cauliflower steaks."

I do! Have done. Many times!

We are a family of cauliflower lovers and the "steaks" -- that is, thick slices cut from a whole head of cauliflower -- look beautiful on a plate, making them a special side dish at dinner.

I have a recipe for cauliflower steaks in my latest cookbook, The Modern Kosher Kitchen. Thanks for posting this, Liz Rueven, at kosherlikeme.com.

Note -- the steaks taste the same as any other "cut" of cauliflower.

The cutting takes some doing, and a very sharp chef's knife. Also, truth to tell, the smaller sections at the side of the cauliflower head fall away into regular florets. No worries. Cook them alongside the steaks. They're like the "burnt ends" that you get from barbecue -- no one ever complains about those, do they?

After the cutting, its' simple. A bit of oil and seasoning.

Like this recipe:


Roasted Cauliflower with Garlic, Sea Salt and Lime

  • 1 head cauliflower
  • 3 tablespoons olive oil
  • 2 cloves garlic, finely chopped
  • 1/2 teaspoon Dijon mustard
  • sea salt to taste
  • 2 tablespoons lime juice

Preheat the oven to 400 degrees. Line a cookie sheet with parchment paper. Remove the green leaves at the bottom of the cauliflower and trim most of the fibrous stem attached to the head. Slice the head into “steaks” about 3/8-inch thick. Rinse and dry the slices on paper towels. Combine the olive oil, garlic and Dijon mustard and brush this mixture on both sides of the cauliflower slices. Place the slices on the parchment. Sprinkle with sea salt. Roast for 15 minutes. Turn the slices over and roast for another 10-15 minutes or until tender and crispy. Sprinkle the roasted cauliflowers steaks with lime juice. Note: for smaller pieces that fall away when you slice the head, cook along with the steaks. They may be done sooner, so look at them about 5 minutes ahead, or let them get browner, no harm done.

Makes 4 servings

Grandma's Blintzes

_DSC9289.jpg
_DSC9381.jpg

I feel blessed that my children and grandchildren come to stay over at my house in Connecticut for holidays and birthdays and occasionally just to hang out. It reminds me of when I was a kid and visited my grandma -- almost every weekend -- along with practically everyone else in my mother's family (aunts, uncles and cousins).

That was back in the day before children had so many other activities. Sure, there were brownies and cub scouts, but back then I never heard of things like soccer or gymnastics. Art classes happened during school hours. The only cooking classes for children took place in your own kitchen if you were lucky to have a Mom like mine who let you patchky around.

Weekends were strictly for family activities.

I'm not saying one way of life is better than another. One size does not fit all, as they say. And maybe today's kids are better educated or are more well-rounded than we were.

But I have wonderful memories of that life. 

It was good. I got to play with my cousin Leslie every weekend. She and her family lived with our grandma.

I also got to eat some of my grandma's wonderful food. 

I hope that in years to come my grandchildren will feel happy when they recall their visits to Ed and me. And have good memories of some of the favorite foods I cooked when they came.

Like Macaroni and Cheese. Apple Pie. Matzo Brei.

My grandma also made matzo brei and macaroni and cheese. But one of her signature dishes was blintzes.

She filled the blintzes with cheese, the classic, but, as I learned later, most people made the cheese filling sweet, seasoned with vanilla and/or cinnamon. My grandma's cheese-blintz filling was lemony, with just a hint of sugar.

Also, because there were so many of us, she had no time to fry them a couple at a time and still have everyone eat at the same time. So she placed the blintzes, seam-side down, on a baking sheet, topped each with a little dab of butter, and baked them until they were golden brown.

Me? I still love blintzes lemony and baked. And -- surprise to me! -- so do my grandchildren.

Her recipe is below, but the filling instructions give you the option to make the more popular vanilla version (and also how to fry them). Don't worry if the wrappers don't fry into perfect circles -- you're going to roll them and if they're a little off, no one will ever know.

Grandma Rachelle Hoffman’s Blintzes

Wrapper:

  • 3/4 cup all-purpose flour
  • 1-1/2 teaspoons sugar
  • 1/2 teaspoon salt
  • 3/4 cup milk, approximately
  • 2 large eggs
  • softened butter for frying

Filling:

  • 1 pound farmer’s cheese
  • 1 large egg
  • 2 tablespoons sugar
  • 1 teaspoon lemon juice
  • 1/2 teaspoon grated fresh lemon peel, optional
  • 1 teaspoon vanilla extract, optional

To make the wrapper, combine the flour, sugar and salt in a bowl and stir to blend the ingredients. Add the milk and eggs and whisk until the batter is smooth and uniform (you may do this in a food processor). Add more milk if the batter seems too thick (it should be the consistency of heavy cream). Set aside for 30 minutes. Place a small amount of the softened butter in a crepe or omelet pan and place the pan over medium-high heat. When the butter has melted and the foam is beginning to separate, add enough batter to cover the bottom of the pan (for an 8-inch pan it will be 1/4-cup), shaking the pan quickly to spread the batter evenly. Cook for a minute or so or until the bottom is lightly browned. Turn the wrapper over and cook briefly. Remove the wrapper and proceed with the remaining batter, separating the cooked wrappers with aluminum foil or waxed paper.

To make the filling, place the cheese, egg, sugar and lemon juice in a bowl and mix thoroughly. Add the lemon peel OR vanilla extract and mix in thoroughly.

To fill each wrapper: use the first fried side as the inside of the blintz. Use about 2 tablespoons of filling for an 8-inch wrapper and place the filling in the center of the wrapper. Fold the bottom side up, over the filling. Fold the left side, then the right side over the filling, then roll up to enclose the filling. Fry the blintzes seam side down first over medium heat (using the same method as for frying the wrappers – let the butter melt and become foamy). Or, you can bake the filled blintzes: Preheat the oven to 350 degrees. Place the blintzes in a single layer on a jelly roll pan, top each with a tiny piece of butter. Bake for about 10 minutes.

Makes 8 8-inch blintzes

Beet and Brussels Sprouts Salad

Now that my children are grown, with children of their own, I sometimes think about the “old days” and remember the good times, the festive occasions, the fun we had. The Jewish holidays rank high on my list of best memories, especially the Passover Seders. Whether I’m thinking about the times that my cousin and I would crawl under the table while my uncle recited the Haggadah or last year, when my grandchildren threw the styrofoam “hail” and plastic locusts as we mentioned the Ten Plagues, the memories are good, the kind that I love to deposit in my memory bank.

There are good food memories too, from my grandma’s famous chicken soup to the complaints I got when I first served haroset made with dried apricots, pistachio nuts and cayenne pepper.

My first Seder continues my family's generations long menu featuring matzo ball soup, followed by roasted turkey. Chremslich, of course. In fact, a double portion of that. 

But all the rest is different. Over the years there was one food change after another, little by little as new in-laws came into our family, tastes changed and allergies had to be considered. So these days we have our own family expected recipes -- matzo ball soup and turkey, plus homemade baked cranberries, spinach pie (made with a matzo crust), imam bayeldi, and lots of other vegetables and the now standard spicy dried fruit haroset.

I used to serve flourless chocolate cake, but we had that a little too often, so because Passover is also my grandson's birthday, I will serve homemade macaroons along with a traditional chocolate roll, the one I used to make when my daughter Meredith's birthday fell during Passover. (You can stuff the roll with whipped cream, jelly or parve lemon curd filling).

Every year I add one new dish to my first Seder. One year it was Ratatouille. A few times there was a new version of haroset. I even made matzo farfel chocolates one year.

This year? A new salad! Here it is:

Roasted Beet and Brussels Sprouts Salad

  • 4 medium beets
  • 3 tablespoons olive oil
  • salt to taste
  • 1/2 pound (about 30) medium size Brussels sprouts
  • 2 tablespoons apple cider vinegar (or use Balsamic vinegar)
  • 1 tablespoon lemon juice
  • 2 teaspoons grated fresh orange peel
  • freshly ground black pepper

Preheat the oven to 425 degrees. Peel the beets and cut them into bite size pieces. Place the beets on a baking sheet and pour one tablespoon olive oil over them. Toss to coat the beets. Sprinkle with salt. Roast for about 20 minutes or until tender. Trim the Brussels sprouts (cut them in half if they are large). Place them on a baking sheet and pour one tablespoon olive oil over them. Toss to coat the sprouts. Sprinkle with salt. Roast for about 15 minutes or until tender. Place the vegetables together in a bowl. Mix the remaining olive oil, apple cider vinegar, lemon juice and orange peel and pour over the ingredients. Let rest for about 10 minutes, place in a serving bowl and sprinkle with salt and black pepper to taste.

Makes 6-8 servings