chocolate

Chocolate-Banana-Applesauce Cake

fullsizeoutput_97d5.jpeg

When I was a kid my mother sometimes made macaroni-and-cheese using somewhat older, hard-around-the-edges American cheese that didn’t look fit to eat. I thought it was appalling.

But she told me that these cheese wasn’t spoiled, just hard because maybe it wasn’t wrapped quite so well, and that in any event she would never make any dish for us using an ingredient that could be harmful.

Of course.

And also, why waste perfectly good cheese that’s going to melt anyway. So if it isn’t perfect to eat cold, as is, it is perfectly fine for macaroni and cheese.

And it was. She made delicious macaroni and cheese.

My children are appalled if I use an ingredient that’s past its sell-by/expiration date. I feel the same way my mother did. I would never use an ingredient that is spoiled or harmful. But some of those expiration dates are meant more as a “use them soon because the flavor or texture won’t be perfect” than “do not eat this EVER!”

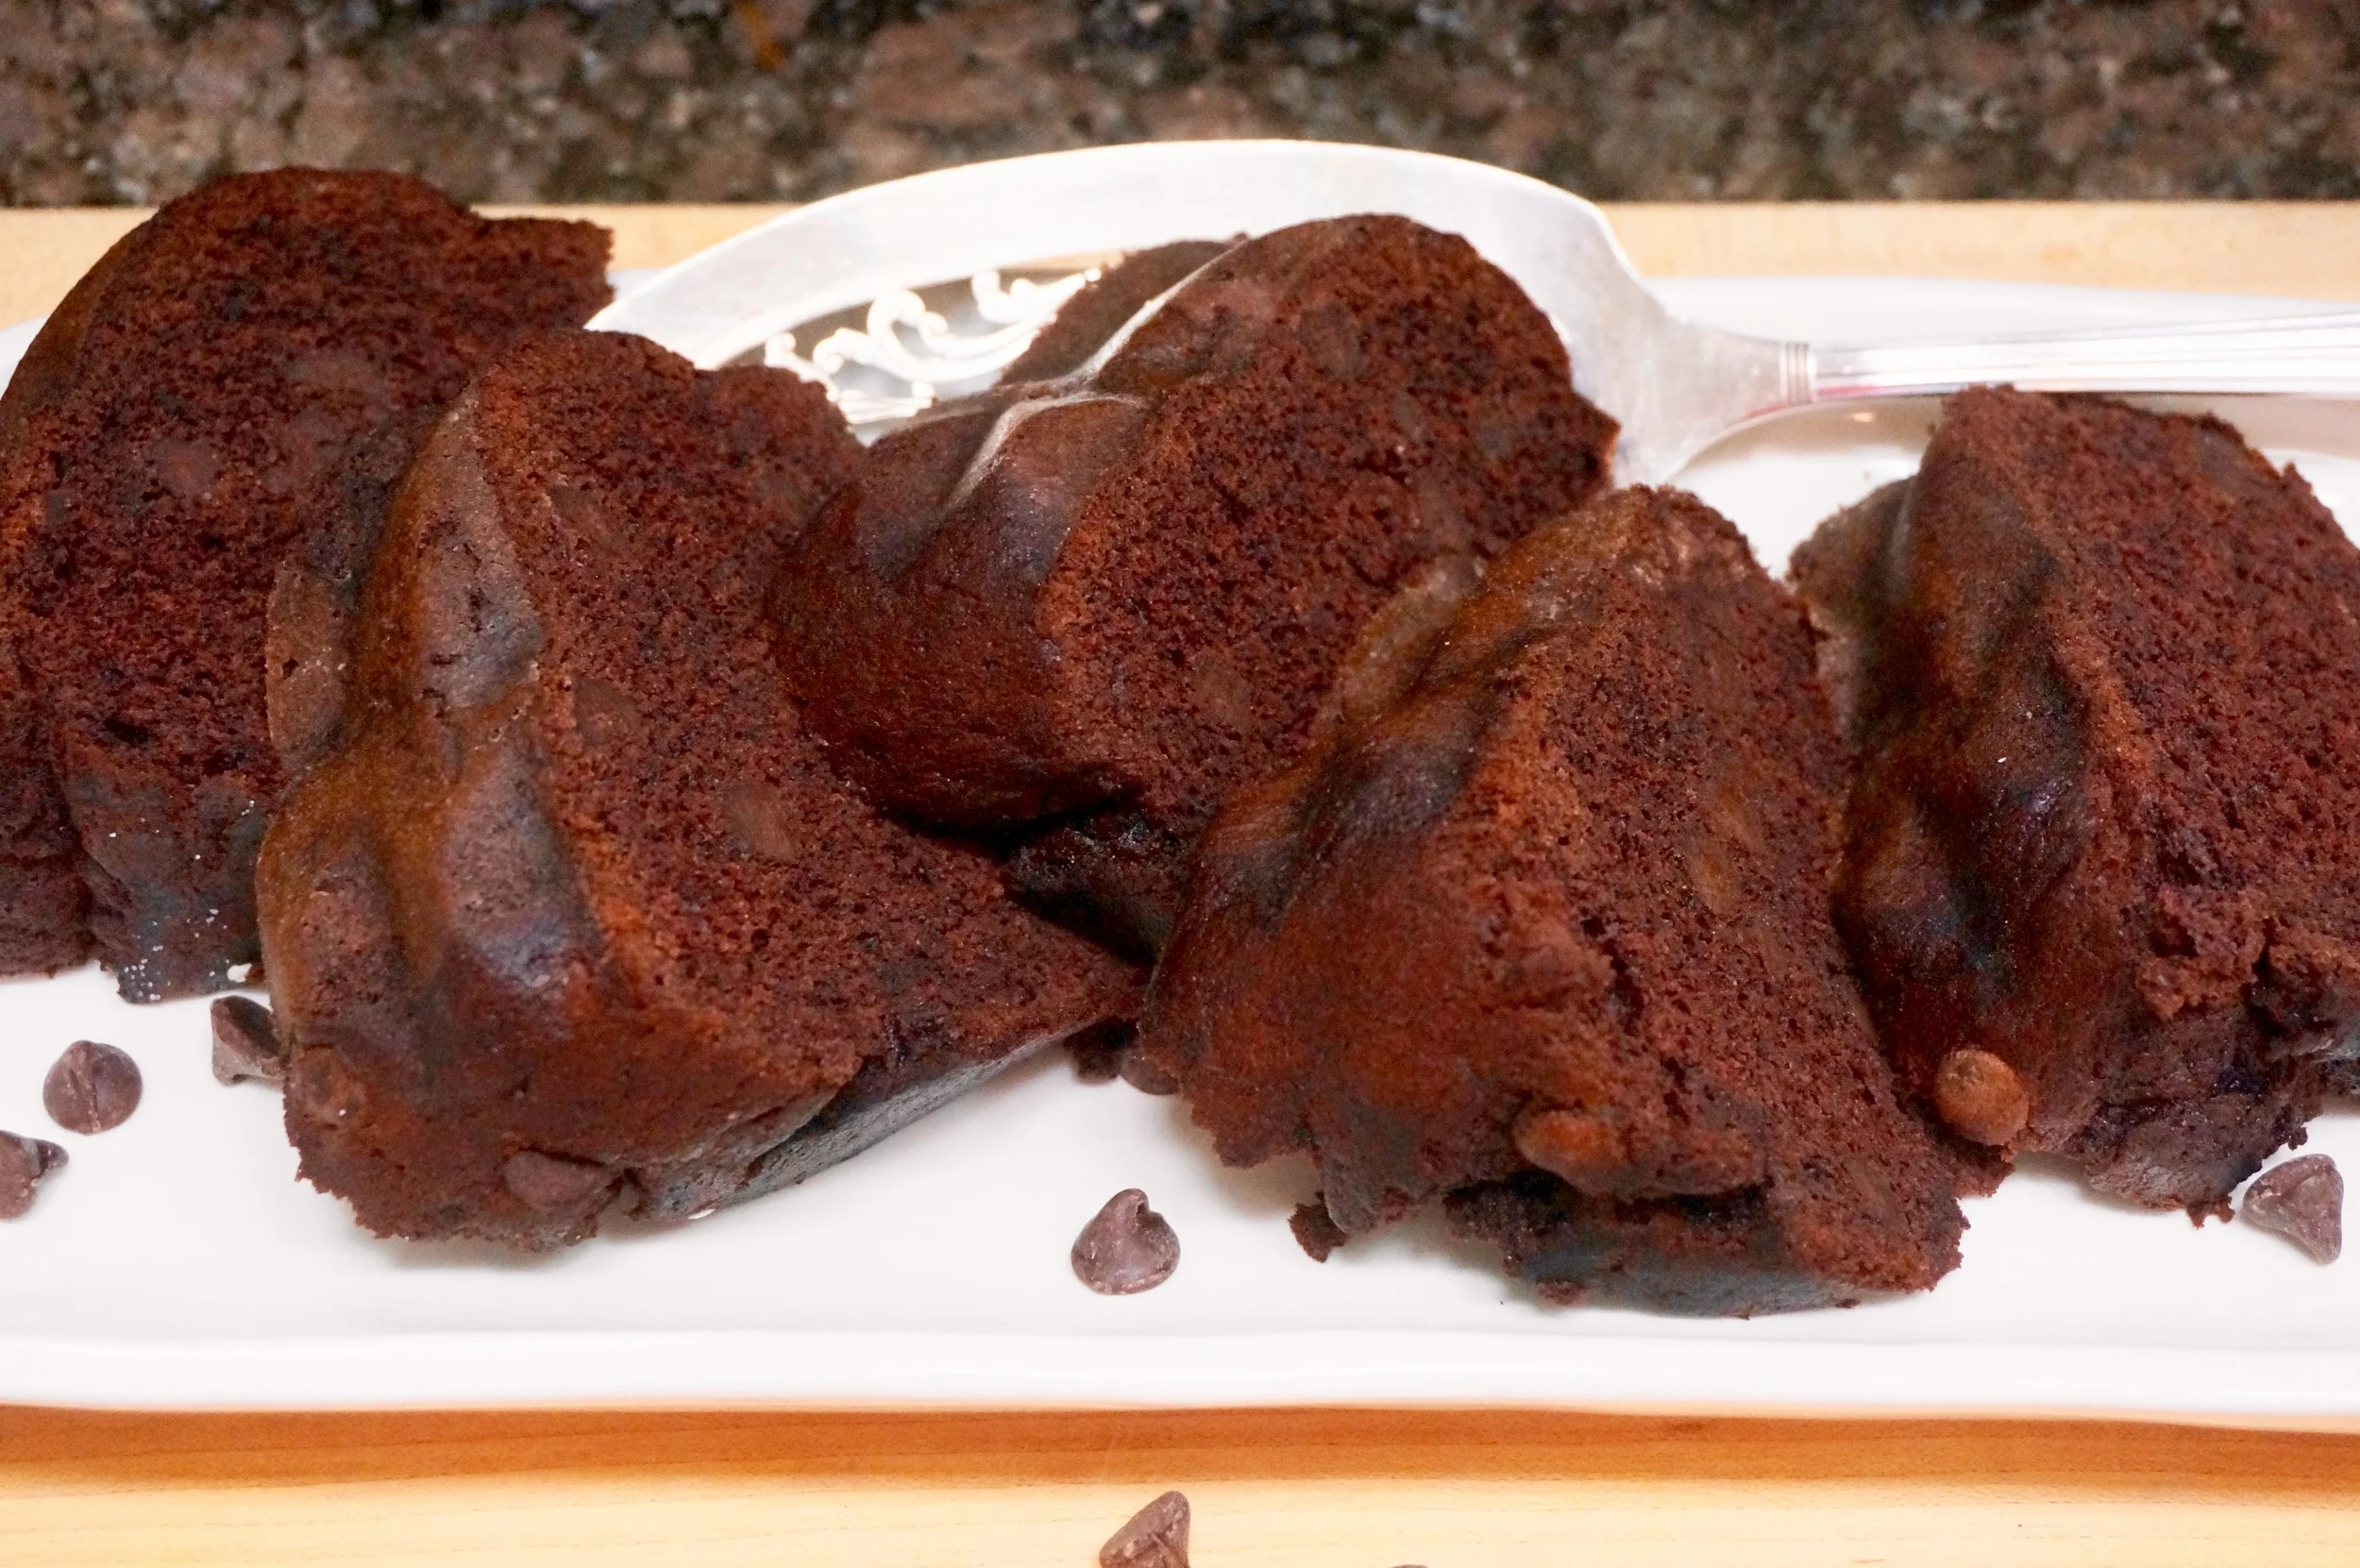
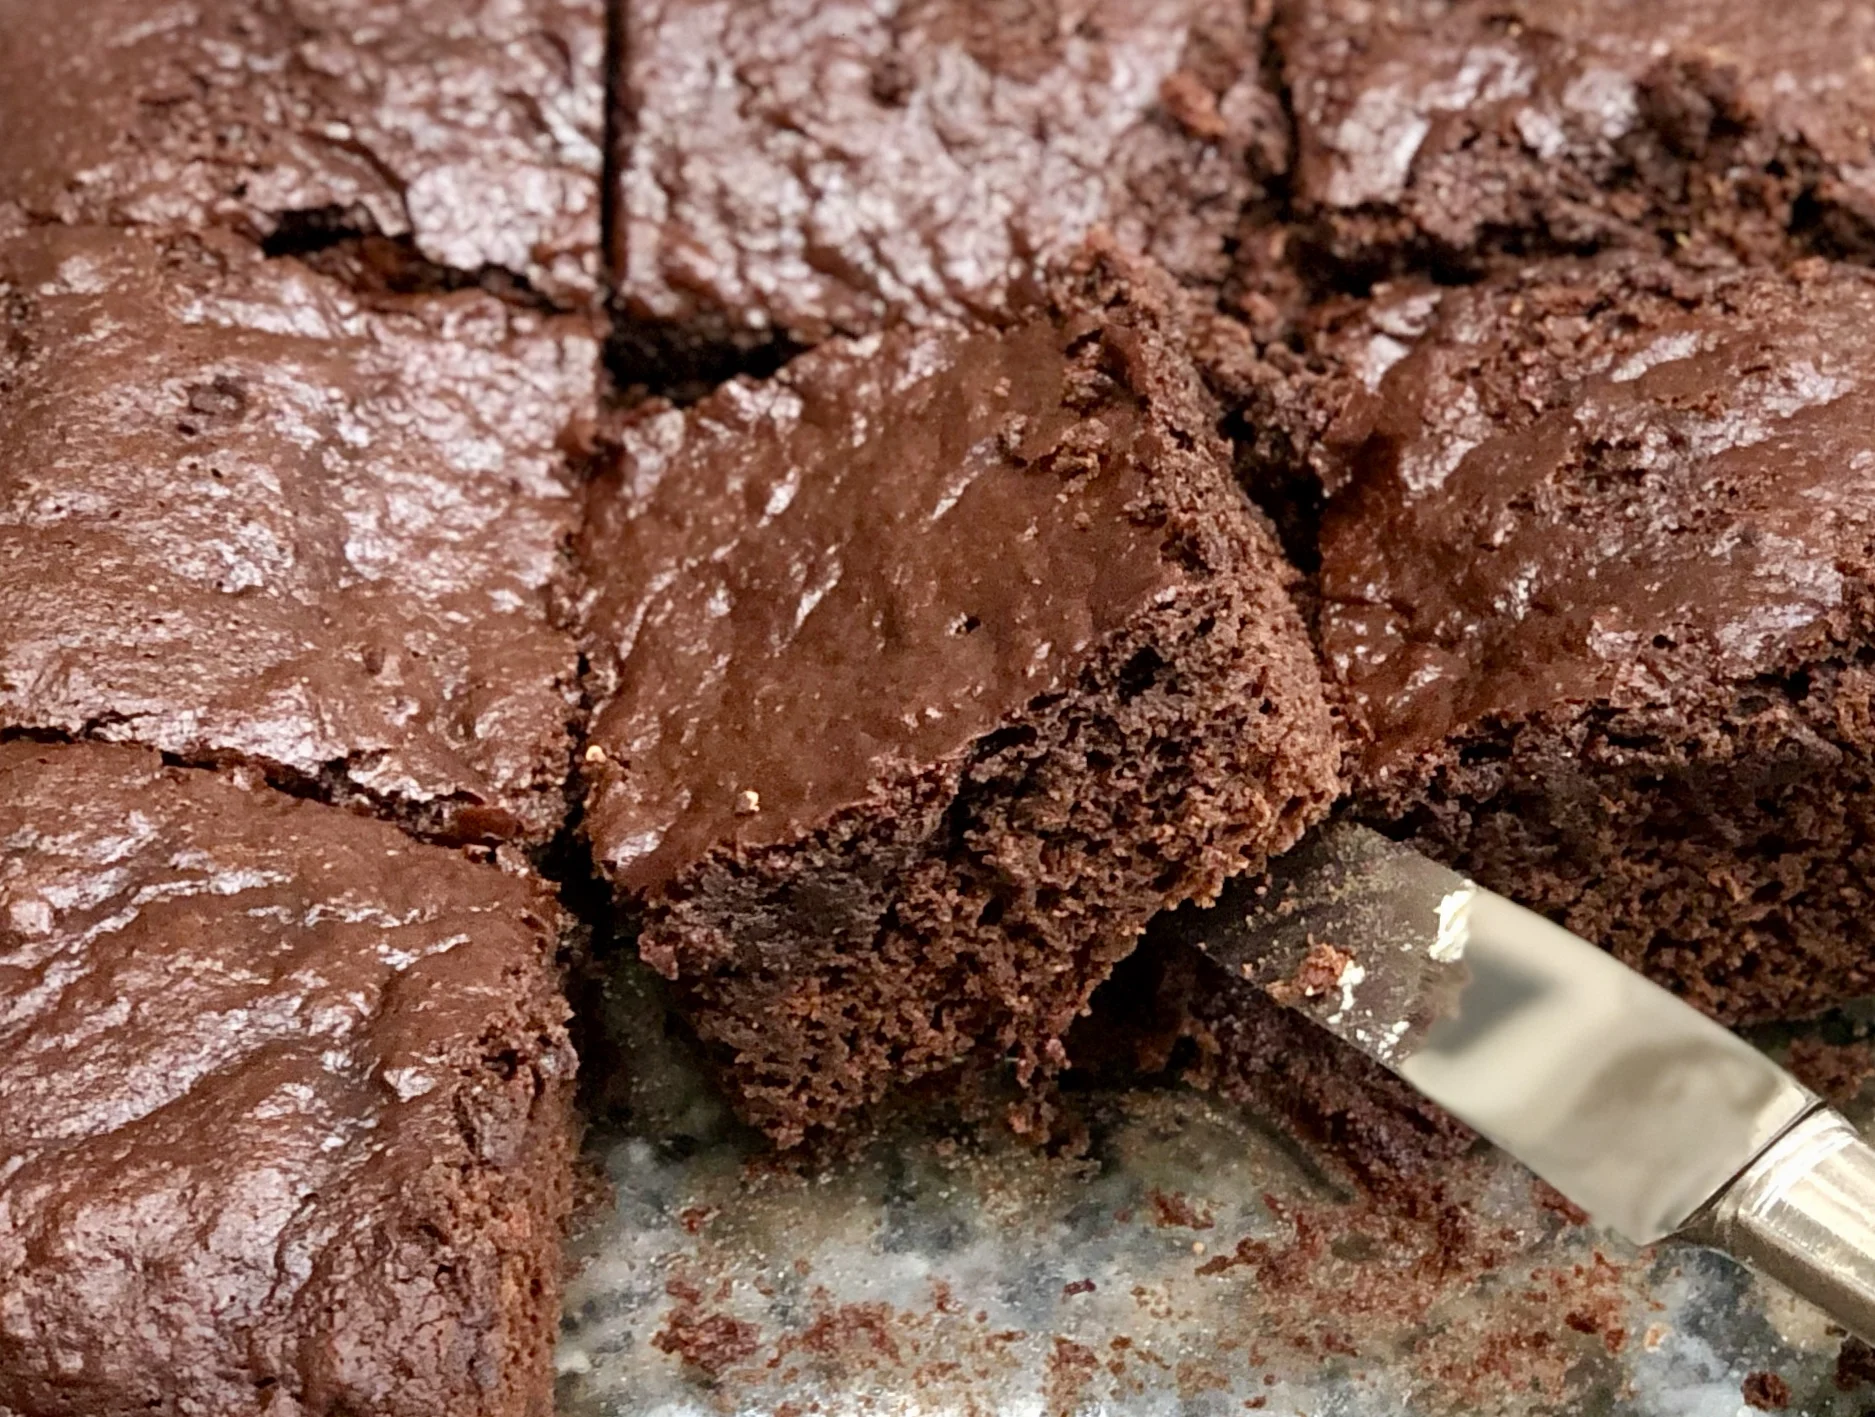
So recently, I noticed that in addition to some fresh bananas turned black-spotty, my snack packages of applesauce were a month beyond their expiration date. Rather than give the applesauce to my grandkids and have my daughters feel appalled, I used it in chocolate cake, in the place of eggs.

Not only was I able to use up a perfectly good ingredient, the cake was delicious and also a good vegan choice.

So there.

Chocolate-Banana-Applesauce Cake

  • 3 ounces semisweet chocolate

  • 1-1/3 cups all-purpose flour

  • 1/3 cup unsweetened cocoa powder

  • 1 teaspoon baking soda

  • 1 teaspoon salt

  • 2 medium ripe bananas

  • 1 cup sugar

  • 1/2 cup applesauce

  • 1/3 cup apple juice (or orange juice)

  • 1 teaspoon vanilla extract

Preheat the oven to 350 degrees. Lightly grease an 8”x8” cake pan. Melt the chocolate and set it aside to cool. In a bowl, whisk together the flour, cocoa powder, baking soda and salt. Set the flour mixture aside. Mash the bananas and place them in the bowl of an electric mixer (or use a hand mixer and bowl). Add the sugar and mix at medium speed for a minute, or until well blended. Add the applesauce, juice, vanilla extract and melted chocolate and beat for 1-2 minutes, or until thoroughly blended. Add the flour mixture and beat for 1-2 minutes, or until throughly blended. Spoon the batter into the prepared cake pan. Bake for 25-30 minutes or until a cake tester inserted into the center comes out clean.

Makes 9 servings

Valentine's Day Chocolate Fudge Brownies

fullsizeoutput_84cd.jpeg

I have told my husband not to buy me chocolate candy for Valentine's Day.

Sure, I love the thought, not to mention the taste (he knows how much I love buttercrunch!!!!!!).

But really, I need to NOT EAT candy for a variety of reasons including the number I see on the scale when I weigh myself each morning.

For Valentine's Day I am going to make brownies, which will be sufficient for the two of us to celebrate with a piece or two, then give the rest away to a friend of mine who loves sweets.

Then it will all be gone, we will have had a delicious, but calorie-limited Valentine's Day and that will be that until the next occasion.


Valentine's Day Chocolate Fudge BROWNIES

  • 3 ounces unsweetened chocolate
  • 1/3 cup butter
  • 2 large eggs
  • 1 cup sugar
  • 3/4 cup plus 2 tablespoons all-purpose flour
  • 3/4 teaspoon baking powder
  • 1/2 teaspoon salt
  • 1 teaspoon vanilla extract
  • 1/2 cup chopped nuts, optional

Preheat the oven to 350 degrees. Lightly grease an 8" square baking pan.  Melt the chocolate and butter together in the top part of a double boiler set over barely simmering water. When the ingredients have melted, blend them thoroughly and remove the pan from the heat. Combine the eggs and sugar in a large bowl and beat them 2-3 minutes or until the mixture is thick and pale. Mix the flour, baking powder and salt in a bowl and stir this mixture into the chocolate mixture. Stir in the vanilla extract and nuts, if used. Spoon the batter into the prepared pan. Bake for 30 minutes. Cool the brownies in the pan. Cut them into 16 squares.

Makes 16

Swiss Chocolate Almond Cookies

fullsizeoutput_86ef.jpeg

I know it's latke season and doughnut season. But in the larger world out there it's also cookie season.

Well, actually, for me it is always cookie season. When I was a kid my Mom baked cookies all the time and when we got home from school we had milk and cookies every day. That was the snack -- before the days of chips (potato, kale or otherwise in little bags) and frozen pizza.

My brothers taught me how to dunk.

So when cookie season comes around I feel nostalgic. Sure, I make the old family favorites. Fannies. Peanut butter cookies. Chocolate Chunk Grand Finale cookies

But occasionally I try something new. I'm not always happy with the results and most often I discard the recipe.

But these were wonderful. And also perfect for dunking.


Swiss Chocolate Almond Cookies

  • 4 ounces bittersweet chocolate, coarsely chopped
  • 3 tablespoons unsweetened cocoa powder
  • 1 teaspoon ground cinnamon
  • 1/2 teaspoon salt
  • 1/4 teaspoon ground cloves
  • 2 cups finely ground almonds (8 ounces)
  • 2 large egg whites, lightly beaten
  • 3/4 cup sugar plus 2 tablespoons sugar for rolling
  • 1 teaspoon vanilla extract (or 1/2 teaspoon orange extract)

In a food processor, pulse the chocolate until almost ground. Add the cocoa powder, cinnamon, salt and cloves and process on pulse to incorporate the ingredients until finely ground and well mixed. Place the mixture into a bowl, add the ground almonds and mix to blend the ingredients thoroughly.

In the bowl of an electric beater, beat the egg whites until soft peaks form. Gradually add the 3/4 cup sugar and beat until stiff peaks form. Fold in the extract and the chocolate-almond mixture.

Sprinkle a sheet of parchment paper with the 2 tablespoons sugar. Place the dough on top of the sugar. Place another piece of parchment paper on top. Roll or press the dough to a thickness of about 1/4 to 3/8 inch. Remove the top piece of parchment paper. Let the unbaked cookies air dry for at least 1-1/2 hours. 

Preheat the oven to 325 degrees. Line a cookie sheet with parchment paper. Cut out circles or shapes with a cookie cutter. Place the cut out cookies on the parchment paper, leaving room between each cookie for them to spread. Bake for 12-15 minutes. Let cookies cool on the sheet for 2-3 minutes. Transfer to a wire rack to cool completely.

Makes about 36 cookies


My Bat Mitzvah Chocolate Cake

fullsizeoutput_8490.jpeg

Today is the anniversary of my Bat Mitzvah. It took place a LONG time ago! In the 1950s to tell you the truth.

Back in the day Bat Mitzvahs were not such a thing. In fact, I was the first girl from our newly established synagogue to reach this momentous occasion.

I have to confess, our rabbi mentioned the notion when we first joined the synagogue and I told my parents I wanted to learn some Hebrew and prayers and do whatever I had to, not so much because I had any particular religious feelings, nor was it because I wanted a big party -- the big themed events we see today didn't exist back then -- but because my two older brothers had Bar Mitzvahs and I couldn't understand why a girl wouldn't be treated equally.

My mother always said that when I was born I came out a feminist.

Still am. (So was she.)

Girls are equal to boys, women to men. Let's not even contest that one.

Still, my brothers did have a Saturday Shabbat service Bar Mitzvah and I was only allowed to have one on Friday night. I was content with that, it was a start.

We had a small party at home. I was allowed to invite one friend, and of course my family was there -- aunts, uncles, cousins, including my cousin Leslie, who, to this day, is like a sister.

I remember my dress: white with red and black lines. 

I don't remember what my Mother made for food.

But I do remember dessert. Because I made it: a dark chocolate cake with fudge frosting.

I didn't keep the recipe. I don't actually know whose recipe I used. I just remember what it looked like and that it tasted fabulous and that I made the cake for my own Bat Mitzvah.

So today I celebrate with Chocolate Cake. This one is a riff on the famous Hershey Black Cake with a few changes to make it dairy-free, less sweet and more to my tastes (you can change the frosting to dairy using 12 tablespoons of butter in place of the coconut milk and coconut oil). 

This is a good cake for a festive occasion, even one's own Bat Mitzvah.

Black Chocolate Cake

  • 1 tablespoon lemon juice
  • water
  • 1-1/2 cups all-purpose flour
  • 1 cup unsweetened cocoa
  • 1-1/2 cups sugar
  • 2 teaspoons baking soda
  • 1 teaspoon baking powder
  • 1 teaspoon salt
  • 2 large eggs
  • 1 cup strong, cooled coffee
  • 1/2 cup vegetable oil
  • 2 teaspoons vanilla extract
  • frosting

Preheat the oven to 350 degrees. Lightly grease 3 9-inch cake pans. Pour the lemon juice into a liquid (pitcher) measuring cup and add enough water to measure one cup. Set aside. Place the flour, cocoa, sugar, baking soda, baking powder and salt in the bowl of an electric mixer and mix at low speed to combine the ingredients. Add the eggs, the lemon-water, coffee, vegetable oil and vanilla extract and beat the ingredients at medium speed for 2-3 minutes, scraping down the sides of the bowl occasionally, or until well combined and smooth. Pour equal amounts of the batter into the prepared pans. Bake for 22-25 minutes or until a cake tester inserted into the center comes out clean. Let cool for 10 minutes. Invert the layers onto a cake rack to cool completely. Frost and serve.

Makes 8-10 servings

Frosting

  • 1-1/2 cups dairy-free semisweet chocolate chips
  • 6 tablespoons coconut milk
  • 6 tablespoons coconut oil
  • 1-1/2 teaspoons vanilla extract
  • 1/4 cup confectioners’ sugar
  • pinch of salt

Place the chocolate chips, coconut milk and coconut oil in a saucepan and place over medium heat. Cook, stirring, for 2-3 minutes or until the chips have melted and the mixture is smooth and uniform. Remove the pan from the heat and whisk in the vanilla extract, confectioners’ sugar and salt. Let cool, whisking the ingredients occasionally. Refrigerate until firm enough to be spreadable.


Corn Syrup Free Butter Crunch

I once wrote that if doomsday was coming and there might not be a tomorrow, I would want some butter crunch before it all ended so I could at least die happy.

That's still my choice. I don't think there's a better candy, that gives that same salty-sweet combo better than butter crunch.

I love my original recipe, but recently someone asked me if I had a recipe that didn't include corn syrup. 

I didn't at the time, but do now.

Here it is: crunchy, salty-sweet and tender chocolate on top.

Don't stint on the good stuff. This recipe is too good for cheap chocolate.

Valentine's Day, mishloach manot for Purim, doomsday, whatever. This is a good choice in (or for) any event.


Corn Syrup Free Butter Crunch

  • 1 cup unsalted butter
  • 3/4 cup sugar
  • 1/4 teaspoon salt
  • 1/4 teaspoon vanilla extract
  • 1 cup chopped toasted almonds
  • 1 cup semisweet chocolate, chopped

Lightly butter a small sheet cake pan (about 10”x7” or a portion of a larger pan). Place the butter, sugar and salt into a deep saucepan. Bring the mixture to a boil, then cook over medium heat, stirring constantly with a wooden spoon until the mixture starts to bubble. Continue to cook, stirring occasionally, until the mixture is golden brown (about 7-8 minutes) (or until a candy thermometer reads 280 degrees). Quickly stir in the vanilla and nuts. Pour the mixture into the prepared pan and spread it out evenly to make a layer about 1/8”-1/4” thick. Immediately sprinkle the chocolate on top. Let it melt briefly, then use a spatula or the back of a large spoon to spread the chocolate evenly over the candy. Keep spreading until the chocolate is completely melted and smooth. Sprinkle the nuts on top and press them in lightly. Let cool until the chocolate is firm and set, at least 3 hours. Break into pieces.

Makes about 1 pound, enough for one person, or two if you want to share


Cream Puff Swans on the Lake

_DSC1118.jpg
IMG_4392.jpg

I love that my grandchildren love to cook and absolutely love that they like a challenge. My eldest makes perfectly shaped butter cookies; the next eldest recently cooked a vegetarian rice and beans dinner for her siblings. One of them once helped me bake a flourless chocolate roll for Passover.

Recently, my 9-year old grand daughter said she was bored and wanted to cook something really delicious, very pretty and also "hard." 

Be still my heart!

What better choice than cream puffs made into the shape of swans?!

I have taught baking classes on this particular recipe and have seen fully committed grown ups nervous about getting it right.

But off we went into the kitchen.

There are two really difficult challenges to making swan shape cream puffs. The first thing is mixing the eggs into the butter-flour dough, which is very stiff and therefore not easy to incorporate the liquidy eggs. Fortunately, this kid is athletic, with the kind of strong arms that come with spending hours doing chin-ups and stuff at the playground.

No problem! Stiff dough/eggs, perfectly mixed and blended. Check!

The second hard part is piping out small slivers of dough for the necks. There were lots of not-so-good ones (we just ate these as snacks after they were baked) but she did manage to create enough for us to use in the final product.

After that it was easy: we made some vanilla pudding but I told her that some other time you could also fill the swan bodies with whipped cream, sorbet or ice cream.

She said it would be really nice for the swans to have something to swim on.

Remember that old piano piece, Swans on the Lake? The music that so many of us learned as children taking our first year or so of piano lessons?

Well of course, there had to be a lake. We melted some chocolate. So easy. So lovely to look at when we put the swans down on each serving plate.

Wouldn't this be a beautiful finale to a lovely dinner for New Year's or someone's birthday or other special occasion?


SWAN PUFFS

  • 1 cup all purpose flour
  • 3/4 teaspoon salt
  • 3/4 teaspoon sugar
  • 1 cup water
  • 1/4 pound unsalted butter, cut into chunks
  • 4 large eggs
  • whipped cream, ice cream, sorbet or vanilla pudding
  • melted chocolate or chocolate sauce


Preheat the oven to 425 degrees. Cover two baking sheets with parchment paper. Whisk the flour, salt and sugar together in a bowl and set aside. Heat the water and butter in a medium size saucepan. Bring the mixture to a boil over medium heat. When the water comes to a boil, raise the heat and add the flour mixture, all at once. Stir vigorously with a wooden spoon until the mixture is blended and begins to come away from the sides of the pan. Remove the pan from the heat and let it cool for 2-3 minutes. Add the eggs, one at a time, blending well after each addition. Spoon 12-18 mounds of the dough onto one of the baking sheets, shaping them into ovals with your fingers, and leaving some space between each oval for the dough to spread. Place the sheet in the oven and bake for 18-20 minutes. Reduce the heat to 375 degrees and bake for another 12-18 minutes or until puffed and golden. Remove from the oven and let cool. 

To make the necks, preheat the oven to 400 degrees. Spoon some of the dough into a pastry bag fitted with a narrow-holed tip. Pipe the dough into "S" shapes about 2-inches long onto the second baking sheet. Bake the necks for about 15 minutes or until golden brown. 

To assemble: Split the swan puffs in half lengthwise using a serrated knife. Cut the top portion in half lengthwise to use as wings. Spoon some whipped cream, ice cream, sorbet or pudding into the swan bottoms. Arrange the split top wings on top of the filling. Spoon some melted chocolate or chocolate sauce onto dessert plates. Place the filled swan bottoms on top of the chocolate. Insert the necks into the front. If desired, use a toothpick to dip into some meted chocolate and make a dot as an eye on the top of the neck.

Makes 12-18


Chocolate Challah Bread Pudding

I usually don't have leftover challah, even when I make my giant size recipe

But for Yom Kippur I make TWO giant size challahs, one for the pre-fast dinner and one for break-the-fast.

So, for the kids, there's usually a hunk or two left for French toast.

But this year I had bits and pieces left over: crusts from the pieces that went into the French toast (for the kids who don't like crust). And a few pieces of "insides" left from the grownups who picked off some of the crust.

I hate throwing food away, especially something as delicious as challah.

Waste not, want not.

I put all the leftover pieces into a bowl and made it into chocolate bread pudding.

You can't go wrong mixing challah, milk, sugar and chocolate.


Chocolate Challah Pudding

  • 6 ounces semisweet chocolate
  • 12 ounces leftover challah,including crusts, (about 7-8 loosely packed
  •                                                                         cups of small pieces)
  • 3 cups whole or 2% milk
  • 3 large eggs
  • 1-1/4 cups sugar
  • 1-1/2 teaspoons pure vanilla extract

Butter a large, deep baking dish or (8-cup) souffle dish. Preheat the oven to 350 degrees. Melt the chocolate and set it aside to cool. Break the bread into pieces into a bowl. Pour the milk over the bread and let it soak for 6-8 minutes, stirring occasionally so all pieces of bread absorb some milk. In the bowl of an electric mixer set on medium speed, beat the eggs with the sugar for 4-5 minutes or until the mixture is thick and pale. Stir in the vanilla extract. Stir in the melted chocolate. Mix in the bread-milk mixture. Pour the bread mixture into the prepared baking dish. Place the dish inside a larger pan. Add enough water to the outer pan to come up one-inch of the sides of the baking dish. Bake for 50-55 minutes. Remove from the oven and let cool slightly.

Makes 8 servings


Banana Chocolate Cake

My grandson wanted to bake a cake with me. I think he actually liked the licking-out-the-bowl part the best and I actually was most thrilled that he came up with the idea about combining banana bread and chocolate cake.

I looked through my recipes for endless variations of banana bread. And chocolate cake. I fooled around with them, combining this and that from several of the recipes and came up with the one here. It's dairy-free, so his sister, my 3-1/2 year-old grand daughter, could eat some too. And we added some chocolate chips, just for good measure.

He did like the licking-out-the-bowl thing.

He also told me the cake was too dry. But I think that was because the temperature indicator on my oven has been cleaned so often for so many years that the numbers have disappeared and I can only estimate the proper cooking temperature. I do have an oven thermometer but that also needs "updating." so I don't know if the cake baked at exactly the right temperature.

Also, I forgot to set the timer.

Anyway, everyone else declared the cake delicious. Even my grandson said it was and would want it again when I finally decide what oven I want to get to replace the old one.

So here it is, the creation.

Banana Cocoa Chocolate Chip Cake

  • 1-3/4 cups flour
  • 3/4 cup unsweetened cocoa
  • 1 teaspoon salt
  • 2 teaspoons cinnamon
  • 2 teaspoons baking soda
  • 1 cup vegetable shortening
  • 1 cup sugar
  • 4 large very ripe bananas, mashed
  • 4 eggs, slightly beaten
  • 2 teaspoons vanilla extract
  • 1 cup chocolate chips

Preheat the oven to 350 degrees. Grease and flour a 10-inch (8-cup) bundt pan. Mix the flour, cocoa, salt, cinnamon and baking soda together in a bowl. In the bowl of an electric mixer beat the shortening and sugar at medium speed for 2-3 minutes or until well blended. Add the bananas and blend them in thoroughly. Add the eggs and vanilla extract and blend them in thoroughly. Add the flour mixture and beat until batter is well blended. Fold in the chocolate chips. Pour into the prepared pan and bake for 60-70 minutes or until a cake tester inserted into the center comes out clean. Remove from the oven and let cool in the pan for 10 minutes. Remove to a cake rack to cool completely.

Makes 16-18 servings


Rich Tangerine-Chili Chocolate Truffles

I love the tradition of mishloach manot -- giving away food to family, friends and even strangers during Purim. Besides the actual mitzvah of giving, it is an opportunity to do what I love: cook a lot and give the food away. It's like having the thrill of eating -- without the calories.

If you make edible gifts for Purim or as a host/hostess gift when you are invited to someone's house or for any other occasion, you might want to try truffles. They take some time but are actually quite easy to make and I guarantee they're rich and tasty and anyone would be thrilled to get them.

Check out the photo and you'll notice that I don't make my truffles perfectly rounded. Candy truffles get their name because they look like the the underground fungi, the ones that are highly fragrant and are dark, small and irregularly shaped. So the sloppy look is actually more authentic.

I made this recipe using tangerine juice and cayenne pepper. I had once tasted tangerine-chili chocolates and thought they were amazingly wonderful. The extra bit of heat pops the citrus and chocolate into one harmonious whole.

Yes, orange juice and peel are fine, though not as flavorful. And you can leave out the cayenne pepper, though I think the truffles are better with the heat.

Pack these in small cardboard or wooden boxes or small cellophane bags (you can get them at most craft stores) and you have a beautiful homemade gift for any occasion.

Or treat yourself and your family. They'll be happy.

Tangerine-Chili Chocolate Truffles

  • 12 ounces semisweet or bittersweet chocolate
  • 1 cup heavy cream
  • 2 tablespoons tangerine juice
  • 6 tablespoons butter at room temperature
  • 2 teaspoons finely grated fresh tangerine peel
  • 1/8 teaspoon cayenne pepper, approximately
  • 1/2 cup unsweetened cocoa powder, sprinkles, toasted coconut, ground nuts, etc. (approximately)

Chop the chocolate in a food processor. Heat the cream over medium heat until it is hot and bubbles form around the edges of the pan. With the processor on, pour in the cream through the feed tube and process until smooth and well blended with the chocolate (you may have to scrape the sides of the bowl once or twice). Refrigerate the mixture for 30 minutes (in the processor bowl). Add the juice, butter, tangerine peel and cayenne pepper and blend them in thoroughly. Spoon the mixture into a bowl and refrigerate for at least one hour or until the mixture has firmed enough to form a soft “dough.” Take small pieces of the dough and shape into small balls (they don’t have to be perfectly rounded) (I do this wearing disposable gloves). Place the balls on waxed paper or aluminum foil on cookie sheets. Refrigerate until firm, at least 30 minutes. Roll the balls in cocoa, sprinkles, etc.

 Makes about 3 dozen. 


The Birthday Dinner Dilemma

DSC09140.jpg
static1.squarespace.jpg

It's my daughter Gillian's birthday today. A round numbered one. And she asked if, instead of going out to dinner at some fancy shmancy joint to celebrate, whether I would make a special dinner at home.

Of course!

With the fancy shmancy china and silverware and different size wine glasses for different wines for different courses.

Of course!

So, okay, I have the china and silverware and wine glasses. All I have to do there is make sure I have candles for the candlesticks, iron the napkins, fill the salt cellars, set the table and so on. Ed will take care of the wine.

It's all good.

BUT WHAT SHOULD I COOK?

Something new and glamorous? Fancy shmancy?

Or old favorites like Pearly Meatballs? Fried Chicken Wings? Sticky Spicy Chicken Wings? with pre-dinner cocktails.

Should I make a soup? Like Beet Soup with Orange and Mint (even the name sounds fancy doesn't it?).

For the main course I'm thinking maybe lamb. Everyone in the family eats that. But she really does like turkey. Unfortunately turkey is not the universal family favorite, so maybe no? Plus -- Gillian is our family carver, so could I really ask her to do all that slicing and deboning for her birthday dinner?

Another dilemma is that Gillian is not such a big dessert person. Or at least what people consider the usual kinds of dessert. This dessert thing would be easy if the birthday person was my son-in-law Greg. He likes chocolate cake.

Ed would always welcome chef Raymond Oliver's Normandy Ice Cream (coffee with Grand Marnier).

For me, birthday dessert is always apple pie

We are celebrating in a few weeks, so I have some time to finalize the menu plus make sure I buy those candles. 

If anyone has suggestions -- I am all ears.

In the meantime, should I also make some candy? Like chocolate dipped dried fruit?

Chocolate Dipped Dried Fruit

  • 2-1/2 ounces semisweet chocolate
  • 1/2 ounce unsweetened chocolate
  • 2 tablespoons unsalted butter or coconut oil
  • 2 tablespoons orange-flavored brandy or rum
  • 50 pieces (approximately) dried fruit such as crystallized ginger, apricot halves, candied orange peel (about 6 ounces)

Melt the semisweet chocolate, unsweetened chocolate and butter in the top part of a double boiler over barely simmering water. Let the ingredients melt, remove the top part of the pan from the heat, pour in the brandy and stir to make a smooth, uniform mixture. Dip each piece of fruit in the chocolate mixture, shake off the excess and place on waxed paper or parchment paper to dry.

Makes approximately 50 pieces