Ruth Bader Ginger Ice Cream

FA460574-0215-4ED0-9A95-E215D3E28148_1_201_a.jpeg

Ok Ben & Jerry’s. You didn’t do it, so I did.

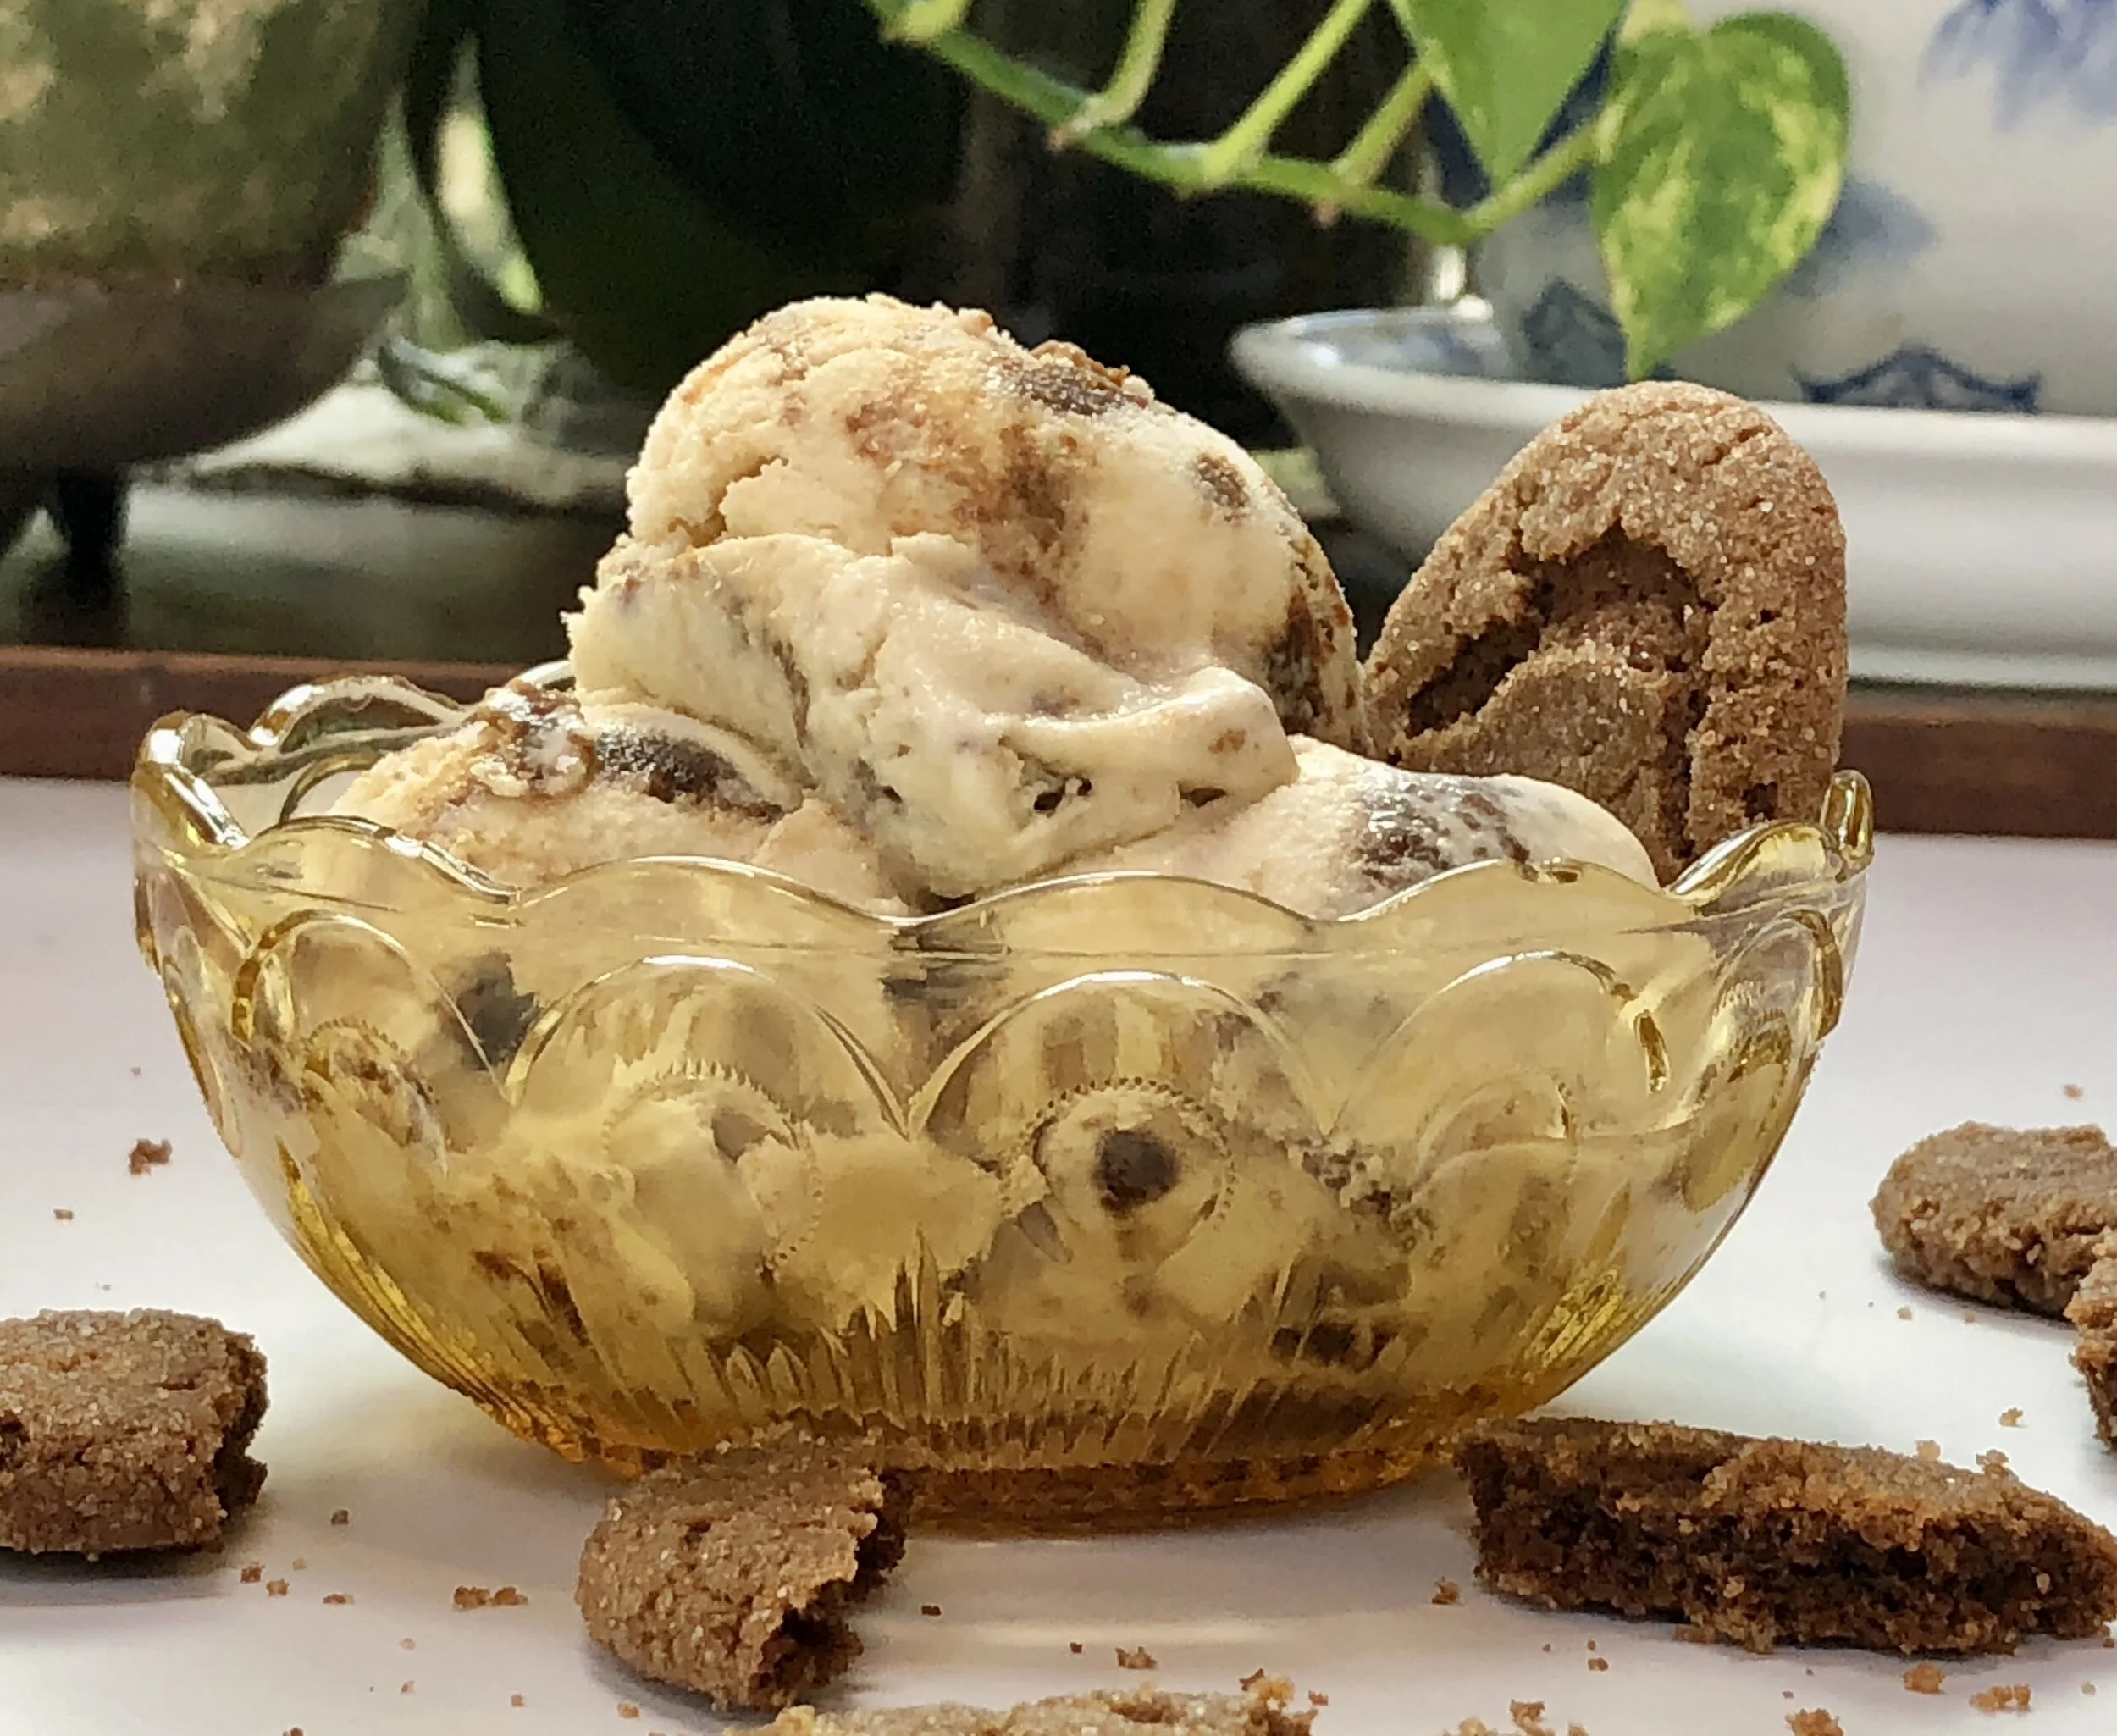
I created Ruth Bader Ginger ice cream.

It’s a brown-sugar based vanilla-ey ice cream loaded with vibrant morsels of crystallized ginger and chewy, sugar coated gingersnap cookies. I used fresh, homemade gingersnap cookies (my recipe includes dark molasses plus cinnamon, nutmeg, cloves and ginger and the cookies are crusted with sugar). But I supposed packaged cookies would be fine.

The notorious RBG will be missed. But you don’t have to miss out on the wonderful ice cream.

Here’s the recipe:

Ruth Bader Ginger Ice Cream

  • 4 cups half and half cream

  • 3/4 cup finely chopped crystallized ginger 

  • 1/2 cup brown sugar

  • 1/4 teaspoon salt

  • 4 large egg yolks

  • 1-1/2 teaspoons vanilla extract

  • 1 cup crumbled gingersnap cookies

Heat 2 cups of the cream with the ginger in a saucepan over medium heat until bubbles appear around the edges of the pan. In the bowl of an electric mixer, beat the brown sugar, salt and egg yolks at medium speed for 3-5 minutes or until light and thick. Gradually add the heated cream and mix the ingredients. Return the mixture to the saucepan and cook over medium heat, stirring constantly, for 5-6 minutes or until thickened enough to coat the back of a spoon. Pour in the remaining cream and blend it in thoroughly. Pour into a container and refrigerate until cold. Stir in the vanilla extract. Freeze in an ice cream freezer according to manufacturer’s directions. When the mixture is almost completely frozen, add the cookie pieces, stir them in and freeze completely.

Makes about 5 cups

Green Tomato, Grape and Apple Chutney

fullsizeoutput_ae20.jpeg

By some extraordinary piece of luck, every year a tomato plant that I never planted pops up and makes its appearance in my garden.

The plant grows and grows into a jungle with stalks that I hold up with a multitude of stakes and ties. It reminds me of Jack and the Beanstalk (am I dating myself with that one?). And the stalks are loaded, absolutely loaded, with what becomes the sweetest, most delicious cherry tomatoes ever.

I am guessing that the thing grows from a seed or two that must have planted itself from either some other plant somewhere (but not my garden because I don’t have other plants with this variety of tomato) or maybe from the remains of some outdoor patio lunch or dinner at which I served that kind of tomato.

Whatever the reason, the plant comes back every year in the same place, just as thick and fecund as ever.

Nature is glorious.

But of course, after a while the cold weather comes and dozens of tomatoes are still growing and I have to harvest them before the frost. They’re green of course, so, what to do?

In past years I’ve breaded and fried the small green tomatoes. These glorious tidbits are crunchy outside and soft inside and when you bite into them you get a spurt of fresh, tart tomato juice. They are really good as hors d’oeuvre.

I’ve also used the tomatoes to make chutney. I cooked this new version recently, because I had some apples and grapes on hand.

We love chutney as a side relish with roasted meat and chicken. I also serve it on crackers spread with a bit of cream cheese and have used a thin layer on top of cheese to make a super delicious and unusual grilled cheese sandwich.

Green Tomato, Grape and Apple Chutney

  • 2 cups green cherry tomatoes, halved (or use chopped green tomatoes)

  • 2 cups seedless grapes

  • 1 cup raisins

  • 2 apples, peeled, cored and diced

  • 2 medium yellow onions, finely chopped

  • 3 large cloves of garlic, finely chopped

  • 1 tablespoon chopped fresh ginger

  • 1 cup apple cider vinegar

  • 1 cup brown sugar

  • 1/2 cup water

  • 1 teaspoon kosher salt

  • 2 dried chili peppers (or one small chopped fresh chili pepper)

  • 2 teaspoons mustard seeds

  • 1/2 teaspoon ground coriander


Place the tomatoes, grapes, raisins, apples, onions, garlic, ginger, vinegar, brown sugar, water, salt, chili peppers, mustard seed and coriander in a large saucepan. Bring to a boil over high heat. Reduce the heat to a simmer and cook for 2-1/2 to 3 hours or until very thick.

 Makes about one quart

Quinoa, Turkey and Veggie Stuffed Peppers

fullsizeoutput_b930.jpeg

My grandma made stuffed peppers for Sukkot. Unfortunately they weren’t my favorite dish because bell peppers and my stomach don’t get along, even when I was a kid.

But I did love what she put on the insides. It was sort of a Turkish-style filling. The family wasn’t Turkish, they were from Romania, which was part of the Ottoman Empire when she was a girl, and a lot of the food she made was influenced by the fabulous cuisine of Turkey.

I realized later in life that using red, orange and yellow peppers made all the difference to my digestive system. They are much easier going down than the green ones my grandma always used! So, I’ve made and enjoyed her recipe from time to time over the years.

But this year I decided on a whole new stuffing based on quinoa instead of rice. It’s nothing like grandma’s but is very tasty and it reminds me of her anyway.

Veggie and Quinoa Stuffed Peppers

  • 4 large bell peppers

  • 1/4 cup quinoa

  • 1/2 cup chicken or vegetable stock or water

  • 2 tablespoons olive oil

  • 2 chopped carrots

  • 1 medium onion, chopped

  • 1 large clove garlic, chopped

  • 1 cup ground veal, beef or turkey

  • 2 packed cups chopped spinach

  • 1 cup corn kernels

  • 2 large eggs

  • 2 teaspoons chopped fresh thyme

  • Salt and freshly ground black pepper to taste


Preheat the oven to 350 degrees. Cut the top of the peppers to remove about 1/2-inch from the top. Reserve the caps. Reach inside the peppers and remove the stringy flesh and the seeds. Place the peppers open side up in a large pot. Fill the peppers with water, then carefully fill the pot with water to cover the peppers. Bring the water to a boil over high heat. Cover the pan. Reduce the heat to medium. Cook for 3-4 minutes. Remove the peppers with a slotted spoon and let cool. Place the quinoa and stock in a saucepan, bring to a boil over high heat, reduce the heat to low, cover the pan and cook for about 15 minutes or until all the liquid has been absorbed and the quinoa is fluffy. Set aside. Heat the olive oil in a sauté pan over medium heat. Add the carrots, onion and garlic and cook for 3-4 minutes, to soften them slightly. Add the veal and spinach and cook, breaking the meat into smaller pieces, for 3-4 minutes or until no longer pink. Remove the pan from the heat. Stir in the corn and quinoa and stir to distribute the ingredients evenly. Mix in the eggs, thyme and salt and pepper to taste. Spoon equal amounts of the mixture inside the peppers. Cover with aluminum foil and bake for 25 minutes. Remove the cover and bake for another 10-15 minutes or until the peppers are tender.

Makes 4

Greens with Figs and Roasted Hazelnuts

fullsizeoutput_b2cd.jpeg

I find it incredibly sad that Ed and I will not be able to host our annual Break-the-Fast. Our group has been gathering together for what seems like forever, and unlike all the other holidays which we celebrate with family, our Yom Kippur break-the-fast included friends from our synagogue and community, people who got together, just for this occasion.

I can’t even remember when we started.

Decades ago.

Not everyone who came had fasted, but we had all done something — skipped breakfast or not had carbs or not had coffee — that reminded us to be mindful about the joy and meaning behind celebrating the new year as well as looking back on what had happened the year before, who we needed to be better to, what we needed to be better at. The Break-the-fast marked a real beginning.

But now we can’t begin because the end of what has brought us to this place doesn’t seem anywhere in sight.

Virtual break-the-fast just doesn’t cut it for me.

I will miss the food too. Our meal is always vegetarian/dairy. No fish because my daughter is allergic. Our must-haves have always been mujadarah, eggplant-mashed potato gratin, my friend Susan’s kugel, a giant challah. And much more, with some changes over the years.

Dessert of course.

But this year it’s just the two of us, so dinner will be salad and roasted salmon.

But ——— even with all the trials and tribulations of the past year as well as the health concerns and social unrest that continue into 5781, I try to be grateful. For my family, friends, my life.

As for food? It will be different this one year. Fortunately, fresh figs are now available! (But only for a short time — one of those get-them-while-you-can items.) Ed and I both love them and I’ve already made several recipes using both green and black figs.

But this salad is the fig dish I’ll be serving post Yom Kippur. It’s easy, festive enough for a holiday meal and easy on the stomach after not eating for a while.

Greens with Figs and Roasted Hazelnuts

  • 6 fresh figs

  • 2 tablespoons olive oil plus extra for coating the figs

  • 3 tablespoons coarsely chopped hazelnuts

  • 3 packed cups mixed soft greens such as spinach, frisee, Bibb lettuce, washed and dried

  • 2-3 teaspoons white wine vinegar

  • salt and freshly ground black pepper

  • Parmesan cheese

Preheat an outdoor grill or oven broiler. Brush the figs with a thin film of olive oil and cut them in half. Place them, flesh side down, on a parchment lined baking sheet. Broil for about 5 minutes or until lightly browned. Remove the figs and set them aside. OR: grill them on an outdoor grill. Place the hazelnuts on the baking sheet and broil them for a minute or two to toast them lightly (or bake in a preheated 400 degree oven for 5-6 minutes). Remove the nuts and set aside. Place the greens in a bowl. Pour in the 2 tablespoons olive oil and toss to coat the leaves. Add 2 teaspoons wine vinegar and toss, taste and add the additional vinegar if desired. Add the figs and nuts, toss, taste and add salt and pepper to taste. Grate or shave Parmesan cheese over the greens and serve.

Makes 2 servings


Beet Salad with Pepitas

fullsizeoutput_b38f.jpeg

Lucky me!

My entire Rosh Hashanah celebration has changed for the better. I thought it would just be Ed and me, attending Zoom services and sharing a meal for two.

But my kids and grandkids are coming too! We will watch outdoors on the patio. And be together —- sort of — for a meal! Each family will have a separate place to eat.

I can’t tell you how thrilled I am, even though it won’t be normal and we can’t hug and kiss. But it’s something. And I am grateful.

Instead of the chicken dish I was planning to make, it’s going to be food for a family, not just the two of us: brisket (I was finally able to get one) and a turkey breast plus several sides, including this beet salad, which I can make in advance and scatter with seeds at the last minute.

This is better than the original plan. For sure.

Beet Salad with Pepitas

  • 3 large beets, trimmed

  • 3 scallions, chopped (or one large shallot or 1/3-1/2 cup chopped red onion)

  • 2 tablespoons olive oil

  • 3 tablespoons orange juice

  • 2 tablespoons chopped fresh mint

  • 1 teaspoon grated fresh orange peel

  • salt to taste

  • 2 tablespoons toasted pepitas

Preheat the oven to 425 degrees. Scrub the beets and wrap them tightly in aluminum foil. Roast until tender, about 45-75 minutes, depending on size. Unwrap the beets and when they are cool enough to handle, peel them. Cut the beets into bite size pieces. Place the beet chunks in a bowl. Add the scallions, olive oil, orange juice, mint and orange peel. Toss ingredients. Sprinkle with salt. Let rest for at least 15 minutes before serving. Sprinkle with pepitas. Serve at room temperature. 

Makes 4-6 servings


Back to School? Maybe. But there’s always Milk and Cookies, right?

592CAF6A-ADE6-4D4F-96AB-9D0739F7EB94_1_201_a.jpeg

Back in the day, when I was a young girl, I walked home from school and before I did any homework or piano practice I had a snack. My Mother was a cookie baker so invariably, the snack was milk and cookies. We didn’t have little bags of chips or puffs or granola bars back then.

I remember one time my mother veered away from her usual Fannies, peanut butter cookies and kichels. That was the day I brought my friend Joseph Lieberman (no, not that Joseph Lieberman) home to do homework together. I was happy my Mom had baked something new because Joseph had been to the house several times and maybe he was bored with the same old stuff. I had asked her if, sometime, she could bake something else. And so she did.

She made sugar cookies.

They were a great success. She made them occasionally after that but usually went back to the old favorites.

I’ve made my Mom’s recipe a few times over the years. Depending on the time of year I cut them into different shapes with cookie cutters (Hearts for Valentine’s Day usually).

This isn’t my Mom’s recipe though. I fiddled with it because hers included butter and I wanted to make it non-dairy. Also, I just bought some new jars of date honey (silan) and wanted to use that instead of the regular honey. She also added citrus peel and I didn’t.

But it is more or less her recipe.

Whether or not our children actually go back to school this season, milk and cookies is always a good treat.

In addition, these cookies, with the traditional holiday dates and honey, are a delicious choice for Rosh Hashanah (whether you use old fashioned honey or silan).

Shanah Tovah.

Date Honey Sugar Cookies

  • 1/2 cup vegetable shortening

  • 1/2 cup solid coconut oil

  • 3/4 cup sugar

  • 1/4 cup date honey

  • 2 teaspoons vanilla extract

  • 1 large egg

  • 1 large egg yolk

  • 3 cups all-purpose flour

  • 2 teaspoons baking powder

  • 1-1/2 teaspoons cornstarch

  • 1/2 teaspoon salt

  • 1/2 teaspoon ground cinnamon

  • Confectioners’ sugar

Preheat the oven to 350 degrees. Line a cookie sheet with parchment paper. Combine the shortening, coconut oil, sugar, honey and vanilla extract and beat at medium speed for 3-4 minutes or until light and fluffy. Add the egg and egg yolk and beat at medium speed for 1-2 minutes or until well blended. In a separate bowl combine the flour, baking powder, cornstarch, salt and cinnamon. Add the dry ingredients to the honey mixture and beat at medium speed until a soft dough forms. Roll the dough on a floured surface to 1/8-inch thickness. Cut out shapes with 2-inch round or heart-shaped cookie cutters. Place the cookies prepared cookie sheet. Bake for about 12 minutes or until the edges are lightly brown. Let cool. Sprinkle with confectioners’ sugar.

Makes about 36

Tomato-free Zucchini Parmesan Strips

10F6174C-BE13-4AD7-87CD-8501BB29F54E_1_201_a.jpeg

My garden didn’t do so well this year.

:(

I got two measly zucchinis from three plants!

This is what I did with them: Zucchini Parmesan Strips.

I didn’t include the traditional tomatoes or tomato sauce because I didn’t get so many tomatoes either and besides, I served these when my brother came over for dinner and he doesn’t like tomatoes.

The dish was really good so I bought zucchini and made the dish again a couple of times.

Tomato-free Zucchini Parmesan Strips

  • 2 medium zucchini

  • salt

  • 1 tablespoon olive oil

  • 6 tablespoons ground Parmesan cheese

  • 1 tablespoon finely chopped fresh oregano

  • 1 tablespoon finely chopped fresh parsley

  • 1 clove garlic, finely chopped

  • freshly ground black pepper to taste

Preheat the oven to 425 degrees. Wash and dry the zucchini, trim the ends and slice each zucchini lengthwise into three or four pieces, depending on width. Lightly salt each slice and let rest for about 15 minutes. Wipe the slices dry with paper towels. Place the slices on a parchment-lined baking sheet. Brush the tops of each slice with olive oil. Combine the Parmesan cheese, oregano, parsley and garlic and scatter this mixture evenly over the slices. Sprinkle with salt and pepper if desired. Bake for about 15 minutes or until lightly crispy.

Makes 6-8 slices

The 826: A Cocktail to Celebrate the 100th Anniversary of Certification of the 19th Amendment

8BE420E7-9502-4093-AD7D-0ED48AF85225_1_201_a.jpeg
98E80F3B-BBB6-447B-B73F-5655BF245450_1_201_a.jpeg

Last week, on August 18th, lots of people celebrated the 100th anniversary of the ratification of the 19th Amendment, which gave women the right to vote.

However, as a legal matter, women could not actually vote until August 26th of that year.

The ratification had to be certified by the Secretary of State (Bainbridge Colby) before it became an Amendment to the Constitution, and he did so on August 26th.

Today, August 26, 2020 is the actual 100th anniversary. On this day, exactly 100 years ago, women were officially, legally allowed to vote throughout the United States.

I wanted to create a recipe for some food or other that would be a fitting tribute to the determination, steadfastness and grit of the women who worked hard, were abused, ridiculed, scorned, arrested, beaten and who otherwise struggled to make this Amendment happen.

But nothing seemed to be good enough.

So I switched gears and decided to concoct a cocktail, even though, ironically, 1920 was also the year that Prohibition went into effect.

This was not hard work folks!

Although it did take several tries.

A most enjoyable time had I testing to make sure all the ingredients were finely attuned.

Which they are.

This is quite a lovely libation if I say so myself!

So, here, in honor of Women’s Suffrage, to celebrate the 100th Anniversary of the certification of 19th Amendment, is my special cocktail, “The 826,” to mark the day.

Make one of these and see for yourself what I mean. And next time you’re at a cocktail party, ask for The 826 and send the bartender over to this page for the recipe.

Most important: don’t take the 19th Amendment for granted. It took hard work, persistence and determination to get it. So make sure you VOTE.

The 826

  • Ice cubes

  • 6 tablespoons pineapple-orange juice (or use pineapple or orange juice)

  • 1/4 cup dark rum

  • 1/4 cup cranberry juice

  • 1 tablespoon grenadine

  • 1 teaspoon lime juice

  • 1 teaspoon maraschino cherry juice

  • Maraschino cherry

Place 6-8 ice cubes in a cocktail shaker. Add the pineapple juice, rum, cranberry juice, grenadine, lime juice and maraschino cherry juice. Shake several times, then either strain through a strainer into cocktail glasses or pour with ice cubes into old fashioned glasses. Garnish with a maraschino cherry.

Makes one big or two small drinks


Garden Fresh Salsa (Pico de Gallo)

024F4DF5-3AEE-483E-A2A4-19130A623DEA_1_201_a.jpeg

Last year my garden was like a jungle, loaded with tomatoes, zucchinis, eggplants, peppers and other stuff.

This year —-meh. Tomatoes not so plentiful (but delicious), I got two measly zucchinis, didn’t grow eggplants. The collard leaves were eaten up by roving outsiders. We managed one good bunch of kale.

The chili peppers though! They gave their all. We have plenty of them, all perfect.

So I decided to make homemade salsa.

I used peppers, tomatoes and scallions, all from my garden. I didn’t have cilantro, so I used the small green leaves from what I thought was a parsley plant but it turned out to be celery.

The avocado — store bought, and I know it isn’t a usual addition to Pico de Gallo, but I added some anyway and it gave a lovely, mellowing flavor and creamy texture.

Garden Fresh Salsa

  • 4 medium tomatoes, chopped

  • 2-3 scallions, chopped

  • 2 small chili peppers, deseeded and chopped

  • 1 small (or 1/2 large) avocado, chopped*

  • 2 tablespoons chopped cilantro, parsley or celery leaves

  • 1 large clove garlic, finely chopped

  • 2 teaspoons olive oil

  • 2 tablespoons lime juice

  • salt to taste

Place the tomatoes, scallions, chili peppers, avocado, cilantro and garlic in a bowl. Pour the olive oil over the vegetables and toss the ingredients to distribute them evenly. Add the lime join, toss again and let rest for at least one hour. Taste for seasoning and add salt as needed.

*You can make this a day ahead. If so, add the avocado an hour before serving rather than at the same time as the other ingredients.

Roasted Corn Salad

fullsizeoutput_b664.jpeg

I can’t wait for 2020 to end. It’s been a stressful, depressing year.

In addition to the pandemic and the hate-filled political climate, we had a storm last week that knocked out our power and land-line telephone for days, and there was sketchy internet service too.

And we lost a huge limb from our favorite hundreds-of-years-old maple tree.

Then there was a water main break so we had no water for a whole day.

YECH!!

Still, I am grateful for a number of things.

For instance: crops. Vegetables that grow despite the political circus, despite the hatreds, despite the racial tensions, despite the bad weather, despite the virus, despite the social distancing and the quarantines.

They don’t make up for the lost lives, the lack of hugs, the inability to travel or be with loved ones. But, thank goodness for these, the positives that nature brings us.

Summer’s best crops: tomatoes, peaches and nectarines.

And corn.

Get a couple of good ears of corn and grill them or use your oven and follow the recipe below for a refreshing summer salad. It made me feel better to make this one.

Charred Corn Salad

  • 2 cups corn (about 3 ears of corn)

  • 1/2 cup chopped red onion ( 2 3/4-inch thick slices)

  • 3 tablespoons olive oil

  • 1/2 cup crumbled queso fresco (or use goat cheese or any crumbly white cheese)

  • 2 tablespoons chopped parsley

  • 2 tablespoons lime juice

  • Salt and freshly ground black pepper (or crushed red pepper or Aleppo pepper)

Preheat the oven to 450 degrees. Place the corn and onion on a parchment lined baking sheet. Pour 2 tablespoons of the olive oil over the vegetables, toss and roast for 12-20 minutes or until crisped and browned. Alternatively, rub the ears of corn and the onion with the olive oil and grill for about 10-12 minutes, turning the vegetables occasionally, or until crispy and tender, then remove the kernels and chop the onion. Place the vegetables in a bowl. Let cool. Add the cheese and parsley. Pour in the remaining tablespoon olive oil and the lime juice. Season to taste with salt and pepper.

Makes 4 servings