buffet food

Banana Muffins with Buttermilk or Yogurt

fullsizeoutput_941b.jpeg

Today is National Muffin Day and it reminds me of what happened long ago when I first started working full time as a low-level attorney at a high-power firm, right after law school. All the other associates came to work carrying coffee and cartons of breakfast, which they proceeded to eat at their desks. Eggs, and everything with it.

I was always a yogurt woman, even back in the day when Dannon was the only one you could buy and there were only about 5-6 flavors.

But then someone told me about the blueberry muffins from the deli downstairs and unfortunately I tasted one. That was the end of my days of never even thinking about whether I gained a pound or two. I added a blueberry muffin to my yogurt breakfast.

Every day.

I gained a quick “freshman ten” and that was no small thing because back then I was really slim.

Alas, I gave up the morning muffins our of sheer vanity. But not my love of them.

Over the years I’ve occasionally made some at home. Blueberry. Cranberry-Orange. Pumpkin Spice. Zucchini. But it’s usually when we have sleepover guests because the muffin indulgence and the memory of how quickly they added to my girth has tempered my desire to eat them as often as I would like to.

Buying muffins is a no-no for me because the store-bought ones have become so ENORMOUS since the days when I had those luscious things from the deli.

I prefer the old-days size. The kind that comes out of a normal household muffin tin.

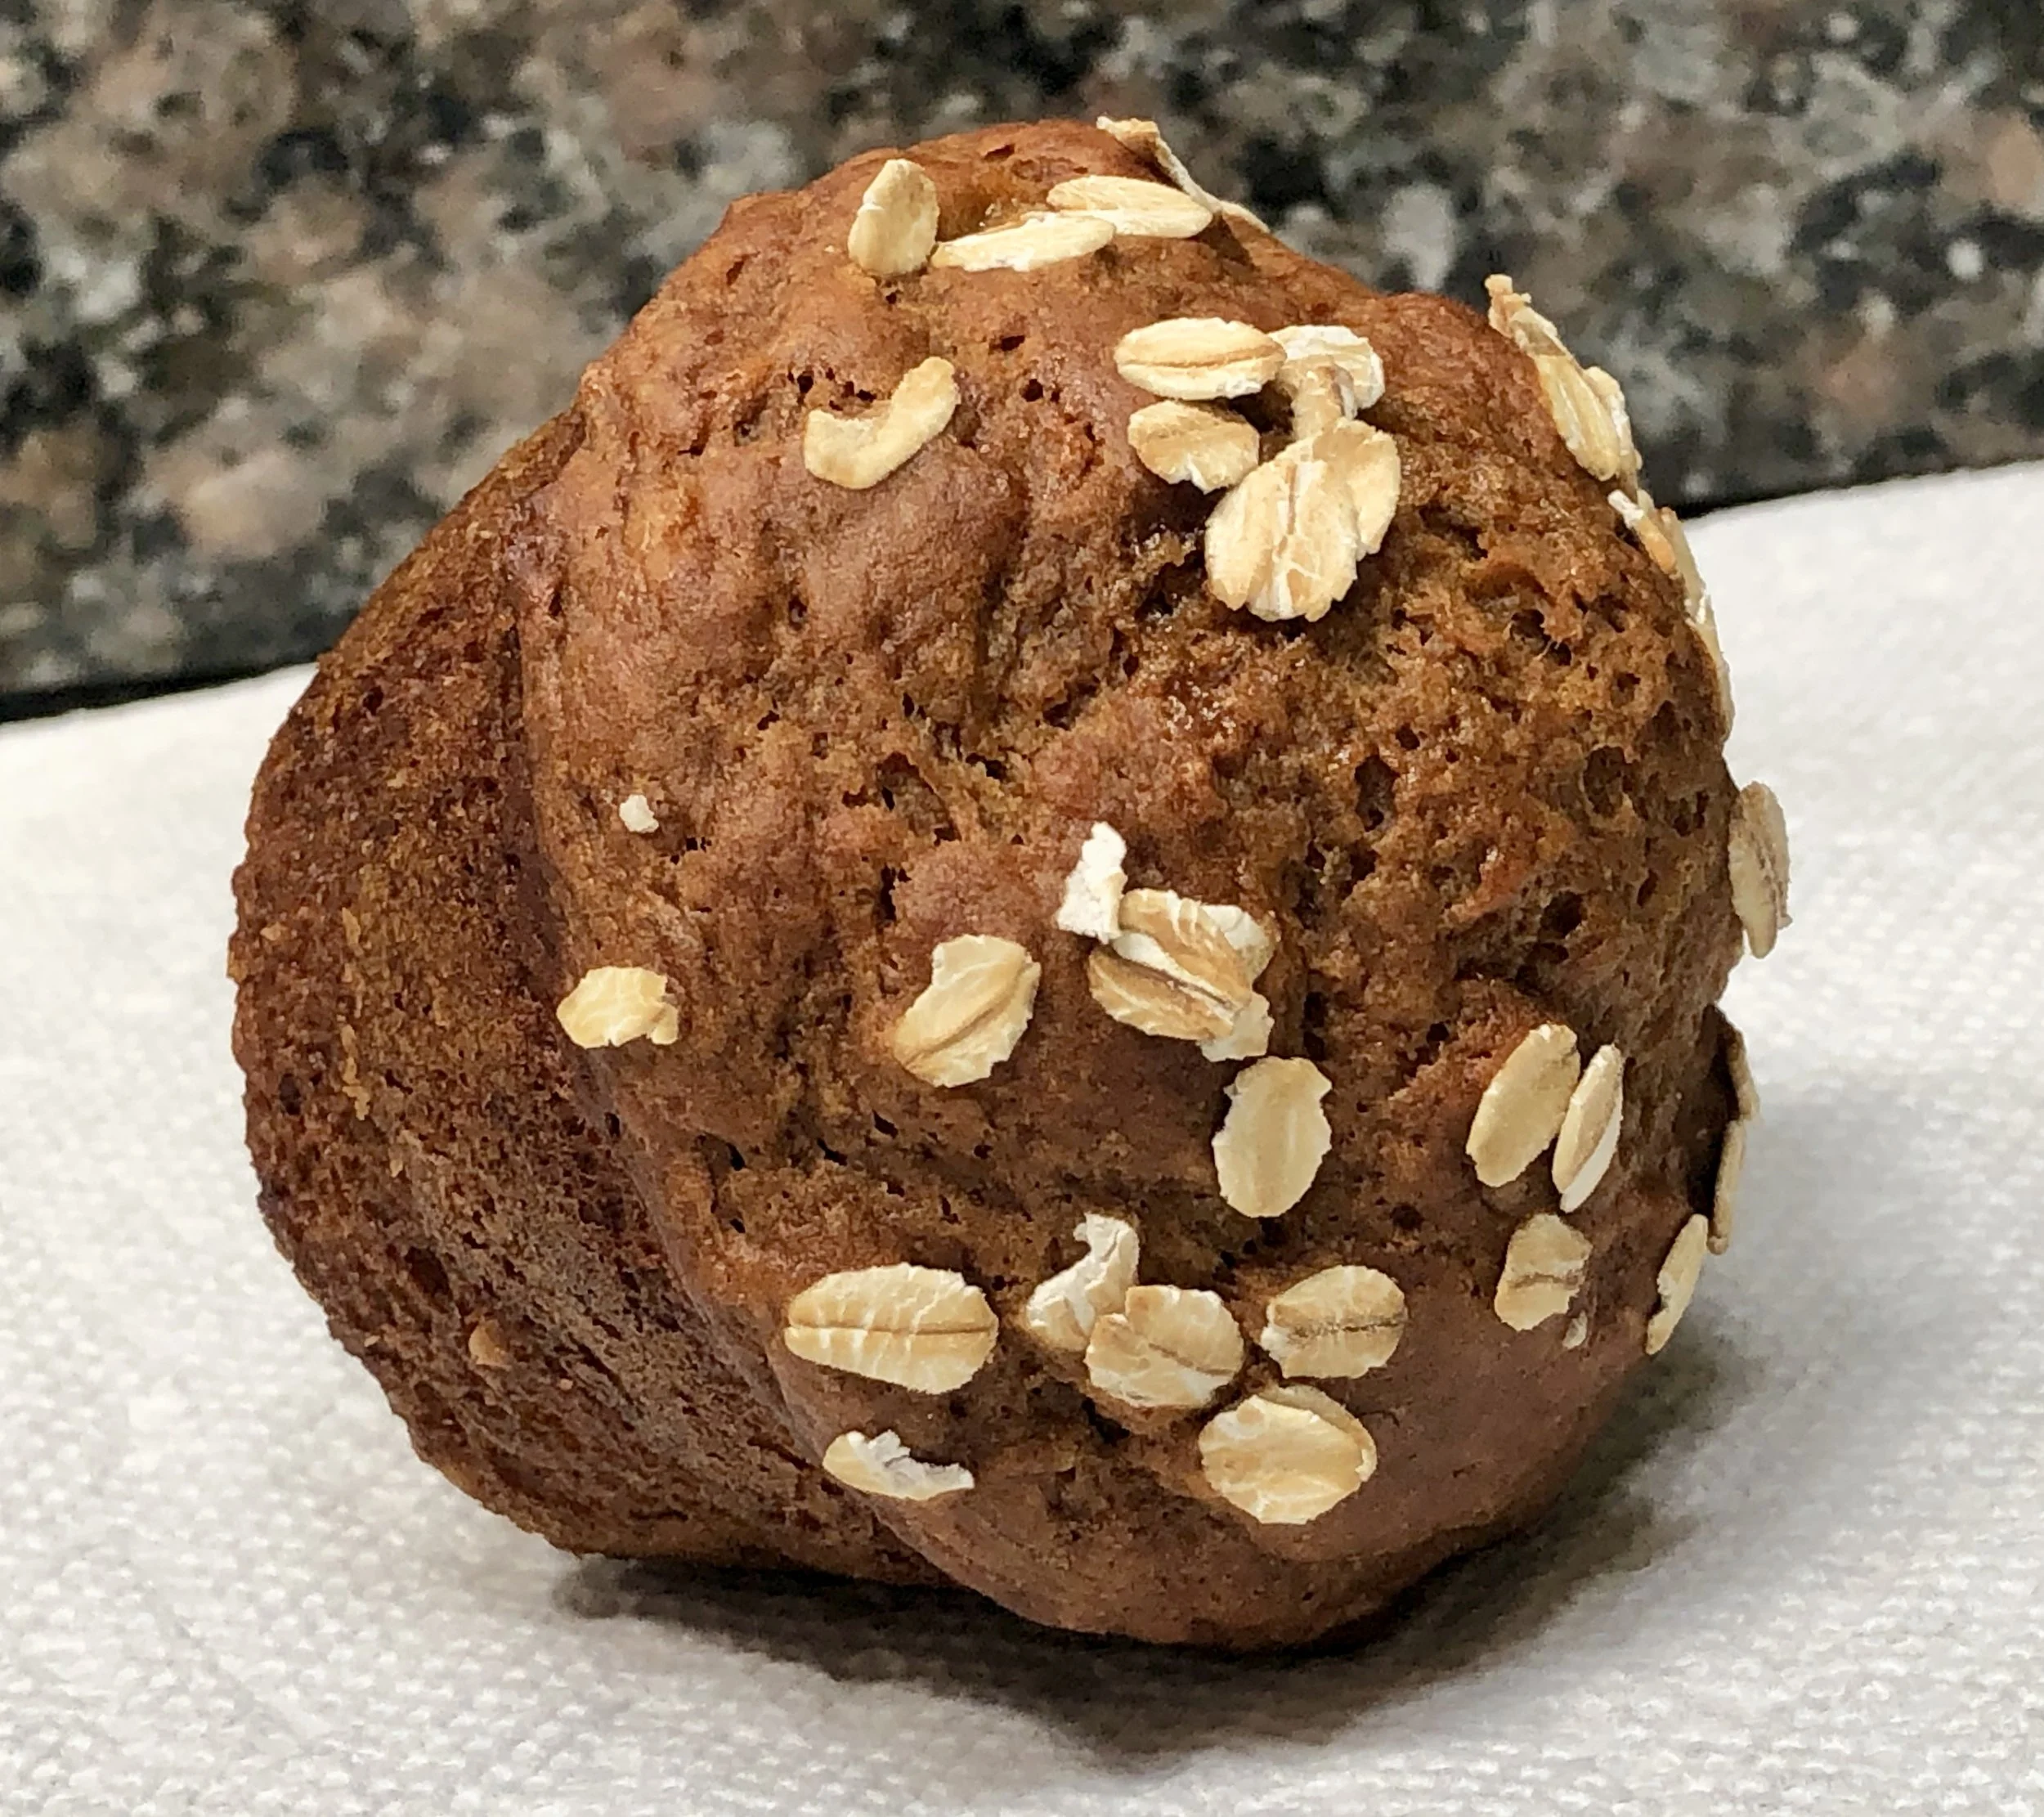
I made these Banana Muffins recently. They’re a lot less sweet the the typical muffin and have a vaguely robust hint of molasses. I’ve made these with stirred, plain yogurt for the times I didn’t have buttermilk on hand.

If you love muffins as much as I do, there are plenty of recipes on my blog. Type “muffins” in the box under “search my recipes” and you can find them.

Btw, if you give away food for Purim, these make a lovely gift.

Banana Muffins with Buttermilk or Yogurt

  • 1-3/4 cups flour

  • 1 teaspoon baking soda

  • 1/2 teaspoon baking powder

  • 3/4 teaspoon salt

  • 1 teaspoon cinnamon

  • 1/2 teaspoon freshly grated nutmeg

  • 2 tablespoons brown sugar

  • 3 very ripe bananas, mashed

  • 3/4 cup buttermilk or sour milk

  • 1/4 cup molasses

  • 3 tablespoons vegetable oil

  • 1 large egg

  • 1-1/2 teaspoons vanilla extract

  • 2-3 tablespoons old fashioned oats

Preheat the oven to 400 degrees. Lightly grease 9 muffin tins. Mix the flour, baking soda, baking powder, salt, cinnamon, nutmeg and brown sugar in a bowl. In a separate bowl, mix the bananas, buttermilk molasses, vegetable oil, egg and vanilla extract. Add the liquid ingredients to the dry ones and mix only long enough to combine thoroughly. Spoon the batter into the prepared muffin tins. Scatter the oats evenly on top of each muffin. Bake for 22-25 minutes or until a cake tester inserted into the center comes out clean.

Makes 9


Vegetarian Moussaka

fullsizeoutput_95b9.jpeg

Way back in 2009 I wrote an article about wedding feasts for Connecticut Bride Magazine, interviewed several caterers, and was astonished that among the menus they showed me there were so many choices for vegetarians and vegans. I read about creative, gorgeous hors d’oeuvres. Substantial, festive main courses. Glamorous desserts.

I’m not a vegetarian but that assignment was a sort of turnaround for me. I realized that there were lots of delicious foods I hadn’t tried and, that even if I had no intention of becoming a vegetarian or vegan, and even if I wasn’t particularly trying to cut down on meat protein, I was missing some really good food!

I don’t like to miss good food!

So, over the years I have prepared many vegetarian hors d’oeuvre and entrees, many of them spectacular.

This Vegetarian Moussaka is one of them. Portobello mushrooms take the place of meat in this creamy, tangy, comforting dinner dish. A hearty, filling meal, perfect for meatless Monday or any other day. Celebratory enough for a special occasion, wedding or otherwise.

Vegetarian Moussaka

  • 2 medium eggplants, sliced into 1/2-inch thick rounds

  • salt

  • 2/3 cup olive oil, approximately

  • 1 large onion, chopped

  • 2 medium chopped carrots

  • 3 cloves garlic, finely chopped

  • 3 Portobello mushrooms, chopped

  • 1 bunch fresh spinach (or 2 packed cups baby spinach leaves)

  • 1 28-ounce can plum tomatoes, undrained

  • 3 tablespoons chopped fresh parsley

  • 1 teaspoon dried oregano

  • 1/2 teaspoon ground cumin

  • 1/4 teaspoon ground cinnamon

  • freshly ground black pepper to taste

  • 3 medium Yukon Gold potatoes, peeled

  • 6 tablespoons butter

  • 6 tablespoons all-purpose flour

  • 2-1/2 cups milk

  • 2 large egg yolks

  • 1 cup grated Parmesan or Romano cheese

Preheat the oven to 400 degrees. Place the eggplant slices on a surface and salt them lightly. Let sit for about 15 minutes, then wipe the surface dry with paper towels. Brush the slices with about 4-5 tablespoons of the olive oil and place them in a single layer on a baking sheet. Bake for 15 minutes, turn the slices and bake for another 12-15 minutes, or until the slices are tender. Let the slices cool. Reduce the oven heat to 350 degrees.

Heat 6 tablespoons olive oil in a sauté pan over medium heat. Add the onion and carrots and cook, stirring occasionally, for 4-5 minutes or until the onions have softened. Add the garlic and mushrooms and continue to cook for another 3-4 minutes. Add the spinach and cook for 1-2 minutes. Add the tomatoes, parsley, oregano, cumin and cinnamon. Season to taste with salt and pepper. Cook for about 15 minutes or until the sauce is very thick.

Cook the potatoes in a large pot of lightly salted water for about 15 minutes, or until tender. Let the potatoes cool, then peel and slice them into 1/4-inch rounds and set aside.

Make a béchamel white sauce: heat the butter in a saucepan over medium heat. When the butter has melted and looks foamy, lower the heat, add the flour and whisk the ingredients for 2-3 minutes. Gradually add the milk and whisk the ingredients for 2-3 minutes or until a thick sauce has formed. Stir about a half cup of the hot sauce into the egg yolks, stir to blend the ingredients and add the mixture back into the saucepan. Stir in 3/4 cup of the cheese, whisk the ingredients until smooth and set aside.

Lightly grease a 9”x13” ovenproof casserole. Layer: half the eggplant on the bottom, then the potatoes, then the vegetable sauce, then the remaining eggplant. Cover with the béchamel sauce. Sprinkle with the remaining 1/4 cup cheese.

Bake for about 45 minutes or until top is bubbly and golden brown.

Makes 8 servings


Mini Salmon Latkes

fullsizeoutput_9bea.jpeg
fullsizeoutput_8536.jpeg

I’m thinking ahead to Hanukkah and the New Year’s Eve weekend. For the first, of course latkes! For New Year’s? Hors d’oeuvre.

Here’s a recipe that works for either or both.

Salmon latkes in mini form. Fried right? So perfect for Hanukkah. Make them small enough and put them on some sort of base and you’ve got a super morsel for cocktail hour.

You can put the latkes on crackers or toasted bread, but I like using small tomatoes (campari tomatoes in the photo) as a base because it makes the hors d’oeuvre colorful. They are less crunchy but much juicier.

The latkes are freezable. Isn’t that nice?!

Mini Salmon Latkes

  • 2 cups mashed cooked salmon

  • 2 large eggs

  • 1/2 cup matzo meal

  • 2 tablespoons chopped chives

  • vegetable oil

  • 12 campari tomatoes (approximately) (or other small tomatoes)

  • 3 tablespoons mayonnaise

  • chives or fresh dill for garnish

In a bowl, mix the salmon, eggs, matzo meal and chives until well combined. Heat about 1/8-inch vegetable oil in a saute pan over medium heat. Shape the salmon mixture into 36 small disks. Fry, a few at a time, for 2-3 minutes per side or until crispy. Drain on paper towels. Before serving, slice the tomatoes about 1/2-inch thick. Place the latkes on top of the tomato slices. Spoon a small amount of mayonnaise onto the tops. Sprinkle with chopped chives for garnish (or use a tiny leaf of fresh dill).

Makes 36

Cranberry Kumquat Conserve

fullsizeoutput_892d.jpeg

There are so many delicious “November foods.” Like sweet potatoes, pears, cranberries, persimmons and so on.

Not as many people know about kumquats though.

In case you don’t know what they are or haven’t used them, kumquats are a small citrus fruit. They look like oval mini-oranges.

They aren’t everybody’s taste. Kumquats are tart, so the flavor is something you love or hate immediately.

I love them. In fact, one of my favorite treats is candied (sugar coated) kumquats.

You can eat kumquats raw. Cut them into a salad — they’re especially good with greens or Brussels sprouts and a soft goat’s milk cheese.

But the pungent flavor mellows beautifully when cooked, so kumquats are especially wonderful in chutneys, relishes and preserves. If you need a pretty hors d’oeuvre that goes beyond ordinary for a party or New Year’s Eve guests, check out my mascarpone crisps with kumquat preserves.

The recipe here for cranberry conserve, is a really good option for Thanksgiving. This dish has several virtues:

1) it goes with turkey, so it’s perfect for Thanksgiving.

2) it’s quick and easy to prepare — about 30 minutes from start to finish.

3) it’s colorful, making it a festive addition to your holiday table.

4) it lasts for a week or so in the fridge, so you can make it ahead and also rely on leftovers.

5) best of all, it is really tasty.

Happy Thanksgiving.

Cranberry Kumquat Conserve

  • 3 cups fresh cranberries

  • 10-12 kumquats

  • 1/2 cup honey

  • 1/2 cup orange juice

Rinse the cranberries and place them in a saucepan. Cut the kumquats in half and remove the seeds. Chop the kumquats and add them to the cranberries. Add the honey and orange juice. Stir the ingredients and bring the liquid to a boil over high heat. Turn the heat to medium and simmer the ingredients for about 20 minutes, stirring occasionally, or until thick.

Makes about 2 cups

Beet and Chickpea Salad

fullsizeoutput_867c.jpeg

I realize beets are available throughout the year. We are a beet-loving family, so I buy them all the time. Throughout the year.

And yet, I still associate beets with autumn. In my memory, September, October, November — those months are the real “season” for harvesting beets. In fact, I remember them as an integral part of the meals during Jewish holidays.

Sukkot, the “harvest holiday” is a good time to include beets on the menu. Look for beets with the greens still attached — they are from a current harvest. They are sweeter and tastier. Lovely however you cook them, including this salad, which you can make ahead. Serve it at room temperature.

Beet and Chickpea Salad

  • 4 large beets

  • 1 15-ounce can chickpeas, drained and rinsed

  • 1 tablespoon olive oil

  • 2 teaspoons fresh thyme leaves

  • sea salt

  • 3 tablespoons olive oil

  • 3 tablespoons white wine vinegar

  • 2-3 tablespoons chopped fresh parsley

  • salt and freshly ground black pepper to taste

Preheat the oven to 450 degrees. Trim the beets, cutting away the greens, if any, and discarding any hard, fibrous parts of the stem. Wash and drain the greens and use them for other purposes. Scrub the beets, wrap them in aluminum foil and roast for 50-60 minutes or until they are tender. Peel the beets when they are cool enough to handle. Cut the beets into bite size pieces and place in a bowl. While the beets are cooking, place the chickpeas on a foil-lined baking sheet. Pour the one tablespoon olive oil on top and shake the pan to coat all the chickpeas. Sprinkle with thyme and sea salt to taste. Shake the pan again. Roast for 20 minutes, shaking the pan every 5 minutes or so, or until golden brown and crispy. Add the roasted chickpeas to the beets. Pour the remaining olive oil over the vegetables and toss, then pour in the white wine vinegar and toss again. Sprinkle with parsley and salt and pepper to taste. Let rest for 10-15 minutes before serving.

Makes 8 servings


Fried Green Cherry Tomatoes

fullsizeoutput_adfb.jpeg

This year my tomato crop was such a bonanza that we ate tomato-something almost every day!

I am not complaining. Fresh garden tomatoes are among the treasures of the food world.

But it’s getting on in the season, the weather is turning, the Jewish holidays are around the corner and hundreds of those little things will never ripen from green to red in time.

I made some chutney of course.

I like fried green tomatoes in a sandwich but the cherry tomatoes are too small for slicing, coating and frying.

So I tried making them whole.

Yes!

Crunchy outside — and when you bite in, you get spurts of sweet-tart juicy tomato.

Terrific as an hors d’oeuvre. If you have extra, little, green tomatoes, try this:

Fried Green Cherry Tomatoes

  • 1/2 cup mayonnaise

  • 2 tablespoons chopped fresh basil

  • lemon juice

  • 18-24 small green cherry tomatoes

  • 1/4 cup all-purpose flour

  • 1 large egg

  • 1/4 teaspoon Sriracha or other hot sauce

  • 1/2 cup matzo meal or breadcrumbs

  • salt, freshly ground black pepper and garlic powder to taste

  • vegetable oil

Combine the mayonnaise, basil and a teaspoon or two of lemon juice in a small bowl. Taste and add more lemon juice if desired. Set aside. Wash and dry the tomatoes. Place the flour in a bowl, add the tomatoes and toss them around to coat them completely. Beat the egg and hot sauce together. Immerse the tomatoes into the egg and roll them around to coat each one completely. In a bowl, combine the matzo meal with salt, pepper and garlic powder to taste. Add the egg-coated tomatoes a few at a time and roll them around to coat them completely. Place the coated tomatoes on a cake rack or other surface for at least 20 minutes, to “air dry” slightly. Heat vegetable oil in a deep pan to a depth of about 2-inches. When the oil is hot enough to make a crumb sizzle quickly, add the tomatoes, a few at a time and cook them, turning them occasionally, for 4-5 minutes, or until golden brown. Remove the tomatoes and set the on paper towels to drain. When all the tomatoes are fried, serve them with the basil mayonnaise.

Makes 6-8 servings

Chick Pea and Carrot Salad

DSC08424.jpg

Of course, of course we will be slicing apples and dipping them in honey on Rosh Hashanah. (which begins at sunset on September 29th).

But chickpeas are on the menu too. In his Encyclopedia of Jewish Food, the late rabbi and food authority Gil Marks wrote that “chickpeas are a traditional Rosh Hashanah food, a symbol of fertility, abundance and a wish for a well-rounded year to come.”

I usually make chickpeas into hummus, but sometimes I serve them whole, as a snack, roasted, the way my mother made them when I was growing up – a recipe called nahit. She coated the chickpeas with vegetable oil, sprinkled them with salt and paprika and baked them until crispy.

I changed her recipe somewhat -- I use olive oil, kosher salt and fresh thyme, or sometimes za’atar, as seasonings. Nahit is a delicious snack and a healthy one too: chickpeas are a good source of protein, minerals (including calcium) and fiber.

For this coming holiday though I’ll be making a chickpea and carrot salad to serve with dinner. Carrots are another symbolic ingredient of the holiday, so this recipe is a double-up of special ingredients of festive food for the holiday table. It’s a dish that can be made in advance, which makes it a good choice at such a busy time. And it is colorful too, fit for any celebration, including Break-the-Fast. 

Chick Pea and Carrot Salad

  • 1 15-ounce can chickpeas

  • 4 medium carrots, sliced thin

  • 1/2 chopped red onion

  • 1/4 cup chopped fresh parsley

  • 1/4 cup chopped fresh mint

  • 1 teaspoon ground cumin

  • 1/8 teaspoon cayenne pepper

  • 1/4 cup olive oil

  • 3 tablespoons lemon juice

  • salt to taste

Rinse the chickpeas under cold running water; let drain and place in a bowl. Add the carrots, onion, parsley, mint, cumin and cayenne pepper and toss to distribute the ingredients evenly. Pour in the olive oil and lemon juice. Toss to coat the ingredients evenly. Taste for seasoning and add salt to taste.

Makes 6 servings

Zucchini Bread

fullsizeoutput_acf2.jpeg

When we were first married, Ed promised me 50 years. That was in 1969. We were young and 50 years seemed like a REALLY REALLY long time.

Grandparent stuff.

But here we are. A few months short of 50.

Wasn’t it yesterday that I fit into that long white dress?

We wanted to celebrate with two other couples, all close friends, who are also at 50.

But we didn’t want to have a big party. Not even an intimate dinner party for six. Although those are lovely, it seemed like the same-old, same-old. 50 years deserved something special.

So we decided to have a 150th Anniversary Afternoon Tea.

It was festive, fun and celebratory.

We started with champagne and tea sandwiches.

Then: scones, clotted cream and jams.

Finally, dessert: several kinds of cookies, Lemon Buttermilk Cake, Pumpkin Spice Cake and this: Zucchini Bread, (made with zucchinis from my garden!).

Just us 6. It was a good day.

We all talked about how amazing it is at how quickly 50 years go by.

Zucchini Bread

  • 2 cups all-purpose flour

  • 1/2 teaspoon cinnamon

  • 1/2 teaspoon nutmeg

  • 1-1/2 teaspoons baking soda

  • 3/4 teaspoon baking powder

  • 3/4 teaspoon salt

  • 3/4 cup brown sugar

  • 1/2 cup sugar

  • 2 large eggs

  • 1/2 cup applesauce

  • 1/4 cup vegetable oil

  • 1 teaspoon vanilla extract

  • 2 cups grated fresh zucchini

Preheat the oven to 350 degrees. Lightly grease a 9”x5”x3” loaf pan. Place the flour, cinnamon, nutmeg, baking soda, baking powder and salt in a bowl and whisk the ingredients until they are evenly distributed. Place the brown sugar, sugar, eggs, applesauce and vanilla extract in the bowl of an electric mixer (or use a hand mixer) and beat at medium speed for 2-3 minutes, until thoroughly blended. Add the flour mixture and stir just until blended. Fold in the zucchini. Spoon the batter into the prepared pan. Bake for 50-60 minutes or until golden brown and a cake tester inserted into the center comes out clean. Cool in the pan on a wire rack for 15 minutes. Invert the muffins onto the rack to cool completely.

Makes one loaf

Gluten-Free Peach Crisp

fullsizeoutput_945d.jpeg

Some summers the peaches are glorious.

And then there’s this year. I haven’t had an excellent peach or nectarine yet.

I bought a bunch a few times and they tasted ok, but not really flavorful. Some were cottony and mealy.

I used the cottony/mealy ones to make sauce — like applesauce only made with peaches (with a bit of cinnamon and a squirt of lemon juice). It was very good. We ate some and I used the rest for quickbread.

I used the sort-of-tasty ones for this peach crisp. This was perfect. Baking — plus some other stuff — brought out the best of the fruit.

And look how easy this dessert is!

Plus, it’s gluten-free, in case you need…

Gluten-Free Peach Crisp

Filling:

  • 6 ripe medium peaches

  • 2 tablespoons sugar

  • 2 tablespoons minute tapioca

  • 1 tablespoon lemon juice

Crust:

  • 1-1/2 cups quick cooking oats

  • 2/3 cup brown sugar

  • 1 teaspoon ground cinnamon

  • 1/4 teaspoon salt

  • 6 tablespoons butter (margarine or solid coconut oil), cut into chunks

To make the filling: Lightly butter a baking dish. Preheat the oven to 400 degrees. Slice the peaches and place the pieces in the baking dish. Add the sugar, tapioca and lemon juice, toss the ingredients and let rest for 15-20 minutes. 

To make the crust: Mix the oats, brown sugar, cinnamon and salt in a bowl. Add the butter and work it into the dry ingredients until the mixture is crumbly. Place on top of the fruit. Bake for 30-35 minutes or until the crust is golden brown.

Makes 6 servings


Vegetable Salad

fullsizeoutput_a6ee.jpeg

Light, refreshing food. That’s what we want during the summer.

Also, easy to make. And as quick as possible.

I made this vegetable salad using leftovers from the veggies we had over a couple of meals. Added some fresh tomatoes, an avocado and some herbs. Not only did I get to use up stuff from the fridge, the dish took less than 10 minutes to make.

It’s a side dish. But you can add some tofu, cheese or hard-cooked eggs and make it into a main course (or add leftover fish, meat or poultry).

Add crusty bread and it’s a sandwich filling.

Mix it into cooked penne or ziti and it becomes pasta primavera.

Use whatever vegetables you have in proportions suggested. There’s no magic here, no actual recipe that will fail if you don’t have one of the ingredients.

Vegetable Salad

  • 3 cups cooked cut up cauliflower

  • 1 cup cooked, cut up green beans

  • 1 cup cooked cut up yellow squash

  • 3-4 cut up small tomatoes

  • 1 avocado, cut into small chunks

  • 3 tablespoons chopped fresh basil

  • 2 teaspoons chopped fresh oregano

  • 2 tablespoons olive oil

  • 2-3 tablespoons fresh lemon juice (or use white wine vinegar)

  • salt and freshly ground black pepper to taste

Place the cauliflower, green beans, yellow squash, tomatoes, avocado, basil and oregano in a bowl and toss the ingredients to distribute them evenly. Pour the olive oil over the vegetables and toss again. Pour 2 tablespoons of the lemon juice over the vegetables and toss again. Taste for seasoning and add more lemon juice and salt and pepper to taste.

Makes 4-6 servings