brunch

Baked Apples with Raisins, Honey, Orange and Pistachios

It’s apples and honey time. First, because those two ingredients are delicious symbols of Rosh Hashanah, which starts at sundown next Sunday.But also because new crop apples are just beginning their season, and after months and months of mealy, dry,…

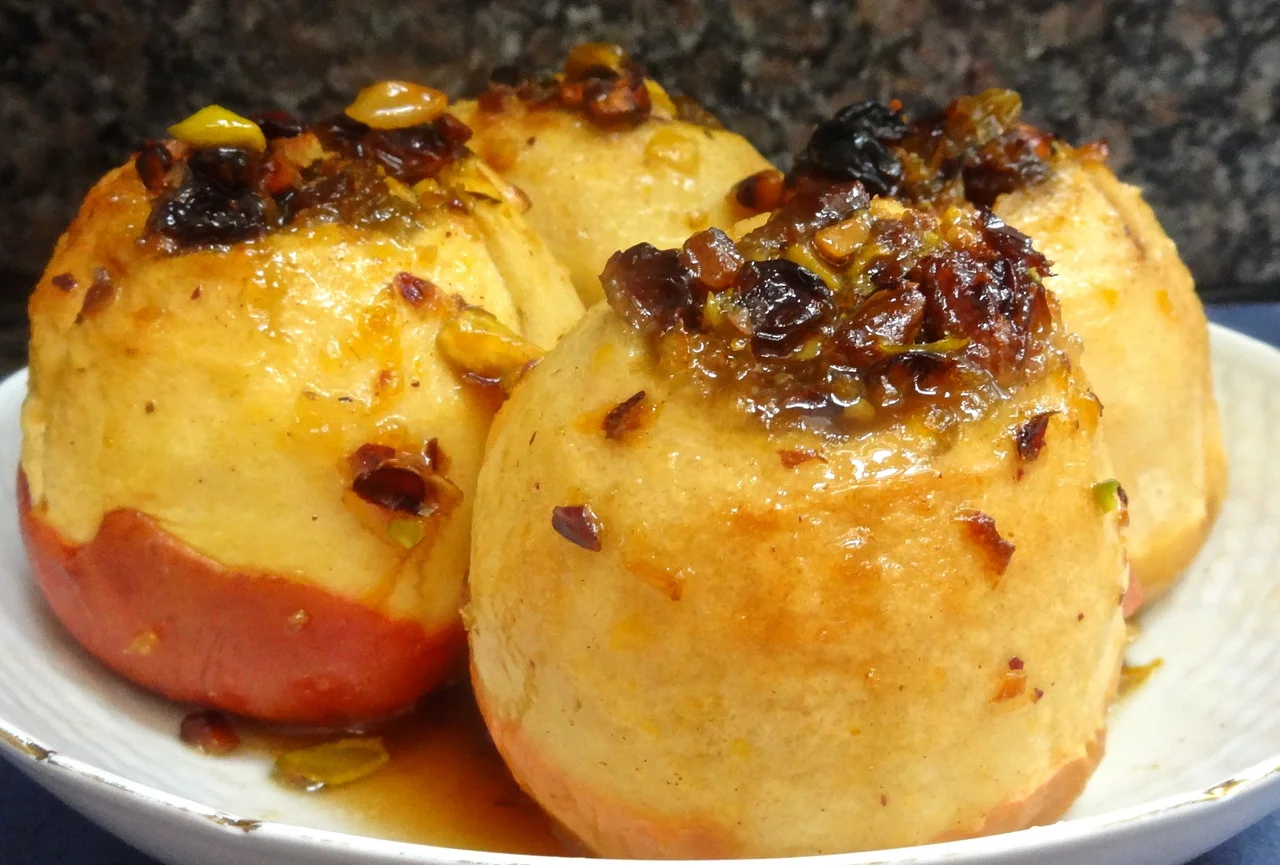
Baked Apples with Raisins, Honey, Orange and Pistachioos

It’s apples and honey time. First, because those two ingredients are delicious symbols of Rosh Hashanah, which starts at sundown next Sunday.

But also because new crop apples are just beginning their season, and after months and months of mealy, dry, tasteless supermarket apples, we can finally find some that taste fresh, juicy and wonderful. Like maybe the kind that tempted Eve. 

And also because September is National Honey Month. Honey, too, is in a high season right now, especially in the Northeast.

So I was delighted to read an article in The Huffington Post that said honey has health benefits.

That means I am going to be terrifically healthy. I have several jars of honey in my pantry. That I keep replenishing because, well, I use a lot of honey.

Honey is so, so good, right from my fingers, as I scoop the remnants that remain on the outside as I close up the jar.

It also tastes really good poured onto ice cream, cereal and pancakes.

And it’s an incredibly useful ingredient in recipes for dessert, like honey cake and also in savory foods — like mixing it with apple juice to baste a turkey.

Honey as healthy?

Well, that’s just an added bonus.

When I read the article and it mentioned using honey to help with night time coughs I thought about where I had heard that before.

Oh yeah. My Mom. Ages ago, when I was a little girl and had a cold and she mixed honey into tea.

Some things never change, nor should they.

Here’s an old recipe that I can now say is healthy because it has honey. Also, fresh, new crop apples.

It’s also a wonderful treat for Rosh Hashanah or any other holiday or any day in the week.

BAKED APPLES WITH RAISINS, HONEY, ORANGE AND PISTACHIOS

  • 4 large baking apples

  • 6 tablespoons golden raisins

  • 1/4 cup chopped pistachios

  • 2 teaspoons grated fresh orange peel

  • 1/2 teaspoon ground ginger

  • 1/4 teaspoon ground cinnamon

  • 6 tablespoons honey

  • 1/2 cup orange juice

  • 1/2 cup water

  • 1 tablespoon butter, cut into 4 pieces (or use coconut oil)

Preheat the oven to 375 degrees. Wash the apples and remove the cores, leaving about one-half inch at the bottom. Peel the apples about halfway down from the top. Place the apples in a baking dish. Mix the raisins, pistachios, orange peel, ginger, cinnamon, 3 tablespoons honey and 3 tablespoons orange juice in a small bowl. Spoon equal amounts of this mixture into the hollowed apple cores. Combine the remaining honey, juice and water and pour over the apples. Dot the tops with butter. Bake for 45 minutes, or until the apples are tender, basting occasionally with the pan juices.

Makes 4 servings

Milk and Honey White Bread

95954099_2581425922125465_2398630099697008640_n.jpg
Milk and Honey Bread

Milk and Honey Bread

Sometimes I’m just bored with all food. It frequently happens after a summer’s worth of grilling and when roasting a turkey or making a hearty stew doesn’t seem right yet.

Also, the tomatoes are coming in now. Real tomatoes. Red, red ones. Aromatic, juicy, sweet, oozing seeds tomatoes. Late August tomatoes.

Then, for dinner, at least one night, I can make tomato sandwiches. Nothing special. I have no need for $40 olive oil or rare, aged Balsamic vinegar. No chili pepper additions. No teriyaki or hummus. No fusion version.

Just white bread, mayo and sliced tomatoes.

Nothing more. Life is sweet.

Packaged (not soft white) or bakery white bread will do. But if you like to bake and have a few moments, here’s a recipe for a spectacular bread that measures up to a good tomato.

Milk and Honey White Bread

  • 1 package active dry yeast

  • 1/4 cup warm water (105-110 degrees)

  • 1/4 teaspoon sugar

  • 4 cups all purpose flour, approximately

  • 1-1/2 teaspoons salt

  • 2 large eggs

  • 2 tablespoons softened butter or vegetable oil

  • 3/4 cup warm milk

  • 2 tablespoons honey

In a small bowl, mix the yeast, water, sugar and 1/2 teaspoon flour. Stir, set aside and let rest for 5 minutes or until the mixture is bubbly. In a bowl of an electric mixer, combine the remaining flour and salt. Add the eggs, butter, milk and honey. Add the yeast mixture. Blend ingredients thoroughly, then knead using the kneading hook, for 4-5 minutes or until the dough is smooth and elastic (or knead by hand for about 10 minutes). Add more flour as necessary to keep the dough from being sticky. (Dough may be made in a food processor). Cover the bowl of dough and put it in a warm place to rise for about 1-1/2 hours or until doubled in bulk. Punch down the dough, cover the bowl and let rise again for about 30 minutes or until doubled. Lightly oil a 9” loaf pan. Place the dough in the pan. Let rise in a warm place for 30 minutes. Preheat the oven to 350 degrees. Bake for about 25 minutes or until firm and golden brown.

Makes one

Corn fritters

Do you ever daydream about foods you haven’t had in a long time?Like the fried chicken you used to eat but you don’t now because it’s too fattening, too fatty and too messy to make?Or Mac n’ Cheese the way your Grandma made it, but it doesn’t taste …

Do you ever daydream about foods you haven’t had in a long time?

Like the fried chicken you used to eat but you don’t now because it’s too fattening, too fatty and too messy to make?

Or Mac n’ Cheese the way your Grandma made it, but it doesn’t taste the same since she’s gone?

Or the original Bonomo’s Turkish Taffy that doesn’t taste anything like it used to so you don’t bother?

One of the foods I think about more than occasionally is my Mom’s Corn Fritters. Crispy outside, soft and puffy within, and loaded with corn. Great for breakfast, lunch or dinner. With a little real maple syrup.

It’s an indulgence, to be sure, so I don’t make them too often. But I just had to have some yesterday. I had been thinking about them, mostly because I had some corn left over from a few extra cobs I cooked over the weekend.

So I made some. I changed one important ingredient though. I switched from dairy milk to coconut milk. UNSWEETENED refrigerator case coconut milk (not canned).

The fritters were vaguely sweeter, but every bit as wonderful, delicate, crispy-edged and perfect. I think Mom would approve.


CORN FRITTERS


2 tablespoons margarine or butter

1 large egg

1 cup coconut milk (or use regular, whole milk)

2 cups cooked corn kernels (about 4 ears of corn)

1-1/4 cups all-purpose flour

1 tablespoon baking powder

1 teaspoon sugar

1-1/4 teaspoons salt (or to taste)

margarine/butter/vegetable oil for frying

maple syrup, optional

Melt the butter and set it aside to cool. In a bowl, beat the egg and coconut milk together. Stir in the cooled melted butter and the corn kernels. In a second bowl, mix the flour, baking powder, sugar and salt; add this to the corn mixture and stir ingredients gently to blend them together. Heat enough margarine, butter and/or vegetable oil in a saute pan over medium heat. When the fat has melted and looks foamy (or the vegetable oil is hot), drop the corn batter by the 1/4-cupful. Cook for about 2 minutes or until the bottom has browned. Flip the pancakes and cook for another 2 minutes or until the second side is brown. Serve with maple syrup if desired.

Makes 6-8 servings

Blueberry Crisp

What’s one of the best things you can do with boxed breakfast cereal? Use it as crust for fruit crisps!My Mom used cereal crust over apples and when I went to visit my parents on cool autumn days the perfume of this dish baking in the oven would rea…

What’s one of the best things you can do with boxed breakfast cereal? Use it as crust for fruit crisps!

My Mom used cereal crust over apples and when I went to visit my parents on cool autumn days the perfume of this dish baking in the oven would reach me all the way out past the garage. As soon as I opened the car door I’d know I was in for a really good treat for dessert. 

She served the dish still warm, with cold cream on top.

Those were good days.

When I wrote my last cookbook, Hip Kosher, I decided to include My Mom’s special recipe but use it with blueberries, not apples. And this week, when I saw some good looking blueberries on sale, I decided to make that dish for my weekend company. I used Raisin Bran, rolled oats and almonds.

This was a big hit. 

Btw, for variety, you can make a simple change by adding some sliced peaches.


BLUEBERRY CRISP  


2 pints fresh blueberries

1/3 cup sugar

5 tablespoons all-purpose flour

1/4 teaspoon ground cinnamon

2 tablespoons lemon juice

1 cup bran flakes or raisin bran

1/2 cup quick cooking or rolled oats

1/2 cup chopped nuts such as almonds, cashews or pecans

1/4 cup brown sugar

1/2 teaspoon ground cinnamon

6 tablespoons melted unsalted butter or margarine


Preheat the oven to 350 degrees. Combine the blueberries, sugar, flour, 1/4 teaspoon cinnamon and lemon juice in a 6-quart baking dish. Set aside. Crush the cereal flakes slightly and put them in a bowl. Add the oats, nuts, brown sugar and 1/2 teaspoon cinnamon and toss ingredients to distribute them evenly. Pour in the melted butter. Mix until the dry the ingredients are coated with the melted butter. Place the cereal mixture over the fruit. Bake for 30 minutes or until the crust is crispy and brown. Let cool slightly but serve warm (may be rewarmed). Serve plain or with cream, ice cream, whipped cream, or sorbet.

Makes 6–8 servings.

Farro Salad with Carrots, Peas, Tomatoes and Dill

Farro is becoming trendy. So says this article, which I read recently.Actually, farro has been pretty popular in my house for the last several years. It’s one of those whole grains, you know, the stuff everyone says is so healthy, full of fiber…

Farro is becoming trendy. So says this article, which I read recently.

Actually, farro has been pretty popular in my house for the last several years. It’s one of those whole grains, you know, the stuff everyone says is so healthy, full of fiber and nutrients and so on.

It’s popular with me because it tastes so good and because there are so many things you can do with it.

I first cooked farro because I was getting bored with white rice, brown rice, black rice, red rice and every other kind of rice. And with pasta, potatoes and egg noodles. And there’s been an overload of quinoa recently too.

But I wanted something filling and “starchy” as a side dish with dinner. 

There was this little bag of farro in the store. It looked intriguing. I decided to give it a try.

SUCCESS! Farro is sumptuous and tastes sort of nutty and toasty.

I’ve made it dozens of ways, treating it just like rice: steamed, poached, sauteed, in pilaf. Plain. With vegetables. As a salad, drizzled with vinaigrette.

Every recipe is terrific.

Some say farro is the same as spelt, but it is actually a different, if similar grain. It is also a lot like wheatberries and oat groats (so you can substitute those in recipes). Farro is sometimes called emmer wheat. 

Do try it. You can use it all summer in a salad and all through the year in other ways.

Here’s one recipe we love at our house. 

Farro Salad with Carrots, Peas, Tomatoes and Dill


1 cup farro

1-3/4 cup water or vegetable stock

2 carrots, chopped

1 cup thawed frozen green peas

1 cup halved grape tomatoes

3 tablespoons olive oil

2 tablespoons lemon juice

1-1/2 tablespoons chopped fresh dill

1 teaspoon grated fresh lemon peel

salt and freshly ground black pepper to taste


Place the farro and water in a saucepan and bring the liquid to a boil over high heat. Lower the heat, cover the pan and simmer for about 30 minutes or until the farro is tender, but still chewy. Set the farro aside to cool slightly. Cook the carrots in boiling water for 3-4 minutes or until tender. Drain and add to the farro. Add the peas and tomatoes and toss the ingredients to distribute them evenly. In a separate bowl or a jar, combine the olive oil, lemon juice, dill and lemon peel. Whisk the ingredients until well combine (or shake in a covered jar). Pour into the farro mixture and toss the ingredients. Season to taste with salt and pepper.


Makes 4-6 servings 


Imam Bayildi

Need a good side dish? Imam Bayildi is one of my favorite go-to recipes whenever I am at a loss. It’s a good family dish and also works for company. 

I learned to make Imam Bayildi years ago when I was working on an article for eggplant. I found a recipe and the name of the dish, translated, was so intriguing — “the Imam fainted” — I had to try it. If only because, as the story goes, the Imam (an Islamic clergyman or spiritual leader) who first ate this dish was so delighted that he passed out from joy.

Well, whether the tale is apocryphal or not, this dish is very very good. And what’s more, you can serve it hot, warm or at room temp, so you can either get it together in advance and cook it for dinner, or make the whole thing in advance and serve it for dinner.

It’s also a good item for a vegetarian meal (I like it accompanied by scrambled eggs or mushroom ragout).

This year during Passover I made this dish for dinner and used leeks instead of the usual onions. My family liked it even better this way, so here’s the recipe.

Btw, a tumblr reader once told me she added olives to the dish when she made it. I’ve tried that and it is delicious! So, add some olives if you like — black, pitted olives make the dish even more colorful.

Imam Bayildi

  • 1 medium eggplant

  • salt

  • 1/2 cup olive oil

  • 3 medium leeks, cleaned and sliced

  • 2 large cloves garlic, chopped

  • 3 large tomatoes, deseeded and chopped

  • 3 tablespoons chopped fresh parsley

  • 1 teaspoon sugar

  • 1 teaspoon salt or to taste

  • 3 tablespoons fresh lemon juice

  • 1/3 cup water

Cut the eggplant into slices about 3/8-inch thick. Sprinkle with salt and let rest for 30 minutes. Wipe the eggplant slices dry with paper towels. Preheat the oven to 350 degrees. Heat one tablespoon olive oil in a saute pan over medium heat. Cook the eggplant slices a few at a time for 2-3 minutes per side or until slightly wilted. Add more olive oil to the pan as needed to prevent scorching (use 4-5 tablespoons more if needed). Place the cooked eggplant into a baking dish (cut it into smaller pieces if you wish). Add 2 tablespoons olive oil to the pan. Add the leeks and cook for 2-3 minutes. Add the garlic and cook for another minute. Add the tomatoes, parsley, sugar, salt and lemon juice. Cook for one minute, stirring frequently. Spoon the vegetables on top of the eggplant. Drizzle with any remaining olive oil and the water. Cover the pan and bake for 45 minutes. Serve hot, warm or at room temperature.

Makes 6-8 servings

Milk and Honey White Bread

IMG_4602.jpeg

Would you believe — there’s a book entirely devoted to white bread. It’s called, (of course), “White Bread” and has a cover reminiscent of a loaf of packaged Wonder Bread.

I thought the scorn for white bread was something new. But according to the author, Aaron Bobrow-Sprain, apparently there’s been a lot of controversy about this stuff on and off for centuries. Some of it had to do with food safety issues. But some of it had to do with racism (one health advocate apparently thought white bread was “threatening white racial superiority”).

Who knew?

When I was growing up my Mom would buy bakery rye bread and something called “corn bread” which isn’t that yellow, cakey Southern style stuff but more like sour-dough rye bread and was known in Jewish neighborhoods as “Jewish corn bread.” Those were for having with dinner. Or toasting for breakfast. Or for deli sandwiches.

But she bought packaged white bread too. It was the modern thing. The help-the-little-lady convenience food. It was too convenient not to buy. And there weren’t very many choices in packaged bread anyway. Maybe whole wheat, but I didn’t know anyone whose mother bought packaged whole wheat bread.

My mother bought packaged white bread for this reason (which Bobrow-Sprain also acknowledges), and that is, there are certain kinds of sandwiches that just don’t work with rye, corn bread or any kind of fancy artisinal loaves.

Like peanut butter and jelly and mostly, my mother’s fried-to-a-crisp kosher salami with yellow mustard. That salami was hot and sizzling, right out of the pan when she put it on the mustard-slathered slices and when you held the sandwich to take a bite, your fingers would make such deep indentations in the soft bread that sometimes it made a hole in the sandwich. Never mind. That’s the way it was supposed to be with packaged white bread.

I could actually have one of those sandwiches now. It’s been years.

No, decades.

Generations.

I don’t remember when I last bought packaged white bread. 

I do bake white bread though. With one of my help-the-little-lady convenience machines like my KitchenAid mixer and my Cuisinart food processor. With either of those it’s not that difficult to make a good loaf of bread.

I don’t agree with those who say white bread is bland. Sometimes it’s the ingredients on the bread that you want to give a starring role, not the bread itself. Like that fried salami.

So, for any of you who would like to have a good white bread, try this recipe.

Milk and Honey White Bread

  • 1 package active dry yeast

  • 1/4 cup warm water

  • 4 cups all-purpose flour, approximately

  • 1/4 teaspoon sugar

  • 1-1/2 teaspoons salt

  • 2 large eggs

  • 2 tablespoons softened butter

  • 3/4 cup warm milk

  • 2 tablespoons honey

  • 1 egg beaten with 1 teaspoon water

Place the yeast and 1/4 cup water in a small bowl. Add 1 teaspoon flour and the sugar. Mix well and set aside for about 5 minutes. In the bowl of an electric mixer, combine the remaining flour and salt. Add the 2 eggs, butter, milk, honey and the yeast mixture. Blend ingredients thoroughly. Knead until the dough is smooth and elastic, adding more flour if the dough seems too sticky. Dough should be soft but not sticky. Place the dough in a bowl, cover and let rise in a warm place for about 1-1/2 hours or until doubled in bulk. Punch down the dough, knead briefly and let rise again for 20 minutes.

Preheat the oven to 350 degrees. 

Lightly grease a 9” loaf pan. Place the dough inside the pan. Let rise for another 30 minutes. Brush the surface of the bread with the beaten egg. Bake for about 30 minutes or until golden brown and well risen.

Makes one loaf

Chocolate Yogurt Pound Cake

"This is just like room service!"

That, from my almost 6-year old grand daughter Lila (who apparently already knows about room service!?!) after I let her have her dinner in the family room and watch TV.

This is something I didn’t allow my own two daughters.

But honestly, after 35 years I was a little out of practice. And, like bike riding, you may not forget how, but you also may not race through the streets or peddle yourself up a steep hill quite as often or as easily either. 

So, when the kids came for a visit, sans parents, from Friday through Sunday, there were occasional, let’s say, concessions. If my daughter Gillian, their Mom, is reading this now, I say, don’t worry. These kids are terrific and 2 meals in front of the TV won’t harm them.

As you can see from the photos we did lots of stuff like draw, have a pedicure, blow bubbles outside, ride bikes, have a fashion show. We also frosted a birthday cake for their cousin Nina’s birthday party on Saturday (although the top decoration, an Ariel rice-paper scene, was store-bought).

The little one, Remy, age 21 months talks a blue streak although sometimes it’s difficult to understand his pronunciations. However, one of the new words he learned this weekend was “chocolate cake,” which he mentioned to his parents as soon as they walked in the door Sunday night.

"Tzockickcake!" he told them, with his tongue literally licking his lips.

When a kid is this young you can’t depend on “what happens at Grandma’s stays at grandma’s.”

I had baked the chocolate cake for a Hadassah Tea and was cutting it into slices. There were a few not-so-lovely pieces that I didn’t include on the platter I sent over for that event. Remy had a small sliver of the leftovers. He liked it, that’s for sure.

Can’t say I blame him. Smart kid!

Here’s the recipe:

Chocolate Yogurt Pound Cake

  • 2-1/2 cups all-purpose flour
  • 1 cup unsweetened cocoa powder
  • 1 teaspoon baking soda
  • 3/4 teaspoon salt
  • 12 ounces butter at room temperature
  • 3 cups sugar
  • 5 large eggs
  • 2 teaspoons vanilla extract
  • 1 cup plain yogurt
  • 1 cup boiling water
  • 1 cup chocolate chips

Preheat the oven to 350 degrees. Butter and flour a 10-cup bundt pan. Sift the flour, cocoa powder, baking soda and salt into a bowl and set aside. Beat the butter and sugar in the bowl of an electric mixer and mix at medium speed for 3-4 minutes or until well combined. Add the eggs, one at a time, blending each one in. Stir in the vanilla extract. Add the dry ingredients in thirds, alternating with the yogurt, until the flour mixture and yogurt have been used and the batter is well blended and smooth. Gradually add the boiling water, beating slowly, for 2-3 minutes or until the batter is smooth and well blended. Stir in the chocolate chips. Pour the batter into the prepared pan. Bake for 65-70 minutes or until a cake tester inserted into the center comes out clean. Let the cake cool in the pan for 10 minutes, then invert onto a cake rack to cool completely. Makes 12+ servings

How to Braid a 6-strand Challah

Baking challah? I posted my recipe last week and later realized that a lot of people don’t know how to braid a challah. A cousin of mine called a while ago to confirm that fact. She had wanted to make a challah but didn’t know how to make the bread …

Baking challah? I posted my recipe last week and later realized that a lot of people don’t know how to braid a challah. A cousin of mine called a while ago to confirm that fact. She had wanted to make a challah but didn’t know how to make the bread look professional.

Btw, her name is Jenny Rosenstrach and she is a food writer and blogger, with a terrific book about getting dinner to the table every day (Time for Dinner) and book coming in June called Dinner: a Love Story and a wonderful, family-oriented blog with the same name: Dinner: a Love Story.

She wasn’t the first to consider the whole braiding issue (plus how to make a round challah at holiday time).

So I decided to tell you all how to do it.

I myself became a “pro” not to long ago, I should confess. I had been to a bakery on a tour with one of the women’s groups I belong to. The baker zipped through the braiding so fast it reminded me of those old time black and white movies where people are walking but they look as if they’re running. So we asked him to show us again but of course it was a “show” not a real instruction lesson so he went even faster the next time and no one figured it out.

I always made challah with a standard three-strand braid.

Then I found someone who showed how to do it on Youtube. I don’t remember which version it was or I would mention it here. But my eldest grand child and I were watching and trying to braid the challah as we watched. We had to stop the computer after each step so we could write it all down (and of course we got flour crumbs all over the keyboard) but we finally did get it right.

The next time we made a challah together he remembered it all.

I had to get my instruction sheet out and do it step by step.

I finally got it (after several times).

Okay, you can make a regular three-strand braided challah, the way I had done for years and years. The challah is still delicious. That kind of braid is like braiding someone’s hair. Left over middle, right over middle, left over middle, right over middle, etc.

But, making a 6-strand braid is a little more complicated.

Here’s how:

Lay the six strands alongside each other and press the strands together at the top to seal the top edge. Then braid the strands as follows:

1. far right strand all the way over to the left

2. former far left strand all the way over to the right

3. the now far left strand into the middle

4. the second from right strand all the way over to the left

5. the now far right into the middle

6. the second from the left all the way over to the right

7. the now far left into the middle

8. repeat 4 through 7 as many times as necessary to use up the strands

9. press the strands together at the bottom

Good luck! And enjoy.

Liberal Buttermilk Pancakes with Citrus-Butter

Today is the day of the famous pancake race in Olney, England and also in Liberal, Kansas. It’s an old tradition, dating back more than 550 years (at least in England).

Well of course, who doesn’t like pancakes?

But a pancake race?

Apparently, the tradition got started back in 1445 when housewives would make food like pancakes on the day before Ash Wednesday, in order to use up all the butter and eggs and other foods that weren’t allowed during Lent.

Well, as it turns out, one woman was running a little late for services and when she heard the church bells she ran out of the house, skillet and all, flipping pancakes. The next year the other women in the town mocked her by running to church with their frying pans filled with pancakes.

But apparently the Vicar thought it was humorous and a good way to bring everyone together so he decided to make it a yearly event. With a winner — the one who runs with the pan, flipping pancakes, and gets to the church first.

Move along 500 years more or less and the mayor of Liberal Kansas visits Olney, sees the race and decides this is great fun. And decides to have one back home. (According to another version though the folks in Kansas read about the race in Time Magazine and decided to make it a competition.)

So now the two “sister” towns, at least on the (Fat) Tuesday before Ash Wednesday, run a similar race (about 415 yards) and people in each place call each other to compare times.

This morning’s race in Olney was won in record time by an 18-year old newcomer, Devon Byrne. In fact, she beat out the winner in Kansas by 10.1 seconds. 

When I first read about the Pancake Race it inspired me to cook pancakes, which are one of my very favorite things to eat. I don’t eat them too often either because they’re so high-carb and all. But every once in a while one needs an indulgence right?

If you love pancakes as much as I do, make this recipe (on Pancake Day or not). I have worked on this recipe for ages, tweaking it here and there and think it is about perfect now. Yes, it calls for buttermilk, which makes the pancakes really really fluffy and tender. It’s worth buying buttermilk just for this recipe (or you can buy dry buttermilk that keeps in your cabinet for about a year). You can also use the buttermilk for lots of other delicious things like muffins and quick breads or blend it with fruit to make a terrific smoothie.

Liberal Buttermilk Pancakes with Citrus-Butter

  • 3 tablespoons butter
  • 2-1/2 cups all-purpose flour
  • 1 teaspoon baking soda
  • 1 teaspoon baking powder
  • 1/2 teaspoon salt
  • 2 tablespoons sugar
  • 1 large egg
  • 3 cups buttermilk
  • butter for frying
  • Citrus Butter

Melt the 3 tablespoons butter and set aside. Sift the flour, baking soda, baking powder, salt and sugar into a bowl. In another bowl, mix the egg and buttermilk until well blended and uniform in color. Add the egg mixture and melted butter to the flour mixture. Stir until well blended. Melt butter in a saute pan over medium-high heat. When the butter has melted and look foamy, drop the batter by the 1/4-cupful (or make larger or smaller pancakes) into the pan. Cook for about 2 minutes or until the bottoms are lightly browned and the pancakes start to bubble on top. Flip the pancakes and cook for another minute or so until the second side is lightly browned. Serve with butter and syrup or with Citrus Butter.

Makes 4-6 servings

To make the Citrus Butter:

  • 1/4 pound butter, slightly softened
  • 1 teaspoon confectioner’s sugar
  • 1-1/2 teaspoons grated fresh orange peel

Mix ingredients until well blended.

Makes 1/2 cup