Shavuot

Mushroom Pot Pie

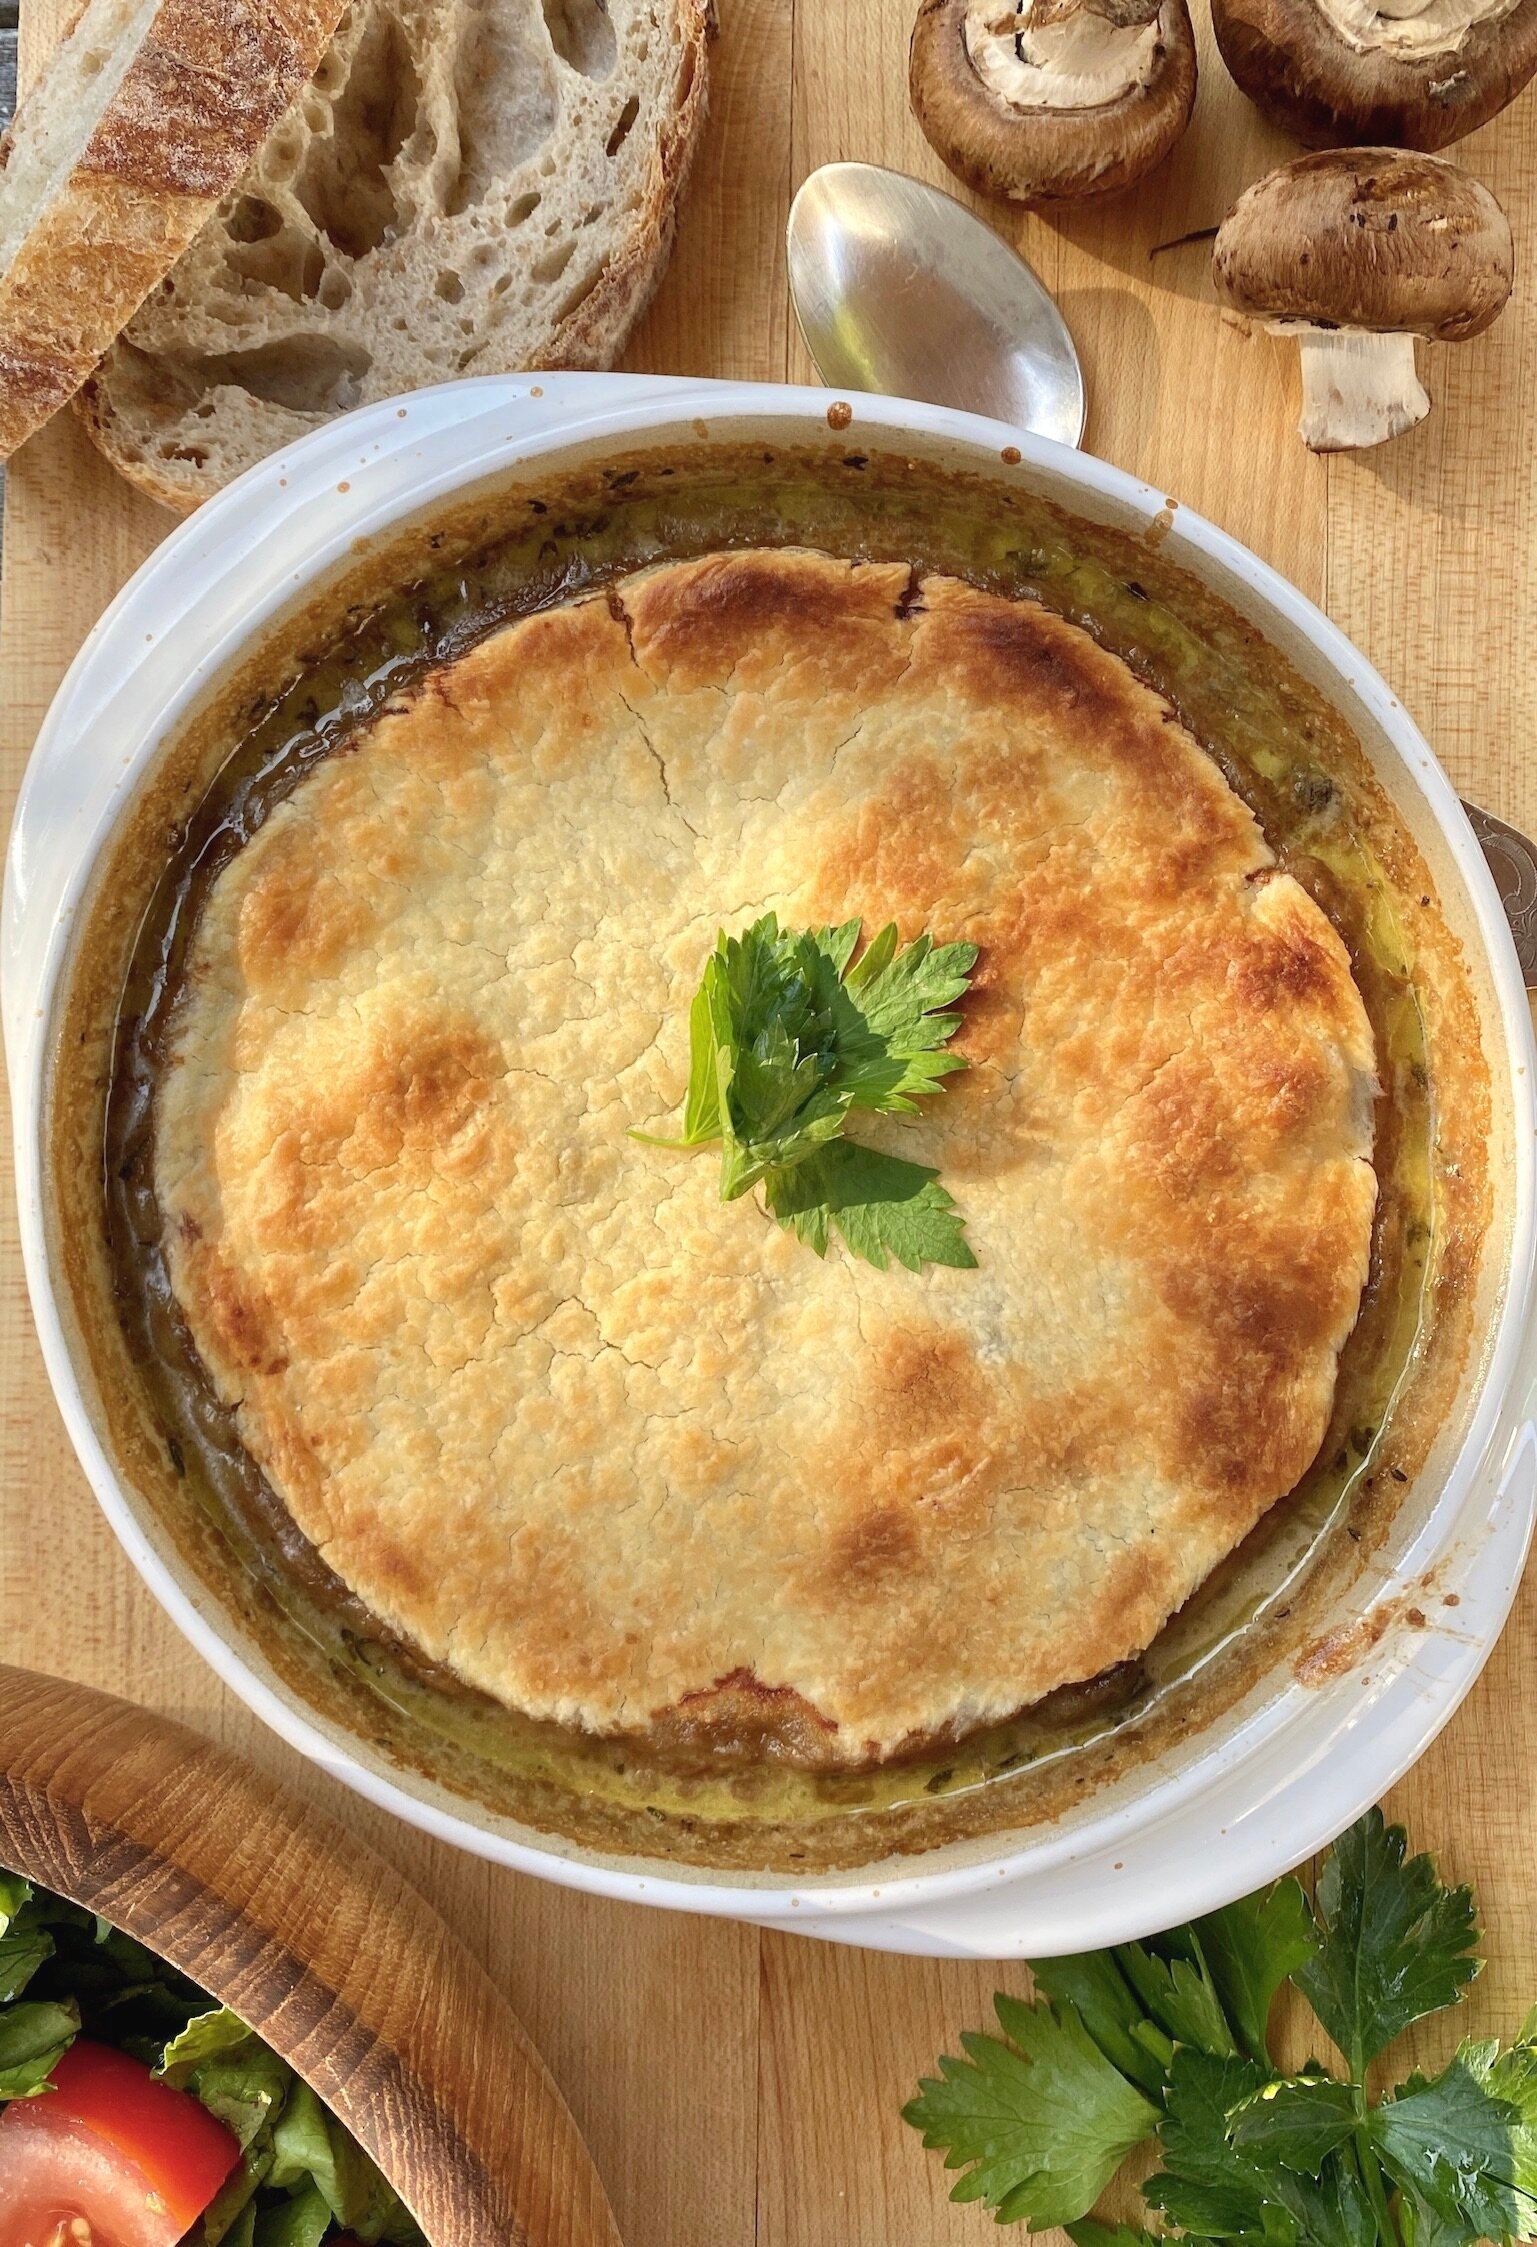
If you’re looking for a fabulously delicious meatless meal, it doesn’t get better than Mushroom Pot Pie.

No more needs be said. Try it and see for yourself.

Mushroom Pot Pie

  • 2 tablespoons olive oil

  • 1 tablespoon butter

  • 1/2 cup chopped shallots

  • 2 medium garlic cloves, chopped

  • 1 pound mixed fresh wild mushrooms, chopped

  • salt and freshly ground black pepper to taste

  • 1 tablespoon all-purpose flour

  • 1 cup plain Greek yogurt or dairy sour cream

  • 1 cup vegetable stock

  • 1 tablespoon lemon juice

  • 1/4 cup chopped fresh parsley

  • 1 teaspoon fresh thyme leaves

  • 1/2 cup grated Parmesan cheese

  • 1 sheet puff pastry

Preheat the oven to 375 degrees. Heat the olive oil and butter in a sauté pan over medium heat. When the butter has melted and looks foamy, add the shallots and cook for 2-3 minutes, or until softened. Add the garlic and cook briefly. Add the mushrooms, salt and pepper and cook for 4-6 minutes or until the mushrooms are tender and all the liquid has evaporated. Add the flour and stir it to dissolve it completely. Add the yogurt and stir it into the mushrooms until completely incorporated as a sauce. Pour in the stock and lemon juice and mix the ingredients thoroughly. Add the parsley and thyme. Reduce the heat and simmer for 10-12 minutes or until the sauce has reduced has thickened. Stir in the Parmesan cheese, cook for another 1-2 minutes and remove the pan from the heat. Spoon the mixture into a 6-cup casserole dish. Roll the puff pastry slightly thinner and cut it to the shape of the casserole used. Place the puff pastry over the mushroom mixture. Bake for about 25 minutes or until the dough is puffed and golden brown.

Makes 4 servings


Pashtida

If you haven’t tried Pashtida, you’re missing out. This dish — so popular in Israel — is kind of like a cross between a quiche, a frittata and a kugel. Sometimes it’s made with meat, sometimes dairy and sometimes just vegetables. Any way at all — this is one delicious treat!

Pashtida is filling and hearty enough for dinner (add a side salad) but light enough for lunch. It’s also the kind of dish that’s made for weekend brunch. Leftovers are good too — easily reheated for weekday breakfast.

If you’re looking for a new dairy dish for Shavuot (and, thinking ahead, during the Nine Days or for your Break-the-fast) I encourage you to try this one. My recipe is a melange of eggs, cheese and veggies that you spoon into a casserole and bake until the eggs are set and the top is crispy.

This dish is also amazingly versatile, so I’ve listed a variety of options for substitution.

Vegetable Pashtida

  • 1 large Yukon Gold potato, peeled and diced

  • 1 tablespoon butter

  • 1 tablespoon olive oil

  • 1 medium onion, chopped (3 scallions; 2 shallots)

  • 1 cup chopped fresh: spinach; kale; (diced) zucchini; or chopped cooked veggies (such as green beans, carrots, bell pepper, asparagus; eggplant); or thawed frozen peas or corn

  • Halved mini-tomatoes (such as grape or cherry; about 7-8); chopped sun-dried tomatoes, optional

  • 4 tablespoons cream cheese, cut into small pieces (or 1/3 cup dairy sour cream or 1/2 cup cottage cheese)

  • 5 large eggs

  • 1 cup whole milk or half and half

  • 1/2 cup shredded meltable cheese such as Swiss, cheddar, Havarti or mozzarella

  • salt and freshly ground black pepper to taste

  • 2 tablespoons chopped fresh parsley (dill, basil)

Preheat the oven to 375 degrees. Lightly grease a casserole dish (such as approximately 8”x 6” or a 6-cup round) and set aside. Cook the potatoes in lightly salted boiling water for about 3 minutes or until barely tender. Drain and set aside. Heat the butter and olive oil in a sauté pan over medium heat. When the butter has melted and looks foamy, add the onion and cook for a minute. Add the potato and cook for 5-6 minutes or until the pieces are lightly crispy, stirring occasionally. Add the vegetables and cook for 2 minutes, stirring occasionally, until they have softened. Add the tomatoes, if used, and cook for another minute. Add the cream cheese and continue to cook and stir until the cheese has melted into the vegetables. Remove the pan from the heat and let the ingredients cool slightly. Beat the eggs and milk together and pour over the vegetable-cream cheese mixture. Add the shredded cheese and stir gently until the ingredients are evenly distributed. Sprinkle to taste with salt, pepper and parsley. Spoon the ingredients into the prepared casserole dish. Bake for about 45 minutes or until the eggs are set and the top is crispy.

Makes 4-6 servings

Grilled Carrots

I always think of Memorial Day Weekend as the start of the official grilling season where I live. Silly, maybe. Lots of people I know grill year round. But I don’t like being outside cooking chicken breasts or hamburgers when the weather is what the weather is in Connecticut during the winter.

So — the grill is open now, thanks to warmth and sunshine.

This recipe for grilled carrots is my official start to the official start of grilling season. We’ve eaten the carrots hot, with the cold sauce. We’ve eaten the leftovers at room temp, with the cold sauce. Winner, either way.

Also - you can cut the carrots into smaller pieces and use them with the sauce, for crudites.

Grilled Carrots with Yogurt Sauce

  • 1 dozen medium carrots

  • 1-1/2 tablespoons olive oil

  • 1 cup plain Greek style yogurt

  • 1-1/2 tablespoons lemon juice

  • 1 teaspoon grated fresh lemon peel

  • 1/4 teaspoon Aleppo pepper (or use crushed red pepper)

  • 3 tablespoons chopped fresh mint

Preheat an outdoor grill to medium heat. Peel the carrots and coat them with the olive oil. Grill the carrots, turning them occasionally, for 12-15 minutes, or until browned and tender. While the carrots are cooking, mix the yogurt with the lemon juice, lemon peel, Aleppo pepper and 2 tablespoons of the mint. Serve the carrots with the yogurt sauce. Sprinkle with fresh mint.

Makes 4-6 servings

Strawberry Pavlova

If you’re like everyone else who observes Passover, you’ve used a lot of eggs during the holiday!

Our usual family Passover menus use up more yolks than whites, so I’m always left with a load of egg whites. So, because I am one of those “waste not want not” people, I recently made a lot of meringues and meringue cookies and these Pavlovas.

Pavlovas, which are hard meringue shells filled with fruit, lavished with sauce and topped with whipped cream, are sugary sweet and you can do a lot with them. They’re also easy to make and are terrific for Passover because there’s no flour or any other ingredient we can’t eat during the holiday.

The meringue shell-cream-fruit dessert is named after a famous Russian ballet dancer named Anna Pavlova (1881-1931). Food historians say that a hotel chef in either Australia or New Zealand named the dessert after her visit there in 1926. The white meringue shell is said to mimic her tutu and in the original recipe, the shells were filled with kiwi fruit, in imitation of the decorations on one of her outfits. But any soft fruit will do.

Note: for more on beating egg whites properly, click here.

Pavolvas

Meringue Shells:

  • 4 large egg whites at room temperature

  • 1 tablespoon lemon juice

  • 1/4 teaspoon salt

  • 1 cup sugar

  • 3/4 teaspoon vanilla extract

  • whipped cream

  • sliced fruit such as strawberries, kiwi fruit, bananas, etc.

Preheat the oven to 275 degrees. Line a cookie sheet with parchment paper. Beat the egg whites in the bowl of an electric mixer with whisk attachment set at medium speed until the mixture is foamy. Add the lemon juice and salt and beat, gradually increasing the speed, until soft peaks form. Gradually add the sugar (2 tablespoons at a time) and the vanilla and continue to beat, gradually increasing the speed to high, until the mixture stands in stiff, glossy peaks. Spread 8-10 equal amounts of the meringue mixture onto the sheet. Flatten the mounds with the back of a large spoon, leaving the edges slightly higher. Bake for 45 minutes. Reduce the oven heat to 250 degrees. Bake for another 15 minutes. Remove the cookie sheet to a cake rack to cool. Gently release the meringues from the parchment. Fill the centers of the meringue shells with whipped cream. Top with sliced fresh fruit.

Makes 8-10

Eggplant Parmesan

IMG_3986.jpg

When I need a meatless meal, Eggplant Parmesan is one of my traditional go-tos. It’s familiar, relatively easy to prepare and you can cook it in advance and freeze it for about a month. Best of all, it tastes really good.

I especially love this dish in the summer when my garden is in bloom with thick, fresh purple eggplants!

The recipe below lists one cup of marinara sauce. I make my own and freeze that too. But in a pinch, store-bought works too when you want to make things easier on yourself.

Another thing that’s easy -- and less caloric too -- I roast the eggplant slices instead of breading and frying them.

Eggplant Parmesan

  • 1 medium to large eggplant

  • salt

  • 5 tablespoons olive oil, approximately

  • 1 cup marinara sauce

  • 15 ounces ricotta cheese

  • 1/4 cup plus 1/4 cup plus 2 tablespoons grated Parmesan cheese

  • 1 large egg

  • 2 teaspoons chopped fresh oregano (or 3/4 teaspoon dried)

  • 1 cup shredded mozzarella cheese

Preheat the oven to 400 degrees. Slice the eggplant about 1/8-inch thick, sprinkle with salt and let rest for 20-30 minutes. Wipe the eggplant slices dry and place them on a baking sheet. Brush each side of each slice of eggplant with a film of olive oil. Roast the slices for about 15 minutes, turning them once, until they are softened and lightly browned. Remove the slices from the oven. Place 1/2 cup of the marinara sauce in a baking dish. Place 1/3 of the eggplant slices in top (overlap the slices slightly). Mix the ricotta cheese with 1/4 cup of the Parmesan cheese, the egg and oregano. Place half of this cheese mixture on top of the eggplant slices. Sprinkle with 1/4 cup of the shredded mozzarella cheese and 2 tablespoons of the Parmesan cheese. Add another layer of eggplant slices. Cover with the remaining ricotta cheese mixture. Spread with the remaining (1/2 cup) marinara sauce. Cover with the remaining eggplant slices. Sprinkle with the remaining (3/4 cup) mozzarella cheese and the remaining (1/4 cup) Parmesan cheese. Bake for 20-25 minutes or until the cheese has melted and is beginning to turn lightly brown.

Makes 4 servings

The Benefits of Buttermilk: Summer Buttermilk Soup

8CFD4F27-DC5B-4C0E-84D9-1472A60AB802_1_201_a.jpeg

Buttermilk makes you beautiful.

So they say.

I once read that Mark Antony fell in love with Cleopatra because she had silky, radiant skin -- thanks to baths in buttermilk. And that Scarlett O’Hara apparently used buttermilk on her face to get rid of her freckles.

Me? Silky and radiant? Not lately (if ever).

Also I have too many freckles to even contemplate rubbing them out. Also, I think freckles are cute.

So no, for me buttermilk isn’t about its beauty functions.

It’s about food.

No surprise there, right?

You heard it here: buttermilk makes a lot of food better, more delicious, more perfect in texture.

Buttermilk makes one of the tastiest, most satisfying, most thirst-quenching drinks (lassis).

It adds a whole new dimension to ordinary cole slaw.

Want moist, tender muffins, scones and pancakes? Make them with buttermilk. Ditto Cake! Pie! Even pudding!

And especially, at this time of year: make satisfyingly creamy, low-fat, low-calorie summer soups like this one, based on cucumbers.

Cold Cucumber-Buttermilk Soup

  • 2 medium cucumbers

  • salt

  • 1 stalk celery, peeled and chopped

  • 2 scallions, chopped

  • 1 clove garlic

  • 1 teaspoon chopped fresh chili pepper, optional

  • 1 cup buttermilk

  • 1/2 cup plain yogurt

  • 3 tablespoons lemon juice

  • 2 tablespoons chopped parsley

  • 1 tablespoon chopped fresh dill

  • Aleppo pepper (or use freshly ground black pepper)

Peel the cucumbers, slice them in half lengthwise and scrape out the seeds. Sprinkle the cucumbers with salt and let them stand for 30 minutes. Wipe the cucumbers with paper towels. Chop the cucumbers into coarse chunks and place in a blender or food processor. Add the celery, scallions, garlic and chili pepper, if used, and process to mince them. Add the buttermilk, yogurt, lemon juice, parsley and dill (use a large bowl and whisk if your blender or processor isn’t large enough) and process until well blended. Season to taste with salt and either Aleppo or black pepper. Chill thoroughly before serving.

Makes 4-6 servings


Romanian Cornmeal Cheese Cake

fullsizeoutput_bfc6.jpeg

My grandmother occasionally made a fabulous cornmeal dish — she called it mamaliga, the national dish of Romania — and served it with sweetened, mashed farmer cheese and sour cream. Sometimes with a drizzle of maple syrup over everything.

I never knew it as Malai, a classic Romanian Shavuot treat, but that’s what it was. But it wasn’t her usual, plain “cornmeal mush” because it also had eggs and sugar mixed into the batter.

All I knew was how delicious it tasted.

So, over the years I experimented over and over until I made a version that tastes something like what I remember.

Here it is, in time for Shavuot.

Romanian MALAI

The Batter:

  • 6 tablespoons butter

  • 3/4 cup all-purpose flour

  • 3/4 cup finely ground cornmeal

  • 1/3 cup sugar

  • 2 teaspoons baking powder

  • 1/2 teaspoon salt

  • 2/3 cup milk, half-and-half or buttermilk

  • 2 large eggs

  • filling

  • sour cream, whipped cream, ice cream, etc. optional

  • extra sugar or maple syrup

Preheat the oven to 350 degrees. Lightly grease an 8-inch cake pan. Melt the butter and set it aside to cool. In the bowl of an electric mixer, combine the flour, cornmeal, sugar, baking powder and salt and mix to distribute the ingredients evenly. Add the milk, eggs and cooled, melted butter and mix on medium speed for 1-2 minutes or until thoroughly blended. Spoon one half of the cornmeal mixture into the prepared pan and spread the batter to make it even. Top with the filling. Top with the remaining batter (spread the batter to make a smooth, even top crust). Bake for 35-40 minutes or until the top is golden brown and the cake is set.

Serve the cake warm, room temperature or slightly chilled. Serve plain or topped with sour cream (traditional), whipped cream or ice cream. (I add about 2 teaspoons of sugar for each cup of sour cream used as a garnish).

Makes 8-10 servings

THE Filling:

  • 1 pound farmer’s cheese

  • 1 large egg

  • 1/4 cup sugar

  • 1/2 teaspoon finely grated fresh lemon peel

Mix the farmer’s cheese, egg, sugar and lemon peel until the ingredients are well blended.

Salmon and Farro Salad

A05F3E0B-A217-434B-AD6D-81EC49EDDFCA_1_201_a.jpeg

We’re big on main course salads in our family. They’re usually easy, unfussy and filling. I also like that I can make them in advance.

I’ve made  numerous versions of this particular salad: I love farro but have also used barley, couscous and wheatberries. I change up the cheese, depending on what I have, and use red onions or shallots if I need my scallions for something else.

Of course I have also made this all-veggie or no-meat, replacing the salmon (or any other cooked fish) with cooked eggs, carrots, peas and zucchini.

This is such a versatile dish! Best served at room temperature.

Salmon and Farro Salad

  • 12 ounces fresh salmon*

  • olive oil or vegetable oil

  • 1 cup farro

  • 2-1/2 cups water

  • 1 ripe avocado, cut into bite size pieces

  • 3/4 cup crumbled feta, goat or blue cheese

  • 2-3 scallions, chopped

  • 1 teaspoon chopped fresh oregano

  • 1 teaspoon chopped fresh mint

  • 1/4 cup vegetable oil

  • 2 tablespoons lemon juice

  • 2 tablespoons white wine vinegar

  • salt and freshly ground black pepper to taste

Preheat a grill, broiler or grill pan. Brush the salmon with a film of vegetable oil and grill, broil or pan-broil for about 4 minutes per side or until cooked to desired consistency. Remove the fish from to a cutting board, cut into chunks and set aside to cool slightly. While the salmon is cooking, place the farro in a saucepan and cover with the water. Bring to a boil over high heat. Lower the heat, cover the pan and simmer for about 25 minutes or until the grain is cooked but still slightly chewy. Drain any remaining liquid. Place the cooked farro into a mixing bowl. Add the fish, avocado, cheese, scallions, oregano and mint. Toss gently to distribute the ingredients evenly. In a small bowl mix the vegetable oil, lemon juice and white wine vinegar. Pour over the ingredients and toss. Sprinkle with salt and pepper to taste. Let rest for 10-15 minutes before serving.

*you can use drained, canned salmon

 Makes 4 servings


Butternut Squash Salad with Feta Cheese and Pepitas

fullsizeoutput_ba39.jpeg

This is the time of year (where I live, anyway) where one day it can be winter: cold, windy and snowy. OR spring: warm, sunny, go-for-a-walk weather.

This salad reflects the season: some roasted winter squash with young, tender greens in a salad that’s light, a first course to a spring meal.

Butternut Squash salad with Feta Cheese and Pepitas

  • 1 medium butternut squash

  • 2-1/2 tablespoons olive oil

  • kosher salt

  • Aleppo pepper or cayenne (optional)

  • 2 cups packed baby spinach or other greens

  • 5-6 tablespoons crumbled feta cheese

  • 4-5 tablespoons pepitas (pumpkin seeds)

  • 2 tablespoons white wine vinegar

Preheat the oven to 425 degrees. Cut the squash in half lengthwise. Scoop out the seeds and stringy flesh. Peel off the skin with a vegetable peeler. Slice the squash into 1/2-inch slices. Place the slices on a parchment-paper lined baking sheet. Coat the slices on both sides using one tablespoon of the olive oil. Sprinkle with kosher salt and Aleppo pepper if desired. Bake the squash for 15 minutes. Turn the slices over. Bake for another 15-20 minutes or until lightly browned. Remove the squash from the oven. Place equal amounts of the spinach leaves on each of four serving plates. Place equal amounts of squash slices on top. Sprinkle with equal amounts of feta cheese and pepitas. Mix the remaining 1-1/2 tablespoons of olive oil with the white wine vinegar. Sprinkle over the salad. Serve at room temperature.

Makes 4 servings

Romanian Cheese Turnovers (Placinta cu Branza)

7478E527-2E6C-45AE-B34E-777D0863E49E_1_201_a.jpeg

This has been a year like no other, but, in an effort to make New Year’s weekend somewhat normal (and with hopes that 2021 will be much better!), the cousins who always spend New Year’s with us have agreed to self-isolate, take Covid tests and so on, and if the tests are negative, they will come and stay with us for a few days!!!

I am so looking forward to that!

Our New Year’s Eve celebration is always an hors d’oeuvre fest. We start at about noon, have a few nibbles. A few hours later we have more nibbles and then at about 7:00-8:00 p.m. our final round. Dessert is much later, maybe 10:00 or 11:00 p.m.

We are doing the same thing this year. TRADITION!

The company and the food style will help us all feel … normal. If only for the long weekend.

I make some classics every year. Gougeres. Stuffed mushrooms. Matbucha. Chicken wings.

This year I am adding these mini-cheese turnovers. The filling is classic — my grandmother (my visiting cousin’s grandma as well) made a similar cheese mixture and wrapped it up in phyllo dough, as I also have many times. But puff pastry is easier to work with and every bit as delicious. We have eaten several of these as I worked to finalize the recipe. The New Year’s stash is safely stored away in my freezer.

Romanian Cheese TUrnovers (Placinta cu Branza)

  • 1-1/4 cups crumbled feta cheese

  • 1 7.5 ounce package farmer cheese (about one cup)(or use dry curd cottage cheese)

  • 1/4 cup sour cream

  • 1 large egg

  • 2 medium scallions, finely chopped

  • 1 tablespoon chopped fresh dill

  • 2 sheets frozen puff pastry*

Preheat the oven to 375 degrees. Line a baking sheet with parchment paper. Place the feta cheese, farmer cheese, sour cream, egg, scallion and dill in a mixing bowl and mix together until the mixture is uniform and the ingredients evenly distributed. Roll one sheet of the puff pastry into a 12”x 12” or 13”x13”square. Cut out 9 or 16 squares. Place equal amounts of cheese filling in the center of each. Wet two sides of each square lightly with some water. Fold the dry sides of the dough in half over the filling to meet the wet sides and to form triangles. Press the ends to seal the dough tightly. Press the edges with the tines of a fork to seal the sides completely. Place the pieces on the baking sheet. Repeat with the remaining dough and filling. Bake for 25-30 minutes or until golden brown.

Makes 18 or 32

*You can make this as strudel, using buttered phyllo leaves