Shavuot

Herbed Feta Cheese with Sundried Tomatoes and Olives

fullsizeoutput_846b.jpeg

A few weeks ago I took a quickie trip to Berlin with my daughter. We took a stroll through the Turkish outdoor market, where I saw someone selling a gorgeous hunk of feta cheese, scattered with sundried tomatoes and olives, seasoned with herbs and sprinkled with a drizzle of olive oil.

I noted the ingredients and took a photo. 

It looked so delicious that the moment I saw this cheese thing I knew I had to make it at home.

I did.

It is as good as I thought it would be. I served it to guests last weekend.

They raved.

Here's the recipe. 

Herbed Feta Cheese with Sundried Tomatoes and Olives

  • 1/2 pound feta cheese
  • 3 sundried tomatoes in oil
  • 8-10 imported black pitted olives
  • 2 teaspoons finely chopped fresh parsley
  • 1/2 teaspoon dried oregano
  • Aleppo pepper
  • 1 tablespoon olive oil

Cut the feta cheese into thick slices and place on a serving dish. Chop the sundried tomatoes and scatter them over the cheese. Scatter the olives around the cheese and dish. Scatter the parsley over the ingredients and sprinkle with the oregano and some Aleppo pepper to taste. Drizzle the olive oil on top.

Makes 8-10 servings


Cheese and Vegetable Kugel

_DSC9295.jpg

When my kids were young and still living at home, I made kugel a lot. My daughters were not terribly anti-vegetable, but I realized that pairing veggies and noodles would make it even easier to have more vegetables at our meals.

Also, it is a good way to use leftovers -- the recipe below is extremely versatile. Add cut up cooked green beans or asparagus, corn kernels, peas. Like that.

This kugel is filling enough for dinner. Also yummy with a sunny-side egg or two on top of each serving for a meatless (Monday) dinner. And a wonderful choice for dairy-fest Shavuot.

Veggie Kugel

  • 4 tablespoons olive oil or vegetable oil
  • 1 medium onion, chopped
  • 10-12 ounces mushrooms, chopped
  • 1 bunch spinach or kale, washed and dried, coarsely cut
  • 2 medium carrots, shredded
  • 12 ounces medium-wide egg noodles
  • 3 large eggs, beaten
  • 1/2 cup sour cream
  • 1 cup grated Swiss cheese
  • salt and freshly ground black pepper to taste
  • 3 tablespoons grated Parmesan cheese
  • paprika

Preheat the oven to 375 degrees. Lightly grease a 9”x9” baking dish. Heat 2 tablespoons of the olive oil in a sauté pan over medium heat. Add the onion and mushrooms and cook for 3-4 minutes. Add the spinach and cook for another 1-2 minutes or until it has wilted (kale may take a minute or so longer). Add the carrots and cook for another minute. Remove from the heat and set aside. Cook the noodles according to package directions, drain and place in a large bowl. Add the remaining 2 tablespoons vegetable oil, the cooked vegetables, eggs, sour cream and 3/4 cup of the Swiss cheese. Season to taste with salt and pepper. Stir to mix ingredients well. Place in the prepared baking dish. Sprinkle the top with the remaining Swiss cheese, Parmesan cheese and paprika. Bake for about 35 minutes or until the top is crispy and brown.

Makes 6-8 servings


Banana Marble Cake

fullsizeoutput_828e.jpeg

Whenever my mother had leftover sour cream that was still safe to eat but had been hanging around the fridge for too long for it to taste fresh, she would use it to bake something. Like her marble cake. 

That cake was a simple wonder. Tender, vaguely sweet, with just enough melted chocolate swirling through the vanilla crumb. Rarely frosted, we ate it like coffee cake, just as is.

I've made that cake many times, and for the same reasons. Leftover sour cream (I also use leftover plain Greek yogurt when I have some). I've made it the original way and with coconut oil in place of shortening. 

Recently I had sour cream and yogurt leftover, the not exactly new kind.

I also had bananas left over. I always have bananas left over. I usually make banana bread with the leftover bananas.

So I took a cue from my mother and decided to bake marble cake. Using bananas.

So good.

Banana Marble Cake

  • 4 ounces semisweet chocolate
  • 2-1/2 cups all-purpose flour
  • 1 teaspoon salt
  • 2 teaspoons baking powder
  • 1/2 teaspoon baking soda
  • 1 cup sugar
  • 3 large eggs
  • 1 teaspoon vanilla extract
  • 1/2 cup vegetable oil
  • 4 very ripe medium bananas, mashed
  • 1 cup dairy sour cream or plain Greek yogurt 

Preheat the oven to 350 degrees. Grease and flour a (10-inch) 8-cup bundt pan. Melt the chocolate and set it aside. Mix the flour, salt, baking powder and baking soda together in a bowl and set aside. In the bowl of an electric mixer set at medium speed, beat the sugar and eggs for 2-3 minutes or until well blended. Add the vanilla extract and vegetable oil and beat for 1-2 minutes or until thoroughly blended. Add the bananas and sour cream and beat them in. Add the flour mixture and beat for 1-2 minutes or until the batter is well blended. Pour half the batter into the prepared pan. Pour in half the melted chocolate and swirl it into the batter using a knife or wooden spoon. Repeat with the remaining batter and melted chocolate. Bake for 50-60 minutes or until a cake tester inserted into the center comes out clean. Remove from the oven and let cool in the pan for 10 minutes. Remove to a cake rack to cool completely.

Makes one bread, serving 12-16


Lullabye Bread

DSC08114.jpg

A few years ago Ed and I were in Berlin and checked out KaDeWe, the city's famous department store that has the biggest food halls in Europe and maybe in the world. They sell every kind of food you can imagine. Gorgeous cakes and pastries. Bountiful, beautiful fruit. Different kinds of eggs, dairy products, chocolates. 

It was all familiar. Pineapples. Peaches. Sachertorte. Macarons. Freshly butchered chickens, and so on.

We stopped counting the different kinds of sausages after we reached 100. Apparently they sell sausages from every region in Germany. 

But we were there for lookin', not cookin' -- so, in the two hours we walked through this place it was more like a visit to an art gallery. 

But then we came to the bakery and there, in the case, was a beautiful, braided loaf called Hefezopf, which is like a challah, but with raisins and almonds.

It was a vision. All at once my mind filled with memories of a lovely shabbat challah mixed with grandma singing rozhinkes mit mandlen, that hauntingly beautiful, classic Yiddish lullabye.

Oh my. My eyes well up even thinking about it.

This was something I had to try at home and get right.

I did, but it took several tries. At first I used my challah recipe and sweetened it a bit, but that just tasted like sweeter challah. The consistency wasn't right.

After doing some research about Hefezopf I realized it was more like brioche -- dense, buttery, dairy-laden, so I started tinkering with my brioche recipe.

Yes. 

A taste is worth a thousand looks.

Try this. It's called Hefezopf, but like to call it Lullabye Bread.

Lullabye Bread (HEFEZOPF)

  • 1 cup milk
  • 1 3-inch piece of cinnamon stick, broken in half
  • 2 2-inch strips of lemon peel
  • 5 tablespoons butter
  • 1/3 cup sugar
  • 1 package active dry yeast
  • 3-1/2 cups all purpose flour, approximately
  • 1 teaspoon salt
  • 2 large eggs
  • 1 cup raisins, optional
  • 2-3 tablespoons chopped almonds, optional


Lightly grease a baking sheet. Pour the milk into a saucepan. Add the cinnamon stick, lemon peel, butter and sugar cook over medium heat, stirring to dissolve the sugar, until bubbles form around the edges of the pan and the mixture is hot. Set aside to cool to lukewarm (about 105-110 degrees). Sprinkle the yeast over the milk mixture and whisk the ingredients to dissolve the yeast. Let rest for about 5 minutes or until thick bubbles form. Place the flour and salt in the bowl of an electric mixer. Remove the cinnamon stick pieces and lemon peel from the yeast mixture and pour the liquid into the mixer bowl. Add one egg and mix the dough with a dough hook for about 2 minutes. Add the raisins, if used, and mix for another 2 minutes or so, or until the dough is smooth. If the dough is sticky, add more flour as needed. (Kneading can be done in a food processor or by hand.) Cover the bowl and let rise in a warm place for about 1-1/2 hours or until doubled in bulk. Punch the dough down and cut it into 3 equal pieces. Working on a floured surface, roll the pieces to make strands of about 12-inches long. Braid the strands and place them on the baking sheet. Beat the remaining egg with one teaspoon water and brush the egg wash over the surface of the braid. Sprinkle with almonds, if used. Let rise again for 30 minutes. Preheat the oven to 350 degrees. Bake for about 30 minutes or until puffed and golden brown.

Makes one bread

Cleveland Cuisine! Really.

Cleveland cuisine? Really?

Yes!

Cleveland is an important place.

For one thing, it's the home of the Rock and Roll Hall of Fame.

And that should be enough.

But there's also The Cleveland Museum of Art -- it has a large, diverse collection. And unlike so many museums of its kind, admission is FREE!!!!

Also -- Cleveland has a world-famous orchestra, a distinguished university (Case Western Reserve), an AFC football team (the Browns) and a major league baseball team (the Indians).

AND, of course, their basketball team is this year's NBA Champions! (You've surely heard of the Cavaliers!)

I'm impressed!

And now there's more. This summer Cleveland will be home to the 2016 Republican National Convention (July 18-21).

And, whatever the goings on at the convention itself, the city will get lots of extra attention in the press. There will be loads and loads of extra people in Cleveland.

So, me being me, I got to wondering about what those people might be eating during their stay. 

I don't mean the food they're going to get at the convention. I mean real, special, famous Cleveland food. 

Not every city has its own culinary specialties. Surely nothing in Stamford, CT., where I live. 

But Cleveland does! And some real goodies, at that! 

For example, because the city is home to large numbers of families whose origins trace back to central and eastern Europe, bratwurst (on a bun) and crunchy apple fritters are really popular.

The apple fritters alone are worth a visit I think.

But also this -- among the most famous of "Cleveland food" is something called the Polish Boy (basically a kielbasa sandwich with coleslaw, french fries and barbecue sauce all on a club roll).

Well, okay. Maybe.

Then I discovered that among the iconic Cleveland dishes are pierogi.

Pierogi. Do you hear my heart pounding? Can you see my grin?

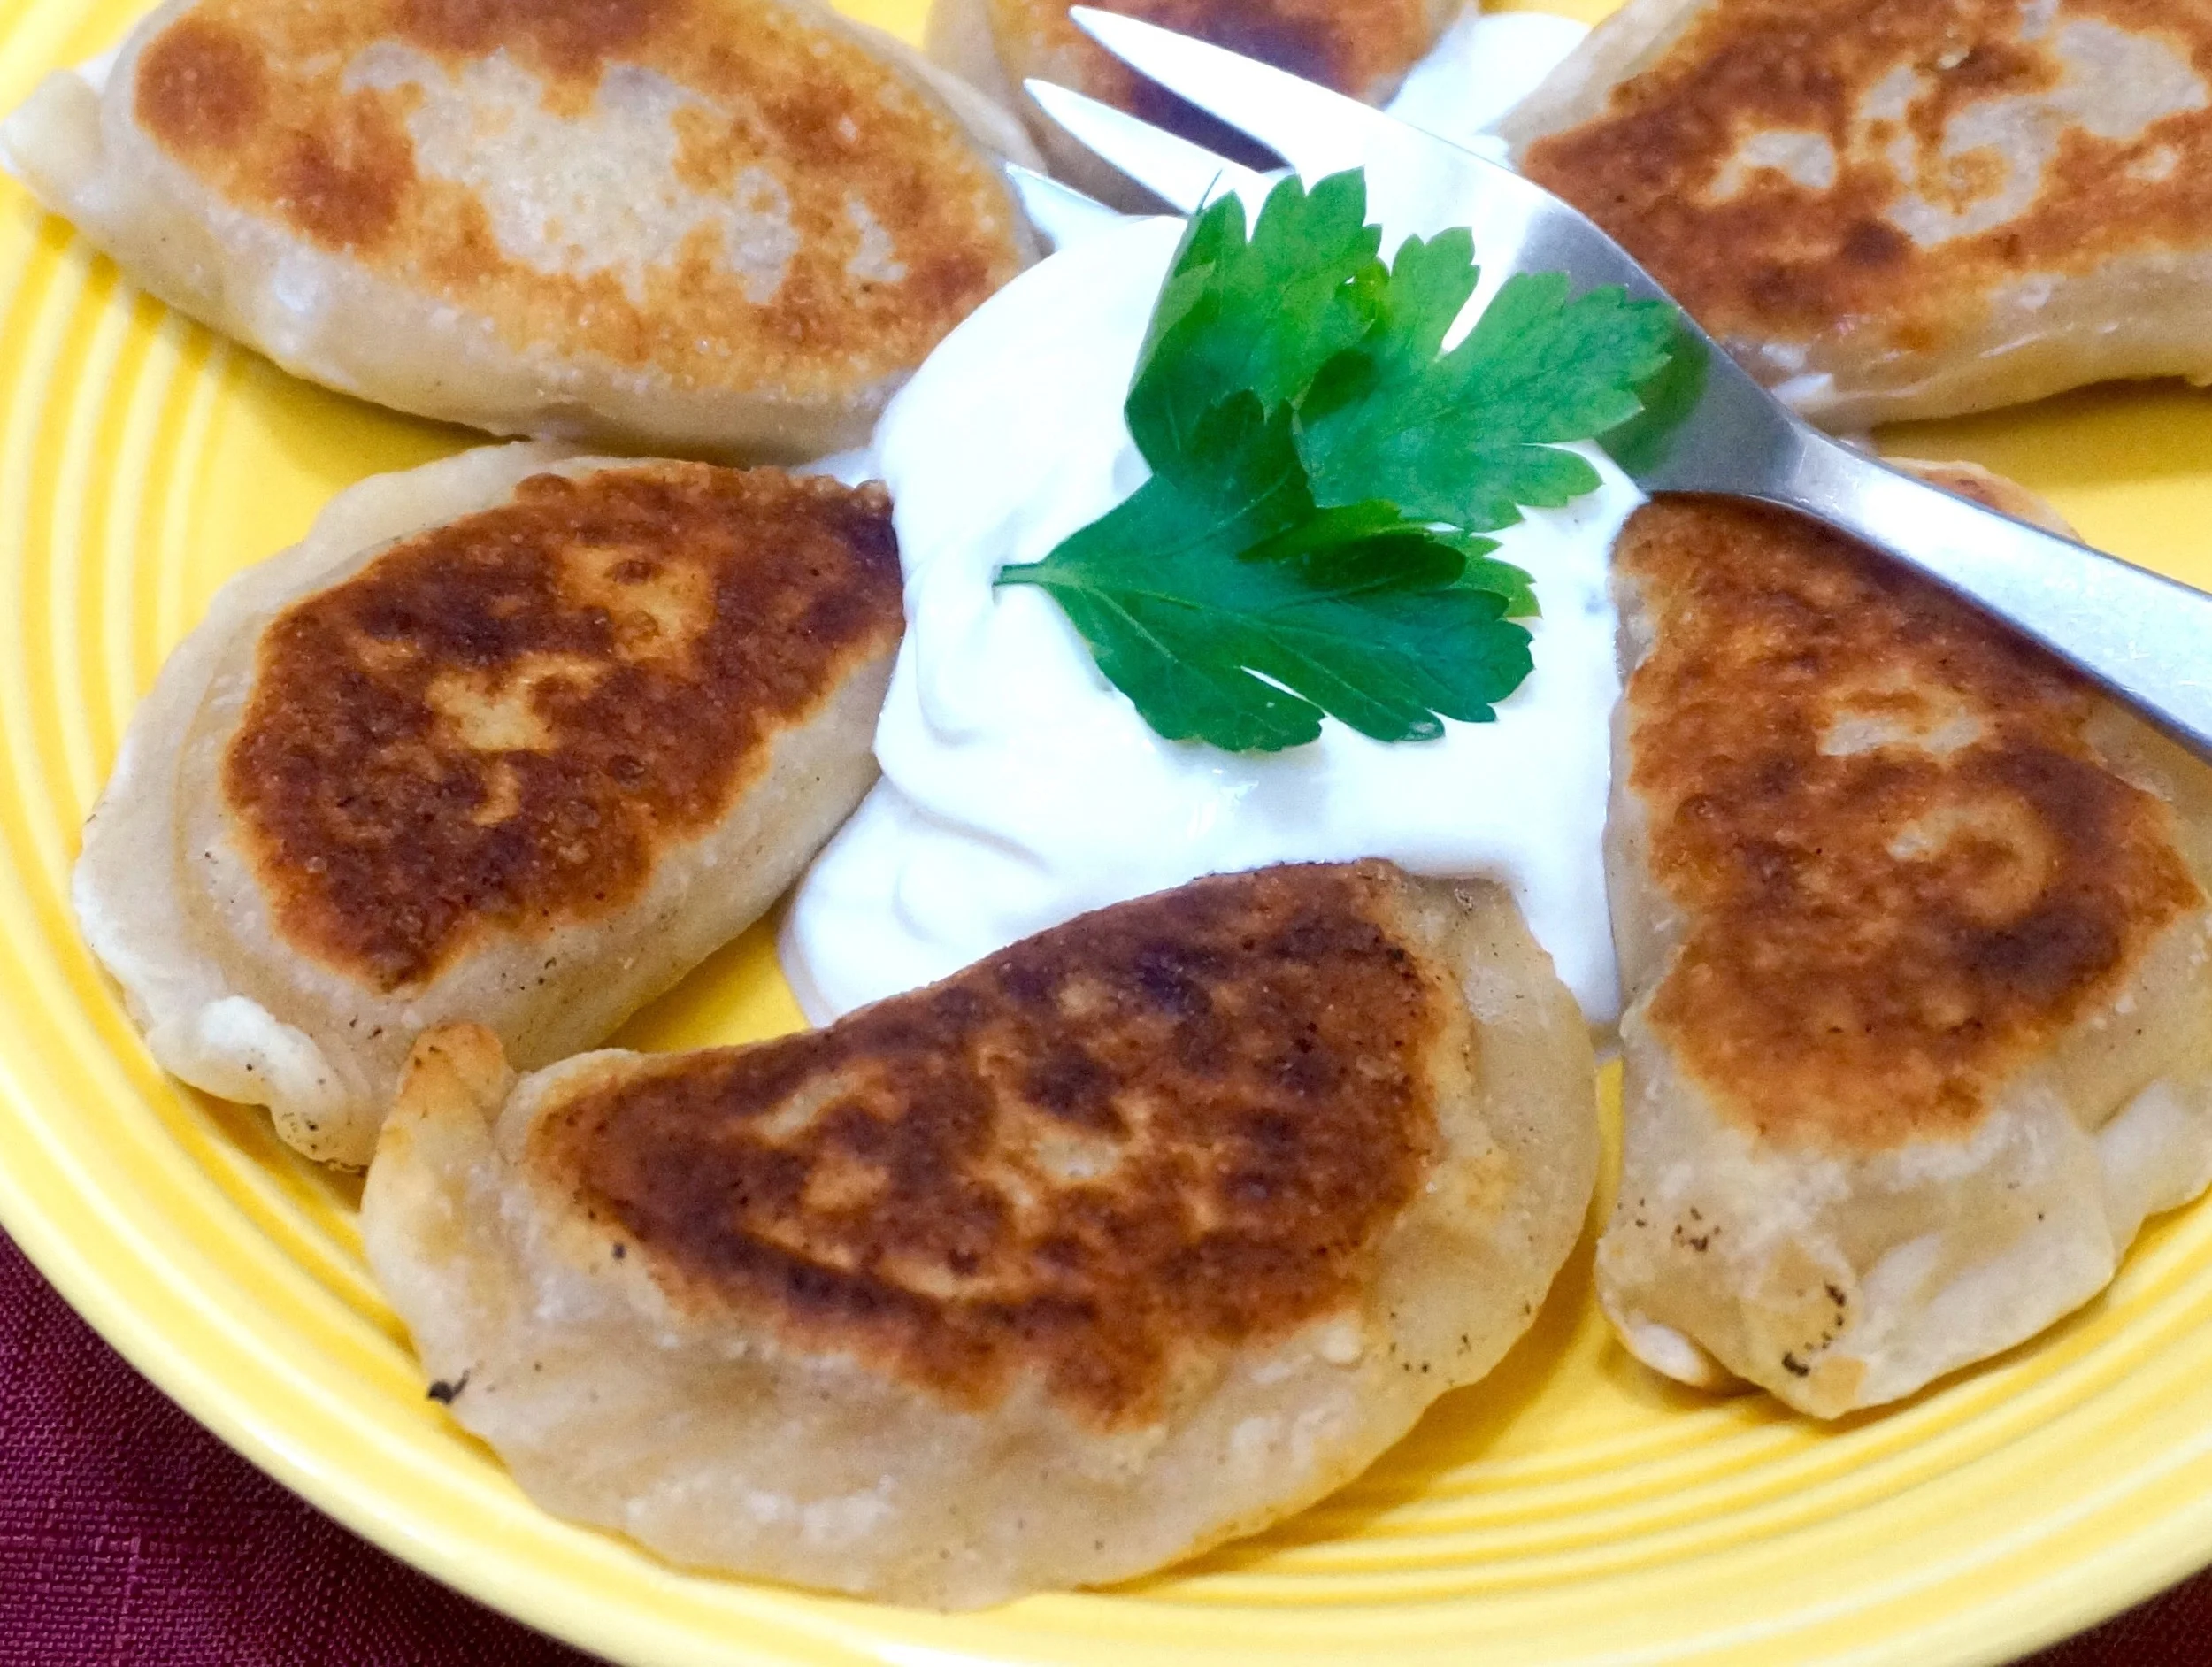
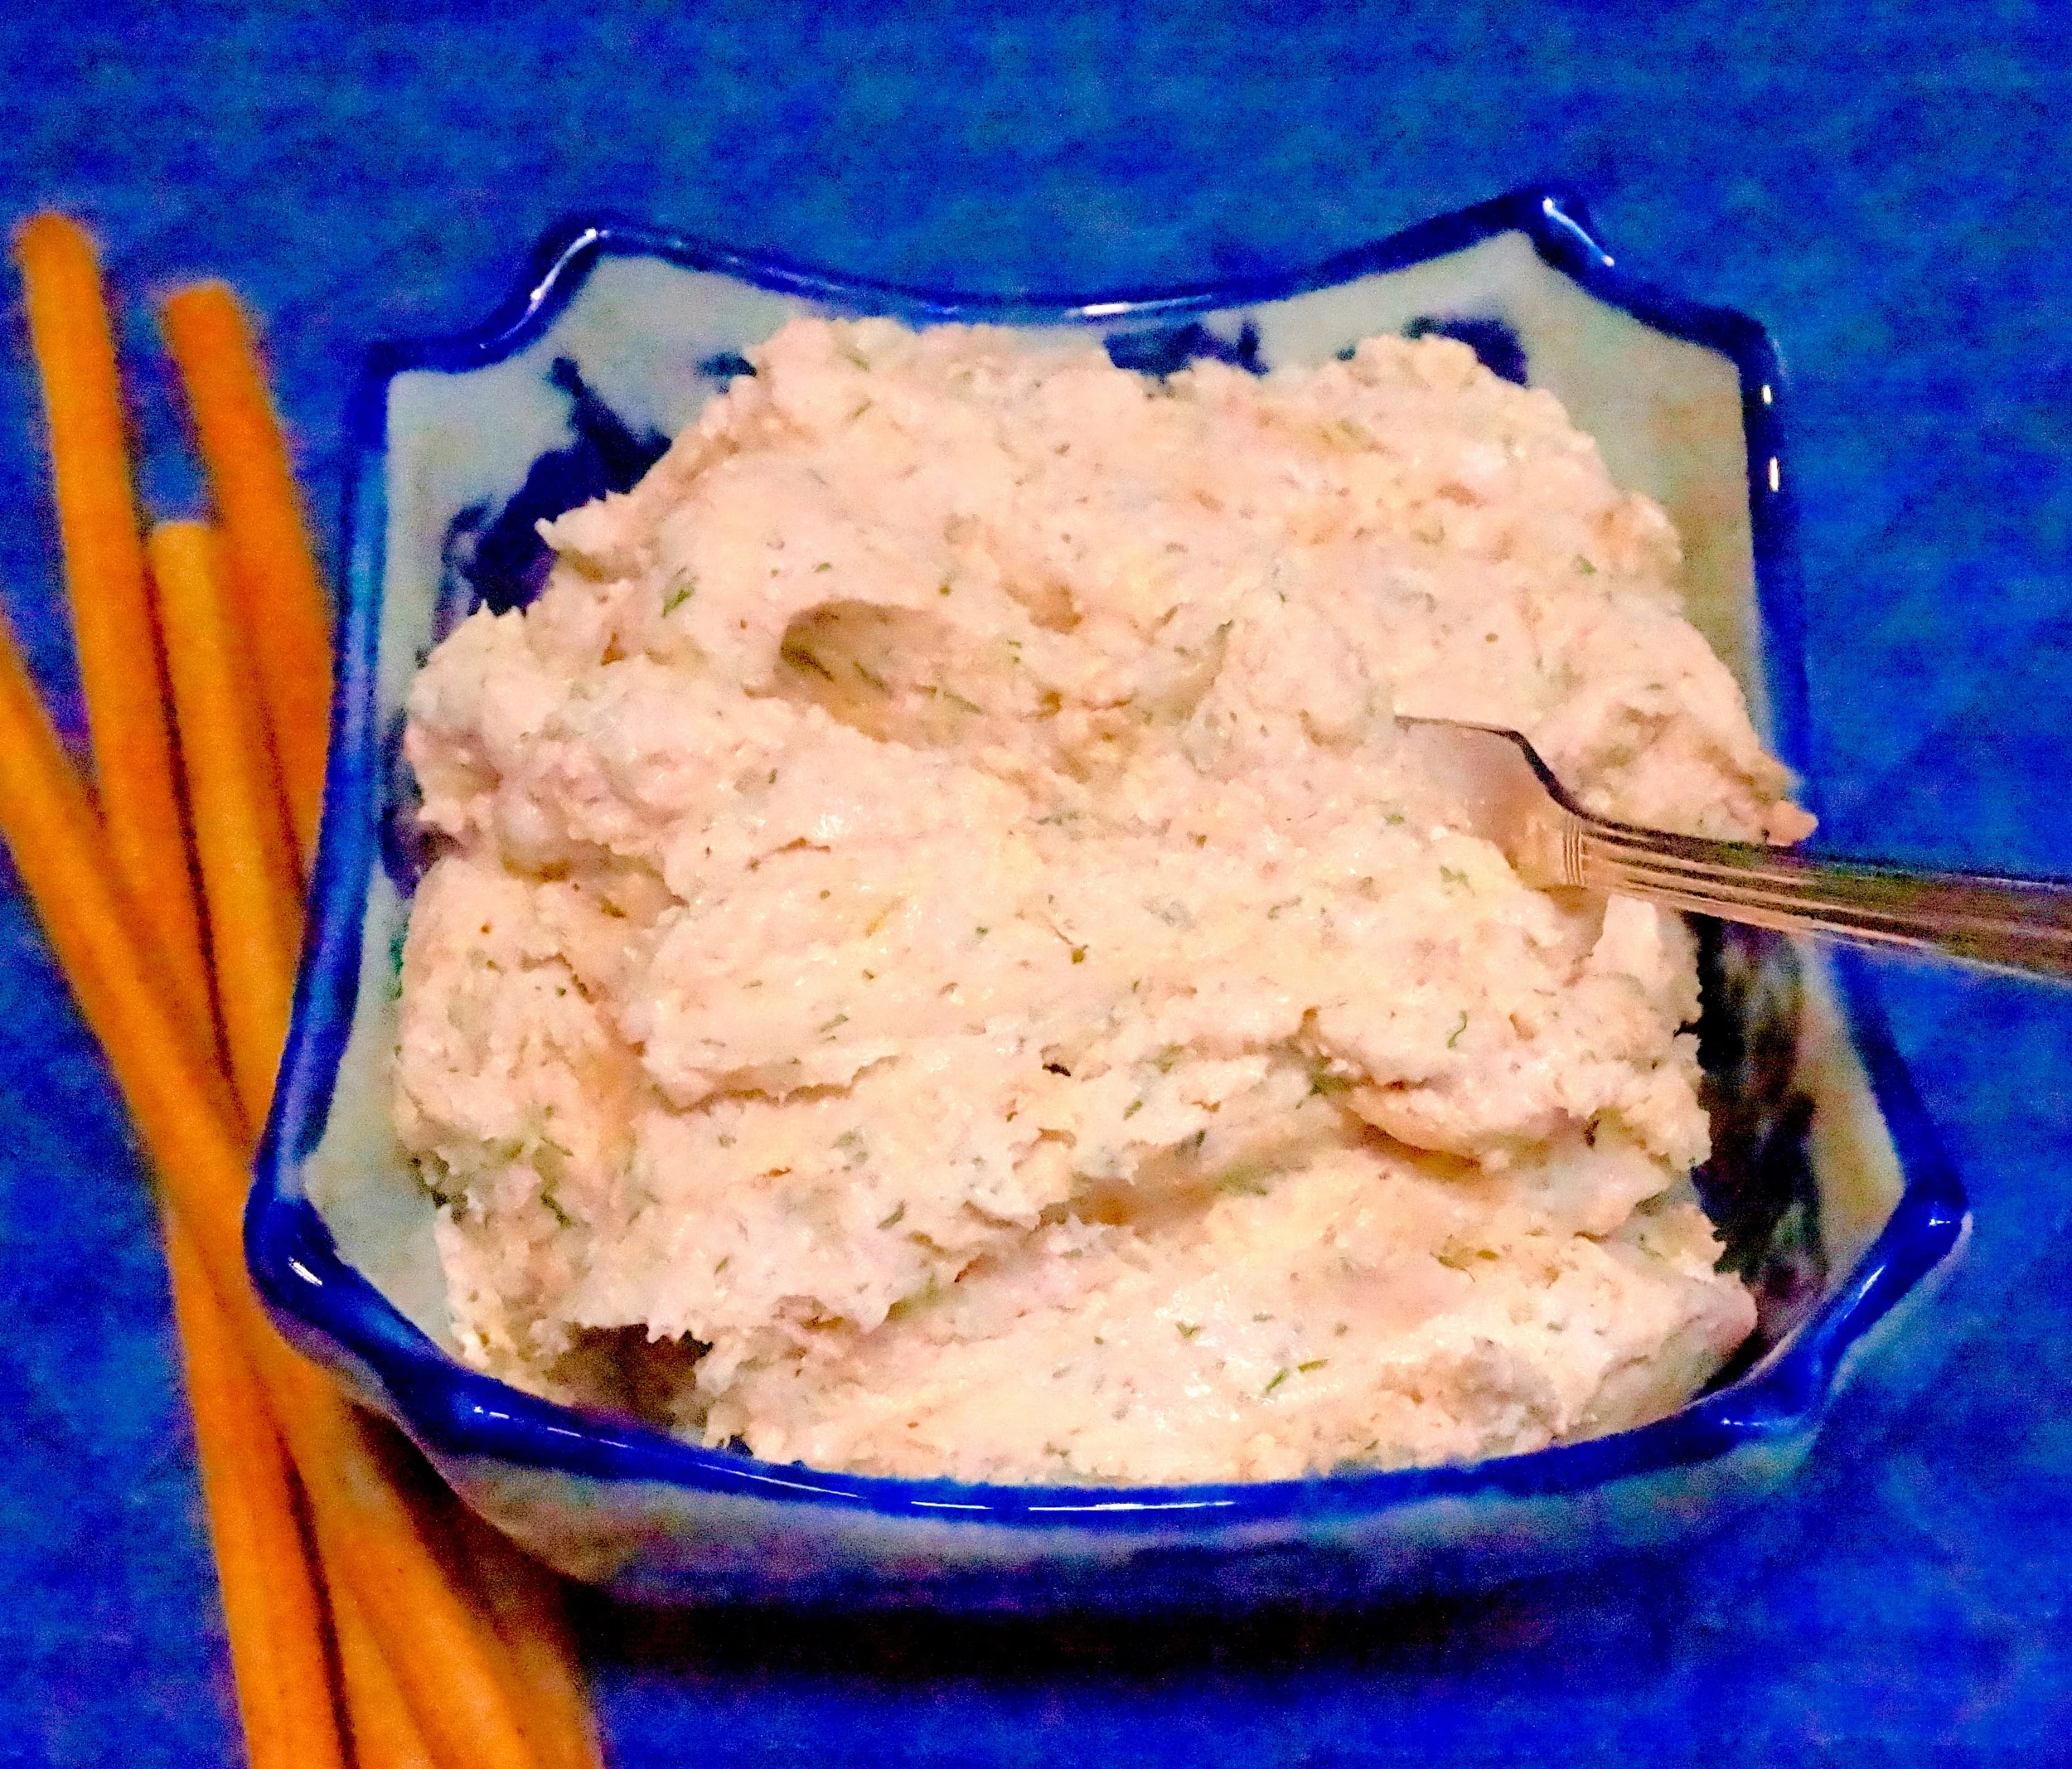
Oh! How I love pierogi! Doughy dumplings stuffed with stuff. Like beef cheeks or potato and cheese (served with thick, tangy sour cream).

Pierogi. The kind of food some of us used to get at grandma's, if we were lucky.

I haven't had a pierogi for as long as I can remember. Thanks to Cleveland I was reminded of that fact.

I had to have some. But the only ones I could find in Stamford, CT. were packaged.

So I decided to make some myself. And after a couple of tries -- oh!

They are as wonderful as I remember.

Thank you, Cleveland, for inspiring this recipe. Good luck this summer.


Potato Cheese Pierogi

Filling:

  • 3 large Yukon Gold potatoes (about one pound), peeled, cut into chunks (about 3 cups mashed potatoes)
  • 2 tablespoons butter
  • 1 large onion, chopped
  • 1 cup farmer cheese
  • salt and freshly ground black pepper to taste

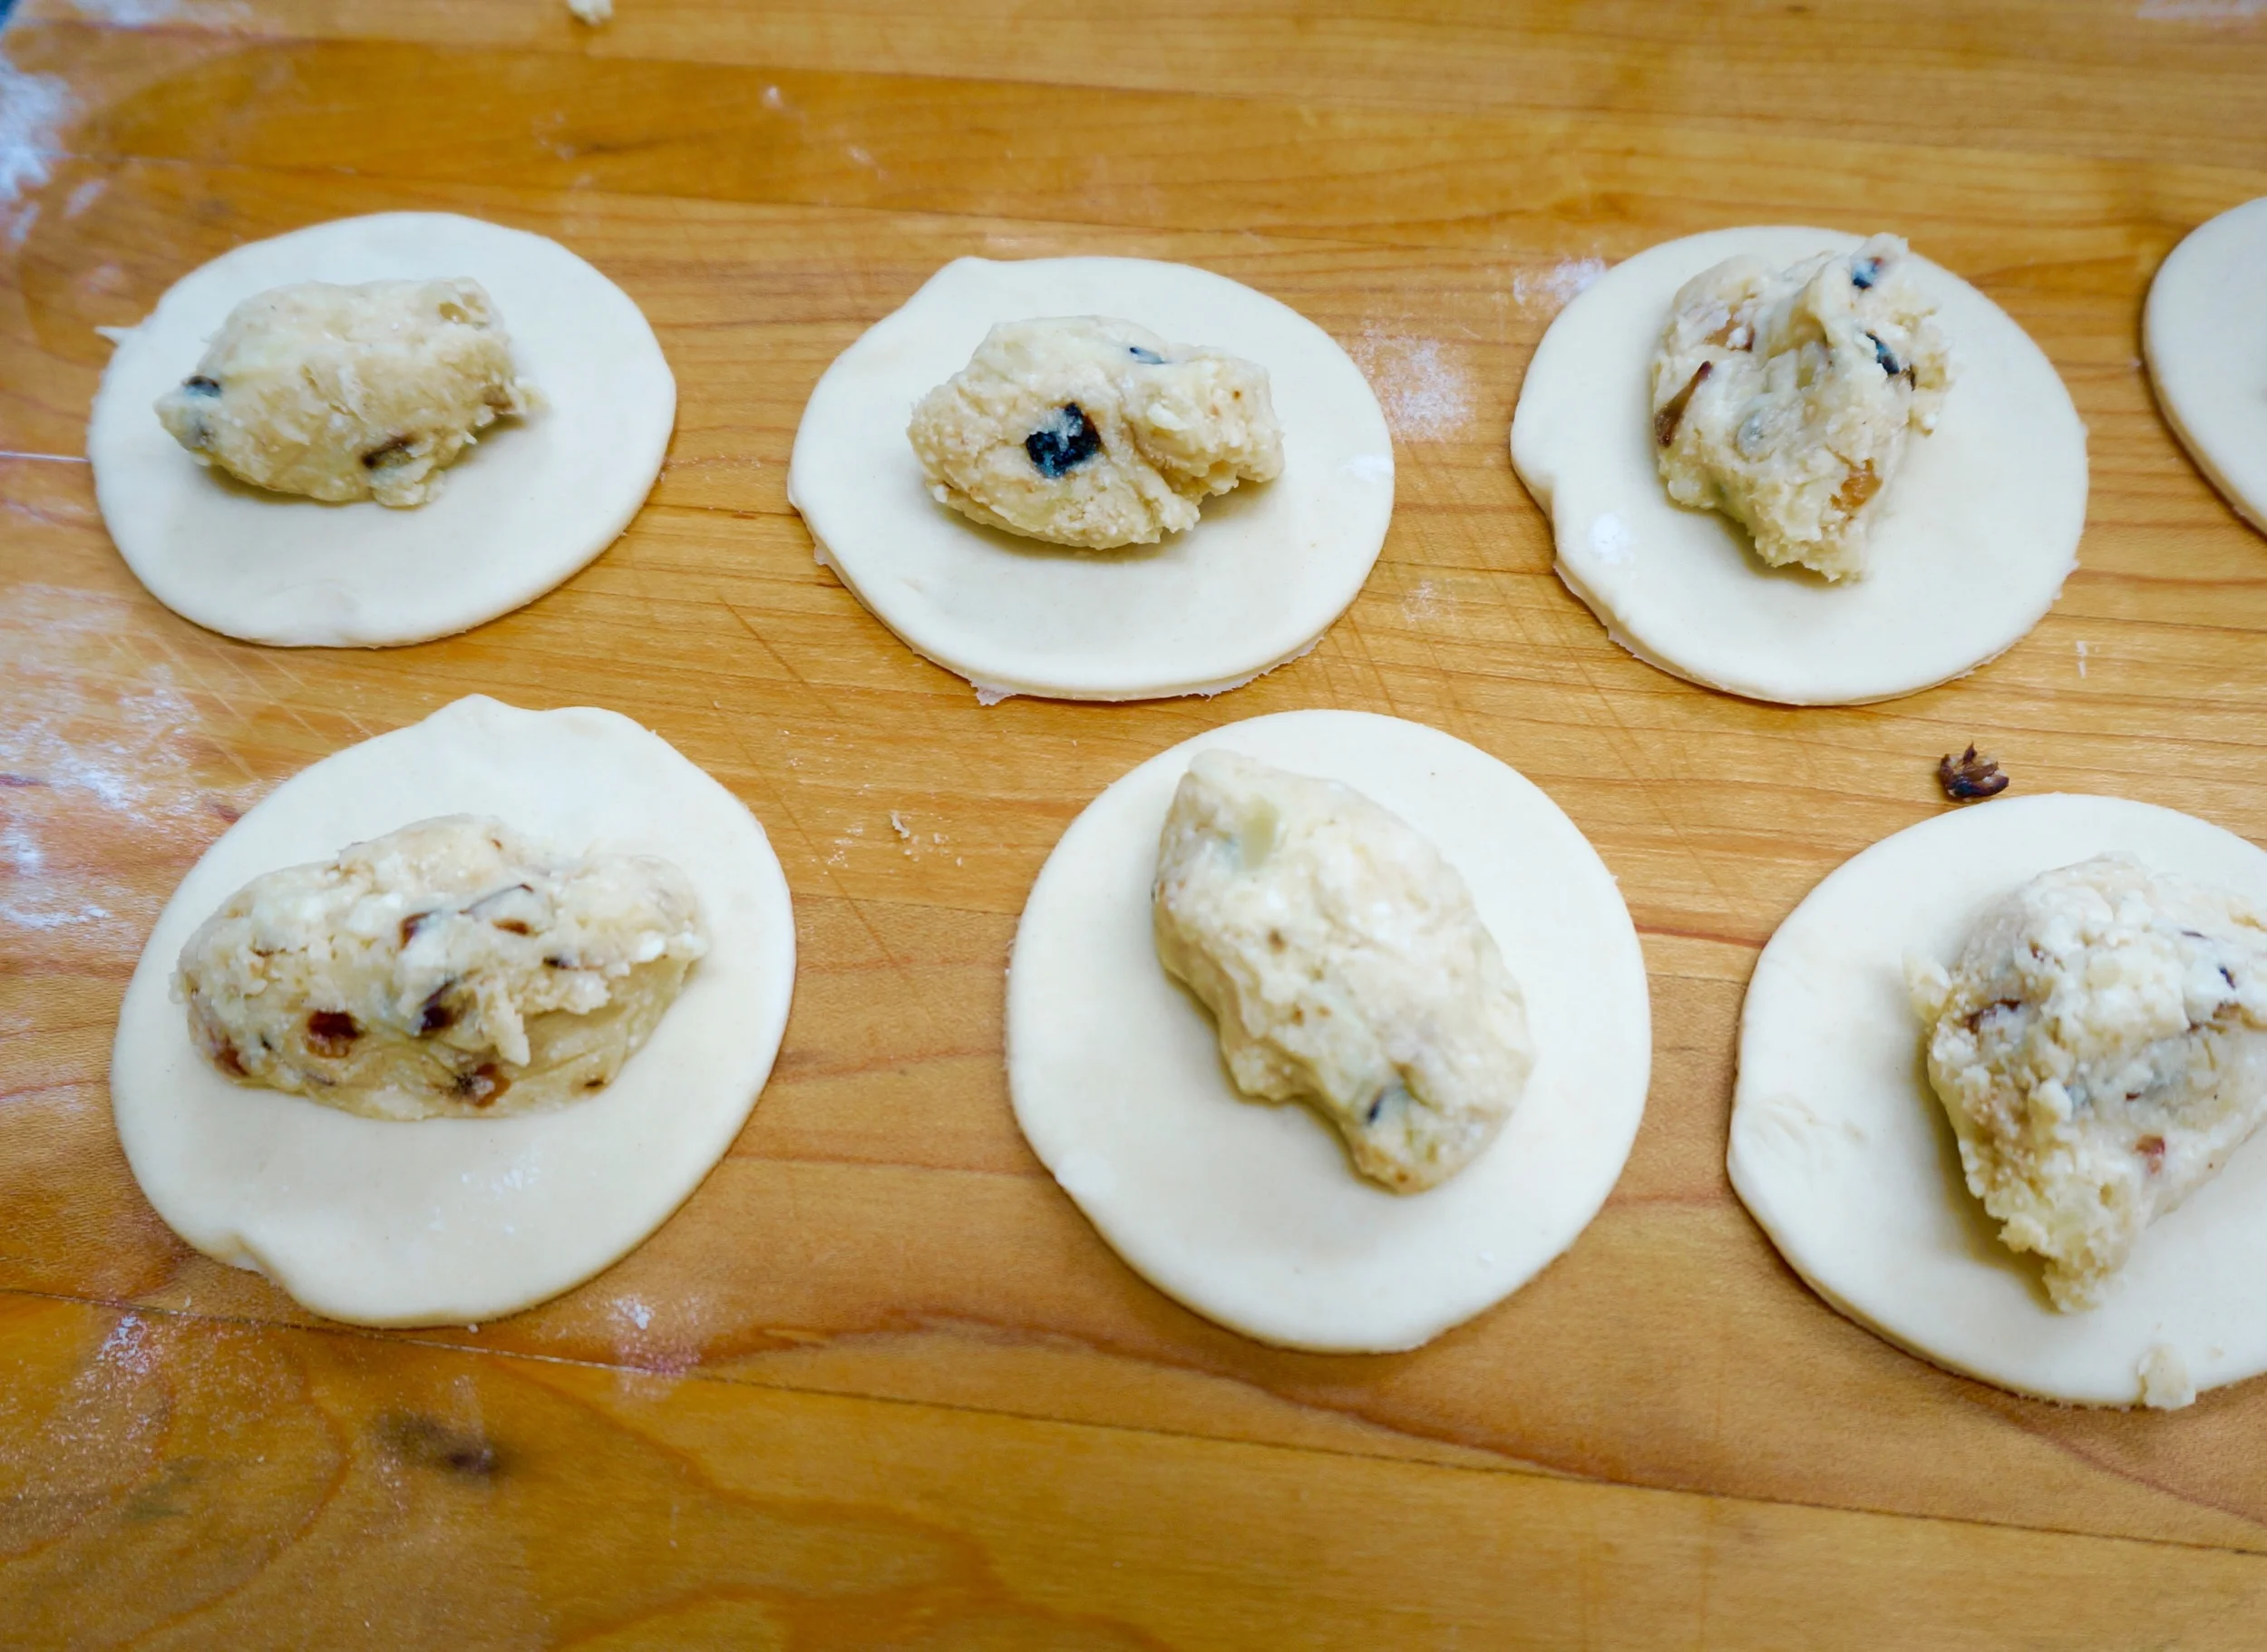
Place the potato chunks in a large saucepan, cover with water and bring to a boil. Lower the heat to a simmer and cook for about 15 minutes or until the potatoes are tender. Drain the potatoes and spoon into a bowl. While the potatoes are cooking, heat the butter in a sauté pan over medium heat. When the butter has melted and looks foamy, add the onions and cook, stirring occasionally, for 12-15 minutes or until soft and golden brown. Add the onions to the potatoes. Add the farmer cheese, sprinkle with salt and pepper and mix the ingredients until well blended. Set aside to cool before filling the dough.

Dough:

  • 3-1/2 cups all-purpose flour
  • 1 teaspoon salt
  • 1/4 cup butter, cut into chunks
  • 1/2 cup water, approximately
  • 1 cup dairy sour cream

Extras:

  • butter
  • vegetable oil
  • sour cream

To make the dough: place the flour and salt in a large bowl. Add the butter and work it into the dough until the mixture is crumbly. Add 1/2 cup of the water and the sour cream and mix the dough until it is smooth, soft and well blended. If the dough seems too dry, add more water. (You can do this in a food processor.) Let the dough rest for at least 30 minutes. Using portions of the dough, roll the dough on a floured surface to 1/8-inch thick and cut out circles with a 3-inch cookie cutter. Place the circles on a board or cookie sheet and cover them with plastic wrap or a kitchen towel while you cut the rest of the dough. Fill the dough using about one tablespoon of the filling for each circle.

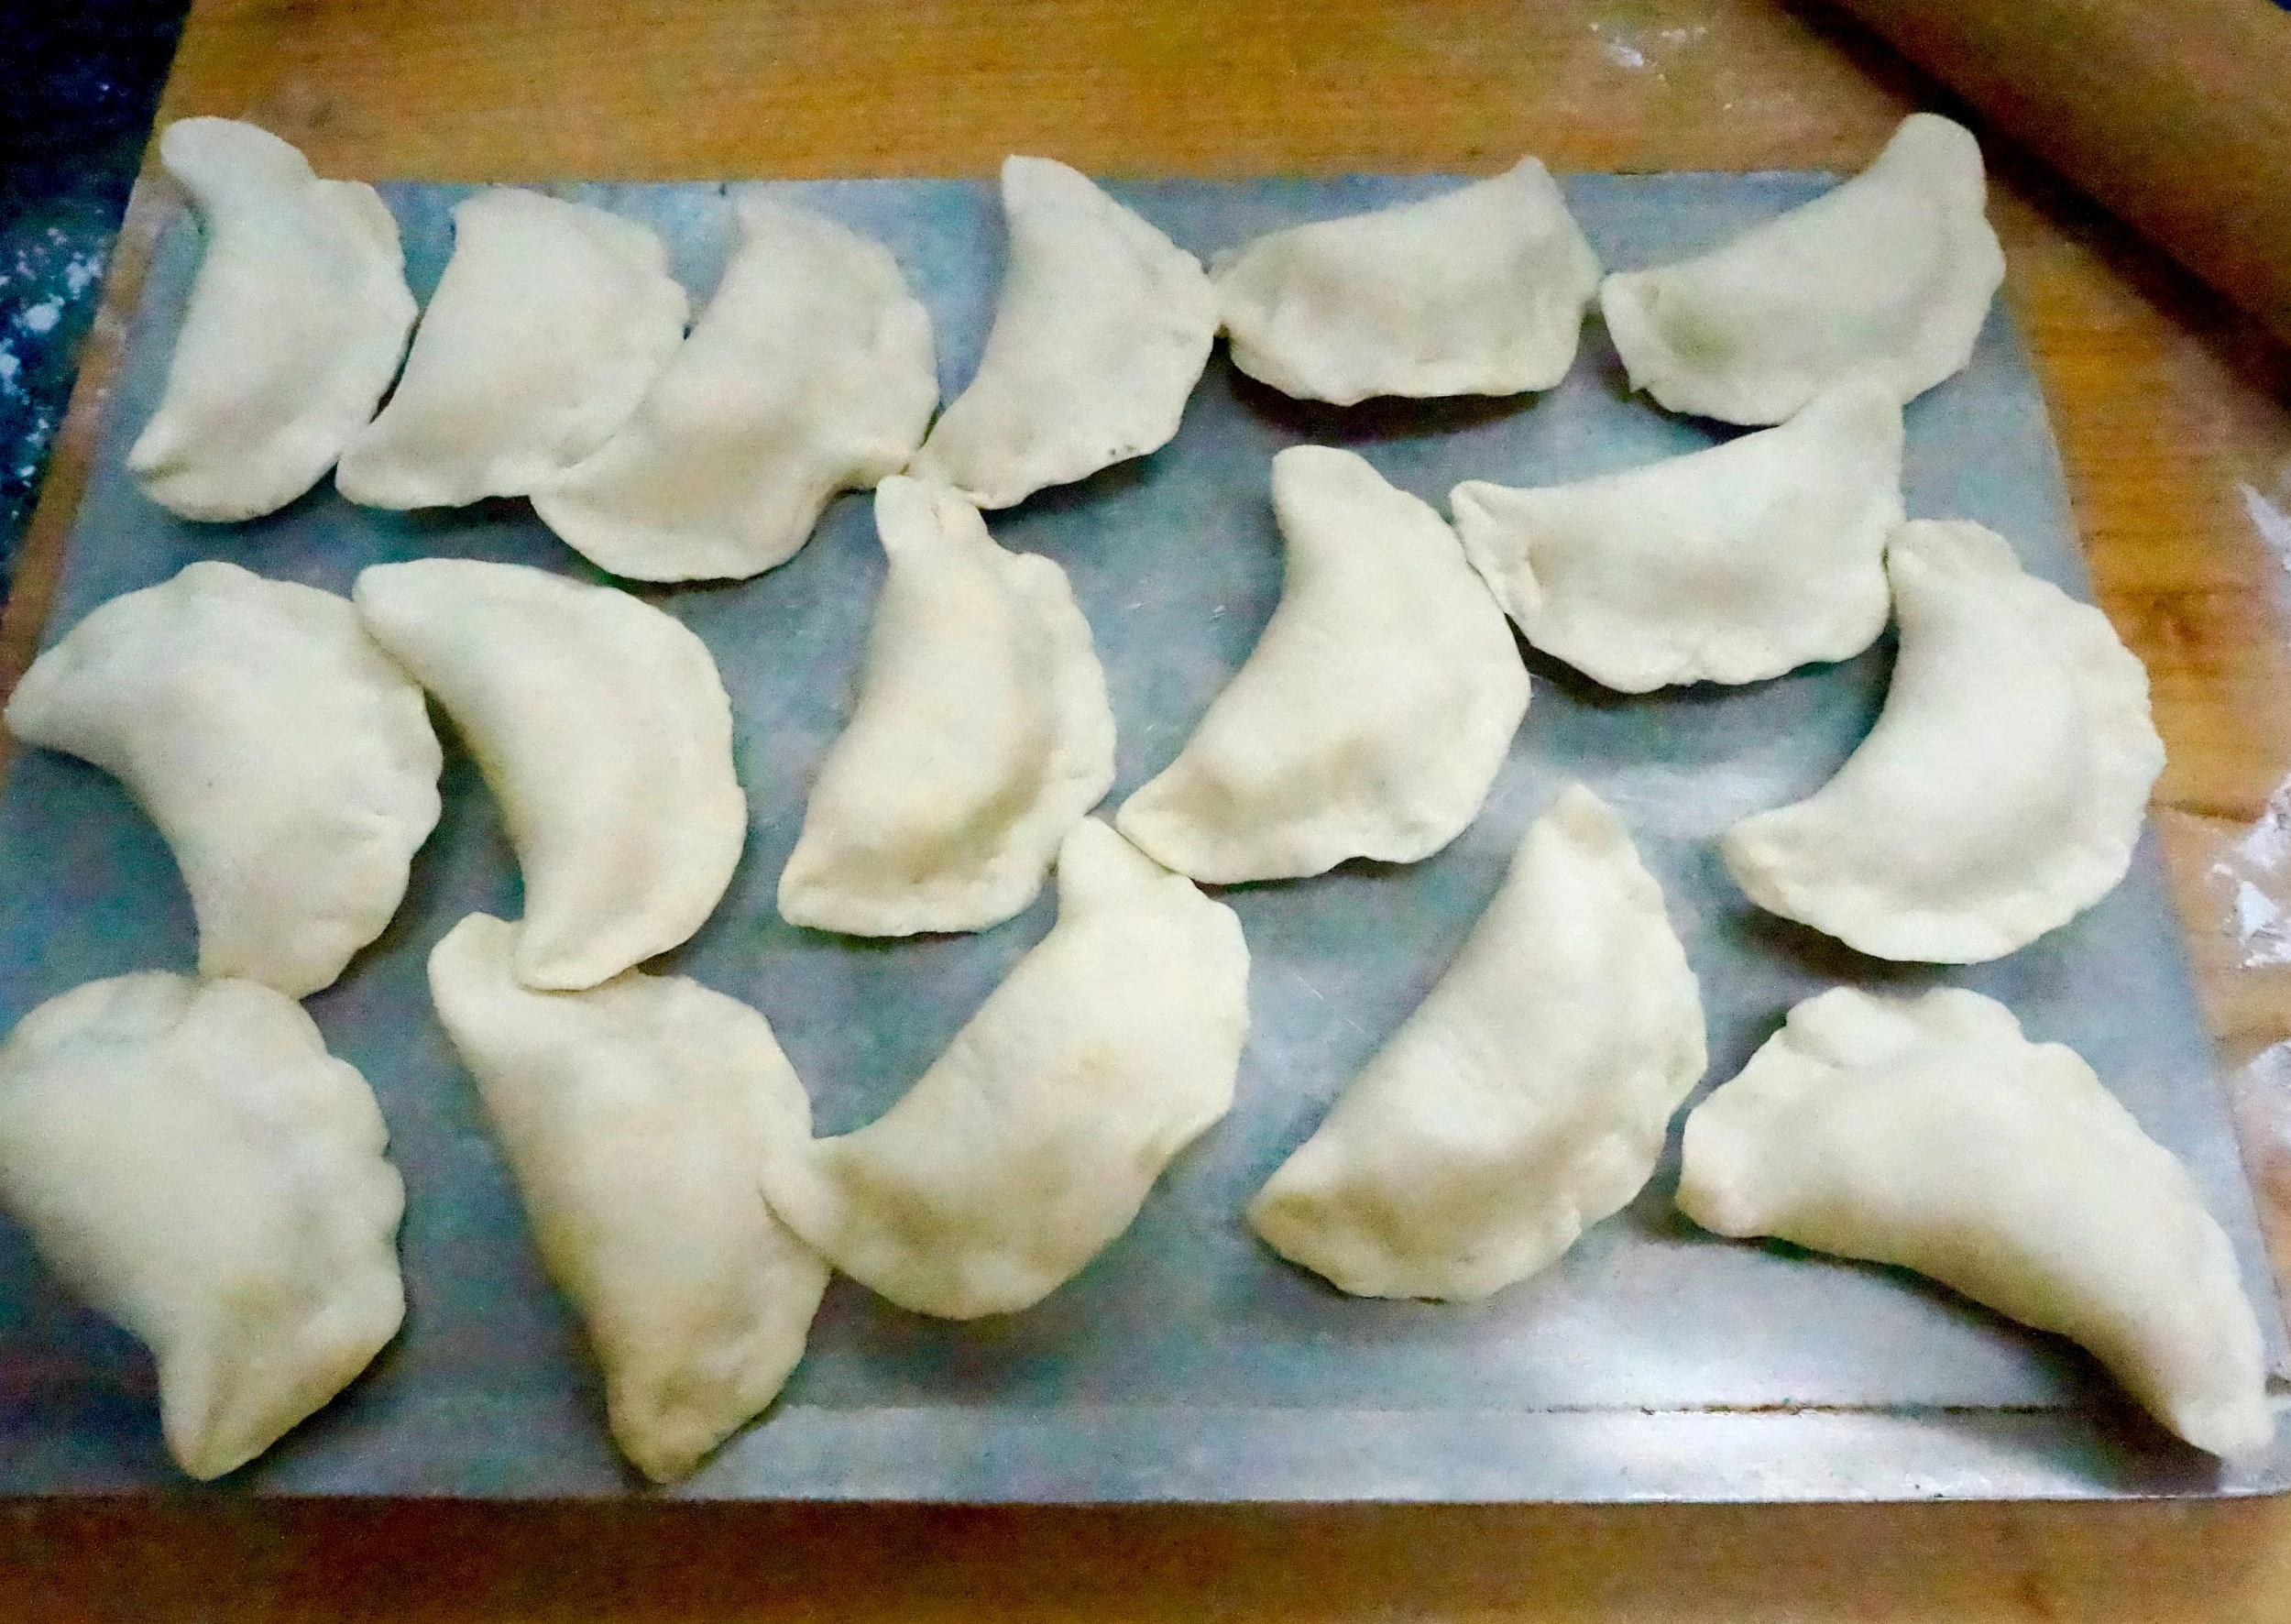
To fill the pierogis: place the filling in the center of the dough circle. Fold the circle in half, pinching the edges to seal in the filling.

To cook the pierogis: bring a large pot of lightly salted water to a boil. Add the filled pierogis, 6-8 at a time, and boil for about 3-8 minutes depending on whether they are at room temperature, refrigerated or frozen (or until they float to the surface). Remove the pierogis with a slotted spoon and set aside; repeat with remaining pierogis.

Extras: To serve the pierogis: serve boiled (as above), with sour cream (can also serve with caramelized onions – make more when making filling above). OR, heat 1 tablespoon butter plus 1 tablespoon vegetable oil in a sauté pan over medium heat. When the butter has melted and looks foamy, add some of the pierogi (do not crowd the pan) and cook for 3-4 minutes on the flat side, or until golden brown on the bottom, then turn the pierogis over and cook for another 2-3 minutes or until crusty and golden brown. Repeat using more butter/vegetable oil with the remaining pierogis. Serve with sour cream (and sautéed onion if desired). 

Makes about 4 dozen

Salmon Spread for Easy Summer Entertaining

My mother was one of those women who always had too much food in the house. Just in case.

Just in case company came. You can't just let them sit there and not eat.

Just in case you needed a little something extra for supper. Or as a snack over the weekend.

Just in case you had some leftovers and you didn't want to throw them out.

If you ever took a look in my freezer, my fridge and my kitchen cabinets you would know, like mother, like daughter.

I have a ton of food things.

Just in case.

This past weekend when my cousins came for a sleepover, I discussed this with my cousin Leslie, whose mother was my Mom's sister. She was bemoaning her overstuffed freezer, refrig, pantry. With all the "just-in-case" stuff. 

We are who we are, products of our upbringing, including our need for just-in-case food.

But I did point out to her that with the leftover salmon I made the other day, the dill, lemons, celery and cream cheese I always have on hand, I made this spread. Which is a perfectly easy-to-make, quick-as-a-wink to make hors d'oeuvre to be served with chips or crudites. And I served it over the weekend.

Easy. 

You can do it too. And if you don't have leftover salmon, you can used canned salmon, tuna or sardines. It's also delicious with leftover cooked bluefish.


Salmon Spread

  • 8 ounces cooked salmon, crumbled
  • 2 scallions, chopped
  • 1 stalk celery, chopped
  • 4 ounces cream cheese
  • 2 tablespoons lemon juice
  • 2 tablespoons chopped fresh dill
  • 2 teaspoons Dijon mustard

Place the salmon, scallions, celery, cream cheese, lemon juice, dill and Dijon mustard in the workbowl of a food processor and process until thoroughly blended. 

Makes about 1-1/2 cups

Grandma's Blintzes

_DSC9289.jpg
_DSC9381.jpg

I feel blessed that my children and grandchildren come to stay over at my house in Connecticut for holidays and birthdays and occasionally just to hang out. It reminds me of when I was a kid and visited my grandma -- almost every weekend -- along with practically everyone else in my mother's family (aunts, uncles and cousins).

That was back in the day before children had so many other activities. Sure, there were brownies and cub scouts, but back then I never heard of things like soccer or gymnastics. Art classes happened during school hours. The only cooking classes for children took place in your own kitchen if you were lucky to have a Mom like mine who let you patchky around.

Weekends were strictly for family activities.

I'm not saying one way of life is better than another. One size does not fit all, as they say. And maybe today's kids are better educated or are more well-rounded than we were.

But I have wonderful memories of that life. 

It was good. I got to play with my cousin Leslie every weekend. She and her family lived with our grandma.

I also got to eat some of my grandma's wonderful food. 

I hope that in years to come my grandchildren will feel happy when they recall their visits to Ed and me. And have good memories of some of the favorite foods I cooked when they came.

Like Macaroni and Cheese. Apple Pie. Matzo Brei.

My grandma also made matzo brei and macaroni and cheese. But one of her signature dishes was blintzes.

She filled the blintzes with cheese, the classic, but, as I learned later, most people made the cheese filling sweet, seasoned with vanilla and/or cinnamon. My grandma's cheese-blintz filling was lemony, with just a hint of sugar.

Also, because there were so many of us, she had no time to fry them a couple at a time and still have everyone eat at the same time. So she placed the blintzes, seam-side down, on a baking sheet, topped each with a little dab of butter, and baked them until they were golden brown.

Me? I still love blintzes lemony and baked. And -- surprise to me! -- so do my grandchildren.

Her recipe is below, but the filling instructions give you the option to make the more popular vanilla version (and also how to fry them). Don't worry if the wrappers don't fry into perfect circles -- you're going to roll them and if they're a little off, no one will ever know.

Grandma Rachelle Hoffman’s Blintzes

Wrapper:

  • 3/4 cup all-purpose flour
  • 1-1/2 teaspoons sugar
  • 1/2 teaspoon salt
  • 3/4 cup milk, approximately
  • 2 large eggs
  • softened butter for frying

Filling:

  • 1 pound farmer’s cheese
  • 1 large egg
  • 2 tablespoons sugar
  • 1 teaspoon lemon juice
  • 1/2 teaspoon grated fresh lemon peel, optional
  • 1 teaspoon vanilla extract, optional

To make the wrapper, combine the flour, sugar and salt in a bowl and stir to blend the ingredients. Add the milk and eggs and whisk until the batter is smooth and uniform (you may do this in a food processor). Add more milk if the batter seems too thick (it should be the consistency of heavy cream). Set aside for 30 minutes. Place a small amount of the softened butter in a crepe or omelet pan and place the pan over medium-high heat. When the butter has melted and the foam is beginning to separate, add enough batter to cover the bottom of the pan (for an 8-inch pan it will be 1/4-cup), shaking the pan quickly to spread the batter evenly. Cook for a minute or so or until the bottom is lightly browned. Turn the wrapper over and cook briefly. Remove the wrapper and proceed with the remaining batter, separating the cooked wrappers with aluminum foil or waxed paper.

To make the filling, place the cheese, egg, sugar and lemon juice in a bowl and mix thoroughly. Add the lemon peel OR vanilla extract and mix in thoroughly.

To fill each wrapper: use the first fried side as the inside of the blintz. Use about 2 tablespoons of filling for an 8-inch wrapper and place the filling in the center of the wrapper. Fold the bottom side up, over the filling. Fold the left side, then the right side over the filling, then roll up to enclose the filling. Fry the blintzes seam side down first over medium heat (using the same method as for frying the wrappers – let the butter melt and become foamy). Or, you can bake the filled blintzes: Preheat the oven to 350 degrees. Place the blintzes in a single layer on a jelly roll pan, top each with a tiny piece of butter. Bake for about 10 minutes.

Makes 8 8-inch blintzes

Creamy Irish Potato Soup

You know that old ad that says you don't have to be Jewish to eat Levy's rye bread? I feel the same way about Irish food. I'm not Irish, but love Irish food. Especially Irish Soda Bread and Irish Oat Scones

Ed and I visited Ireland several years ago and despite warnings to the contrary we found the food there was scrumptious. We had salmon almost every night, and I remember fondly one dish of broiled salmon with a horseradish crust. So simple, fresh and fabulous for dinner. 

And of course, we had lots of those famous Irish potatoes. Mashed with kale or cabbage. And just plain boiled.

Oh, I do love those earthy, mineral-y potatoes.

Every year on St. Patrick's Day I make one or more of these recipes, and sometimes Irish potato soup. Classic Irish potato soup usually starts with bacon, but for a vegetarian version of that smoky, bacony flavor, roast some shiitake mushrooms (see below) and add them as a final garnish. But the soup is also wonderful if you skip that step and garnish with some fresh, chopped chives.

Creamy Irish Potato Soup

  • 2 tablespoons vegetable oil
  • 2 leeks, washed and sliced
  • 1 medium onion, chopped
  • 2 pounds all-purpose potatoes, peeled and coarsely chopped
  • 6 cups vegetable stock
  • salt and freshly ground black pepper to taste
  • 1/8 teaspoon freshly ground nutmeg
  • 3/4 cup cream
  • 1 tablespoon chopped fresh chives, optional
  • 6-8 shiitake mushrooms, optional
  • 2 teaspoons vegetable oil, optional

Heat the vegetable oil in a soup pot over medium heat. Add the leeks and onion and cook, stirring occasionally, for 2-3 minutes. Add the potatoes, stir for a minute. Pour in the vegetable stock. Add salt and pepper and the nutmeg. Bring to a simmer, lower the heat and cook, partially covered, for 45 minutes or until the potatoes are tender. Puree the ingredients in a blender or food processor or with an immersion blender. Return the soup to the pan. Add the cream and heat through. If desired, serve with a garnish of chopped chives or chopped, roasted shiitake mushrooms.

To make the roasted mushrooms: while the soup is cooking, preheat the oven to 450 degrees. Rinse and dry the mushrooms and coat them with the 2 teaspoons vegetable oil. Place on a baking sheet and roast for about 25 minutes or until well browned. Chop and sprinkle over the soup.

Makes 6 servings

Cranberry Cheese Cake

_DSC7798.jpg

Many years ago I was one of three judges at a cheese cake contest sponsored by a local cookware shop. We were told that 50 people had entered and would be bringing their cakes over.

Fifty cakes!

Fortunately only 32 people showed up. My first thought was about what might have happened to those other people. Did they just decide not to bother or had their cakes not come out right?

My second thought -- how am I going to eat -- even small samples -- of 32 cakes!

But, I was younger and thinner then and so I soldiered on.

There were some incredibly elaborate versions -- one was swirled with gorgeous white chocolate leaves, another was drizzled with thick, viscous drippings of autumn-leaf-colored caramel.

But frankly, we all thought the best cakes were the simplest ones. The ones where you could actually taste the cheese in the cheese cake. Like classic New York Cheese Cake. Or, if adorned, only simply, with some glazed fresh fruit.

And so, in this season of cheese cakes (it's the number one food for Shavuot), I offer a simple cheese cake. You can absolutely taste the lush, creamy cheese. It isn't overloaded with sugar or chocolate. There is a fruit top, made with fresh cranberries, which are tart and acidic and do a fabulous job balancing out the dense, rich cake beneath.

Or, you can serve the cake plain, maybe garnishing with a sprinkle or two of confectioner's sugar.


Cranberry Cheese Cake

  • 1-1/2  teaspoons butter
  • 1/3 cup graham cracker crumbs
  • 1-1/2 pounds cream cheese (3-8 ounce packages)
  • 2 teaspoons grated orange peel
  • 1 teaspoon vanilla extract
  • 1/2 cup whipping cream
  • 1 cup sugar
  • 4 large eggs
  • 1/3 cup dairy sour cream or unflavored yogurt

 Topping:

  • 2 cups fresh cranberries
  • 1/3 cup sugar
  • 3 tablespoons water
  • 1 teaspoon cornstarch dissolved in one tablespoon water
  • 1 teaspoon grated orange peel

Preheat the oven to 350 degrees. Spread the butter on the bottom and sides of a 9-inch springform pan. Sprinkle the inside of the pan with the graham cracker crumbs. Shake the pan to coat it evenly. Beat the cream cheese in an electric mixer at medium speed for 1-2 minutes or until softened and smooth. Add the orange peel, vanilla, cream and sugar and beat for 2-3 minutes or until the mixture is smooth, scraping down the sides of the bowl occasionally with a rubber spatula. Add the eggs one at a time, beating after each addition. Stir in the sour cream. Pour the batter into the prepared pan. Place the springform pan inside a larger pan. Fill the larger pan with enough hot water to come at least 1-inch up the sides of the baking dish. Bake for 70-75 minutes or until the top of the cake is tanning lightly. Remove the springform pan from the water and let the cake cool. When the cake is at room temperature, refrigerate it at least 4 hours or until thoroughly chilled. Remove the sides of the pan. Spread the topping over the cake.

 Topping:

Place the cranberries, sugar and water in a small saucepan. Bring to a boil and cook over medium-high heat, stirring often, for about 3 minutes or until cranberries start to pop. Stir the cornstarch mixture and add it to the pan. Mix for about one minute or until the topping thickens. Stir in the orange peel. Let cool.

 Makes one cake serving 8-10

Cream Cheese Cookies

While cleaning out/purging my files recently, I rediscovered this recipe for these Cream Cheese Cookies. It was on an old index card, in my mother's handwriting. I'd always wanted to try these, but never did because after the list of ingredients there was this instruction: "bake and freeze."

I don't remember watching my Mom bake these cookies and I had no clue what "bake and freeze" meant other than that I had to chill the dough before doing anything with it. She also never wrote down the oven temperature.

So I tried several versions. I rolled clumps of dough into 1-inch balls and baked them. I made some crescent shaped. The best ones were when I rolled the dough into two long logs, refrigerated them overnight and cut the logs into 1/4-inch slices, baked at 325 degrees.

My mother never said to dust the baked cookies with confectioners' sugar. I tried them with and without and think the cookies taste better and look nicer with that final garnish.

Glad I finally tried the recipe! The cookies are rich and tender, lightly sweet (only 2 tablespoons of sugar!), a perfect snack for a coffee or tea break.

Here's the recipe, with instructions.

MY MOTHER'S CREAM CHEESE COOKIES

  • 1/2 pound butter
  • 1/2 pound cream cheese
  • 2 large egg yolks
  • 2 tablespoons sugar
  • 1/2 teaspoon salt
  • 1 teaspoon vanilla extract
  • 1-3/4 cups all-purpose flour
  • confectioners' sugar

Beat the butter and cream cheese together in the bowl of an electric mixer set at medium (or use a hand mixer) for 2-3 minutes, until softened and completely blended. Add the egg yolks, sugar, salt and vanilla extract and beat them in thoroughly. Add the flour gradually, beating it in until a smooth, uniform dough has formed. Cut the dough in half and roll each half into a long log about 1-inch in diameter. Wrap in plastic wrap and chill for at least 4 hours, or until firm and cold. Preheat the oven to 325 degrees. Slice the logs into 1/4-inch slices and place the slices on cookie sheets. Bake for 23-25 minutes or until lightly browned. Remove from the oven and let cool. Dust with confectioners sugar (best if sifted over the cookies).

Makes about 60 cookies