Roasted Vegetables

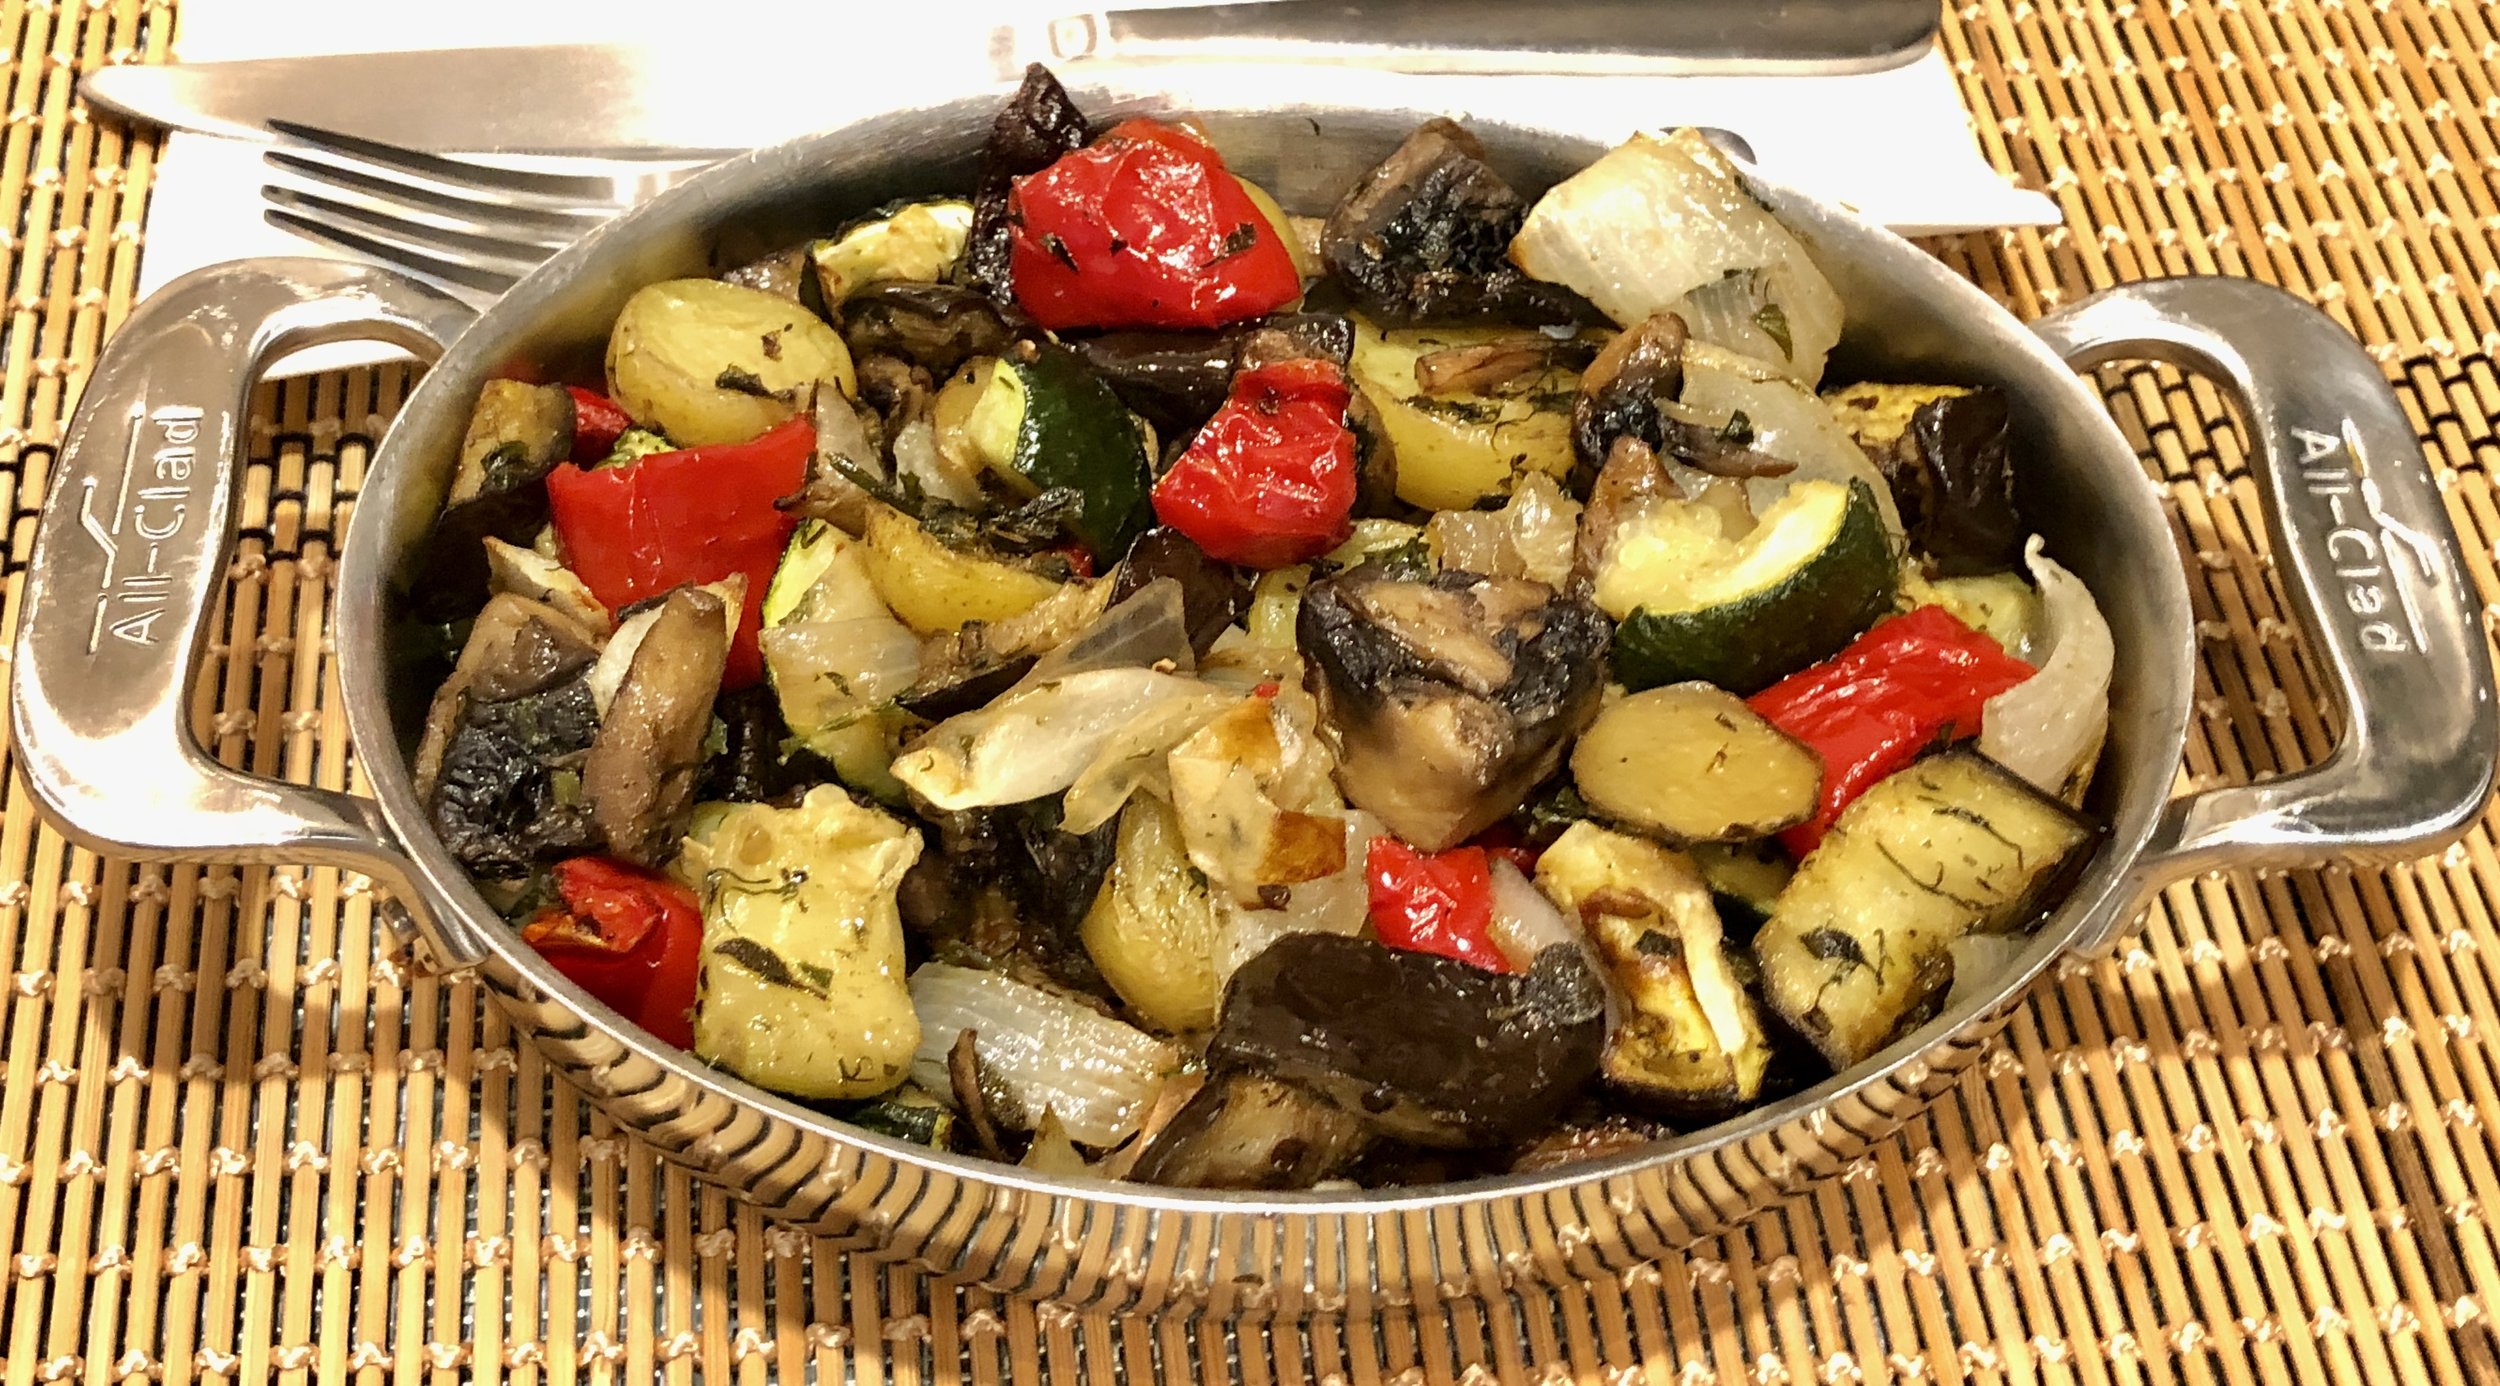
I make roasted vegetables all the time, with different combinations of veggies and seasonings. It’s such a useful dish. A good side dish for sure, but also:

  • nice over polenta/mamaliga for a substantial vegetarian dinner

  • cooked, then covered with shredded mozzarella cheese and baked until the cheese bubbles and melts

  • placed on a pizza crust and topped with cheese (as above)

  • topped with a fried egg

  • served at room temperature as a salad (drizzled with olive oil and wine vinegar or Balsamic vinegar)

and so on ….

Roasted Vegetables

  • 12-16 baby potatoes

  • 1 large onion, peeled

  • 1 medium eggplant

  • 1 sweet red bell pepper, deseeded

  • 1 medium zucchini

  • 8 ounces mushrooms

  • 5 tablespoons olive oil

  • 3 cloves garlic, chopped

  • salt and pepper

  • 3 tablespoons mixed finely chopped fresh parsley and/or herbs such as thyme, basil, marjoram, rosemary, etc.

  • Balsamic vinegar or lemon juice, optional

Preheat the oven to 400F. Wash and drain the vegetables. Slice the potatoes 1/8-inch thick. Cut the onion, eggplant, red pepper, zucchini and mushrooms into chunks. Place all the vegetables in a single layer inside a large roasting pan. Pour olive oil over vegetables and toss to coat them. Sprinkle with garlic, salt and pepper and herbs. Toss to coat the vegetables evenly. Place the vegetables in the oven. Turn the heat down to 350F and roast the vegetables for about 50 minutes, stirring them occasionally. Serve hot or at room temperature. Serve plain or sprinkled with Balsamic vinegar or lemon juice. 

Makes 8 servings


Stewed Dried Fruit

I know some people think it’s too old fashioned, but I have always loved — still love — dried fruit compote.

Last year I wrote about it for The Nosher (My Jewish Learning) and got lots of responses! It’s the kind of dish that some people absolutely hate (until they try some updated version) but people like me love not just for the flavor but also the memories this dish conjures up.

I grew up in an Ashkenazi Jewish family so dried fruit compote was a given! My grandmother, who made it basically with prunes and the occasional dried apricot, called it kumput. The young kids, me included, hated it.

Years later I rediscovered the dish after trying something similar (Khoshaf) in Egypt and I’ve been tinkering with the recipe ever since. This is my latest version; a tasty and fitting dish anytime, but especially for the lovely holiday of Tu B’shevat (New Year of the Trees), which comes at the beginning of a new season in Israel when trees bring forth their first fruits of the year (this year the holiday starts at sundown on February 5th).

We eat compote with yogurt for breakfast but I’ve also served it with mascarpone cheese for dessert. It’s really good anytime.

Dried Fruit Compote

  • 2 cups orange juice

  • 1-1/2 cups water

  • 1/4 cup honey

  • 1 3” cinnamon stick

  • 12 whole cloves

  • 2 pieces of orange peel, each about 2-inches long

  • 12 prunes

  • 8-10 whole dried figs, cut in half

  • 1 cup dried cherries, blueberries or cranberries

  • 1 cup dried apricot halves

Place the juice, water, honey, cinnamon stick, cloves and orange peel in a saucepan large enough to hold all the dried fruit. Bring to a boil over high heat. Turn the heat to medium-low and simmer for 15 minutes. Add the fruit and simmer another 18-20 minutes or until the fruit is soft. Let the fruit cool in the pan. The sauce will thicken as the fruit absorbs some of it. Discard the cinnamon stick (you won’t find the cloves). Serve with the poaching liquid.

Makes 8 servings

Squash Streusel Muffins

Last Thanksgiving I had some cooked pumpkin left over after making some pies, so in an effort not to waste any food, I mashed some of the pieces and used a cupful to make muffins. They were so good that I made them again a few times but used cooked winter squash.

Even better!

Those muffins came in really handy for breakfast when I had sleepover guests for New Year’s weekend.

These are delicious with the streusel top — a nice nosh with afternoon tea or coffee — but they’re good plain too (just make them without the streusel).

Squash Streusel Muffins

 Streusel:

  • 1/4 cup all-purpose flour

  • 1/4 cup quick cooking or rolled oats

  • 2 tablespoons white sugar

  • 1/8 teaspoon salt

  • 2 tablespoons vegetable shortening or solid coconut oil, cut into chunks (butter if desired)

Place the flour, oats, sugar and salt in a bowl and mix ingredients to distribute them evenly. Add the shortening and work it into the dry ingredients with fingertips or a pastry blender until the mixture looks like coarse meal. Set aside.

Batter:

  • 1 cup mashed, cooked squash (canned pumpkin is fine)

  • 1/2 cup white sugar

  • 1/3 cup brown sugar

  • 1/2 cup vegetable oil

  • 1/3 cup oat milk (or other dairy or nondairy milk)

  • 2 large eggs

  • 1-3/4 cups all-purpose flour

  • 1 teaspoon baking soda

  • 3/4 teaspoon salt

  • 1/2 teaspoon ground cinnamon

  • 1/2 teaspoon grated fresh nutmeg

  • 1/2 teaspoon ground ginger


Preheat the oven to 350 degrees. Lightly grease 10 muffin pan wells. Combine the mashed squash, white sugar, brown sugar, vegetable oil, oat milk and eggs in a large bowl and whisk the ingredients for 1-2 minutes or until thoroughly blended. In another bowl, combine the flour, baking soda, salt, cinnamon, nutmeg and ginger and add the mixture to the squash mixture. Whisk or mix the ingredients for 1-2 minutes or until thoroughly blended. Spoon equal amounts of the batter into the prepared wells. Sprinkle equal amounts of the streusel on top of each muffin. Bake for 25-30 minutes or until a cake tester inserted into the center of a muffin comes out clean.

Makes 10


Sweet and Sour Chicken

Ed’s birthday is coming up soon and even though we’ve dined on fancy food and feasted on multi-course meals at lovely restaurants; even though I’ve cooked fancy food and prepared multi-course meals, it’s not what he wants for his birthday.

He always wants Chinese food. Usually, old-fashioned Cantonese style Chinese food, the kind he remembers from his boyhood. Like this Sweet and Sour Chicken. It’s also a perfect dish for Lunar New Year which begins on Sunday January 22.

Sweet and Sour Chicken

  • 1/2 cup chicken stock

  • 1/4 cup apple cider vinegar

  • 1/4 cup sugar

  • 2 tablespoons ketchup

  • 1 tablespoon soy sauce

  • 1/4 cup flour

  • 1/4 cup cornstarch

  • 1/4 cup water

  • 1 large egg

  • 16-20 ounces boneless chicken, cut into bite-size chunks

  • Vegetable oil

  • 1/2 small green or yellow bell pepper cut into chunks

  • 1/2 small red bell pepper cut into chunks

  • 1 small onion, sliced

  • 1 large clove garlic, chopped

  • 1 cup pineapple chunks (fresh or canned)

  • 1 tablespoon cornstarch dissolved in 2 tablespoons water

Preheat the oven to warm. Make the sauce: place the chicken stock, vinegar, sugar, ketchup and soy sauce in a saucepan. Cook the ingredients over medium-high heat and bring to a boil. Mix the ingredients, turn off the heat and set aside.

Mix the coating ingredients: place the flour, cornstarch, water and egg in a bowl. Whisk thoroughly until a smooth batter has formed. Add the chicken pieces and stir to coat all the pieces.

Add enough vegetable oil to a deep saute pan to cover the chicken pieces halfway. Heat the oil until it is hot enough for a bread crumb to sizzle. Cook a few chicken pieces at a time (don’t crowd the pan) for about 4 minutes or until the pieces are browned and crispy. Drain on paper towels and place in the preheated warm oven. Repeat with the remaining pieces.

Drain all but 1-2 tablespoons of the vegetable oil from the pan. Add the bell pepper pieces, onion and garlic to the pan and cook over medium heat for 2-3 minutes or until softened. Add the pineapple chunks and cook for a minute to heat the pieces. Spoon the vegetables and pineapple into the sauce and reheat over medium heat for about 2 minutes or until hot. Mix the cornstarch/water together until smooth, add it to the sauce and stir until the sauce has thickened.

Place the chicken onto a serving platter. Pour the sauce on top and serve.

Makes 4 servings

Chicken Vegetable Soup

After all of the end-of-year holidays, a lot of us need to scale back eating and spending— which makes this Chicken Vegetable Soup such a winner. I make it with a leftover chicken carcass — there’s still plenty of meat on it (I’ve also used a turkey carcass). There are also lots of healthy vegetables (you could add others such as green beans) and a boost of chick peas (I’ve also used white beans; red beans would also be fine).

Like spicy? Add a bit of harissa or hot sauce to the liquid when you add the other seasonings.

This dish is filling, nourishing, uncomplicated and easy to make. Delicious too. And cheap.

Give it a try.

Chicken Vegetable Soup

  • 1 28-ounce can tomatoes plus the liquid

  • chicken carcass and scraps

  • 3 carrots, peeled and sliced 1-inch thick

  • 2 stalks celery, peeled, leaves included if available, and sliced 1-inch thick

  • 1 medium onion, sliced

  • water to cover (or use vegetable or chicken stock)

  • salt and pepper

  • 2-3 sprigs fresh thyme, marjoram or oregano

  • 1 15-ounce can chick peas or white beans, drained

  • 2 cups zucchini

Cut the canned tomatoes into smaller pieces; save the liquid from the can. Place the chicken carcass, carrots, celery, onion and tomatoes plus liquid in a soup pot. Add enough water to just cover the ingredients. Add salt, pepper and the chosen fresh herb and bring the liquid to a boil over high heat. Lower the heat and simmer for 3-1/2 hours. Add the beans and zucchini and cook for another 20 minutes.

Makes 8-10 servings

Sweet and Sour Pot Roast

There are two truths about pot roast.

First, it’s not glamorous or gorgeous.

Second, it is delicious and satisfying.

So, with that in mind, please remember that the photo may not be an artist’s dream, but the food in it is always devoured because the recipe is big winner. And, while pot roast is ideal when the weather is cold or dreary, it’s so satisfying that it will do in just about any weather.

Sweet and Sour Pot Roast

  • 3-4 tablespoons all purpose flour

  • salt and freshly ground black pepper to taste

  • 3 pound chuck roast

  • 4 tablespoons vegetable oil (I use avocado oil)

  • 2 medium onions, sliced

  • 2 large cloves garlic, chopped

  • 1 teaspoon finely chopped fresh ginger

  • 1 1-pound 12-ounce can tomatoes (including liquid)

  • 1/4 cup brown sugar

  • 3 tablespoons cider vinegar

  • 1 tablespoon Worcestershire sauce (I use vegetarian Worcestershire sauce)

  • 4-5 carrots, peeled and cut into chunks

  • 2-3 medium all-purpose potatoes, peeled and cut into chunks

In a dish, mix the flour with some salt and pepper. Dredge the beef in the flour to coat it on all sides. Pour 2 tablespoons vegetable oil in a Dutch oven over medium heat. Add the meat and cook, turning the meat occasionally, for 6-8 minutes, to brown the surface. Remove the meat and set it aside. Add the remaining vegetable oil to the pan. Add the onions, garlic and ginger and cook, stirring occasionally, for 2-3 minutes. Add the tomatoes (and liquid), brown sugar, cider vinegar and Worcestershire sauce. Stir to blend the ingredients. Return the meat to the pan. Add the carrots and potatoes. Cover the pan and place it in the oven. Turn the heat to 275F. Cook for about 3 hours or until the meat is tender.

Makes 6 servings

Lox and Cream Cheese Dip/Spread

It’s almost new year’s weekend, so I’ve been cooking for our annual New Year’s Eve hors d’oeuvres fest (storing a lot of stuff in the freezer).

These are some of the items I’ll serve at various times during the day: Marinated Mushrooms (a cinch to make); Potato-Carrot Latkes; Romanian Cheese turnovers; Scallion Cakes; Almond Chicken Nuggets; Hot Dog en Croute, and some others, plus a couple of dips, like hummus.

This Smoked Salmon and Cream Cheese dip is a definite for our smoked fish hour. It’s amazingly easy to put together, so if you need something last minute, this is for you.

Lox and Cream Cheese Dip/SPREAD

  • 4 ounces smoked salmon

  • 1 cup cream cheese (8 ounces)

  • 1/3 cup dairy sour cream

  • 1 tablespoon lemon juice

  • 2 tablespoons chopped fresh dill

  • 2 chopped scallions

Chop the smoked salmon into small pieces and set aside. Cut the cream cheese into chunks and place in a food processor. Add the sour cream, lemon juice, dill and scallions. Process on pulse until the ingredients are relatively smooth and well blended. Add the smoked salmon, pulse a few more times to distribute the pieces evenly.

Makes 1-1/2 cups

Cranberry-Oat-Chocolate Chip Bars

Back in the day — before emailing — I hand-delivered hard copy of the food articles I wrote to the editors of the various media I wrote for (I snail-mailed copy to the people who were further away). After some years I would deliver (or send) “floppy discs.”

Of course that ended long ago and with it, the hundreds of cookies I baked, packed, decorated and delivered to the various newsrooms during the year-end holiday season.

Today? I still bake cookies — not as many! — because I always think of the end of the calendar year as cookie season. Christmas cookies. Hanukkah cookies. New Year cookies. Kwanzaa cookies. I give a lot away to friends but there’s always a load left for us in my freezer.

Whatever you want to celebrate, cookies always win.

Like these Cranberry-Oat bars. Bonus: they’re egg-free, dairy-free and gluten-free.

Happy Everything.

Cranberry-Oat-Chocolate Chip Honey Bars

  • 2 cups rolled oats

  • 1/2 cup chopped almonds

  • 6 tablespoons vegetable oil

  • 1/2 cup honey

  • 1/3 cup maple syrup

  • 1/4 cup brown sugar

  • 1/2 teaspoon salt

  • 1 teaspoon ground cinnamon

  • 1 cup dried cranberries

  • 3/4 cup chocolate chips

Preheat the oven to 350 degrees. Lightly grease a 9-inch square cake pan, line the pan with parchment paper, leaving an overhang (to pull the cookies out after baking) of about 3-inches on each side. Lightly grease the paper. Place the oats and almonds on a cookie sheet and bake for 4-5 minutes, stirring once or twice, or until the oats and almonds are lightly toasted and aromatic. Remove from the oven. In a medium saucepan, combine the vegetable oil, honey, maple syrup, brown sugar and salt and cook, stirring frequently for 2-3 minutes or until hot and smooth. Remove the pan from the heat and stir in the oat mixture. Stir in the cinnamon and cranberries. Let cool. Stir in the chocolate chips. Spoon the mixture into the prepared pan. Bake for 25-30 minutes or until lightly browned. Let cool. Remove by pulling the overhanging paper. Lift out, place on a cutting board and cut into 16-24 pieces.

Makes 16-24 cookies


Potato-Carrot-Curry Latkes

Potato latkes for Hanukkah? Of course!

But I make other kinds of latkes too.

This year it’s going to be these potato-carrot latkes. They have just enough curry powder to add an intriguing but not too spicy seasoning. I’ve made them several times already and they’ve been getting rave reviews. I’ll also serve some for my new year’s hors d’oeuvres fest.

The sauce is a bit tangy and very refreshing, sort of like tzadiki (cacik). It’s a soft, rich, smooth and tasty counterpoint for the crispy fried latkes.

Potato-Carrot-Curry Latkes with Yogurt Sauce

  • 3 medium Russet type potatoes, peeled

  • 4 medium carrots, peeled

  • 1 large onion, cut into chunks

  • 2 large eggs

  • 1/4 cup potato starch, matzo meal or bread crumbs

  • 1 teaspoon salt or to taste

  • freshly ground black pepper to taste

  • 2 teaspoons curry powder

  • vegetable oil for frying

Yogurt Sauce

  • 1 cup plain Greek yogurt

  • 2-3 scallions, chopped

  • 1/4 cup grated cucumber

  • 2-3 teaspoons lemon juice


Shred the potatoes, carrots and onion in a food processor. Squeeze out as much of the liquid as possible (I put portions of the shreds in a kitchen towel and squeeze until they are practically dry). Place the shreds in a bowl. Immediately mix the eggs in (this helps keep the potatoes from browning). Add the potato starch, salt, pepper and curry powder. Heat about 1/4” vegetable oil in a heavy pan over medium-high heat. Shape latkes by hand, squeezing liquid out if there is any, and place them in the hot oil, leaving space between each one so that they brown well and become crispy (if they are too close they will “steam” and become soggy). Press down on the latkes to keep them evenly shaped. Fry for about 3 minutes per side or until the pancakes are golden brown and crispy. Drain on paper towels. Serve with the Yogurt Sauce.

To make the sauce, mix the yogurt, scallions, cucumber and lemon juice together until well mixed. Place in a serving bowl.

Makes 12-15

Carrot Fries Redux: convection or air fryer?

I’ve been experimenting with my air fryer and — I know people will vigorously disagree with me, but —- I’m not as big a fan as others seem to be.

Granted — vegetables come out really good: crispy, tender, attractive. And the cooking is relatively quick. I’ve also been successful airfrying unbreaded chicken wing parts, shnitzel and other items (e.g. grilled cheese). It’s also terrific and handy for heating hors d’oeuvre.

But other foods have been a disaster. “Fried chicken” (more on that in another post), for example. Sorry folks, no, it doesn’t taste like or have the texture of actual fried fried chicken.

Latkes? Absolutely not. The pan fried latkes were perfect (more on that in another post) and the airfryer ones went right into the garbage. They were leaden, not crisp, not even completely cooked no matter how many ways I tried.

Carrots? Perfect. The photo above shows carrots made in my convection oven (then dressed with Balsamic vinegar and chives) and the bottom photo shows air fried carrots. Taste, texture both terrific. So, yay for the airfryer

BUT:

  • even though I have a large airfryer (Breville), there is a limit to the amount of carrots and other vegetables that I can cook at one time. So, while it’s perfect when I’m making dinner for just Ed and me or maybe when there’s two other people, it’s useless when I have the family (11 of us)

  • there’s more to clean up: the fry basket plus wherever the drips from food happen as opposed to removing the parchment paper I use when I “oven fry” on a jelly roll pan in my convection oven

  • the airfryer is quicker but not substantially: about 15 minutes for the carrots compared to 20 minutes in the convection oven (although it must be said that I used twice as many carrots when I cooked them by convection).

    Anyway, that’s my take. I will continue to experiment!