Banana Marble Bread

fullsizeoutput_b6da.jpeg

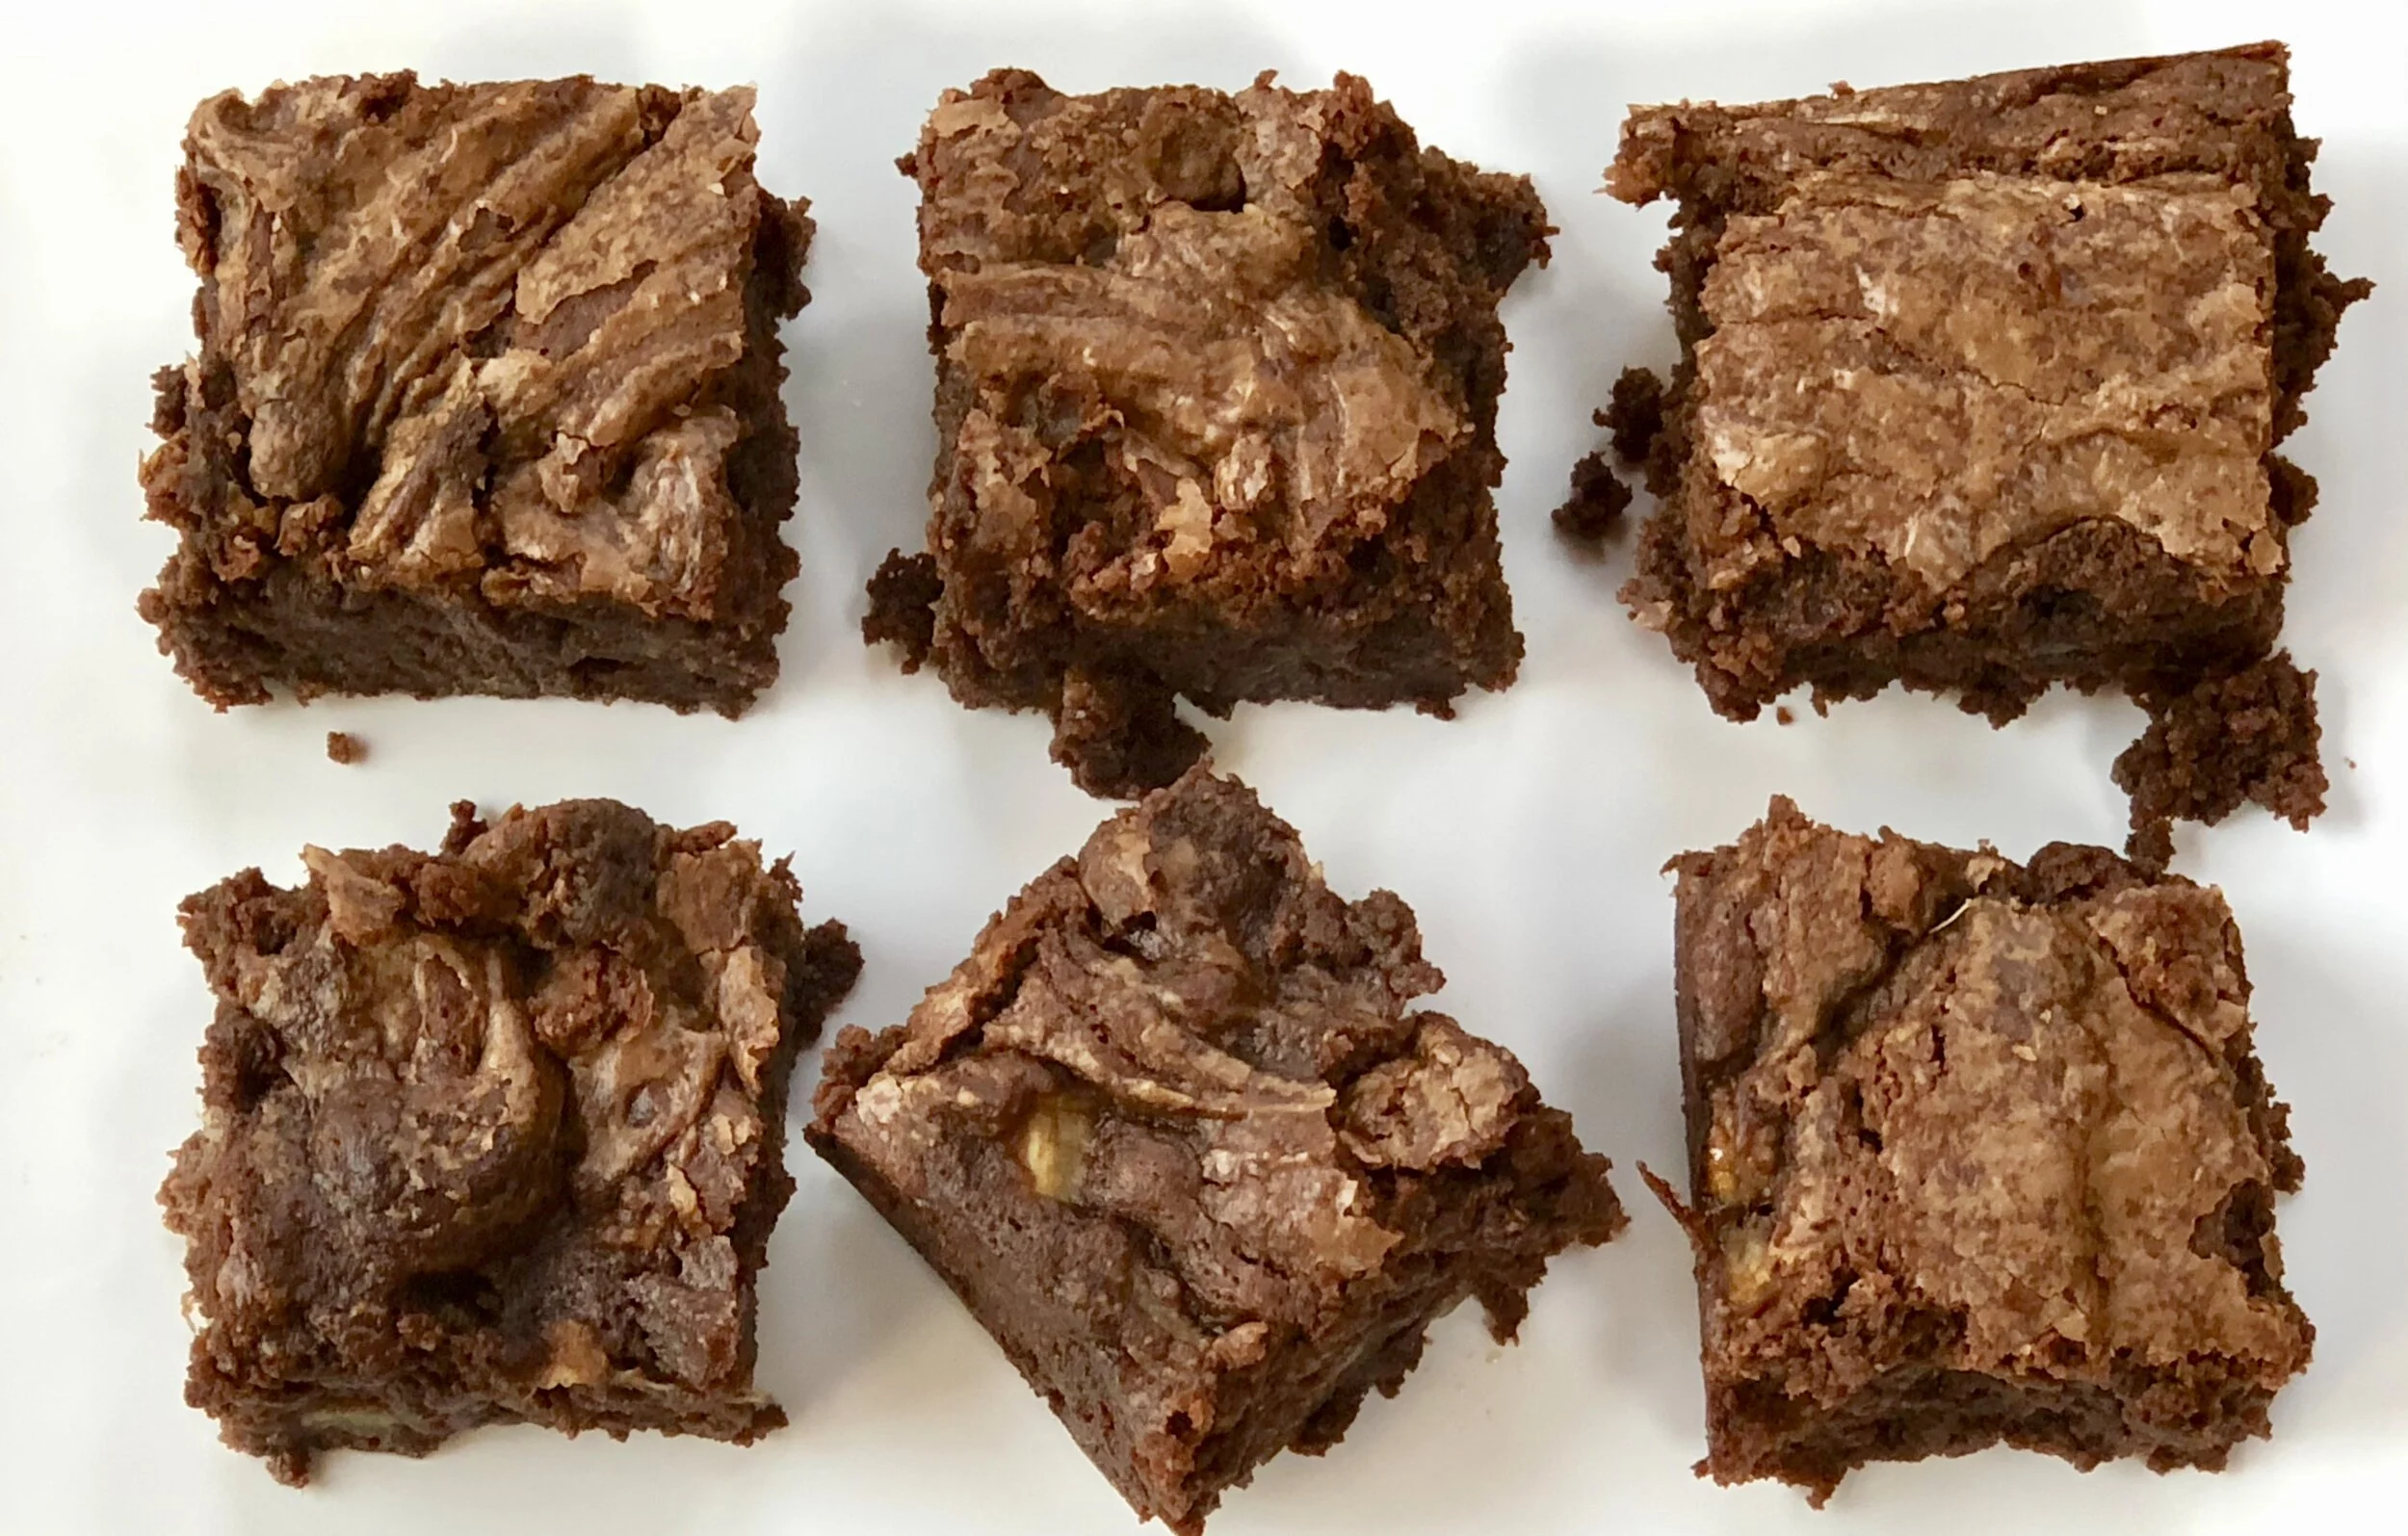
Got some leftover bananas? Maybe a little chocolate (bar/chips/anything)?

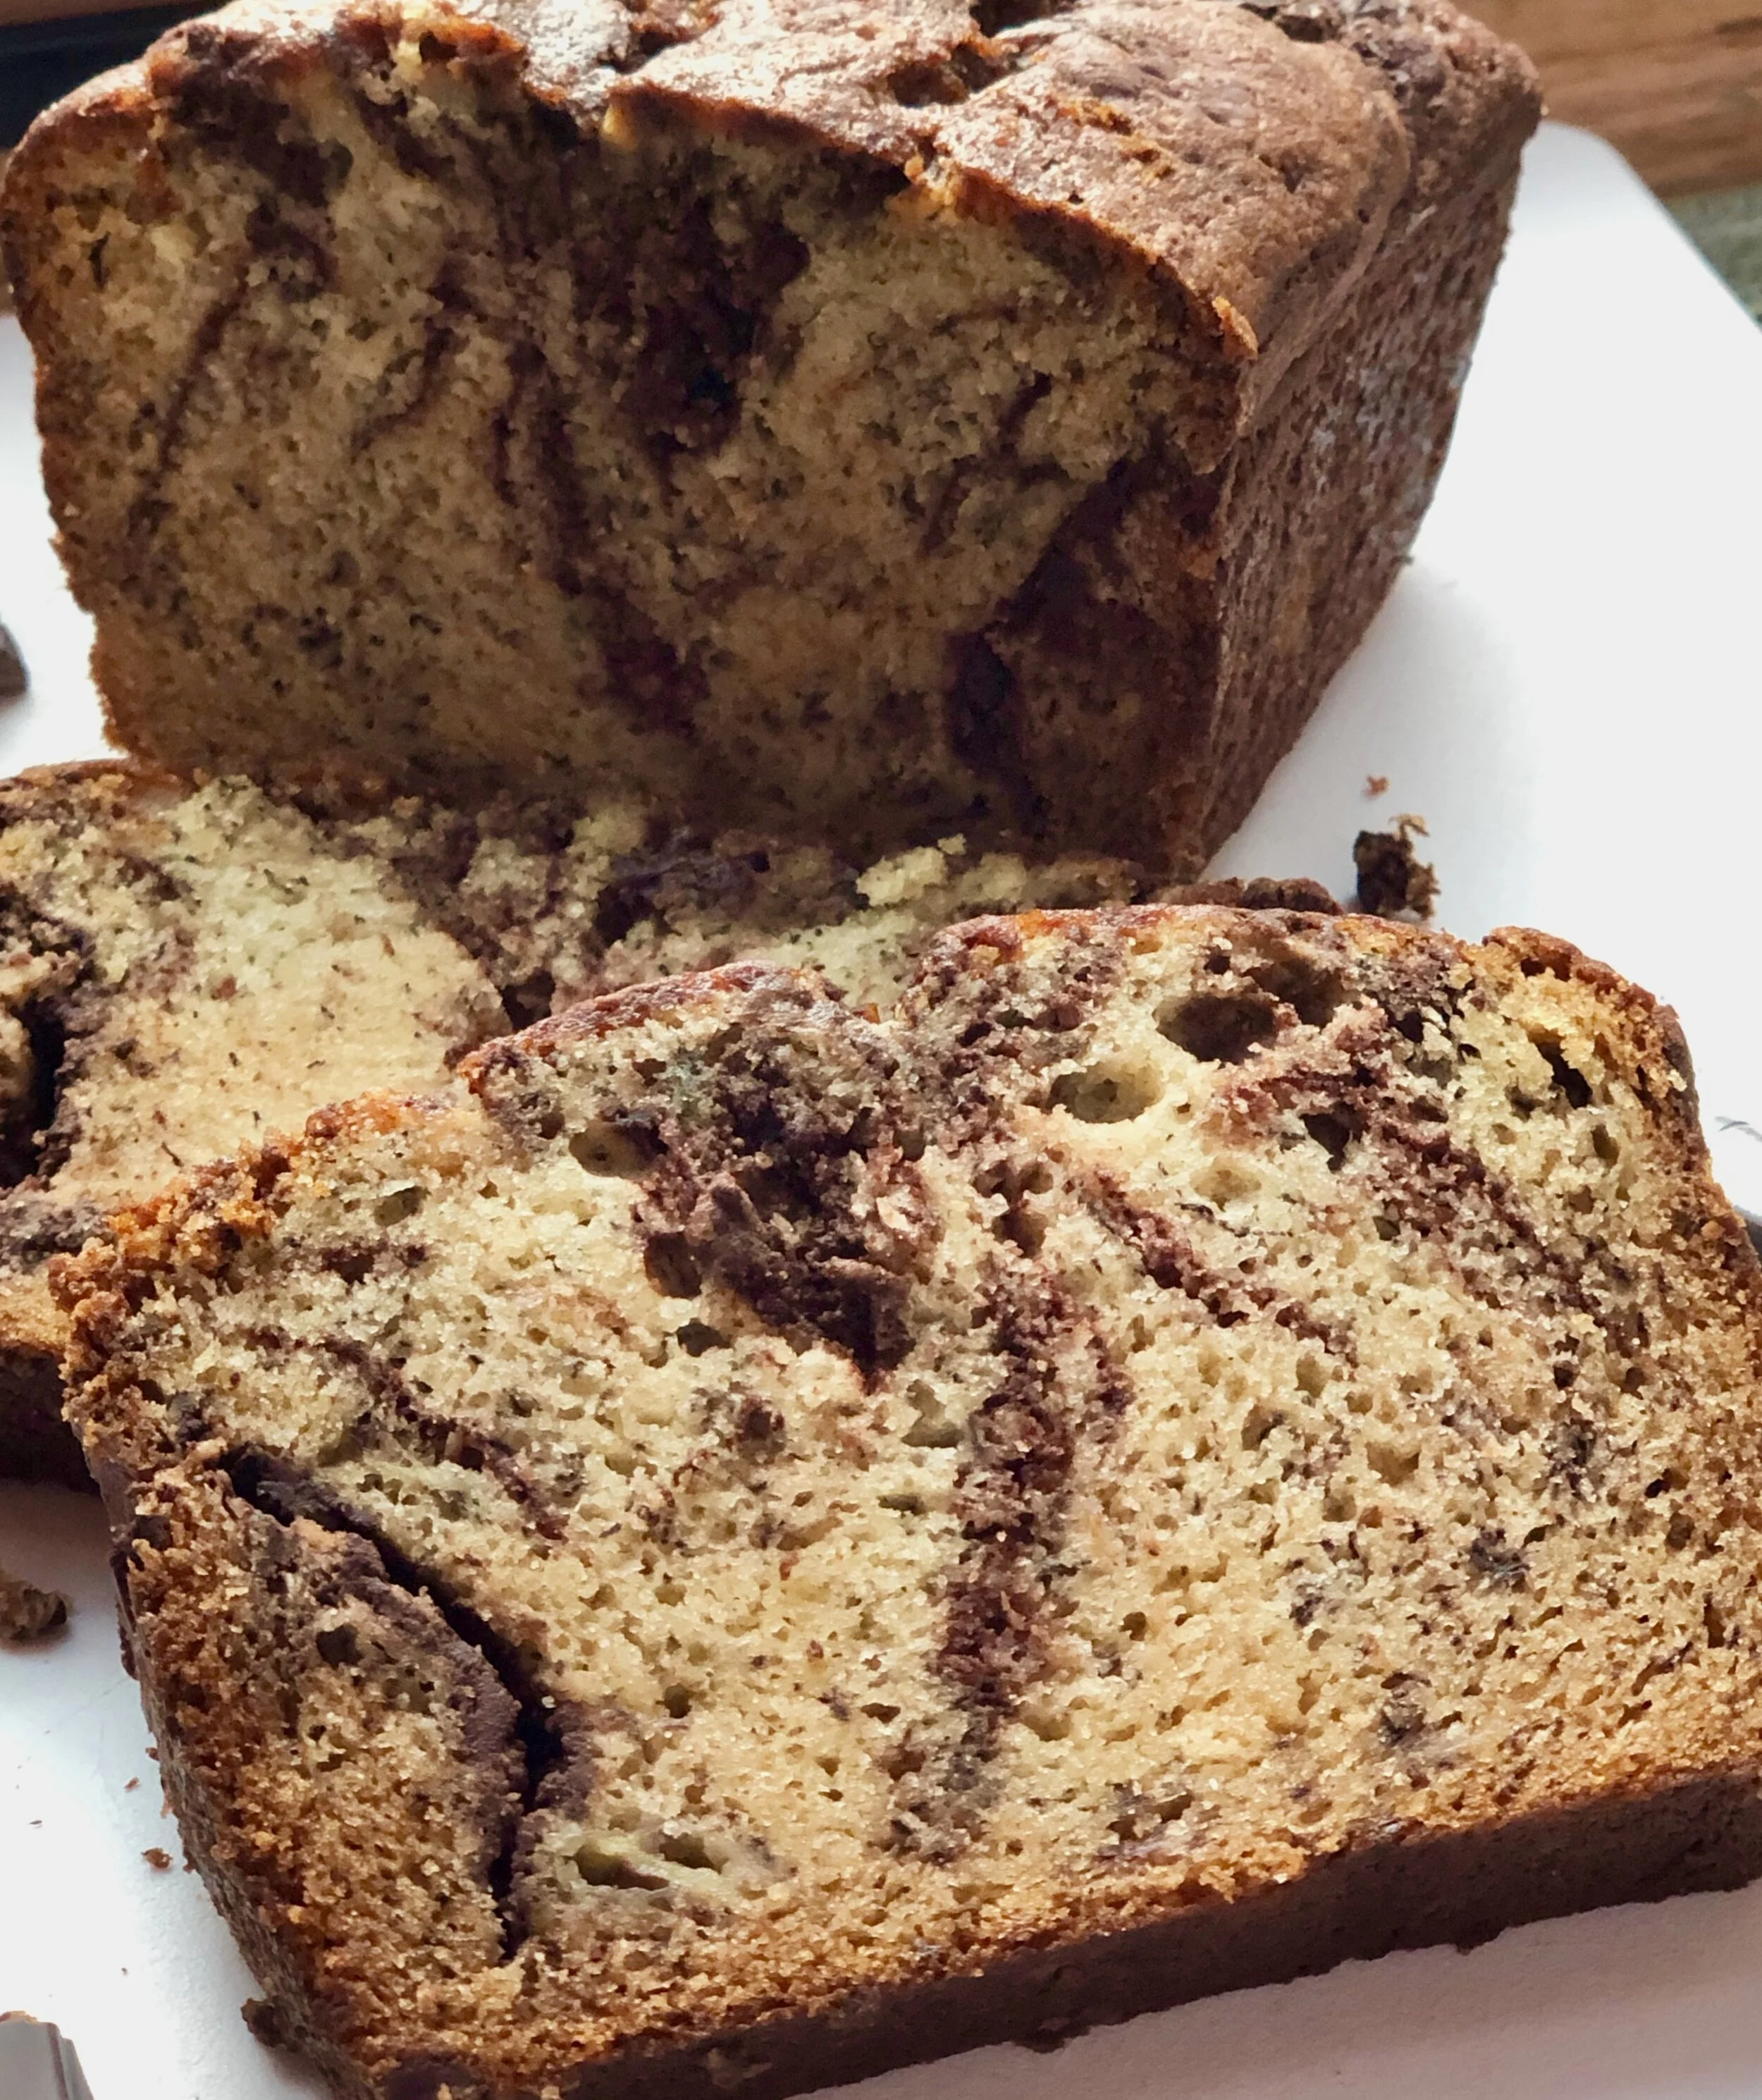
Here’s a comforting treat. The swirl of chocolate makes plain old banana bread a bit more festive.

If you’re socially distancing at home like so many of us, this Banana Marble Bread is a tasty way to pass the time, use what you have and add a comforting fragrance to your home.

Banana Marble Bread

  • 3 ounces semisweet chocolate

  • 2 cups all-purpose flour

  • 1 teaspoon baking soda

  • 1/2 teaspoon baking powder

  • 1/2 teaspoon salt

  • 1 cup sugar

  • 1/2 cup vegetable oil

  • 2 large eggs

  • 3 medium ripe bananas

  • 1/4 cup fruit juice, oat milk or other non-dairy milk (or use dairy milk)

  • 1 teaspoon vanilla extract

Preheat the oven to 350 degrees. Grease a 9”x5”x3” loaf pan. Melt the chocolate and set it aside to cool. Mix the flour, baking soda, baking powder and salt in a bowl and set it aside. Beat the sugar and vegetable oil with a handheld or electric mixer set at medium speed for 2-3 minutes or until the mixture is well blended. Add the eggs one at a time, beating after each addition. Mash the bananas and add them to the sugar mixture. Beat thoroughly until the ingredients are well blended. Add the flour mixture and beat for 1-2 minutes to blend the ingredients thoroughly. Stir in the juice and vanilla extract. Pour the batter into the prepared pan. Pour the melted chocolate on top and use a knife or spatula to swirl it through the banana batter. Bake for 1 hour or until a cake tester inserted into the center comes out clean. Cool the bread in the pan 15 minutes. Remove the bread from the pan and let it cool on a cake rack.

 Makes one bread serving 10-12

Fresh Ginger Cake

IMG_4405.jpeg

When life gives you lemons, you make lemonade.

And, when life gives you fresh ginger, you make ginger cake (to go with ginger tea of course).

I’ve been using Instacart to get groceries recently because of the stay-at-home and social distancing Ed and I are following strictly. This delivery service has been excellent and I am incredibly grateful to the men and women who have shopped for us and delivered everything to our front door.

So first, bravo and thank you to them.

There have been some mistakes, none really worth talking about, but one that I found amusing.

I ordered a piece of fresh ginger and my shopper bought a pound!

That’s a lot of ginger.

But okay. I’ll use it.

First of all, I love ginger steeped in near-boiling water for tea. I’ve been drinking a lot of that recently. It’s healthy and a perfect way to stay hydrated too.

And of course, to go with the tea: cake. Like gingerbread. Except I didn’t have enough molasses so I used a mixture of date honey and regular honey. And I used fresh ginger instead of dried.

Perfect. This cake is milder than traditional gingerbread (because of the missing molasses), yet with the familiar heat because fresh ginger has a bit of a bite.

Would have loved some whipped cream, but alas, no cream in the house.

Fresh Ginger Cake

  • 3/4 cup butter

  • 3/4 cup date syrup (silan) (or use molasses)

  • 1/4 cup honey (or use molasses)

  • 1/2 cup brown sugar

  • 3 cups all-purpose flour·      

  • 2-1/2 teaspoons baking soda

  • 1/2 tsp. salt

  • 1 teaspoon ground cinnamon

  • 1/2 teaspoon grated fresh nutmeg

  • 1/4 cup grated fresh ginger

  • 2 large eggs

  • 1/3 cup milk

Preheat the oven to 350 degrees. Lightly grease a 9”x9” cake pan. Place the butter, date syrup, honey and brown sugar in a saucepan and cook, stirring occasionally, over medium heat until the butter has melted. Stir to blend ingredients thoroughly. Set aside to cool. Mix the flour, baking soda, salt, cinnamon and nutmeg together. Pour the date liquid mixture over the flour mixture and beat the ingredients to blend them thoroughly. Add the ginger and eggs and beat them in. Pour in the milk and mix until the batter is smooth. Pour the batter into the pan. Bake for about 40 minutes or until a cake tester inserted into the center comes out clean.

Makes 8-10 servings

Quarantine Charoset or Pantry Charoset or Completely Made-up Charoset

fullsizeoutput_a458.jpeg

When I was growing up the Seder charoset was used symbolically only. My grandmother, and in later years my mother, would grate an apple or two, mix it with some walnuts and Manischewitz concord grape wine and that was that. It always turned brown and didn’t look very appetizing and we ate it only as commanded during the reading of the Haggadah.

Then, several years ago, charoset became a big deal. It was now expected to taste good, look good and be eaten like a side dish, the way we eat cranberry sauce or apple sauce.

And so, I stopped making the apple mush. Instead, over the years, I’ve made Persian versions, nut-free versions, coconut charosets and all sorts of others, based on different ethnicities.

This year I am making my special COVID19 jumble, made with what I have on hand in the way of dried fruit (plus an orange, which I always have in the fridge.

Should I call it Quarantine Charoset, Pantry Charoset or simply Completely Made Up Charoset?

I don’t use any nuts because of allergies, but you can add 1/3-1/2 cup of chopped nuts (any kind) to this recipe if you have some in your pantry.

Quarantine Charoset or Pantry Charoset or Completely Made-up Charoset

  • 1-1/2 cups chopped dates

  • 1 cup chop dried figs

  • 1 cup chopped dried apricots

  • 1/2 cup raisins

  • 1 fresh apple, peeled and chopped

  • 1/2 cup pomegranate jam (or any jam you have)

  • 1/3 cup Passover wine (preferably Concord grape)

  • 1/4 cup orange juice

  • 1 teaspoon grated fresh orange peel

Place the dates, figs, apricots, raisins and apple in a bowl and toss the fruit to distribute the pieces evenly. Add the pomegranate jam and stir to coat the fruit. Pour in the wine and orange juice; add the orange peel. Toss the ingredients. Let rest for at least one hour before serving.

Makes about 5 cups

Maple Sweetened Corn Muffins

Maple Sweetened Corn Muffins

Maple Sweetened Corn Muffins

Looking to cook with stuff from your pantry?

Trying to use up chometz before Passover?

Try these.

Easy, tasty and useful.

Maple Sweetened Corn Muffins

  • 1/3 cup butter

  • 1 cup cornmeal

  • 1 cup all-purpose flour

  • 1 tablespoon baking powder

  • 3/4 teaspoon salt

  • 3 tablespoons pure maple syrup

  • 1 large egg

  • 2/3 cup milk

Preheat the oven to 425 degrees. Lightly grease 8 muffin tins. Melt the butter and set it aside to cool. In a bowl, mix the cornmeal, flour, baking powder and salt. In another bowl mix the maple syrup, egg, milk and cooled butter, beating until well blended. Pour the liquid into the cornmeal mixture and stir to blend the ingredients. Spoon equal amounts into the muffin tins. Bake for 20-25 minutes or until golden brown.

Makes 8


Lemon Aquafaba Bread

fullsizeoutput_9516.jpeg

At this particular time, when we are going through a world-wide crisis, a terrifying pandemic, it can be therapeutic for many of us to cook and bake.

I am one of those people.

I have plenty of ingredients to cook with because over the years I’ve learned to keep shelf-stable foods on hand in case I can’t shop: ingredients such as canned beans, rice, frozen veggies, dried fruit, canned or packaged milk, and so on.

Equally important for me is — don’t waste food (I’ve talked about that often). I believe that it is important to use all resources — “food forage” as my colleague Susan Barocas calls it. Don’t throw out any ingredient that’s useable, including leftovers.

With all this in mind I offer this lemon bread.

I have lots of lemons in my crisper because of an article I am writing. I’ve developed the recipe for that, so I need to make use of the extra lemons.

I also needed to do something with the liquid leftover from a can of chick peas that I opened for a salad. Chick pea liquid is incredibly useful.

In case you aren’t familiar with this leftover liquid (also from canned beans), it is called aquafaba and it can be used in place of eggs. That makes it an ideal ingredient for vegans and anyone who is allergic to or otherwise can’t eat eggs.

When you beat chick pea liquid with a whisk, it traps air like eggs do, so baked goods have both structure and also a light, tender crumb.

I am trying not to use too many fresh eggs that I might need for meals, so I used the aquafaba instead to make this lemon bread.

Dee-lish!

To get the most out of the liquid in a can of chick peas, be sure to scrape the residue at the bottom of the can. For best results, reduce the liquid slowly over medium-low heat until it becomes the consistency of egg white. Use about 3 tablespoons of the liquid in place of each egg. 

For another delicious recipe (carrot bread) using aquafaba, click here.

Lemon Aquafaba Bread

  • 6 tablespoons aquafaba

  • 4 tablespoons coconut oil

  • 3/4 cup sugar

  • 1 tablespoon finely grated fresh lemon peel

  • 2 cups all-purpose flour

  • 2-1/2 teaspoons baking powder

  • 3/4 teaspoon salt

  • 1 cup coconut milk

  • 1/4 cup fresh lemon juice

  • 1-1/2 tablespoons sugar

Preheat the oven to 350 degrees. Grease a 9”x5”x3” loaf pan. If the aquafaba seems thin, boil it for a few minutes to thicken slightly to the consistency of egg white. Set aside to cool. In the bowl of an electric mixer, beat the coconut oil and 3/4 cup sugar at medium speed for 1-2 minutes or until well combined. Add the lemon peel and aquafaba and blend them in. Mix the flour, baking powder and salt in a small bowl. Add the dry ingredients to the creamed mixture in thirds, alternating with the coconut milk. Beat to blend the ingredients to a smooth, even batter. Spoon the batter into the prepared pan. Bake for 50-55 minutes or until a cake tester inserted into the center comes out clean. While the bread is baking, combine the lemon juice and 1-1/2 tablespoons sugar in a small saucepan and cook over medium heat for 1-2 minutes or until the sugar has dissolved. When the bread comes out of the oven, pour the lemon juice mixture on top. Cool the bread in the pan for 10 minutes. Invert onto a cake rack to cool completely.

Makes one bread

Mashed Potato Pancakes

fullsizeoutput_b675.jpeg

When I am going through periods of stress in my life, the food I want most is anything made with a potato.

So: these.

Mashed potato pancakes.

Just in time for St. Patrick’s Day.

I’m not Irish but will use any excuse to eat Irish food, which, despite the outcries of surprise from my Irish friends, is quite wonderful (fresh salmon, fabulous oatmeal, spectacular bread and the best potatoes ever).

I’ve been to Ireland a few times and have eaten mashed potato pancakes there, although I’ve never seen them crusted with panko; it’s usually plain old bread crumbs on the outside.

You can use either; I like the texture of panko better.

Mashed potato pancakes are very soft, so be careful when placing them in the pan and turning them.

These make a good side dish, but also a meal if you top them with a fried egg or two.

Mashed Potato Pancakes 

  • 3 cups cold mashed potatoes

  • 1 large egg

  • 2 chopped fresh scallions or 3 tablespoons chopped fresh chives

  • 1/3 cup bread crumbs

  • Salt and freshly ground black pepper to taste

  • 1 cup panko or bread crumbs, approximately

  • 5-6 tablespoons vegetable oil

Place the mashed potatoes, egg, scallions, 1/3 cup bread crumbs and salt and pepper to taste in  a bowl and mix thoroughly to blend all the ingredients. Shape the mixture into patties about 1/2-inch thick and refrigerate for at least one hour. Place the panko on a dish, then press each patty into the panko to coat both sides. Patties are very soft and fragile, so work carefully. Heat 2-3 tablespoons vegetable oil in a saute pan over medium-high heat. When the oil is hot, fry a few of the potato cakes for about 3 minutes per side, or until crispy. Be sure to leave room in the pan with space between each pancake. Repeat with the remaining potato cakes, adding more oil to the pan as needed.

Makes about 12

Potato and Cheese Kreplach

fullsizeoutput_baff.jpeg
fullsizeoutput_b9ac.jpeg
fullsizeoutput_b9ad.jpeg
fullsizeoutput_b9ae.jpeg
fullsizeoutput_b969.jpeg

If I knew that the world was going to end or that it was my last day on earth, I would want potato-and-cheese kreplach with sour cream for dinner before I go.

For me, this simple, rustic, peasant dish is the ultimate.

I hadn’t had any for ages and ages and then, one day Ed and I were in Bratislava, Slovakia, perusing the menu at Houdini, a small restaurant conveniently located in our hotel.

They had potato-cheese pierogi!

Oh my.

There was no question about what I would order for dinner. I don’t even remember what else I could have chosen.

All I know is that the pierogies — the best I had ever eaten — came laden with sour cream and topped with chopped fresh chives.

I would go back to Bratislava just to have some more.

And I have been fantasizing about those things ever since.

However, because a trip to Slovakia is not in my immediate future, I decided to make some at home, but I made them kreplach shape in celebration of Purim, when it is customary to eat triangular shaped foods. These would be just perfect whether you make triangles or half moons.

If you’d like to make some, follow the recipe and look at the photos to see how the triangles are cut, filled and folded.

This is truly good food. Last day on earth worthy.

Potato Cheese Kreplach

FillinG:

  • 3 large Yukon Gold potatoes (about one pound), peeled, cut into chunks (about 3 cups mashed potatoes)

  • 2 tablespoons butter

  • 1 large onion, chopped

  • 1 cup farmer cheese

  • salt and freshly ground black pepper to taste

Place the potato chunks in a large saucepan, cover with water and bring to a boil. Lower the heat to a simmer and cook for about 15 minutes or until the potatoes are tender. Drain the potatoes and spoon into a bowl. While the potatoes are cooking, heat the butter in a sauté pan over medium heat. When the butter has melted and looks foamy, add the onions and cook, stirring occasionally, for 12-15 minutes or until soft and golden brown. Add the onions to the potatoes. Add the farmer cheese, sprinkle with salt and pepper and mix the ingredients until well blended. Set aside to cool before filling the dough.

DougH: 

  • 3-1/2 cups all-purpose flour

  • 1/2 teaspoon salt

  • 1/4 cup butter, cut into chunks

  • 2/3 cup water, approximately

  • 1 cup dairy sour cream

Place the flour and salt in a large bowl. Add the butter and work it into the dough until the mixture is crumbly. Add 1/2 cup of the water and the sour cream and mix the dough until it is smooth, soft and well blended. If the dough seems too dry, add more water. (You can do this in a food processor.) Let the dough rest for at least 30 minutes. Using portions of the dough, roll the dough on a floured surface to 1/8-inch thick. Cut the dough into 3-3-1/2” squares. Place about one tablespoon of the filling onto each square. Slightly wet 2 sides of the square along the border. Fold the dough over the filling to make a triangle, pressing down onto the moist strips to seal the dough. Use the back of a fork to press the edges. Bring a large pot of water to a boil. Add the filled kreplach, 8-10 at a time, and simmer for about 15 minutes or until they are tender. Remove the kreplach with a slotted spoon and set aside; repeat.

Serve with sour cream and chopped chives or scallion tops.

Makes about 30


Roasted Citrus Yogurt

Roasted Citrus Yogurt

Roasted Citrus Yogurt

I have been a yogurt woman for decades. Even before it became as popular and ubiquitous as it is today. I mentioned it last week in a post about muffins.

Back in the day, at least where lived, there was only one brand of yogurt to buy — Dannon — and just a few flavors. No mango that I recall, or key lime, and most certainly no salted caramel.

My favorite was prune, which disappeared even before yogurt became au courant because, I’m guessing, there were maybe two or three people in the entire world other than me, who loved it.

I wish there was a good prune yogurt today (there is one brand but it contains gelatin, which I don’t want in my yogurt). I confess to buying plain yogurt and occasionally adding a blob or two of prune lekvar. For those who haven’t tried that — it’s awesome.

In fact, I almost never buy flavored yogurt, other than Chobani Passion Fruit flavored, because, after prune that is my top choice. I almost always get a large tub of unflavored Greek-style, so I can create my own flavors. Like prune.

This being winter, when citrus fruit is the best that a supermarket can offer (I do not buy out of season summer fruit!) I decided to prepare a citrusy flavor blend for my yogurt breakfast: roasted grapefruit and oranges, a touch of honey and butter, a texture crunch by way of toasted almonds.

Delicious. I’ve made this with all-oranges too. Equally delicious (substitute 4-5 oranges for the grapefruit).

Roasted Citrus Yogurt

  • 2 large grapefruit

  • 4 oranges

  • 2 tablespoons butter

  • 3 tablespoons honey

  • 2-1/2 cups plain Greek style yogurt

  • 1/4 cup chopped toasted almonds

Preheat the oven broiler. Remove the skin and pith from the fruit. Cut the fruit into bite size chunks and place the chunks on a parchment lined baking sheet. Heat the butter and honey in a small pan over medium heat. When the butter has melted, stir the mixture to blend the ingredients and pour the mixture over the fruit and toss to coat each piece. Broil the fruit for about 6 minutes, tossing once, or until lightly crispy. Remove the fruit from the oven and set aside to cool. Spoon layers of the fruit and yogurt into 6 serving bowls. Sprinkle the nuts on top.

Makes 6 servings

Banana Muffins with Buttermilk or Yogurt

fullsizeoutput_941b.jpeg

Today is National Muffin Day and it reminds me of what happened long ago when I first started working full time as a low-level attorney at a high-power firm, right after law school. All the other associates came to work carrying coffee and cartons of breakfast, which they proceeded to eat at their desks. Eggs, and everything with it.

I was always a yogurt woman, even back in the day when Dannon was the only one you could buy and there were only about 5-6 flavors.

But then someone told me about the blueberry muffins from the deli downstairs and unfortunately I tasted one. That was the end of my days of never even thinking about whether I gained a pound or two. I added a blueberry muffin to my yogurt breakfast.

Every day.

I gained a quick “freshman ten” and that was no small thing because back then I was really slim.

Alas, I gave up the morning muffins our of sheer vanity. But not my love of them.

Over the years I’ve occasionally made some at home. Blueberry. Cranberry-Orange. Pumpkin Spice. Zucchini. But it’s usually when we have sleepover guests because the muffin indulgence and the memory of how quickly they added to my girth has tempered my desire to eat them as often as I would like to.

Buying muffins is a no-no for me because the store-bought ones have become so ENORMOUS since the days when I had those luscious things from the deli.

I prefer the old-days size. The kind that comes out of a normal household muffin tin.

I made these Banana Muffins recently. They’re a lot less sweet the the typical muffin and have a vaguely robust hint of molasses. I’ve made these with stirred, plain yogurt for the times I didn’t have buttermilk on hand.

If you love muffins as much as I do, there are plenty of recipes on my blog. Type “muffins” in the box under “search my recipes” and you can find them.

Btw, if you give away food for Purim, these make a lovely gift.

Banana Muffins with Buttermilk or Yogurt

  • 1-3/4 cups flour

  • 1 teaspoon baking soda

  • 1/2 teaspoon baking powder

  • 3/4 teaspoon salt

  • 1 teaspoon cinnamon

  • 1/2 teaspoon freshly grated nutmeg

  • 2 tablespoons brown sugar

  • 3 very ripe bananas, mashed

  • 3/4 cup buttermilk or sour milk

  • 1/4 cup molasses

  • 3 tablespoons vegetable oil

  • 1 large egg

  • 1-1/2 teaspoons vanilla extract

  • 2-3 tablespoons old fashioned oats

Preheat the oven to 400 degrees. Lightly grease 9 muffin tins. Mix the flour, baking soda, baking powder, salt, cinnamon, nutmeg and brown sugar in a bowl. In a separate bowl, mix the bananas, buttermilk molasses, vegetable oil, egg and vanilla extract. Add the liquid ingredients to the dry ones and mix only long enough to combine thoroughly. Spoon the batter into the prepared muffin tins. Scatter the oats evenly on top of each muffin. Bake for 22-25 minutes or until a cake tester inserted into the center comes out clean.

Makes 9


Banana Fudge Brownies

fullsizeoutput_b4f1.jpeg

If you like fudgy brownies, you have to try these! The mashed up bananas I added to the batter make them incredibly moist. And the fruit flavor is a perfect balance to the sweet from sugar and chocolate.

The recipe is simple too, easy enough for kids, and a good lesson too, not just on cooking but on how to avoid food waste. I made these when I had two soft, older bananas — no one was going to eat them out of hand and they weren’t enough for banana bread.

Makes a memorable treat on Valentine’s Day.

Banana Fudge Brownies

  • 6 ounces semisweet chocolate (1 cup of chips)

  • 1/2 cup butter

  • 1 cup sugar

  • 2 large eggs

  • 1 cup all-purpose flour

  • 1 teaspoon baking powder

  • 1/2 teaspoon salt

  • 1 teaspoon vanilla extract

  • 2 medium bananas, cut into small pieces

Preheat the oven to 350 degrees. Lightly grease an 8" or 9” square baking pan. Melt the chocolate and butter together in the top part of a double boiler over barely simmering water. When the ingredients have melted, blend them thoroughly. Remove the pan from the heat and separate the top part of the double boiler from the bottom. Combine the sugar and eggs in a large bowl and beat with an electric mixer set at medium speed for 2-3 minutes or until the mixture is as thick and pale. Add the flour, baking powder, salt and vanilla extract and stir to blend them in. Add the chocolate mixture and blend it in thoroughly. Fold in the banana pieces. Pour the batter into the prepared pan. Bake for 30 minutes. Let the brownies cool in the pan. Cut into 16 pieces.

Makes 16