brunch

Fried Green Tomatoes

IMG_0006.jpg

I go out to my garden now and it's still warm, like summer. But the leaves on big maple trees in the back are starting to turn and I can see the vague copper tips. It's that transition season when you want to grab the last of summer but your head understands that autumn is coming.

I've picked dozens of luscious tomatoes in the last few weeks, but there are still some green ones hanging on the vines. Do I wait for them to ripen and have the last few precious bites?

What if there's a sudden frost! That happened to me last year and all my tomatoes were ruined.

Here's what to do: use some green tomatoes and leave just a few to ripen and hope for the best.

In the past I've baked green tomato pie, fried green tomato slices, baked green tomato slices, made green tomato pickles and cut green tomatoes into different kinds of chutney.

This year I decided to pack them into a sandwich.

Dee-lish.

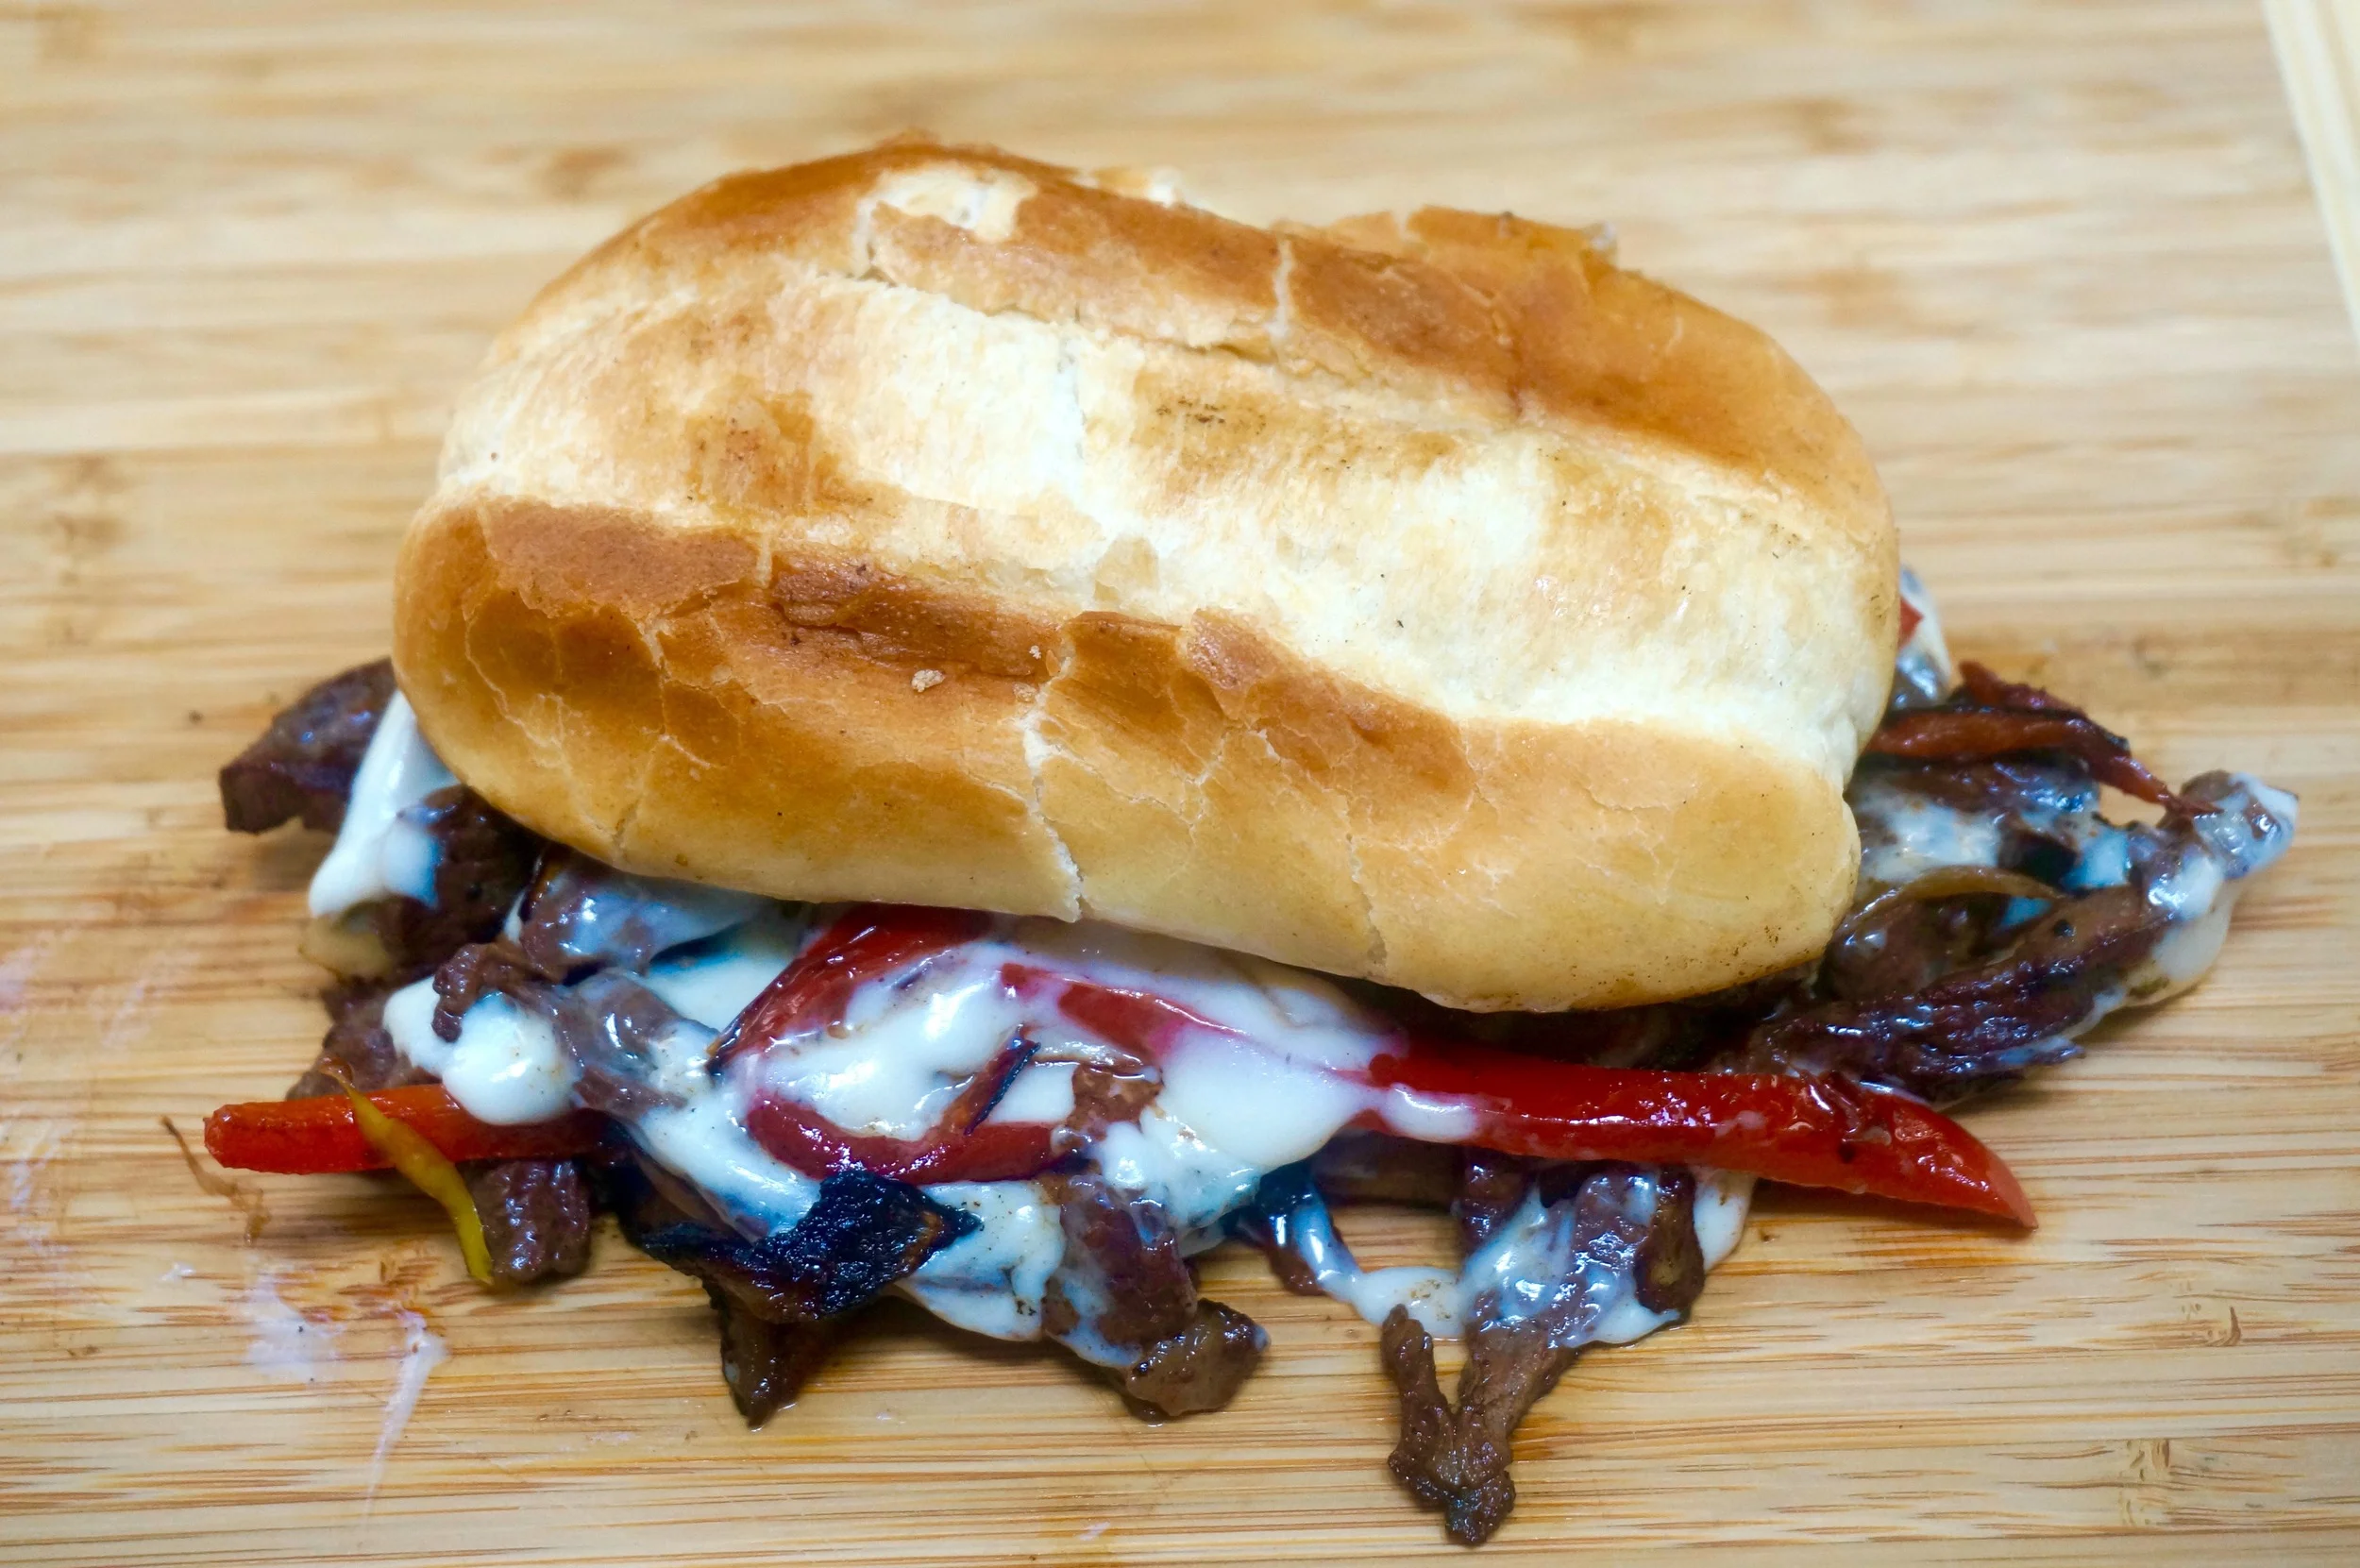
Fried Green Tomato, Roasted Red Pepper and Cheese Sandwich

  • 2 medium red bell peppers
  • 2 teaspoons olive oil
  • 1/3 cup all-purpose flour
  • salt and freshly ground black pepper, to taste
  • 2 large eggs, beaten with one teaspoon water
  • 3/4 cup plain bread crumbs
  • 12-16 slices green tomato (about 1/2-inch thick)
  • 4 Portuguese rolls, sliced
  • vegetable oil
  • 1/2 cup mayonnaise
  • 2 tablespoons chopped fresh basil
  • 2 cups shredded mozzarella cheese

Preheat the oven broiler or outdoor grill with the rack about 4 inches from the heat source. Remove the stem and seeds from the bell peppers and cut them into quarters. Brush the pepper pieces with the olive oil. Broil the pepper pieces, turning them occasionally, for 8–10 minutes or until charred. Remove the pieces to a plate. When cool, peel off the skin.

Preheat the oven to 300 degrees. Mix the flour with some salt and pepper in a shallow dish. Place the beaten eggs in another dish. Place the breadcrumbs in a third dish. Coat the tomato slices with flour. Shake off the excess. Dip the coated slices in the beaten eggs, covering the slices completely. Coat the slices with the breadcrumbs. Place the tomato slices on a cookie sheet or baking rack to air dry for at least 15 minutes. Heat about 1/4-inch vegetable oil in a large sauté pan over medium-high heat. Fry the tomatoes for 2-3 minutes per side or until golden brown. Drain on paper towels.

Place the rolls in the oven to warm them up for about 4-5 minutes. Remove the rolls from the oven. While the rolls are warming, mix the mayonnaise and basil together. Spread equal amounts of the mayonnaise on the bottoms of each of the rolls. Top each with 3-4 tomato slices. Top each with two roasted pepper quarters. Top each with equal amounts of the cheese. Finally, cover with the top of the roll. Place back in the oven for a minute or so to slightly melt the cheese and serve.


Makes 4 sandwiches

Bubbe and Me in the Kitchen

photo by Evi Abeler

photo by Evi Abeler

Although my Mom was the one who taught me how to cook and who encouraged me to expand my recipe repertoire, I post a lot about the dishes my grandma cooked. My mom's food was thoroughly up-to-date and wonderful, but my grandma made the old-fashioned, old-world Ashkenazi favorites that I loved (still love!) so much. 

And so, when I got hold of Miri Rotkovitz's new cookbook, "Bubbe and Me in the Kitchen," I felt right at home. I understood immediately that for Miri, whose recipes are geared to mostly modern food that today's kosher home cooks prefer, she keeps a special place within her heart and soul for her bubbe, for the foods her bubbe cooked and the words of wisdom, culinary and otherwise, that her bubbe gave to her. Like how bubbe taught her that using spices could "bump up the flavor and stamp a personal signature on favorite dishes." That slicing apples rather than chopping them would result in a more flavorful Apple Cake.  

The book is filled with some of her bubbe's recipes, culled from a collection of index cards and clippings, plus an occasional recipe from other kosher food writers (including me) and mostly, Miri's own contemporary creations and riffs on traditional dishes. There are so many fabulous recipes, I don't even know where to begin cooking them. Shall it be the chapter on Grains, with the Forbidden Rice Salad with Mango and Ginger Vinaigrette? Or the Mezze/Snack chapter that includes Nori and Smoked Salmon "Petits Fours?"

I love meatless meals, so actually, it's the Kasha Varnishkes with Ratatouille for me. This is the kind of dish that brings together traditional and contemporary, that makes a standard side dish into a full meal.

This book is a winner and a keeper. Not simply for the wonderful kosher recipes, but also for all the extras: notes on pantry items, information about what kosher means today in terms of global ingredients and healthy eating, and because of the charming narrative and headnotes that lets us hear bubbe's voice, translated by a loving grand daughter.

Here's that recipe, so fine for a meatless Monday (but really, anytime).

Kasha Varnishkes with Ratatouille

SERVES 4 TO 6 | PAREVE 

Prep time: 25 minutes Cook time: 45 minutes

 FOR THE RATATOUILLE

  • 3 tablespoons extra-virgin olive oil

  • 1 large onion, peeled and chopped

  • 3 large garlic cloves, chopped

  • 1medium eggplant, cut into 1-inch pieces

  • 1 large red bell pepper, cored and chopped

  • 1 medium zucchini, trimmed and cut into 1-inch pieces

  • 2 medium tomatoes, seeded and cut into 1-inch pieces

  • 2 tablespoons tomato paste or tomato sauce

  • Generous pinch dried thyme

  • 2 tablespoons thinly sliced fresh basil leaves, plus extra for garnish

  • Sea salt or kosher salt

  • Freshly ground black pepper

FOR THE KASHA VARNISHKES

  • 4 tablespoons extra-virgin olive oil or canola oil, divided

  • 1 large onion, peeled and finely chopped

  • 1 pound bowtie (farfalle) noodles

  • 1 large egg

  • 1 cup kasha (medium granulation) 2 cups water or vegetable stock

  • 1 teaspoon salt

  • ¼ teaspoon freshly ground black pepper

MAKE THE RATATOUILLE:  Preheat the oven to 400°F. Warm the oil in a Dutch oven or ovenproof covered chef’s pan set over medium heat. Add the chopped onion and sauté  until it softens and begins to turn translucent, about 5 minutes. Add the garlic and sauté 1 minute more.

Add the chopped eggplant and cook, stirring frequently, until it begins to soften, about 5 minutes. Add the red peppers, sauté for 2 minutes, then add the zucchini, stirring occasionally, until the zucchini softens, about 3 minutes more. Stir in the tomatoes, tomato paste (or sauce) and thyme.

Cover the pan and place in the preheated oven. Bake for 30 minutes, stirring after 15 minutes. The vegetables should be saucy and tender, yet still mostly hold their shape. Remove from the oven, stir in the basil, and season with salt and pepper. Set aside.

MAKE THE KASHA VARNISHKES: While the ratatouille is baking, set a large pot of water to boil for the pasta. In a chef’s pan or large skillet, heat 2 tablespoons of oil over medium-high heat. Add the onions and sauté until they turn soft and translucent, about 5 minutes. Reduce the heat and cook, stirring occasionally, until the onions start to caramelize, about 10 minutes more. Remove from the heat and set aside.

In the meantime, when the pasta water comes to a boil, stir in the bowties and cook until al dente, about 10 to 11 minutes. Drain and transfer the pasta to a large serving bowl.

In a small bowl, beat the egg. Add the kasha and stir well to coat the kasha grains. Transfer the onions from the chef’s pan to the serving bowl with the pasta. Return the pan to the stove top and place over medium heat. Add the kasha and cook, stirring constantly, until the egg dries and the kasha separates into individual grains, about 3 minutes.

Add the water or stock to the kasha and bring to a boil. Reduce the heat, cover, and simmer until the liquid is absorbed, about 10 minutes.

When the kasha is cooked, add to the bowl with the bowties and onion. Drizzle with 2 table- spoons of oil and stir well to combine. Spoon into shallow bowls and top with the ratatouille. Garnish with additional basil.

STORAGE: Store the ratatouille and the kasha varnishkes in separate covered containers in the refrigerator. The ratatouille will keep for 4 to 5 days, the kasha for 2 to 3 days. You can also freeze both dishes in freezer-safe containers

Zucchini Muffins

_DSC9968.jpg

This summer I was finally able to grow tomatoes. I had lots of them and there are still more to come!

I feel as if I finally did it right because I have failed every year up to now.

It makes me confident about next year, and not just about tomatoes. I might try to grow peppers and string beans and all sorts of things.

Maybe even zucchini. Now's the time of year that several people I know are harvesting their zucchinis, and some are gigantic! I'd like to see those in my garden.

For now I have to rely on my neighbors' and friends' generosity!

Here's what I did with zucchini this week. These muffins are not too sweet so you can have them for breakfast as well as snack.


Zucchini Muffins

  • 3 cups all-purpose flour
  • 1 teaspoon cinnamon
  • 1/2 teaspoon nutmeg
  • 2 teaspoons baking soda
  • 1/2 teaspoon salt
  • 2/3 cup vegetable oil
  • 1 cup sugar
  • 1/2 cup brown sugar
  • 3 large eggs
  • 2 teaspoons vanilla extract
  • 3 cups grated fresh zucchini
  • 1 cup raisins, optional 

Preheat the oven to 375 degrees. Lightly grease 12 muffin tins. In a large bowl whisk the flour, cinnamon, nutmeg, baking soda and salt until thoroughly combined. In a separate bowl combine the vegetable oil, sugar, brown sugar, eggs, and vanilla extract and whisk until well blended. Add the liquid ingredients to the flour mixture and stir just until blended. Fold in the zucchini and optional raisins. Spoon the batter into the tins. Bake for about 20-25 minutes or until golden brown and a cake tester inserted into the center comes out clean. Cool in the pan on a wire rack for 5 minutes. Invert the muffins onto the rack to cool completely.

Makes 12


New LaLa Lunchbox kosher content

My daughter Gillian, mother of three kids and creator of the best-selling lalalunchbox app, is expanding the content of this wildly successful tool that helps parents and children plan lunches for school, camp, field trips and so on.

It involves cute monsters and shopping lists that make it easy to get all that's needed, but mostly it encourages children to make decisions and healthy food choices. You can read more about it here.

Now there is going to be a special section geared for kosher food. Yes, many of the original items can already be kosher -- chicken leg, for example. Or made with kosher substitutions. But now there is a special section that is kosher-only. With no need to make changes or substitutions.

And I am thrilled to be curating the kosher items for the app!

Here are some of the items you can choose from when you download this app:

Traditional favorites such as: Pierogies! Blintzes! Banana bread! Hamantaschen! Potato Latkes! Matzo Ball Soup!

Pierogies KOSHER protein (1).jpeg

But also lots of up-to-date foods that kids love, like Date Snack Balls, Roasted Carrots, Grilled ChickenHummus, and much, much more.


I am happy to shard my recipes with you so you can make them with your family.

Check it out today so you can be ahead of the game in time for back-to-school!

Philly Cheese Steak, the Kosher way

Philadelphia. City of Brotherly Love. So named (from the Greek words "philos" meaning love and "adelphos" meaning brother) because the city's founder, William Penn, wanted the place to be a refuge from religious persecution. 

I wonder what Penn might think of that today, what with this year's contentious election and the Democratic National Convention at hand in the city.

But, current times aside, Philadelphia has a lovely history.

Home of the Liberty Bell. And Independence Hall, where the founding fathers debated (and adopted) the Declaration of Independence AND the Constitution.

Once the temporary capital of the United States while the newly minted America waited for the District of Columbia to be built.

And, among the more mundane of matters, home of the Philly Cheese Steak.

Philly Cheese Steak.

I have to say, I've been to Philadelphia several times and never ate one.

But thoughts of the city and its famous hoagie (hero sandwich, sub, whatever others may call it) got me to think about trying one at home.

Kosher.

I looked at lots of recipes and saw that they called for different cuts of beef, cut into strips. I decided on skirt steak because it's so juicy and flavorful.

I also noticed that the cheese could be cheddar or American or provolone and even -- OY -- cheese whiz. 

I opted for provolone (non-dairy, soy-based from Daiya Foods) because it has such a magnificent tang to it.

Some recipes called for sauteed mushrooms or other vegetables in addition to the more usual onions and red bell pepper. I decided not to.

In the end -- magnifico!!

Does it taste the way a Philly Cheese Steak is supposed to? 

I have no clue.

All I know is that it tasted good. Very good.

And so, in honor of Philadelphia's few days in the sun again -- my recipe for Philly Cheese Steak.


Kosher Philly Cheese Steak

  • 8 ounces skirt steak, semi-frozen
  • 2 tablespoons vegetable oil
  • 1 small onion, sliced
  • 1 small red bell pepper, deseeded and sliced into narrow strips
  • 2 hoagie rolls
  • salt and freshly ground black pepper to taste
  • 4 slices Daiya soy “provolone style cheese”

Cut the beef into thin slices against the grain. Heat the vegetable oil in a large sauté pan over medium heat. Add the onion and pepper strips and cook, stirring occasionally, for 4-5 minutes or until soft and lightly browned. Add the meat to the pan and cook, stirring occasionally, for 3-4 minutes or until browned. Cut the rolls in half. Move the meat and vegetables to one side of the pan (or temporarily spoon into a plate) and place the 4 pieces of roll, cut side down in the pan. Cook for a minute or so, to lightly toast the rolls. Turn the rolls cut side up. Using equal quantities, place equal quantities of meat and vegetables on each of the two roll bottoms. Top with equal amounts of the soy cheese. Cover with the tops of the rolls. Turn the heat to low. Cover the pan and cook for a minute or so or until the cheese has melted.

Makes 2 sandwiches

Cleveland Cuisine! Really.

Cleveland cuisine? Really?

Yes!

Cleveland is an important place.

For one thing, it's the home of the Rock and Roll Hall of Fame.

And that should be enough.

But there's also The Cleveland Museum of Art -- it has a large, diverse collection. And unlike so many museums of its kind, admission is FREE!!!!

Also -- Cleveland has a world-famous orchestra, a distinguished university (Case Western Reserve), an AFC football team (the Browns) and a major league baseball team (the Indians).

AND, of course, their basketball team is this year's NBA Champions! (You've surely heard of the Cavaliers!)

I'm impressed!

And now there's more. This summer Cleveland will be home to the 2016 Republican National Convention (July 18-21).

And, whatever the goings on at the convention itself, the city will get lots of extra attention in the press. There will be loads and loads of extra people in Cleveland.

So, me being me, I got to wondering about what those people might be eating during their stay. 

I don't mean the food they're going to get at the convention. I mean real, special, famous Cleveland food. 

Not every city has its own culinary specialties. Surely nothing in Stamford, CT., where I live. 

But Cleveland does! And some real goodies, at that! 

For example, because the city is home to large numbers of families whose origins trace back to central and eastern Europe, bratwurst (on a bun) and crunchy apple fritters are really popular.

The apple fritters alone are worth a visit I think.

But also this -- among the most famous of "Cleveland food" is something called the Polish Boy (basically a kielbasa sandwich with coleslaw, french fries and barbecue sauce all on a club roll).

Well, okay. Maybe.

Then I discovered that among the iconic Cleveland dishes are pierogi.

Pierogi. Do you hear my heart pounding? Can you see my grin?

Oh! How I love pierogi! Doughy dumplings stuffed with stuff. Like beef cheeks or potato and cheese (served with thick, tangy sour cream).

Pierogi. The kind of food some of us used to get at grandma's, if we were lucky.

I haven't had a pierogi for as long as I can remember. Thanks to Cleveland I was reminded of that fact.

I had to have some. But the only ones I could find in Stamford, CT. were packaged.

So I decided to make some myself. And after a couple of tries -- oh!

They are as wonderful as I remember.

Thank you, Cleveland, for inspiring this recipe. Good luck this summer.


Potato Cheese Pierogi

Filling:

  • 3 large Yukon Gold potatoes (about one pound), peeled, cut into chunks (about 3 cups mashed potatoes)
  • 2 tablespoons butter
  • 1 large onion, chopped
  • 1 cup farmer cheese
  • salt and freshly ground black pepper to taste

Place the potato chunks in a large saucepan, cover with water and bring to a boil. Lower the heat to a simmer and cook for about 15 minutes or until the potatoes are tender. Drain the potatoes and spoon into a bowl. While the potatoes are cooking, heat the butter in a sauté pan over medium heat. When the butter has melted and looks foamy, add the onions and cook, stirring occasionally, for 12-15 minutes or until soft and golden brown. Add the onions to the potatoes. Add the farmer cheese, sprinkle with salt and pepper and mix the ingredients until well blended. Set aside to cool before filling the dough.

Dough:

  • 3-1/2 cups all-purpose flour
  • 1 teaspoon salt
  • 1/4 cup butter, cut into chunks
  • 1/2 cup water, approximately
  • 1 cup dairy sour cream

Extras:

  • butter
  • vegetable oil
  • sour cream

To make the dough: place the flour and salt in a large bowl. Add the butter and work it into the dough until the mixture is crumbly. Add 1/2 cup of the water and the sour cream and mix the dough until it is smooth, soft and well blended. If the dough seems too dry, add more water. (You can do this in a food processor.) Let the dough rest for at least 30 minutes. Using portions of the dough, roll the dough on a floured surface to 1/8-inch thick and cut out circles with a 3-inch cookie cutter. Place the circles on a board or cookie sheet and cover them with plastic wrap or a kitchen towel while you cut the rest of the dough. Fill the dough using about one tablespoon of the filling for each circle.

To fill the pierogis: place the filling in the center of the dough circle. Fold the circle in half, pinching the edges to seal in the filling.

To cook the pierogis: bring a large pot of lightly salted water to a boil. Add the filled pierogis, 6-8 at a time, and boil for about 3-8 minutes depending on whether they are at room temperature, refrigerated or frozen (or until they float to the surface). Remove the pierogis with a slotted spoon and set aside; repeat with remaining pierogis.

Extras: To serve the pierogis: serve boiled (as above), with sour cream (can also serve with caramelized onions – make more when making filling above). OR, heat 1 tablespoon butter plus 1 tablespoon vegetable oil in a sauté pan over medium heat. When the butter has melted and looks foamy, add some of the pierogi (do not crowd the pan) and cook for 3-4 minutes on the flat side, or until golden brown on the bottom, then turn the pierogis over and cook for another 2-3 minutes or until crusty and golden brown. Repeat using more butter/vegetable oil with the remaining pierogis. Serve with sour cream (and sautéed onion if desired). 

Makes about 4 dozen

Avocado, California's Big Winner

MTMxNzY5MDkyNzg3OTgwMjk4.jpg

When I was a young Mom I met another young woman for a playdate for our daughters. She lived in the same town in Connecticut as I did, but had originally come from California. We became friends, and so did our kids, and we spent time together talking about things most mothers talk about. School. Babysitters. What our children should/don't/won't eat.

We also talked about food. One day she mentioned avocado. 

What?

Please don't think I'm a dinosaur, but back in the late 1970s avocados were not a thing. REALLY! I had heard of them. In fact once, when I was a little girl my mother took me for lunch at Lord & Taylor in the city and I insisted on trying tuna-salad-filled avocado (which my mother let me do although she insisted I would hate it -- and I did). 

I hadn't had an avocado since that time.

And I had not yet heard of guacamole, which this women raved about. She said everyone in California made guacamole. So, I started to also.

Now, these many years (and thousands of avocados later) I can say I am well acquainted with avocados, not just for guacamole but for dozens and dozens of recipes

Many thanks to the woman who name-dropped avocado. Many thanks to California, thriving avocado country (in fact, according to The California Difference, the Hass avocado is a California native).

Today that state will have its presidential primaries. And no matter who you are rooting for, I can say without question, the avocado is the state's big winner.

Avocado, Egg and Tomato Sandwich with Pesto Mayonnaise

  • 3 tablespoons mayonnaise
  • 4 teaspoons olive oil
  • 2 tablespoons grated Parmesan cheese
  • 2 tablespoons chopped fresh basil
  • 1 small clove garlic, finely chopped
  • 4 slices Tuscan-Italian style bread
  • 2 teaspoons butter
  • 2 large eggs, beaten
  • 1 avocado, sliced
  • 1 tomato, sliced

In a bowl, combine the mayonnaise, olive oil, Parmesan cheese, basil and garlic and mix thoroughly. Refrigerate until ready to use (may be made 2 days ahead). Toast the bread slices lightly. While the bread is toasting, heat the butter in a small pan over medium heat. When the butter has melted and looks foamy, pour in the eggs and cook, moving the egg around slightly to allow wet portions to reach the bottom of the pan. When the egg is almost cooked, flip it over, cook briefly and remove from the pan. Spread some of the pesto mayonnaise on 2 slices of the toasted bread. Top each with half the cooked egg. Top with slices of avocado and tomato. Cover with remaining bread slice. Cut sandwiches in half.

Makes 2 servings

Grandma's Blintzes

_DSC9289.jpg
_DSC9381.jpg

I feel blessed that my children and grandchildren come to stay over at my house in Connecticut for holidays and birthdays and occasionally just to hang out. It reminds me of when I was a kid and visited my grandma -- almost every weekend -- along with practically everyone else in my mother's family (aunts, uncles and cousins).

That was back in the day before children had so many other activities. Sure, there were brownies and cub scouts, but back then I never heard of things like soccer or gymnastics. Art classes happened during school hours. The only cooking classes for children took place in your own kitchen if you were lucky to have a Mom like mine who let you patchky around.

Weekends were strictly for family activities.

I'm not saying one way of life is better than another. One size does not fit all, as they say. And maybe today's kids are better educated or are more well-rounded than we were.

But I have wonderful memories of that life. 

It was good. I got to play with my cousin Leslie every weekend. She and her family lived with our grandma.

I also got to eat some of my grandma's wonderful food. 

I hope that in years to come my grandchildren will feel happy when they recall their visits to Ed and me. And have good memories of some of the favorite foods I cooked when they came.

Like Macaroni and Cheese. Apple Pie. Matzo Brei.

My grandma also made matzo brei and macaroni and cheese. But one of her signature dishes was blintzes.

She filled the blintzes with cheese, the classic, but, as I learned later, most people made the cheese filling sweet, seasoned with vanilla and/or cinnamon. My grandma's cheese-blintz filling was lemony, with just a hint of sugar.

Also, because there were so many of us, she had no time to fry them a couple at a time and still have everyone eat at the same time. So she placed the blintzes, seam-side down, on a baking sheet, topped each with a little dab of butter, and baked them until they were golden brown.

Me? I still love blintzes lemony and baked. And -- surprise to me! -- so do my grandchildren.

Her recipe is below, but the filling instructions give you the option to make the more popular vanilla version (and also how to fry them). Don't worry if the wrappers don't fry into perfect circles -- you're going to roll them and if they're a little off, no one will ever know.

Grandma Rachelle Hoffman’s Blintzes

Wrapper:

  • 3/4 cup all-purpose flour
  • 1-1/2 teaspoons sugar
  • 1/2 teaspoon salt
  • 3/4 cup milk, approximately
  • 2 large eggs
  • softened butter for frying

Filling:

  • 1 pound farmer’s cheese
  • 1 large egg
  • 2 tablespoons sugar
  • 1 teaspoon lemon juice
  • 1/2 teaspoon grated fresh lemon peel, optional
  • 1 teaspoon vanilla extract, optional

To make the wrapper, combine the flour, sugar and salt in a bowl and stir to blend the ingredients. Add the milk and eggs and whisk until the batter is smooth and uniform (you may do this in a food processor). Add more milk if the batter seems too thick (it should be the consistency of heavy cream). Set aside for 30 minutes. Place a small amount of the softened butter in a crepe or omelet pan and place the pan over medium-high heat. When the butter has melted and the foam is beginning to separate, add enough batter to cover the bottom of the pan (for an 8-inch pan it will be 1/4-cup), shaking the pan quickly to spread the batter evenly. Cook for a minute or so or until the bottom is lightly browned. Turn the wrapper over and cook briefly. Remove the wrapper and proceed with the remaining batter, separating the cooked wrappers with aluminum foil or waxed paper.

To make the filling, place the cheese, egg, sugar and lemon juice in a bowl and mix thoroughly. Add the lemon peel OR vanilla extract and mix in thoroughly.

To fill each wrapper: use the first fried side as the inside of the blintz. Use about 2 tablespoons of filling for an 8-inch wrapper and place the filling in the center of the wrapper. Fold the bottom side up, over the filling. Fold the left side, then the right side over the filling, then roll up to enclose the filling. Fry the blintzes seam side down first over medium heat (using the same method as for frying the wrappers – let the butter melt and become foamy). Or, you can bake the filled blintzes: Preheat the oven to 350 degrees. Place the blintzes in a single layer on a jelly roll pan, top each with a tiny piece of butter. Bake for about 10 minutes.

Makes 8 8-inch blintzes

Oven Roasted Cheesy-Crusted Potato Sticks

_DSC5943.jpg

If someone mentions Idaho the first thing you're likely to think is: potato.

Of course.

Potatoes are Idaho's leading crop and Idaho is also first in the nation in potato production.

Why do I tell you this now?

First because of all foods on earth, my favorite is the potato. I've written about it before. 

But also because as I have said, I love the political scene and keep track of all the state primaries and caucuses. Idaho's is coming (Republicans today, Democrats on March 22). And that fact reminded me of potatoes.

As if I needed any reminding.

I decided that no matter which political party or candidate you prefer, if any, at primary/caucus time a good dish to honor Idaho would be this particular recipe for crispy cheesy-crusted oven roasted potato sticks. I could make this dish into dinner all by itself. Maybe with some sunnyside eggs. They're nice as part of a vegetarian/meatless Monday dinner too. 

Oven-Roasted Cheesy-Crusted Potato Sticks

  • 1-1/2 to 2 pounds potatoes
  • 3 tablespoons olive oil
  • 3 cloves garlic, finely chopped
  • 1-1/2 teaspoons chopped fresh thyme
  • 1/2 teaspoon paprika
  • salt and freshly ground black pepper to taste
  • 1/2 cup grated Parmesan cheese

Preheat the oven to 400 degrees. Line a baking sheet with parchment paper. Peel the potatoes and cut them into 1/2-inch thick strips. Place the strips in a single layer on the parchment paper. In a bowl, combine the olive oil, garlic, thyme and paprika. Pour over the potatoes and toss the strips to coat them completely. Sprinkle with salt and pepper. Scatter the cheese evenly over the potatoes. Roast for about 30 minutes, turning the strips once or twice.

Makes 4 servings 


Apple Bundt Cake

I've been hearing a lot about Minnesota in recent days, probably because of politics. Both the Democratic and Republican caucuses are on March 1st, a/k/a Super Tuesday.

But someone on Facebook also posted quiz about Minnesota foods. You had to pick the state specialties from a group of choices to determine whether you actually came from there. 

I didn't. 

I knew that!

But I wanted to see if any of the foods was familiar anyway, and was surprised that I knew as many as I did. My result was something like: I may have been born and raised in Minnesota but probably moved away.

Nope. I haven't even been to visit Minnesota although I would like to.

One thing I was surprised about though. Minnesota is the home of bundt pan and bundt cake, and they didn't include that in that quiz!

Millions and millions of people throughout the United States -- the world, even -- have a bundt pan. The original one was trademarked by H. David Dalquist, founder of Minneapolis, Minnesota based Nordic Ware in 1950 (the Nordic Ware website does give credit to Dave's wife Dotty for her part in creating this cake pan). Apparently there was a baking contest sometime in the 1950s and a bundt cake won and thus the popularity of the now familiar dessert was assured.

So, okay Minnesota. I know there is such a thing as National Bundt Cake Day (November 15th, which happens to be my wedding anniversary so I will have to remember that later this year) but I made this one in honor of your day in the political sun (along with all the other Super Tuesday States) and may the best man/woman win. In any event, this cake is a winner.

Apple Bundt Cake

  • 3 cups all-purpose flour
  • 2 tablespoons baking powder
  • 1 teaspoon salt
  • 3 large, tart apples, peeled and chopped
  • 1/4 cup sugar
  • 1-1/2 teaspoons cinnamon
  • 1 cup vegetable oil
  • 4 large eggs
  • 1-1/4 cups sugar
  • 1/3 cup orange juice
  • 1 teaspoon vanilla extract

Preheat the oven to 350 degrees. Lightly grease a bundt pan. Mix the flour, baking powder and salt together in a bowl and set aside. Mix the apples, 1/4 cup sugar and cinnamon together in a bowl and set aside. Place the vegetable oil and eggs in the bowl of an electric mixer. Beat at medium speed for about 3 minutes, or until thoroughly blended. Add the 1-1/4 cups sugar and beat for another 2 minutes or until thoroughly blended. Add the orange juice and vanilla extract and beat for another minute. Add the flour mixture and beat for another minute or until the batter is smooth and uniform. Spoon about 1/3 of the batter into the prepared bundt pan. Add 1/2 the apple mixture. Cover with another 1/3 of the batter, top with remaining apples and cover with remaining batter. Bake for 60-70 minutes or until a cake tester inserted into the center comes out clean. Let cool in the pan for 15 minutes. Invert onto a cake rack to cool completely.


Makes 12 servings