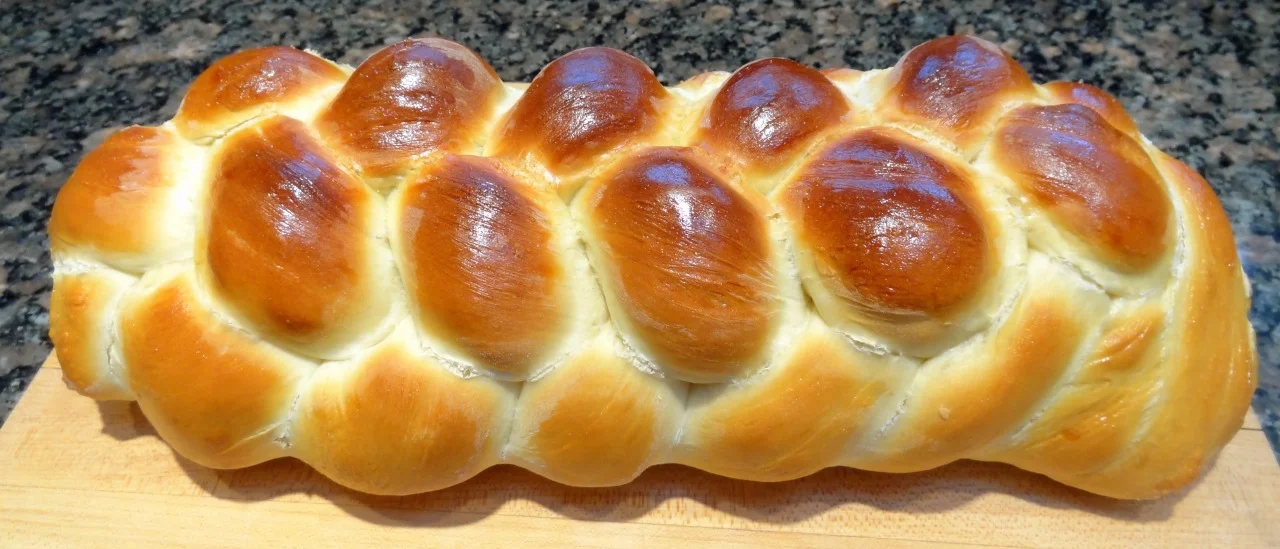
Break-the-Fast

Challah for a Special Event and Special Person

This coming weekend is my grand daughter’s bat mitzvah.In addition to being a rather wonderful person, she is my first grandchild and named for my father, so she’s always had a special hold on my heart.Her mother, my daughter Meredith, asked me to b…

Challah

This coming weekend is my grand daughter’s bat mitzvah.

In addition to being a rather wonderful person, she is my first grandchild and named for my father, so she’s always had a special hold on my heart.

Her mother, my daughter Meredith, asked me to bake the challah for the celebration.

I find myself inexpressibly moved by this request.

I really can’t say anything more, so I’ll just give you the challah recipe. It’s already been posted on this blog, but never before has it seemed this delicious.

Challah

  • 2 packages active dry yeast

  • 1/2 cup warm water (105-110 degrees)

  • 1/2 cup sugar

  • 8 cups all purpose flour, approximately

  • 1 tablespoon salt

  • 5 large eggs

  • 1/4 cup vegetable oil

  • 1-1/2 cups lukewarm water (about 100 degrees)

  • 1 teaspoon water

  • poppy seeds or sesame seeds, optional

Preheat the oven to 350 degrees. In a small bowl, mix the yeast, 1/2 cup warm water, 1/2 teaspoon of the sugar and a pinch of flour. Stir, set aside and let rest for 5 minutes or until the mixture is bubbly. In a bowl of an electric mixer, combine 7-1/2 cups flour with the remaining sugar and salt. In a small bowl, mix 4 of the eggs, the vegetable oil and the lukewarm water. Add to the flour mixture. Add the yeast mixture. Blend ingredients thoroughly. Using the kneading hook, knead for 4-5 minutes or until the dough is smooth and elastic, adding more flour as necessary to make sure the dough is not sticky. NOTE: you can make this dough in a food processor (halve the recipe). Cover the bowl of dough and put it in a warm place to rise for about 1-1/2 hours or until doubled in bulk. Punch down the dough, cover the bowl and let rise again for about 30 minutes or until doubled. Remove the dough to a floured surface. Cut dough in 6 or 12 pieces depending on whether you are making one large or two smaller loaves. Make long strands out of the pieces. Braid the strands. Place the braided dough on a lightly greased cookie sheet. Beat the last egg with the tsp. of water. Brush this over the surface of the bread. Sprinkle with seeds if desired. Let rise again for 30 minutes. Bake for about 35-40 minutes for large loaf, about 28-30 minutes for smaller ones (they should be firm and golden brown).

Braiding a 6-strand Challah:

Place 6 strands of dough on a floured board. Press the strands on the top to seal them together. Now:

1. Take the strand on the far right all the way over to the left

2. Former far left all the way over to the right

3. The now far left into the middle

4. Second from right to the far left

5. The now far right into the middle

6. Second from left to far right

7. Now far left into the middle

Repeat 4-7 until the strands are used up. Press the strands to seal the bottom of the loaf.

Mandelbrot

See these slices of Mandelbrot? I offered one to a friend of mine who is Italian-American and he said “I love biscotti. Thanks!”

And of course he was right. Mandelbrot is the Jewish version of biscotti: cookies (or biscuits) that have been baked twice. First you bake the sweet dough in the form of a low cake and when it is finished baking and cools, you slice the loaf and toast the slices until they’re dry and crispy.

In my family we prefer the slices soft, so I serve Mandelbrot after only one baking, which means they actually aren’t exactly bi-scotti. But they are really good. At your house you can do it either way of course.

Mandelbrot (like biscotti) can be plain or be swirled with chocolate or contain chopped nuts and/or fruit. This is our favorite family version. 

It freezes well in case you want to make some in advance.

Mandelbrot

  • 1/2 cup butter or margarine

  • 1 cup sugar

  • 3 large eggs

  • 2-1/2 to 3 cups all-purpose flour

  • 2-1/2 teaspoons baking powder

  • 1 tablespoon brandy or apple juice

  • 1 teaspoon almond extract

  • 1/4 teaspoon salt

  • 1/2 cup chopped nuts

  • 1/3 cup cut up candied cherries

  • 1/3 cup chocolate chips

  • 1/3 cup raisins

Preheat the oven to 350 degrees. Lightly grease a cookie sheet. Cream the butter and sugar together in the bowl of a mixer set at medium speed for about 2 minutes or until creamy and well blended. Add the eggs one at a time, beating after each addition. Add 2-1/2 cups of the flour, baking powder, brandy, almond extract and salt and beat at medium speed until the ingredients are thoroughly blended. Blend in the remaining flour if the pastry is very sticky. Fold in the nuts, cherries, chocolate chips and raisins. On a lightly floured surface, divide the dough into thirds and shape each piece into an oval loaf about 1-1/2 to 2 inches thick. Place the loaves on the cookie sheet. Bake for 25-30 minutes or until the loaves are golden brown. Remove from the oven and let cool. Serve sliced, as is, or toast the slices for extra crispness.

Makes 3 loaves. 

NOTE: sometimes I cut the dough in half, rather than thirds, to make larger loaves/slices. These need a few more minutes of baking time.

My Mom's Famous and Fabulous Nut Roll

Today would have been my mother’s 100th birthday and although she and my Dad died many years ago, I think about them a lot. You can’t possibly realize how much you’re going to miss people when they’re in your life. You only understand when they aren’t. And what happens from time to time is that something comes up during the day that reminds you of them. A smell. Or a magazine picture of a scarf in your mother’s favorite color. Or a song you hear on your car radio.

The memories can be sad or poignant or funny or thrillingly happy.

Today my memories are happy. I am celebrating with my brother and toasting our Mom, who was was funny and sometimes controversial and more than occasionally provocative, which would make us furious, but also make us think.

She was smart and interesting too. A feminist before the word feminist existed. I am sure that had she been born at an even earlier time, she would have been a Suffragette.

My mother was also a good cook. She mostly stuck to what she knew and wasn’t much for experimenting. She’d say “why change a good recipe?”

There is some wisdom to that, although I don’t follow it. My family never gets to eat the same thing too many times, except maybe for holiday dinners.

But for Mom, a winner was a winner, and she had so many it’s difficult to choose among her recipes to make one special thing for her birthday celebration.

I considered my Mom’s fried chicken (which was better than anyone’s, even Colonel Sanders) together with a dozen or so of the crispy-edged corn fritters she served with it.

For dessert? Her apple pie of course. It was legendary. We still talk about it every autumn, when I make a batch of my own.

Then again, speaking of apples, I remember how often she made that most wonderful apple crisp that was my Dad’s favorite and I would come in to their house through the garage and the perfume from the baking apples and the crunchy cereal crust would greet me before even they did.

Maybe I should choose that?

Or her rice pudding? It was baked custard actually, with a smooth inside and crispy top. I haven’t cooked it in a while.

I could go on and on. About her most comforting and wonderful chicken soup. Or her family-famous cookies that we all called Fannies, but are actually plain old butter thumbprint cookies. Or her most welcome roast beef hash which she made out of leftover meat and mashed potatoes and more sauteed onions than you can imagine.

She said she hated to use leftovers, a consequence of having struggled through the Great Depression and never wanting the memories.

And yet she used leftovers. Cleverly and creatively but for simple, uncomplicated, unsophisticated dishes that became our favorites. Like her Macaroni and Cheese, put together with scraps and bits from the fridge.

There was only one dish she ever made that I didn’t like (potato salad).

And one dish — Nut Roll — I could never get the hang of, even though she told me how and showed me how to make it many many times. Mine just never tasted as good.

That’s the one.

That’s the one I decided it had to be. I’d give this one another try.

Which I did this morning (I made the dough yesterday because it has to sit in the fridge for a few hours).

It’s almost as good as hers. Maybe it is as good but the memories of hers are too good to let me think it is.

But my Nut Roll is enough like it, anyway, to celebrate with. Superb with coffee or maybe a glass of dessert wine.

My Mom used walnuts in her Nut Roll; because of allergies in my family I never cook with walnuts, so I used almonds. 

In the photos you can see the lump of one section of dough that I started with, then, in the second photo, rolled it thin. The third photo shows how to scatter the sugar and nuts over the dough and the fourth photo, how to roll the Nut Roll. The fifth photo shows what the rolls look like when it comes out of the oven. The last photo is a plate of slices — let the rolls cool, then use a serrated knife to cut the pieces.

Enjoy. Btw, the rolls freeze beautifully.

Happy Birthday Mom!


Lily Vail’s Nut Roll

 dough:

  • 1/2 pound unsalted butter

  • 3-1/2 cups all-purpose flour

  • 1/2 cup sugar

  • 1 teaspoon baking powder

  • 1/2 teaspoon salt

  • 2 large eggs, separated

  • 1/2 cup dairy sour cream

  • 2 tablespoons milk

filling:

  • 1 cup sugar

  • 1 teaspoon ground cinnamon

  • 12 ounces chopped nuts (about 3 cups)

Cut the butter into chunks and place in the bowl of an electric mixer. Add the flour, sugar, baking powder and salt and mix (using the flat paddle if your machine has one) at slow speed until the ingredients are blended and crumbly looking. Make a well in the center and add the egg yolks, sour cream and milk. Mix the ingredients at medium speed until a smooth, uniform dough has formed. Knead the dough 3-4 times on a floured surface; shape into a cylinder, cover with plastic wrap and refrigerate for at least 8 hours.  Cut the cylinder into 3 parts. Mix the sugar and cinnamon together in a bowl. Working with one dough part at a time, roll out on a floured surface into a circle about 1/16-inch (very thin). Sprinkle each circle with 1/3 of the cinnamon-sugar and 1/3 of the chopped nuts. Roll up tightly into a compact roll, tucking in the sides. Preheat the oven to 375 degrees. Place the rolls in the refrigerator for about 20-30 minutes. Brush the rolls with some of the egg white. Bake the rolls for 40-45 minutes or until golden brown. Let cool and slice.

Makes 3 Nut Rolls 

Hummus with Zatar

I come from a talkative and political family, a family who discussed lots of different stuff at the table over dinner. I was the youngest child, but was still included, encouraged to have my say.I remember that we yakked about all sorts of things fr…

I come from a talkative and political family, a family who discussed lots of different stuff at the table over dinner. I was the youngest child, but was still included, encouraged to have my say.

I remember that we yakked about all sorts of things from what happened at school to when we were going shopping for new socks to why we had to take polio vaccinations to whether the government should put fluoride in the drinking water.

On the drive back from college one year my parents, brother and I discussed the merits of Medicare.

On that same trip — during the 1960s — we drove through Tennessee to visit my father’s sister and we were all aghast at the signs in the restaurants saying “we reserve the right to refuse service to anyone.” We knew what that meant and found it horrifying.

It prompted a family discussion about civil rights.

We were a lively bunch and, thinking back, a thinking bunch too. We actually cared about issues and people and what kind of country we were living in.

My parents and brothers always talked about the importance of voting. Not just because we were people who were passionate about issues, but because it is so important to exercise a right that so many people don’t have. And to voice your opinion.

Every vote counts. My one vote among the millions makes a difference. To the total tally and also to me, because if my candidates win I can feel proud to be part of the victory. And if they lose, well, it won’t be because of me.

Please vote everyone. You are too important not to.

I will be hosting an election night get-together, something I do every four years. My guests are friends and family who feel the commitment to vote as strongly as I do (including one of my brothers).

We’ll be having sandwiches (smoked fish, cream cheese, bagels) for dinner so we can eat in the family room and watch TV for hours.

But we’ll start with a few hors d’oeuvre. Including hummus.

I like zatar, the Middle Eastern spice blend, so I’ll make this easy hummus recipe and sprinkle the seasoning on top.

There will be popcorn for sure and leftover Halloween candy.

Plus a pie.

It’s always a comfort to share this evening with other people. I recommend it highly.

Please vote.

HUMMUS WITH ZATAR


1/3 cup pine nuts

1 15-ounce can chickpeas

1/4 cup fresh lemon juice

1/4 cup tahini

1-1/2 tablespoons olive oil

1 clove garlic

1/2 teaspoon salt

1/4 teaspoon ground cumin

2 tablespoons chopped fresh parsley

zatar

pita chips


Toast the pine nuts until lightly browned. Set aside. Drain the chickpeas but reserve the liquid. Place the chickpeas, lemon juice, tahini, olive oil, garlic, salt, cumin, parsley and pine nuts in a food processor. Add 4 tablespoons to 2/3 cup reserved bean liquid, depending on desired texture (start with the minimum). Process until blended to the desired texture. Place the hummus in a serving dish. Sprinkle with zatar. Serve with cut up pita wedges or pita chips.

Makes 1-1/2 cups

Best Hummus Ever

Best hummus ever?

That’s what everyone told me Wednesday night at our Break-the-fast. They said it was the best hummus they ever tasted. Also the best texture; smooth but with some graininess; moist but not pasty.

Maybe they were all just hungry? And hummus is the first nibble of food they consumed in 24 hours, the initial tidbit to prepare the stomach before eating dinner?

But I kept it out even during dinner and by the end of the night it was gone, gone gone. Several people took a bit more to eat with the Mujadarah, Spinach Pie, Kugel, chopped salad and egg salad.

So, here’s the recipe. Try it yourself and let me know what you think. 

Btw, hummus stuffed cherry tomatoes is a good treat for Sukkot. 


HUMMUS WITH ZATAR

  • 15 ounce can chickpeas

  • 2 large cloves garlic

  • 1/4 cup tahini

  • 1/4 cup lemon juice

  • 2 tablespoons olive oil

  • 2 tablespoons chopped fresh parsley

  • 1 teaspoon paprika

  • 1/2 teaspoon salt

  • 1/2 teaspoon zatar

Drain the chickpeas but reserve the liquid. Place the chickpeas in a food processor. Cut the garlic into smaller chunks and add to the food processor. Add the tahini, lemon juice,   olive oil, parsley, paprika, salt and zatar. Process to combine ingredients into a rough puree. Continue to process while adding some of the reserved liquid though the feed tube until the mixture reaches the desired consistency (approximately 3-6 tablespoons).

Makes about 1-1/2 cups

The Kugel to End all Kugels

This is the kugel to end all kugels.I mean it. I am a kugel-eating expert, if only because when I grew up my grandmother and mom made salty kugel stuffed with mushrooms and onions and it was only when I was grown, married and with kids that I had my…

This is the kugel to end all kugels.

I mean it. I am a kugel-eating expert, if only because when I grew up my grandmother and mom made salty kugel stuffed with mushrooms and onions and it was only when I was grown, married and with kids that I had my first taste of this. That taste was a transforming moment.

My friend Susan brought this dish to my annual Break-the-fast (she got the recipe from her friend Linda and I don’t know where Linda got it).

For years after that I have tasted more kugels than you could possibly imagine (including those hard, dried up things they sell in some supermarkets) always trying to surpass that moment of culinary discovery. 

I was even a judge once in a kugel contest.

I have made some wonderful kugels since then. But this is still my favorite. I always ask Susan to make an extra one so there will be leftovers. I pack pieces of it in my freezer so I can have a little treat whenever.

Don’t even think about the calories. Just enjoy.


Susan/Linda’s Sweet Noodle Kugel

      1 12-ounce package egg noodles

      1 8-ounce package cream cheese at room temperature

      1/4 pound unsalted butter at room temperature

      1 cup sugar

      2 cups dairy sour cream

      6 large eggs

      1 teaspoon cinnamon

      1 cup raisins, optional

      2 cups crushed frosted flakes or corn flakes

      4 tablespoons melted butter

Preheat the oven to 350 degrees. Cook the noodles in slightly salted water until al dente (not soft). Drain and set aside. In an electric mixer, beat the cream cheese and butter until thoroughly blended and softened. Beat in the sugar until well blended. Add the sour cream and blend thoroughly. Add the eggs one at a time, beating after each addition. Stir in the cinnamon and raisins, if used. Pour the mixture into the noodles and toss to coat them completely. Place in a baking dish. Combine the frosted flakes and melted butter and sprinkle on top of the noodles. Bake for about 40 minutes or until the top is crispy. 

Makes 8 servings  

Imam Bayildi

Need a good side dish? Imam Bayildi is one of my favorite go-to recipes whenever I am at a loss. It’s a good family dish and also works for company. 

I learned to make Imam Bayildi years ago when I was working on an article for eggplant. I found a recipe and the name of the dish, translated, was so intriguing — “the Imam fainted” — I had to try it. If only because, as the story goes, the Imam (an Islamic clergyman or spiritual leader) who first ate this dish was so delighted that he passed out from joy.

Well, whether the tale is apocryphal or not, this dish is very very good. And what’s more, you can serve it hot, warm or at room temp, so you can either get it together in advance and cook it for dinner, or make the whole thing in advance and serve it for dinner.

It’s also a good item for a vegetarian meal (I like it accompanied by scrambled eggs or mushroom ragout).

This year during Passover I made this dish for dinner and used leeks instead of the usual onions. My family liked it even better this way, so here’s the recipe.

Btw, a tumblr reader once told me she added olives to the dish when she made it. I’ve tried that and it is delicious! So, add some olives if you like — black, pitted olives make the dish even more colorful.

Imam Bayildi

  • 1 medium eggplant

  • salt

  • 1/2 cup olive oil

  • 3 medium leeks, cleaned and sliced

  • 2 large cloves garlic, chopped

  • 3 large tomatoes, deseeded and chopped

  • 3 tablespoons chopped fresh parsley

  • 1 teaspoon sugar

  • 1 teaspoon salt or to taste

  • 3 tablespoons fresh lemon juice

  • 1/3 cup water

Cut the eggplant into slices about 3/8-inch thick. Sprinkle with salt and let rest for 30 minutes. Wipe the eggplant slices dry with paper towels. Preheat the oven to 350 degrees. Heat one tablespoon olive oil in a saute pan over medium heat. Cook the eggplant slices a few at a time for 2-3 minutes per side or until slightly wilted. Add more olive oil to the pan as needed to prevent scorching (use 4-5 tablespoons more if needed). Place the cooked eggplant into a baking dish (cut it into smaller pieces if you wish). Add 2 tablespoons olive oil to the pan. Add the leeks and cook for 2-3 minutes. Add the garlic and cook for another minute. Add the tomatoes, parsley, sugar, salt and lemon juice. Cook for one minute, stirring frequently. Spoon the vegetables on top of the eggplant. Drizzle with any remaining olive oil and the water. Cover the pan and bake for 45 minutes. Serve hot, warm or at room temperature.

Makes 6-8 servings

How to Braid a 6-strand Challah

Baking challah? I posted my recipe last week and later realized that a lot of people don’t know how to braid a challah. A cousin of mine called a while ago to confirm that fact. She had wanted to make a challah but didn’t know how to make the bread …

Baking challah? I posted my recipe last week and later realized that a lot of people don’t know how to braid a challah. A cousin of mine called a while ago to confirm that fact. She had wanted to make a challah but didn’t know how to make the bread look professional.

Btw, her name is Jenny Rosenstrach and she is a food writer and blogger, with a terrific book about getting dinner to the table every day (Time for Dinner) and book coming in June called Dinner: a Love Story and a wonderful, family-oriented blog with the same name: Dinner: a Love Story.

She wasn’t the first to consider the whole braiding issue (plus how to make a round challah at holiday time).

So I decided to tell you all how to do it.

I myself became a “pro” not to long ago, I should confess. I had been to a bakery on a tour with one of the women’s groups I belong to. The baker zipped through the braiding so fast it reminded me of those old time black and white movies where people are walking but they look as if they’re running. So we asked him to show us again but of course it was a “show” not a real instruction lesson so he went even faster the next time and no one figured it out.

I always made challah with a standard three-strand braid.

Then I found someone who showed how to do it on Youtube. I don’t remember which version it was or I would mention it here. But my eldest grand child and I were watching and trying to braid the challah as we watched. We had to stop the computer after each step so we could write it all down (and of course we got flour crumbs all over the keyboard) but we finally did get it right.

The next time we made a challah together he remembered it all.

I had to get my instruction sheet out and do it step by step.

I finally got it (after several times).

Okay, you can make a regular three-strand braided challah, the way I had done for years and years. The challah is still delicious. That kind of braid is like braiding someone’s hair. Left over middle, right over middle, left over middle, right over middle, etc.

But, making a 6-strand braid is a little more complicated.

Here’s how:

Lay the six strands alongside each other and press the strands together at the top to seal the top edge. Then braid the strands as follows:

1. far right strand all the way over to the left

2. former far left strand all the way over to the right

3. the now far left strand into the middle

4. the second from right strand all the way over to the left

5. the now far right into the middle

6. the second from the left all the way over to the right

7. the now far left into the middle

8. repeat 4 through 7 as many times as necessary to use up the strands

9. press the strands together at the bottom

Good luck! And enjoy.

Pear Torte

Creative People aren’t usually creative just about one thing. They think in unusual and varied ways about a lot.
Like my niece Rachel, who writes children’s books (such as Sometimes I’m Bombaloo and Justin Case) and young adult fic…

Creative People aren’t usually creative just about one thing. They think in unusual and varied ways about a lot.

Like my niece Rachel, who writes children’s books (such as Sometimes I’m Bombaloo and Justin Case) and young adult fiction (such as Lucky and Brilliant).

She decided she wanted to bake the Plum Torte recipe I posted a few months back. But plums aren’t in season now. So she made the cake with pears, and added a little vanilla to the batter, because pears and vanilla, well, it’s a perfect duo.

So here’s her recipe. We had this as one of the MANY desserts on Saturday night at her mother and father’s (my brother) annual Hanukkah party. It was DE-LISH!

Pear Torte

1/2 cup unsalted butter

3/4 cup plus one tablespoon sugar

1 cup all-purpose flour

1 teaspoon baking powder

1 teaspoon finely grated lemon peel

1/4 teaspoon salt

2 large eggs

1 teaspoon vanilla extract

2 ripe pears, unpeeled, cored, sliced

lemon juice (about one tablespoon)

cinnamon (about 1/4 teaspoon)

Preheat the oven to 350 degrees. Lightly grease a 9-inch springform pan. In the bowl of an electric mixer, cream the butter and 3/4 cup sugar on medium speed for 3-4 minutes or until creamy and well blended. Add the flour, baking powder, lemon peel and salt and mix briefly to blend ingredients slightly. Add the eggs and vanilla extract beat at medium speed for 2-3 minutes or until smooth and creamy. Spoon the batter into the prepared springform pan. Arrange the pear slices on top, pressing them slightly into the batter. Sprinkle the cake with the remaining tablespoon sugar. Squeeze some lemon juice over the cake and sprinkle with cinnamon. Bake for 55-60 minutes or until browned, set and crispy. Let cool. Makes 8 servings

Egyptian Hummus with Tahini

DSC01020.jpg

What’s the most popular hors d’oeuvre?

I think it has to be hummus. I don’t have any scientific proof but I once counted the kinds of hummus sold at one of my local supermarkets and stopped when I reached 38.

Thirty-eight kinds of hummus? That’s almost as many varieties as potato chips!

Of course there aren’t actually 38 different flavors. There are several brands and some of them are the same flavor, brand to brand — like garlic flavored or spicy, olive, tahini.

But there are also some that I will call post-modern versions because I can’t think of another word for it. Like Sabra’s chipotle or Buffalo style hummus or Tribe’s hummus topped with Cilantro Chimichurri. Wow, that’s what I call fusion cuisine!

Sorry, but when it comes to certain foods, I am a purist. Like with hummus.

In Egypt, hummus is still blessedly kind of pure and simple, so I’ve been eating it every day with breakfast and dinner. It’s basic stuff: pureed chickpeas mixed with spices, olive oil and lots of tahini. Mix it all up in a food processor, garnish with a drizzle of olive oil and a few cooked chickpeas and it’s yummy enough. You don’t need to make it more complex or add any sauce or topping. That way you can actually taste the hummus.

Try this version — it’s easy to make, cheaper than store-bought and you won’t have to make a decision about which of the 38 (or more) flavors to buy.

Egyptian Hummus with Tahini

  • 1 pound can chickpeas
  • 1/3 cup tahini
  • 3 tablespoons olive oil
  • 2 tablespoons lime juice
  • 1 clove garlic
  • 1/2 teaspoon salt or to taste
  • pita bread

Drain the chickpeas but reserve the liquid. Set aside a tablespoon of chickpeas. Place the remaining chickpeas in a food processor with the tahini, 2 tablespoons olive oil, lime juice, garlic, salt and 1/4 cup of the reserved bean liquid. Process until the ingredients form a smooth puree (turn the machine off and scrape the sides of the work bowl once or twice). If you prefer a thinner hummus, add some more of the bean liquid. Spoon the hummus into a serving bowl. Garnish with the remaining tablespoon olive oil and the reserved chick peas.

Makes about 1-1/2 cups