Vanilla Cupcakes

A few weeks ago I baked cupcakes with Lila, age 8, and Remy, almost age 4, and when it came to decorating the frosting they wanted to use every sugar-laden item in my cabinet: like sprinkles, crystallized colored sugar, candy confetti and silver bea…

A few weeks ago I baked cupcakes with Lila, age 8, and Remy, almost age 4, and when it came to decorating the frosting they wanted to use every sugar-laden item in my cabinet: like sprinkles, crystallized colored sugar, candy confetti and silver beads.

It got me to thinking about when it was that we “grow up” and graduate from cupcakes with all sorts of stuff on it to plain cupcakes with simple buttercream icing. 

Then I went to Magnolia Bakery on Bleecker Street in New York and, as usual, there was a line out the door (and partway down the block), so there were enough adults who would be ordering cupcakes for me to get a handle on the answer to this question.

How many people had outgrown the everything on it variety?

Not many as it turns out.

It was a mixed-age crowd, anywhere from mid-twenties through 30s and 40s to middle-agers and, well, me. Plus my grand daughter Nina, age 7.

With choices like mocha cupcakes with caramel meringue frosting and caramel drizzle or chocolate cake cupcakes with vanilla fluff icing and cake crumbs or German chocolate cupcakes with pecan-caramel frosting and chocolate or vanilla cupcakes with buttercream frosting and sprinkles in every imaginable color, who would pick plain?

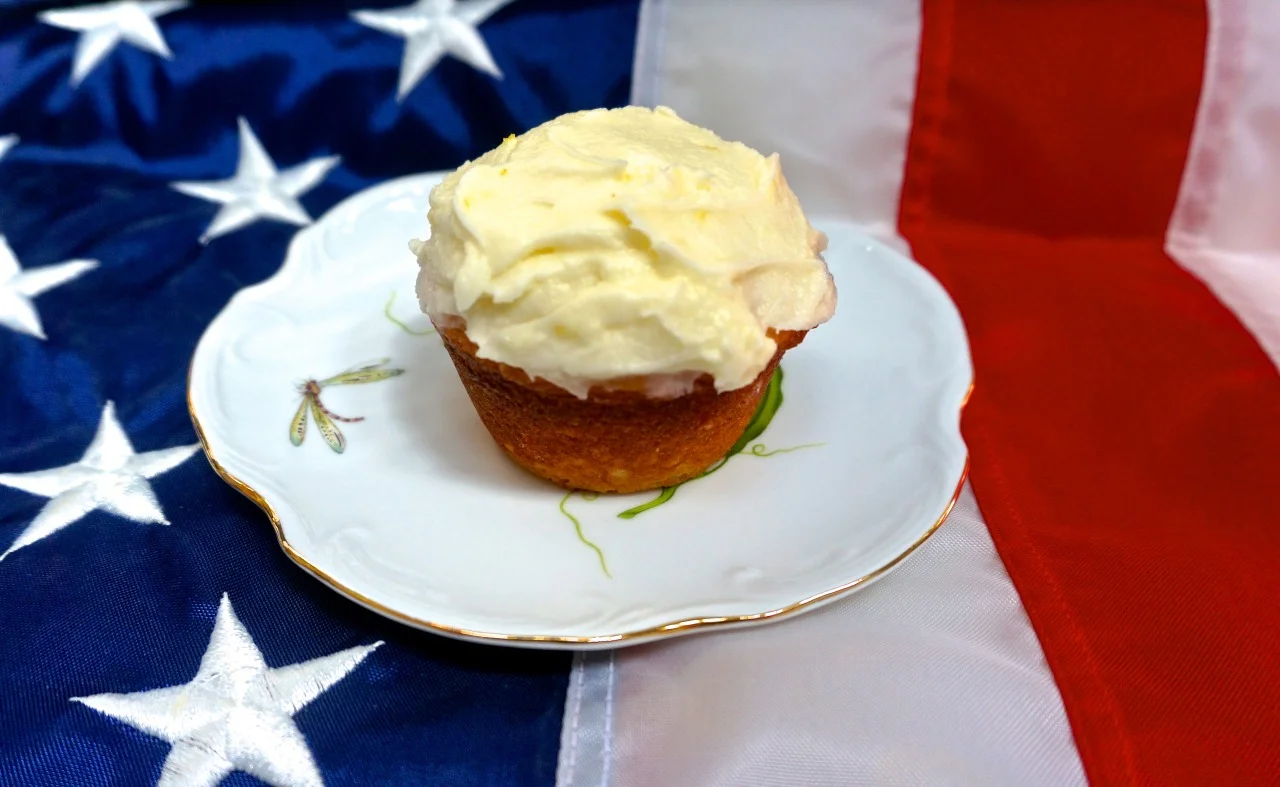
Even I, lover of plain, pure vanilla ice cream, chose a yellow cake cupcake with marshmallow frosting and flaked coconut.

Fortunately, unlike most modern day bakeries who sell giant-sized cupcakes (and everything else) that would satisfy the Brobdingnagians of Gulliver’s Travels fame, Magnolia sells regular size cupcakes. The size I remember as normal from the old days.

So I didn’t feel so guilty consuming the entire thing in about 5 bites.

On the other hand, the prices at Magnolia (my cupcake was $3.50) are, if not quite Brobdingnagian, a bit on the upscale side, so, in addition to the calories, it’s not the kind of thing I want to do every day.

Homemade cup cakes are a lot cheaper and you can decorate them with as many sprinkles (and all sorts of other stuff) as you wish.

You can freeze them too. 

Vanilla Cupcakes


1-1/2 cups sifted all-purpose flour (measure after sifting)

1-1/2 teaspoons baking powder

1/2 teaspoon salt

3/4 cup unsalted butter

3/4 cup sugar

2 large eggs

1/2 cup milk

1 teaspoon vanilla extract


Preheat the oven to 350 degrees. Butter and flour 12 muffin tins (or line them with cupcake papers). Combine the flour, baking powder and salt in a bowl and set aside. In the bowl of an electric mixer set at medium, beat the butter and sugar for 3-4 minutes or until smooth and creamy. Add the eggs, one at a time, beating after each addition until thoroughly blended. Combine the milk and vanilla extract. Add the flour mixture and milk mixture in 3 batches each, beating after each addition. Spoon equal amounts of the batter into the prepared tins. Bake for 18-20 minutes or until a cake tester inserted into the center comes out clean. Let cool for 10 minutes, then invert onto a cake rack to cool completely.


Makes 12 cupcakes


Buttercream Frosting 


1/2 cup softened butter

2 cups confectioner’s sugar

1 teaspoon vanilla extract

milk


In a large bowl or an electric mixer, beat the butter, confectioner’s sugar and vanilla extract together at medium speed until well blended. Gradually add milk, using enough to make the mixture spreading consistency.

Lemonade Cupcakes with Lemonade Frosting

My daughter Gillian and her husband Jesse and the kids are in Brazil for the World Cup.Okay, they’re there to see family, so it’s a two-fer. But they are going to some of the games and Jesse is a huge futbol/soccer fan. Some of his enthusiasm h…

My daughter Gillian and her husband Jesse and the kids are in Brazil for the World Cup.

Okay, they’re there to see family, so it’s a two-fer. 

But they are going to some of the games and Jesse is a huge futbol/soccer fan. Some of his enthusiasm has rubbed off on us over the years. So of course we’ll watch the United States play tonight.

Is the team an underdog? Yes, but who cares? They might just win. I picked the winning horse at the Belmont Stakes a few weeks ago and that animal was running with 11-1 odds (too bad I didn’t make an actual bet). So I am betting on the U.S.

While we watch we’ll have real American food.

Takeout.

Actually, I haven’t figured out dinner yet. But I know dessert will include some lemonade cup cakes because what could a more American drink than lemonade?

Okay, maybe coca cola, but that’s not homemade. I made homemade lemonade syrup for lemonade over the weekend and with the extra liquid, mixed it into cup cakes. Tangy, sweet but not too sweet. Nice for nibbling while watching the game.

                                                                                                                                                                 Lemonade Syrup


1-1/2 cups water

1-1/2 cups sugar

1-1/2 cups lemon juice (6-7 lemons)

1 tablespoon freshly grated lemon peel


Combine the water and sugar in a saucepan and bring the mixture to a boil over high heat. Stir until the sugar dissolves. Boil the liquid 3 minutes. Remove the pan from the heat and stir in the lemon juice and peel. Refrigerate for at least one hour or until very cold. Strain the mixture into a storage container. Makes just under 3 cups (to make lemonade mix some cold water or seltzer with some syrup, add ice cubes).


Lemonade Cupcakes with Lemonade Frosting                                                                                                                                                               


1/2 cup butter

1 cup sugar

2 large eggs

1/3 cup plain yogurt

1/3 cup lemonade syrup

1-1/2 cups all-purpose flour

2 teaspoons baking powder

1/2 teaspoon salt

3 tablespoons lemonade syrup


Preheat the oven to 375 degrees. Lightly grease 10 muffin cups. In the bowl of an electric mixer combine the butter and sugar and beat at medium speed until fluffy and well combined. Add the eggs one at a time beating after each addition. Beat in the yogurt and 1/3 cup lemonade syrup. The mixture will look curdled. Combine the flour, baking powder and salt and mix together. Add the dry ingredients to the butter mixture. Beat to blend ingredients thoroughly to a smooth batter. Spoon the batter into the prepared muffin tin. Bake for about 18-20 minutes or until a cake tester inserted into the center comes out clean. Remove from the oven and brush the remaining 3 tablespoons lemonade syrup over the tops of the cupcakes. Let cool. Frost and serve. Makes 10


Lemonade Frosting


1/2 cup butter

3-4 tablespoons lemonade syrup

1 teaspoon freshly grated lemon peel

2 cups confectioner’s sugar


Cream the butter in an electric mixer at medium speed. Add 3 tablespoons lemonade syrup and the lemon peel and beat them in. Gradually add the confectioner’s sugar and beat until the frosting is smooth and well blended. Add more lemonade syrup if needed for spreading consistency. Enough for 10 cupcakes

Fried Rice with Turkey and Mushrooms

On Father’s Day my husband does not:1) grill2) want hot dogs or hamburgers3) play golf (baseball, soccer, etc.)He wants:1) me to cook2) Chinese food3) to relax, sit outside, and spend a good deal of time googling all sorts of stuff on his iphone and…

On Father’s Day my husband does not:

1) grill

2) want hot dogs or hamburgers

3) play golf (baseball, soccer, etc.)

He wants:

1) me to cook

2) Chinese food

3) to relax, sit outside, and spend a good deal of time googling all sorts of stuff on his iphone and then regale us with the miraculous things he has learned.

I haven’t figured out the menu but maybe it will be Chicken with Hoisin Sauce and Cashew Nuts or Chicken with Peanuts (his favorite). Or maybe Grilled Chicken/Ginger kebabs. He’d absolutely LOVE some Pearly Meatballs

Fried Rice is a definite. Any kind, even if it is “Chinese style” and not authentically Chinese like this recipe, which is more or less what I sometimes cook when I have just a little bit of meat leftover. Ed will always welcome this dish or any variation. He always mixes in a little bit of sesame seed oil. I don’t.

This recipe will serve 4-6 as a combo dish to be eaten with other food. When it’s just the two of us for dinner, we eat it all.

One cup if raw rice cooked with 1-3/4 cups water will yield 3 cups cooked rice.


Fried Rice with Turkey and Mushrooms


3 dried shiitake mushrooms

2 eggs

3 tablespoons vegetable oil

3 scallions, chopped

1 cup diced leftover turkey 

1/2 cup thawed frozen peas

6-8 water chestnuts, diced (or 1/2 cup diced bamboo shoots)

3 cups cooked cold rice

1/2 teaspoon salt or to taste

sesame seed oil, optional, to taste


Soak the mushrooms in hot water for about 30 minutes or until they are softened. Rinse them, discard the inedible stem, if any, and cut the caps into small pieces. Set the mushrooms aside. Beat the eggs in a bowl and set aside. Heat 2 teaspoons vegetable oil in a wok or stirfry pan over medium-high heat. Add the eggs and cook, stirring once or twice until they are set on the bottom. Turn the eggs over and cook briefly until firm. Dish out the eggs onto a chopping board, chop them and set them aside. Heat the remaining vegetable oil in the pan. Add the scallions, turkey and mushrooms and stirfry for about 2 minutes. Add the peas and water chestnuts and cook for another minute, stirring frequently. Add the rice, eggs and salt and stirfry for 1-2 minutes to distribute ingredients and heat the rice. Sprinkle with sesame seed oil if desired.

Makes 2-6 servings, depending on whether this is a one-dish meal or part of a meal


The Tea Plantation; Honey Corn Muffins

Last week’s post about taking Lila to tea got me thinking about the tea plantation Ed and I visited in Sri Lanka.

The place went on for acres and acres, it was a fabulous, warm, sunny day and we were able to see everything from plant to package and then, of course, we sipped tea and nibbled on cake in the shade of a beautiful garden.

We learned a lot too.

In case you don’t already know this, all tea comes from the camellia sinensis plant. Flavor differences have to do with lots of other factors such as where the plant is grown, the acidity of the soil, leaf size and so on, and also how it is processed, (whether it is left immature, or green, or “fermented” to darken; whether it is smoked, blended with other teas, etc.).

Sri Lanka is known for its tea and Ed and I agree it’s the best tea in the world, which is why we were so excited to spend a day and see exactly how it’s made.

The plantation we went to wasn’t totally set up for visitors, but we were able to speak with some of the workers who showed us the entire tea-leaf process. You can see one of the women plucking the tops — only the new, light green growths are harvested (every 7 days on this plantation). Then (second photo), the leaves are placed in a bin to wither and dry. Once they dry somewhat they are sent (photo 3) to crushing machines (photo 4), which breaks the leaves. The leaves are then dried some more and as they dry they oxidize and change color from golden to dark blackish-brown, to achieve varieties of tea such as oolong and different black teas. (Green tea and white tea are not oxidized.)

Finally, the leaves are sorted for quality (photo 5).

The best quality teas are sold in bulk, as whole or partially broken leaves; the lowest quality teas are tiny, crushed, sometimes almost powdery leaves packed into tea bags. For the most part I can say that tea bags are less messy and more convenient but tea tastes better when you make it from loose tea leaves.

After visiting a tea plantation I prefer the loose tea, if only because I know how much work is involved and it makes me appreciate the beverage better.

Your choice on that though. Whatever you choose, enjoy the muffins, which are perfect no matter what kind of tea you pick.  

If you are ever in a place where you can visit a tea plantation, I recommend it highly. It’s a good learning experience and lots of fun too.                                                                                                                                             

Honey Corn Muffins


5 tablespoons butter

3 tablespoons honey

1-1/4 cups all-purpose flour

3/4 cup cornmeal

1 tablespoon baking powder

3/4 teaspoon salt

1 large egg

2/3 cup milk


Preheat the oven to 425 degrees. Lightly grease 8 muffin cups. Melt the butter with the honey and set aside to cool. In a bowl, mix the flour, cornmeal, baking powder and salt. In another bowl mix the egg, milk and cooled butter mixture, beating until well blended. Pour the liquid into the cornmeal mixture and stir to blend the ingredients. Spoon equal amounts into the muffin cups. Bake for 18-20 minutes or until golden brown.


Makes 8

Scones

Last week I took Lila, age 8, to afternoon tea at a tea parlor in New York City. I usually meet her after school on Wednesdays and we do something special together. On this particular day she requested tea because she said she wanted “scones and jam and that soft white stuff we had at Zivia’s bat mitzvah," (the celebration after the service was an Afternoon Tea).

The “soft white stuff” was, of course, clotted cream.

Who can resist clotted cream?

Lila has good taste. I say that not just because she understands that clotted cream is something wonderful. But also because when we were seated at our table, she noticed that our places were set with clunky mugs while at the next table there were beautiful floral-design china tea cups, which, when the waiter left after taking our order, she switched. Then she switched the sugar box from our plain white earthenware one to the next table’s gold-trimmed bone china one.

I thought such niceties were gone from the earth, at least for young folks, so I felt positively uplifted by what she did.

Fancy is good sometimes, don’t you think?

As for the scones, Lila had known about those long before our date or even her cousin’s bar mitzvah celebration. She and I have made them at my house. Scones are easy. Even a young child can do it.

Scones also take very little time. And they are amazingly tender, moist and flaky.

Scones: perfect for tea, breakfast, coffee break, snack and even a bar mitzvah celebration. With or without the jam and that soft white stuff.  


Scottish Lemon Currant Scones


  • 2 cups sifted all-purpose flour

  • 2-1/2 tablespoons sugar

  • 2-1/4 teaspoons baking powder

  • 3/4 teaspoon baking soda

  • 1/2 teaspoon salt

  • 1/2 teaspoon grated lemon peel

  • 6 tablespoons butter

  • 1/2 cup currants

  • 1 large egg

  • 1/2 cup buttermilk


Preheat the oven to 425 degrees. Lightly grease a cookie sheet. Combine the flour, sugar, baking powder, baking soda, salt and lemon peel in a bowl. Add the butter in chunks and work the butter into the dry ingredients until the mixture resembles coarse meal.  Stir in currants. Mix the egg and buttermilk together and add them to the dry ingredients. Mix until a soft dough forms. Roll the dough on a floured surface to a 1/2" thickness. Cut out circles with a cookie cutter. Place the scones on the prepared cookie sheet. Bake for 12-15 minutes or until the scones are browned and well risen.


Makes 12


NOTE: you may also make wedge-shaped scones: divide dough in half, then roll each half to 1/2” thick circle. Cut each circle into 6 wedges.


Baked, Stuffed Potatoes

Some people eat out on their birthday and that’s fine, but I prefer to be in my casual clothes and eat exactly what I want (over the course of the entire day) rather than in a chair all dressed up at a restaurant having to choose from a menu s…

Some people eat out on their birthday and that’s fine, but I prefer to be in my casual clothes and eat exactly what I want (over the course of the entire day) rather than in a chair all dressed up at a restaurant having to choose from a menu someone else planned.

What I like could vary, depending on my mood, but often the birthday food has something to do with fried chicken. Or anything made with a potato. And, most especially, homemade apple pie the way my mom made it.

I already have the pie in my freezer. So, I am getting ready for my birthday (in a few days) by making baked stuffed potatoes: organic Russets baked to a crisp, the insides removed and mashed with plenty of butter and cream cheese (maybe even a little dairy sour cream), salt and freshly ground black pepper before being stuffed back into the potato skins and baked until the top is crusty.

Please don’t tell me that white potatoes are unhealthy and fattening. I know. The flesh is high on the glycemic index and that’s not good But potato skins contain good supplies of vitamins, minerals and fiber. 

And of course I am aware that adding butter and cream cheese adds fat and calories. That’s what makes this recipe so awesome. Besides, I am a big believer that if you eat healthy most of the time — we do — then indulging occasionally is not only good but important for one’s emotional well being.

By the way, if it turns out I don’t eat these baked stuffed potatoes on the day, they freeze well and I know I’m gonna want them sometime soon.


Baked, Stuffed Potatoes 

4 Russet type potatoes, scrubbed

2 tablespoons butter

3 ounces cream cheese

4-5 tablespoons milk or dairy sour cream

salt and freshly ground black pepper to taste

paprika

Place an oven rack in the center of the oven. Preheat the oven to 400 degrees. Scrub the potatoes, place them in the oven and bake for 15 minutes. Prick the potatoes with the tip of a sharp knife. Bake for another 45 minutes or until the knife can easily pierce through the potato. When the potatoes are cooked and cool enough to handle, slice them in half lengthwise and scoop the flesh into a bowl. Add the butter and mash it into the potatoes. Add the cream cheese and blend it in thoroughly. Mix in enough of the milk or dairy sour cream to achieve a moist and tender consistency. Season to taste with salt and pepper. Spoon the mixture back in equal amounts inside the potato skins. Sprinkle the surface with paprika. When ready to bake, preheat the oven to 375 degrees. Place the filled potato skins on a cookie sheet and bake for 10-15 minutes or until hot, with the skins crispy.

Makes 4-8 servings

Kale and Potato Kugel

When I hear the word kugel I daydream about old fashioned Jewish food like the kind my grandma made and that brings back happy memories of when I was a kid. She made noodle kugel, always a salty kind made with noodles, schmaltz, onions and some…

When I hear the word kugel I daydream about old fashioned Jewish food like the kind my grandma made and that brings back happy memories of when I was a kid. She made noodle kugel, always a salty kind made with noodles, schmaltz, onions and sometimes mushrooms and of course, lots of eggs. It’s still one of the best side dishes that you could possibly eat with roasted chicken.

In fact kugel is hard not to like, whether it’s made with noodles, potatoes or vegetables. 

My grandma never made Kale and Potato Kugel like the one here, but I bet she would have loved it. It’s filing enough to be dinner, but of course it’s also a good bet as a side dish for fish, eggs, whole grains or vegetarian dishes.

It’s also a nice choice for brunch and perfect for a Shavuot dairy meal.                                                                                                                                                                                   

Kale and Potato Kugel


4 medium Yukon Gold potatoes (about 1-1/2 pounds)

1 large bunch kale (about 14-16 ounces)

6 large eggs

3/4 cup shredded Swiss cheese

5 tablespoons melted butter

1/8 teaspoon freshly grated nutmeg

salt and freshly ground black pepper to taste

3/4 cup panko crumbs

2-3 tablespoons grated Parmesan cheese


Preheat the oven to 375 degrees. Lightly grease a 2-quart baking dish. Peel the potatoes, cut them into chunks and boil them in lightly salted water for about 15 minutes or until tender. Let cool and chop into small pieces. Place the potatoes in a bowl. While the potatoes are cooking, wash the kale and remove the thick stems from the bottom. Chop the kale coarsely. Bring a large saucepan of water to a boil. Immerse the kale and cook for 10 minutes or until soft. Drain and squeeze out as much water as possible. Chop into smaller pieces and add to the potatoes. Beat the eggs in a large bowl. Mix in the Swiss cheese, 3 tablespoons of the melted butter, nutmeg and salt and pepper to taste. Add to the potato and kale mixture. Gently mix the ingredients to distribute them evenly. Place the mixture inside the greased baking dish. In a small bowl, mix the panko and remaining 2 tablespoons melted butter and sprinkle over the ingredients. Top with the Parmesan cheese. Bake for about 30 minutes or until hot and crispy.

Makes 8-10 servings

Red Velvet Cheesecake Ice Cream

Cheesecake is one of the good things in life right? No matter what kind of cheesecake. New York style. Baked into Chocolate Cheesecake Brownies. Any and all really.
So why not cheesecake ice cream? The weather has turned, all the snow has finally me…

Cheesecake is one of the good things in life right? No matter what kind of cheesecake. New York style. Baked into Chocolate Cheesecake Brownies. Any and all really.

So why not cheesecake ice cream? The weather has turned, all the snow has finally melted, it’s hot.

Which makes it ice cream weather.

Cheesecake ice cream.

Which I made recently and just for good measure, added some red velvet cake crumbs (icing and all) from the cake I made last week.

Oh my, this was good.                                                                                                                                                                                                   

Red Velvet Cheesecake Ice Cream                                                                                                                                                                               

8 ounces cream cheese

1/2 cup sugar

pinch of salt

1 cup dairy sour cream

1 cup half and half cream

1 teaspoon vanilla extract

2 cups cut up red velvet cake                                                                                                                                                                                       

Cut the cream cheese into pieces and place in a food processor or electric mixer. Add the sugar and salt and process or mix at medium speed until well combined. Add the sour cream and blend it in thoroughly. Gradually add the half and half and blend it in thoroughly. Stir in the vanilla extract. Chill in the refrigerator for about an hour or until cold. Freeze in an ice cream maker according to manufacturer’s instructions. Just before the mixture is finally thick enough to place in the freezer, add the cake pieces and mix them in. Spoon into a container to freeze.

Makes about 6 cups

Red Velvet Cake

Last week a New York Times article bemoaned the fate of Red Velvet, which, like so many other American products, got twisted and turned and commercialized beyond repair and has been reproduced in so many gimmicky ways — red velvet candles, red velvet body mist, and so on — that it has become preposterous.

We’ve all seen this happen before. When something, anything is popular, there are going to be those who want to cash in on it in ways never intended.

They can sell it, but of course we don’t have to buy it. And if we don’t buy it, they will stop selling it and we can move on.

But that doesn’t mean that the original product was outlandish. There is a reason that Red Velvet Cake has endured. People love how it tastes. It has a miraculously soft texture. In its article, the New York Times, while ridiculing the commercialization, deemed Red Velvet Cake a classic.

Truth to tell, I never understood the wow in the whole red velvet cake thing. To me the versions I tasted seemed as if they couldn’t make up their minds about whether to be a vanilla cake with too much color and too-little cocoa to make a flavor difference or a devil’s-food cake.

But after experimenting somewhat with recipes, I came up with one that’s mighty good! So, now I get it. It isn’t vanilla cake. Or devil’s-food. Or chocolate cake. It’s its own thing. A classic. Here’s the recipe, plus a recipe for frosting that’s way less sweet than most:

Red Velvet Cake

  • 3-1/2 cups all-purpose flour
    1/3 cup cocoa powder (not Dutch process)
    1 teaspoon salt
    2 cups sugar
    1-1/2 cups vegetable oil
    3 large eggs, at room temperature
    1 ounce red food coloring mixed with 6 tablespoons water
    1-1/2 teaspoons vanilla extract
    1-1/4 cups plain yogurt
    2 teaspoons baking soda
    2 teaspoons white vinegar
    Lemon-Cream Cheese Frosting 

Preheat the oven to 350 degrees. Lightly grease 3 9-inch cake pans. Sift the flour, cocoa powder and salt into a bowl and set aside. Beat the sugar and vegetable oil together at medium speed for 1-2 minutes or until thoroughly blended. Add the eggs, one at a time, beating after each addition. Add the food coloring mixture and vanilla extract and stir the ingredients at low speed until thoroughly blended. Add the flour mixture, alternating with the yogurt, beating the ingredients after each addition. Mix the baking soda and vinegar in a small bowl, pour it into the batter and blend it in thoroughly. Spoon the batter equally among the cake pans. Bake for about 30-35 minutes or until a cake tester inserted in the center comes out clean. Let the cake layers cool for about 10 minutes, then insert them onto a cake rack to cool completely. Before serving, frost the cake.

Lemon-Cream Cheese Frosting

  • 1 pound cream cheese at room temperature
    1/2 cup butter at room temperature
    2 cups confectioner sugar
    1 tablespoon lemon juice
    1 teaspoon vanilla extract
    1 teaspoon grated fresh lemon peel


Beat the cream cheese, butter, confectioners sugar, lemon juice, vanilla extract and lemon peel together at low-medium speed until smooth, creamy and well blended.

Makes 10-12 servings

Tagged: red velvet cakecakedessert

Share


Caprese Salad Grilled Cheese

Someone should build a monument to the grilled cheese sandwich.

Say what you will about burgers or hot dogs, I don’t think any other dish is as well loved as this one. We should preserve one in a time capsule and send it to another universe so whoever eventually gets it will know how good the food is here.

Anyone old kind of grilled cheese sandwich will do. The plain old classic works: cheddar or American cheese on white bread. But few would argue the merit of variations.

Like this one: caprese salad grilled cheese panini made with fresh mozzarella cheese, ripe red tomatoes, fragrant basil and fruity olive oil inside a crusty hunk of ciabatta, fried to a crisp in a little butter.

It’s the perfect light lunch or supper, weekend brunch dish. Excellent choice for Shavuot, the “cheese” holiday.                                                                                                                                                                                 

Caprese Salad Grilled Cheese    

  •   ciabatta bread (or 2 slices sourdough bread)

  • 2 teaspoons olive oil

  • 3-1/2 to 4 ounces fresh mozzarella cheese, sliced

  • 3-4 slices fresh tomato

  • 1 tablespoon chopped fresh basil

  • 2 teaspoons butter

Cut the bread to make two sandwich size slices from the loaf. Brush or spoon one teaspoon olive oil on each bread slice. Place the cheese on one of the bread slices. Place the tomato slices on top of the cheese. Scatter the basil on top. Cover with the second bread slice. Melt half the butter in a saute pan over medium heat. When the butter has melted and looks foamy, place the sandwich in the pan. Weight down the sandwich (use a large pan with a saucepan or cans inside; or use a panini grill). Cook for 2-3 minutes or until the bottom slice of bread is crusty and brown. Lift the sandwich using a rigid spatula. Add the remaining butter to the pan. When the butter has melted and looks foamy, add the sandwich, uncooked side down. Replace the weights. Cook for another 3 minutes or until the bottom is crusty and brown and the cheese is melted.

Makes one sandwich