Banana Split with Honey-Fudge Sauce

I’ve just come back from some travels that included parts of Africa and Malaysia and I can tell you it was a feast for the eyes, ears and brain.
Some aspects — the poverty — were terribly painful to see, heartbreaking, eye-opening.…

I’ve just come back from some travels that included parts of Africa and Malaysia and I can tell you it was a feast for the eyes, ears and brain.

Some aspects — the poverty — were terribly painful to see, heartbreaking, eye-opening.

But so much was extraordinarily beautiful — rainforests thick with palms and thousands of different kinds of orchids. A mama rhinoceros and her baby crossing the road within ten feet of us. Chameleons with such bright aqua, orange or vermillion skin they looked fake, like some high-end souvenir from a natural history museum. 

One of the biggest surprises were the banana trees. I shouldn’t actually say trees because although the local people we met called them that, bananas do not grow on trees. They are large herbaceous plants and the thick stalks and huge leaves only look like trees.

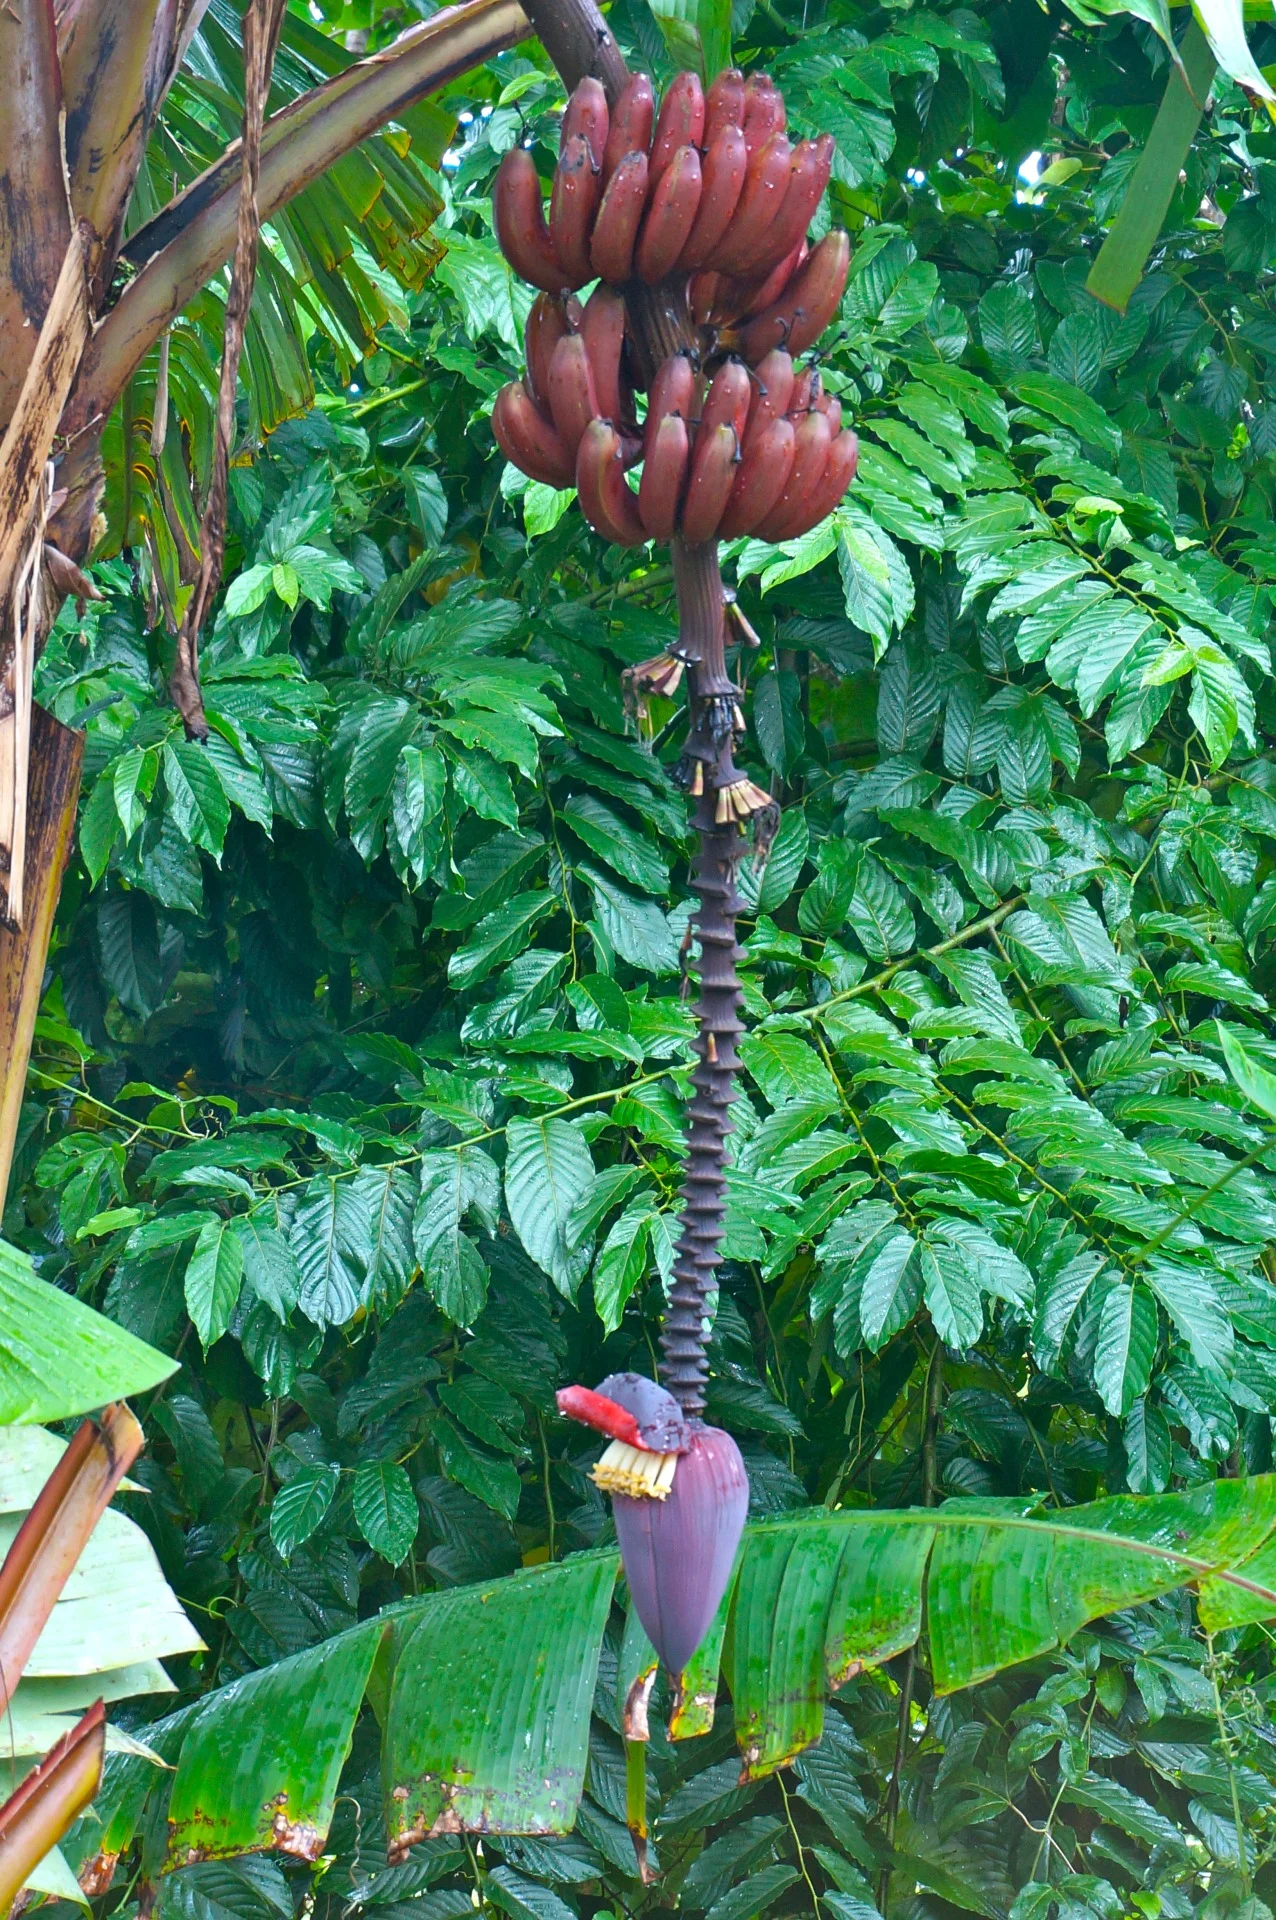
No matter. Bananas were everywhere. We were driving along any old road in the Seychelles when I noticed the banana flower in the photo and had to stop and take a picture. That purple, rounded triangle at the bottom is the part that produces flowers. Female flowers will develop the fruit, which grow in clusters that will eventually become “hands” of bananas like the red ones in the photo (each banana is called a finger).

There are many types of bananas and most of what we get in this country are the large Cavendish. Some markets also sell different kinds of small, fat bananas and occasionally I’ve seen some red ones. But in Africa and Asia there are so many different varieties available I stopped counting or trying to remember each one. No big Cavendish type. All the ones we saw were small, fragrant and sweet.

The worst part of the whole banana thing for me is — I am allergic. I can’t eat or even taste one!

I love bananas. I remember them from the old days (Ed says I ate my fair share by the time I met him). I remember what they taste like. I like the smell. I like to look at them. I like to cook with them. I’ve made banana bread more times than you could imagine.

I couldn’t eat any of the bananas. But one day, my cousin who was traveling with us, ate 6, as if to make up for my lack.

She said they were very delicious indeed.

If you see any of those small bananas in the store, give them a try. They look, smell and, from what I hear, taste different than the common Cavendish. Don’t be put off by the brown spots. That’s the way they’re marketed throughout the parts of the world I just visited. That’s the way you’re supposed to eat them.

Sweet enough for a Valentine’s Day treat.

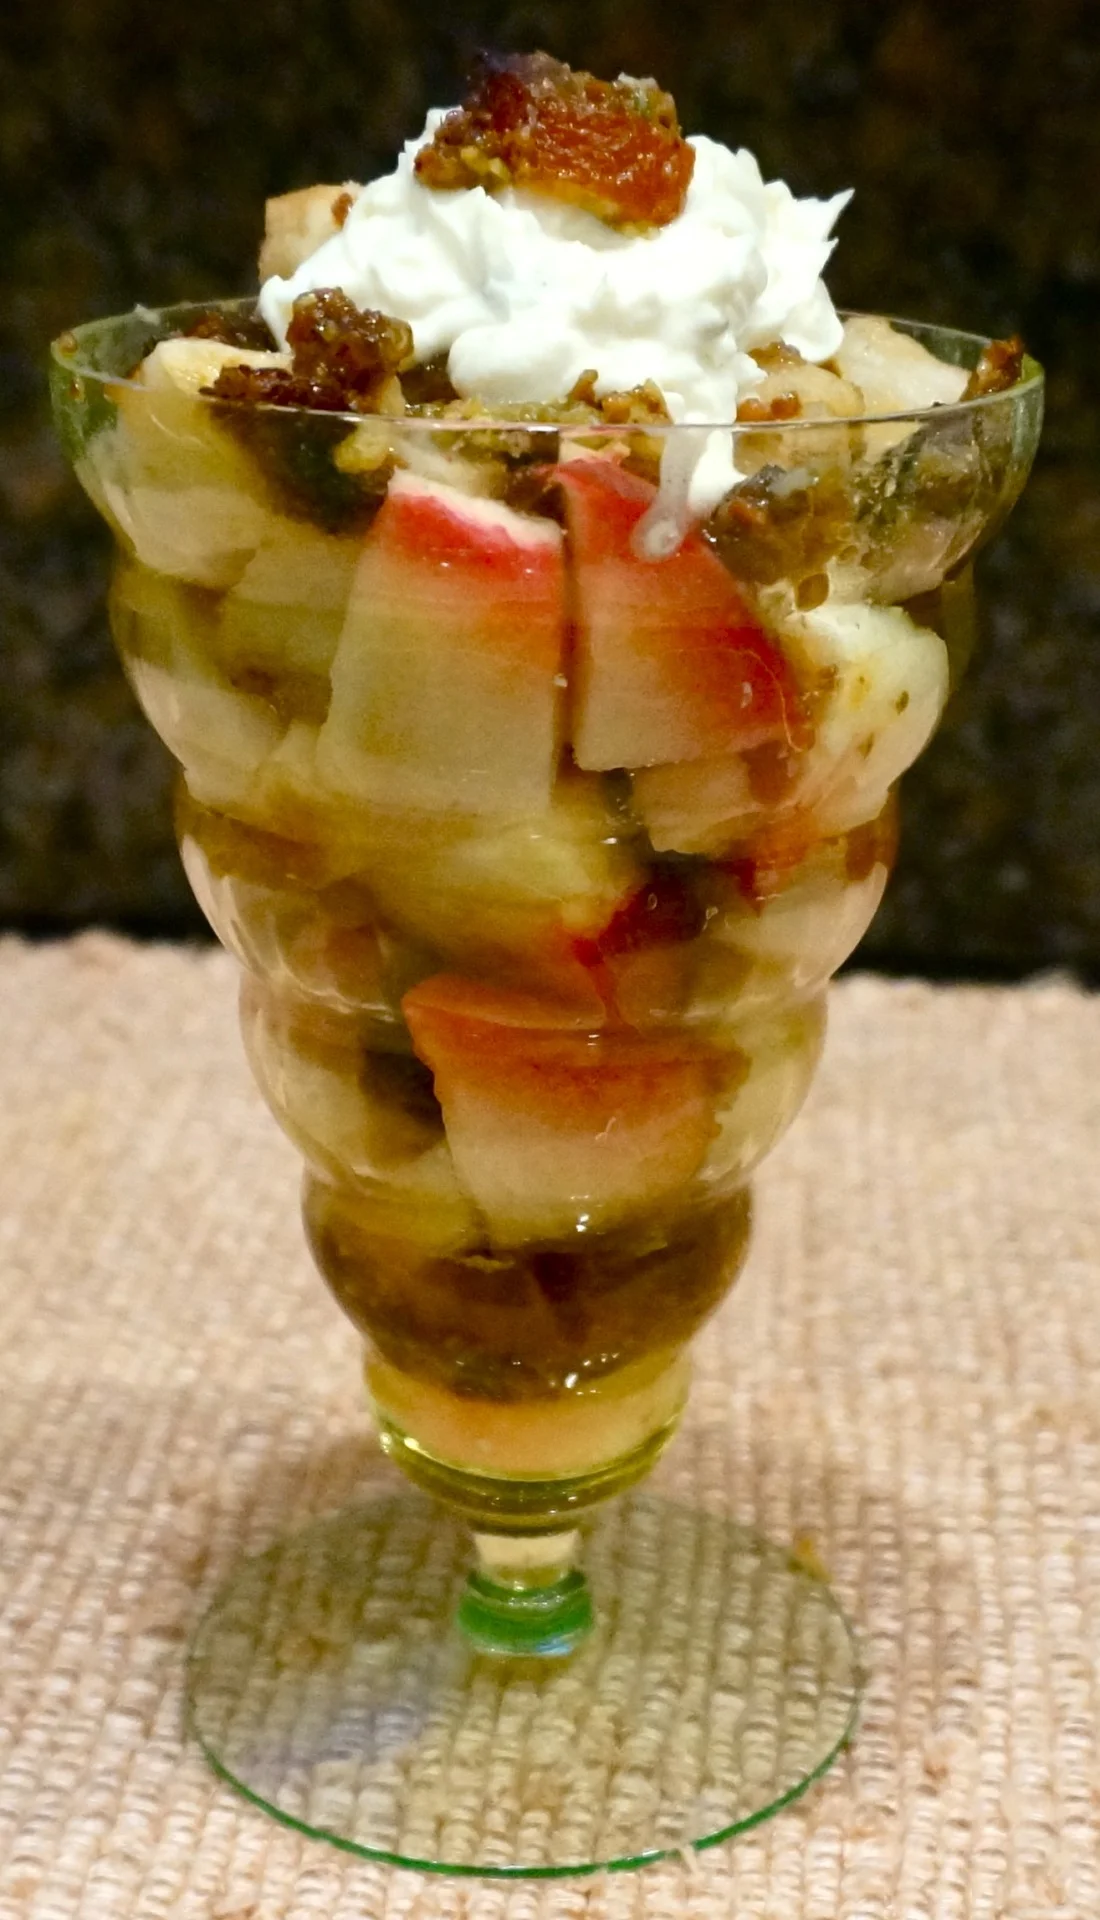
Or, if you wish, dressed up with ice cream and fudge sauce.

Banana Split with Honey-Fudge Sauce

1 tablespoon honey

2 teaspoons unsalted butter

1/4 cup whipping cream

2 ounces bittersweet chocolate

1 large or 2 small bananas

2 scoops vanilla ice cream

1/2 cup whipped cream

1/4 cup chopped almonds

2 fresh raspberries or strawberries

Place the honey, butter and cream in a small saucepan over medium heat until the butter has melted and bubbles form around the edges of the pan. Stir in the chocolate and remove the pan from the heat. Whisk the ingredients until the chocolate has melted and the sauce is smooth. Let cool. Slice the bananas and place the pieces on the bottom of two dessert plates. Top each with the ice cream. Pour the fudge sauce on top. Place half the whipped cream on top of each serving. Scatter the almonds on top and garnish with a raspberry or strawberry. Makes 2 servings

Chocolate Bark with Tangerine and Cayenne

I’m not a would-be confectioner and have absolutely no patience for tempering chocolate or simmering sugar syrup to the exact right temperature for it to become caramel. I did both of those things at least once and moved on to cooking stuff I&…

I’m not a would-be confectioner and have absolutely no patience for tempering chocolate or simmering sugar syrup to the exact right temperature for it to become caramel. I did both of those things at least once and moved on to cooking stuff I’m better at.

BUT

I tasted some chocolates filled with cayenne-infused tangerine syrup and loved them. The store I bought them in is too far from where I live. Besides, I prefer bark to syrupy-filled candies. So I decided to make my own homemade bark with tangerine-cayenne flavor. Plus chopped nuts.

I didn’t temper the chocolate so it doesn’t have the gloss of professionally created candies. And it took hours for the melted chocolate mixture to try.

On the other hand it was about four times cheaper than the store-bought candies (I used good quality chocolate too!). And this candy was so good that it disappeared in a flash. That tiny hint of chili pepper even appealed to my 12 year old grandson.

Chocolate Bark with Tangerine and Cayenne


1 pound dark chocolate

1 tablespoon melted butter or coconut oil

2 teaspoons grated fresh tangerine peel

1/8 teaspoon ground cinnamon or cardamom

2 pinches cayenne pepper

1 cup coarsely chopped roasted marcona almonds

sea salt


Line a baking sheet with parchment paper. Melt the chocolate and butter together in double boiler. Stir in the tangerine peel, cinnamon or cardamom and cayenne pepper. Add the almonds and stir. Spread the mixture over the parchment. Sprinkle lightly with sea salt. Let cool and set (this will take at least 5 hours). Break into pieces. Makes one pound +

Blueberry Corn Muffins

The problem (for me) with corn muffins is that when I make them I eat one every day for 10 days because Ed doesn’t like muffins and each recipe makes 10 and if there is no one else around to finish them off, I do. This breaks the monotony of my dail…

The problem (for me) with corn muffins is that when I make them I eat one every day for 10 days because Ed doesn’t like muffins and each recipe makes 10 and if there is no one else around to finish them off, I do. This breaks the monotony of my daily yogurt for breakfast, which is nice, but also gets me on a bread-type breakfast for too long and that’s not so good for my waist or weight.

Alas, sometimes I just can’t help myself. I need a corn muffin. And so the cycle begins.

I keep the first two days worth in a plastic bag on the countertop; the remainder I freeze. You’d think I wouldn’t look in the freezer. That I could resist.

But I can’t. These are too good.


Blueberry Corn Muffins


6 tablespoons butter

1 cup cornmeal

1 cup all-purpose flour

1 tablespoon baking powder

3/4 teaspoon salt

1/3 cup honey

1 large egg

3/4 cup milk

1-1/2 cups blueberries


Preheat the oven to 425 degrees. Lightly grease 10 muffin tins. Melt the butter and set it aside to cool. In a bowl, mix the cornmeal, flour, baking powder and salt. In another bowl mix the honey, egg, milk and cooled butter, beating until well blended. Pour the liquid into the cornmeal mixture and stir to blend the ingredients. Fold in the blueberries. Spoon equal amounts into the muffin tins. Bake for 20-25 minutes or until golden brown.

Makes 10


Roasted Green Beans with Aleppo Pepper

When my kids were young, they were like most other children I knew and refused to eat most vegetables. They did say okay to carrots and winter squash and they didn’t love, but reluctantly ate, green string beans.
They were required to eat 4 st…

When my kids were young, they were like most other children I knew and refused to eat most vegetables. They did say okay to carrots and winter squash and they didn’t love, but reluctantly ate, green string beans.

They were required to eat 4 string beans when I served them with dinner.

I wouldn’t exactly call that child abuse and I don’t think it damaged their psyches. But they still talk about it, that I made them eat 4.

Actually, I think in the very depths of their beings they are happy I insisted on that because when they talk about the green bean requirement they have a smile on their faces.

I usually cooked the green beans straight. Steamed or poached. Nothing on top so they could dip it in oil or butter or ketchup or whatever.

I think they ate them straight though.

We still are a green bean family. Green beans are mild and easy to eat. If you’re gonna get a child to try a vegetable this might be a good one for starters. I think they “sell” a whole lot better than, say, broccoli.

Recently I roasted the beans. We all love roasted vegetables and I’d never tried it with green beans because I was so used to making them just plain.

I sprinkled some dried Aleppo pepper on top. If you don’t know about this spice, I can tell you it is one of the milder (but still slightly hot) peppers and the dried version is vaguely smoky. I guess you could substitute smoked paprika, though I’ve never actually tried that. Anyway, this recipe is a keeper:

Roasted Green Beans with Aleppo Pepper

1 pound green string beans

1-1/2 tablespoons olive oil

1 large clove garlic, finely chopped

2 teaspoons fresh thyme leaves

1/4 teaspoon dried Aleppo pepper

salt to taste

Preheat the oven to 425 degrees. Line a baking sheet with parchment paper. Wash the beans and remove the ends. Dry the beans and place them on the parchment paper. Pour the olive oil over the beans and toss to coat them. Sprinkle the beans with the garlic, thyme, Aleppo pepper and salt to taste. Roast for 12-15 minutes or until tender but still crispy.

Makes 4 servings

Chili Con Carne

I used to cook chili a lot more often than I do these days. I suppose I overdid it and Ed said “HALT!” on the chili and that was that for a while.But it’s chili season isn’t it?Maybe it’s time to start the cycle again. I have plenty of recipes …

I used to cook chili a lot more often than I do these days. I suppose I overdid it and Ed said “HALT!” on the chili and that was that for a while.

But it’s chili season isn’t it?

Maybe it’s time to start the cycle again. 

I have plenty of recipes that I’ve tried over the years but this one is my favorite. It’s extra delicious with a blob of guacamole on top.


Chili Con Carne

1-1/2 tablespoons vegetable oil

1 large onion, chopped

2 cloves garlic, minced

1 pound chopped or diced beef

28-ounce can Italian style plum tomatoes, drained and chopped

6-ounce can tomato paste

1-3/4 cups beef stock

2 tablespoons chili powder

2 teaspoons dried oregano

1-1/2 teaspoons ground cumin

1/2 teaspoon crushed red pepper

1/2 teaspoon freshly ground black pepper

salt to taste

2 bay leaves

15-ounce can white beans, drained


Heat the vegetable oil in a large, deep sauté pan. Add the onion and garlic and cook over medium heat for 3-4 minutes or until the vegetables have softened. Add the meat and cook for 5-6 minutes or until the meat turns brown. Add the tomatoes, tomato paste, beef stock, chili powder, oregano, cumin, crushed red pepper, black pepper, salt and bay leaves. Bring the mixture to a boil, lower the heat, and simmer for 25 minutes. Add the beans and cook for another 15-20 minutes, or until most of the liquid has evaporated and the meat is surrounded by sauce as thick as gravy.


Makes 4 servings


Meyer Lemon Yogurt Pie

When life gives you lemons, make lemonade, right? Or lemon pie, lemon bars, lemon vinaigrette. And so on.

That’s exactly what I did, years and years ago, when one of Ed’s business associates moved to California and mentioned the lemon trees in his backyard. He had so many lemons that he wanted to send us a box.

They were the strangest looking lemons I’d ever seen. Thin-skinned and vaguely orange. They also tasted sweeter than the standard, in fact, they tasted almost as if it were some kind of lemon mixed with an orange.

This was in the pre-Google search era. No one I knew had ever heard of a Meyer lemon.

In fact, Meyer lemons, which seem so familiar now, popped into popularity only about a decade ago. And when they started appearing in supermarkets during the winter I realized what I had in that box all those years before.

I had used those lemons in all the recipes I cooked that called for lemon juice and peel. It worked, though not perfectly. Meyer lemons are sweeter and they don’t have the tang and pop of a standard lemon, so they’re not ideal for recipes that need a lemony acidity.

On the other hand, because the flesh is sweeter than the more usual lemon, Meyer lemons are perfect for cookies and quick breads. I also slice them and use it as a bed for roasted fish. I make Meyer Lemon Chutney.

And this fabulous, rich, sweet and mildly tangy Meyer Lemon Yogurt Pie. 

Meyer Lemon Yogurt Pie

  • 1 fully baked pie crust or Graham Cracker crust
  • 1 cup sugar
  • 5 tablespoons cornstarch
  • 1/2 teaspoon salt
  • 1/2 cup cold water
  • 1/3 cup fresh Meyer lemon juice
  • 2 large eggs
  • 1-1/2 cups boiling water
  • 1-1/2 tablespoons butter
  • 2 tablespoons freshly grated Meyer lemon peel
  • 1 cup plain Greek style yogurt
  • whipped cream

Bake the crust or set it aside. Or, make a graham cracker crust (or use a store bought crust).* Combine the sugar, cornstarch, salt, cold water and Meyer lemon juice in a saucepan. Add the eggs and blend them in thoroughly using a whisk. Gradually add the boiling water and whisk the ingredients until the mixture is smooth. Place the saucepan over medium heat and bring the mixture to a boil. Continue to cook, whisking constantly, for one minute. Remove the pan from the heat and stir in the butter and Meyer lemon peel. Let the mixture rest for 15 minutes. Add the yogurt and whisk it in. Pour the mixture into the pie crust and chill in the refrigerator until cold, about 4 hours. Top with whipped cream and serve.

Makes one 9-inch pie

*to make a graham cracker crust: preheat the oven to 350 degrees. Combine 1-1/2 cups crushed graham crackers and 5 tablespoons melted butter. Mix until all the crumbs are coated. Press the mixture onto the bottom and sides of a 9-inch pie dish. Bake for 10 minutes. Remove from the oven and let cool.

Braised Breast of Veal

Every time I serve Breast of Veal Ed says, “my mother used to make this.” He never says it was a favorite from his youth or that he hated it, just that she cooked it. This dish apparently conjures memories for him, though he doesn’t say so (alt…

Braised Breast of Veal

Every time I serve Breast of Veal Ed says, “my mother used to make this.” 

He never says it was a favorite from his youth or that he hated it, just that she cooked it. This dish apparently conjures memories for him, though he doesn’t say so (although he once told me his father thought Breast of Veal was “plebeian”).

My mother-in-law roasted Breast of Veal and packed the pocket with matzo stuffing. I loved that dish. But recently I decided to skip the stuffing and the roasting and I braised the veal instead. 

The result? Really tender, succulent meat and lots of savory pan juices (that would be perfect if you added some mashed potatoes or egg noodles as a side dish). I included carrots and parsnips to the pan and slow cooked it all for hours so it was a one-pot dinner, which makes mealtime much easier.

Plebeian or elegant, who cares if it tastes good? Not me. This way of cooking Breast of Veal is for me.

Braised Breast of Veal

  • one breast of veal, about 3-1/2 pounds

  • all-purpose flour

  • 2 tablespoons vegetable oil

  • 3 large carrots, peeled and cut into chunks

  • 3 parsnips, peeled and cut into chunks

  • 1 large onion, peeled and cut into chunks

  • 1/2 cup chicken or vegetable stock

  • 1/2 cup white wine

  • 3 tablespoons chopped fresh parsley

  • 2-3 sprigs fresh thyme

  • salt and freshly ground black pepper to taste

Rinse and dry the veal and press the meat into the flour to lightly coat the entire surface. Heat the vegetable oil in a large saute pan over medium heat, add the meat and cook for about 4 minutes per side to brown the outside. Remove the meat to a plate and set aside. Add the carrots, parsnips and onion to the pan and cook for 3-4 minutes to cook them slightly. Return the meat to the pan. Pour in the stock and wine. Scatter the parsley around the pan and place the thyme sprigs in the pan. Sprinkle with salt and pepper. Bring the liquid to a simmer. Cover the pan, lower the heat and cook at a simmer for about 2 hours or until very tender.

Makes 4 servings 

Oatmeal Raisin Cookies

I’ve been thinking about finger foods lately. The stuff of wedding cocktail hours, Superbowl parties and so on. There are many that I love and could eat any time, for any occasion. Fancy ones like smoked salmon Napoleons with Meyer lemon and caviar …

I’ve been thinking about finger foods lately. The stuff of wedding cocktail hours, Superbowl parties and so on. There are many that I love and could eat any time, for any occasion. Fancy ones like smoked salmon Napoleons with Meyer lemon and caviar creme fraiche. And good old goodies like franks-in-blankets.

What’s not to like? Most of the time I fill up on the finger foods and don’t leave much room for the rest and that suits me just fine.

But honestly folks, when I started thinking about which finger food I like best, which I crave most often, which I would pick first before anything else, I realized it’s not any of the ones I mentioned. Not even potato puffs or goat cheese and caramelized onion bruschetta.

It’s the cookies.

Fannies, Grand Finale cookies, gingersnaps, peanut butter cookies, frozen dough cookies, Hello Dollys, Orange Marmalade cookies, Honey-Oat Granola Bars. Or old-fashioned Oatmeal Raisin cookies.

Which is why I blog about cookies so often.

Oatmeal Raisin Cookies

10 tablespoons unsalted butter

3/4 cup sugar

3/4 cup brown sugar

2 large eggs

1 teaspoon vanila extract

1-3/4 cups all-purpose flour

1 teaspoon cinnamon

1 teaspoon baking soda

1/2 teaspoon salt

2 cups quick oats

1 cup raisins

Preheat the oven to 350 degrees. Lightly grease a cookie sheet. In the bowl of an electric mixer set at medium speed, cream the butter and sugar together for a minute or so until creamy. Add the brown sugar and blend it in thoroughly. Beat in the eggs and vanilla extract. Add the flour, cinnamon, baking soda and salt and beat until the ingredients are well blended. Stir in the oats and raisins. Drop mounded tablespoons of the mixture onto the cookie sheet, leaving some space between each lump of dough. Bake the cookies for about 15 minutes or until lightly browned. Repeat with remaining dough. Makes about 42-48

Salmon, Potato and Spinach Cakes

Leftover salmon makes me think of my Mom, which sounds strange even as I am writing this. But the reason this happens is that even though she was a fish-hater she loved salmon and made it for dinner a lot. She also bought canned salmon (“only …

Leftover salmon makes me think of my Mom, which sounds strange even as I am writing this. But the reason this happens is that even though she was a fish-hater she loved salmon and made it for dinner a lot. She also bought canned salmon (“only buy red salmon” she always instructed).

We usually ate up the fresh fish at dinner. The canned salmon was for latkes. She made those once a week, at least.

Her salmon latkes were awesome. I’ve made them a zillion times. It’s a good way to use up leftover salmon (although canned is fine. The red kind of course!)

I’ve branched out though, and don’t always make my Mom’s recipe. Recently I also had some Yukon Gold potatoes in the bin and wanted to use those up. So I made salmon latkes with potatoes. And threw in some baby spinach, just for fun.

So, Mom, this month would have been your birthday and I am thinking of you and making salmon latkes. Wish you could taste these.

Salmon, Potato and Spinach Cakes 


1 pound Yukon Gold potatoes

8 ounces cooked salmon (2 cups mashed)(canned is fine)

1 cup packed baby spinach leaves, washed and dried

2 large eggs

1/2 cup plain bread crumbs

2 chopped scallions

1 tablespoon lemon juice

2 tablespoons chopped fresh parsley

2 tablespoons chopped fresh cilantro

1/2 teaspoon ground cumin

1/2 teaspoon paprika

1/8 teaspoon cayenne pepper

2/3 cup panko

vegetable oil


Cut the potatoes into chunks and cook them in lightly salted boiling water for about 15 minutes or until tender. Drain the potatoes. When they potatoes are cool enough to handle, peel them and mash the flesh in a bowl. Add the salmon and spinach and mix the ingredients to distribute them evenly. Add the eggs, breadcrumbs, scallions, lemon juice, parsley, cilantro, cumin, paprika, and cayenne pepper and mix the ingredients to distribute them evenly. Shape the mixture into 4-6 patties, about one-inch thick. Press the patties into the panko, to coat both sides. Heat about 1/4-inch vegetable oil in a large sauté pan over medium heat. Fry the patties for 2-3 minutes per side or until golden brown and crispy.


Makes 4-6

Nut Crusted Baked Apple Parfaits

What do you do when you’ve cooked something and it’s a disaster?
Well, sometimes there’s nothing you can do. Once the souffle falls, there’s no puffing it up again.
But more often than not there are some remedies.
Like the ba…

What do you do when you’ve cooked something and it’s a disaster?

Well, sometimes there’s nothing you can do. Once the souffle falls, there’s no puffing it up again.

But more often than not there are some remedies.

Like the baked apple in the photo. It doesn’t look like a baked apple at all, but that’s how it started out. I had baked nut-crusted apples before but when I made these I lost track of time and left them in the oven too long. They tasted wonderful but didn’t look so good. And so, I made Baked Apple Parfaits with the remaining ones. 

And that’s what everyone thought dessert was supposed to be.

Ain’t that grand?

Nut Crusted Baked Apple Parfaits


4 large baking apples

half a lemon

1-1/2 cups water

1 tablespoon melted butter

2 tablespoons brown sugar

2 tablespoons raisins

2 tablespoons chopped dates

2 tablespoons chopped dried figs

2 teaspoons butter, cut into small pieces

1/2 cup finely chopped almonds or pistachios

1/2 teaspoon grated lemon peel

3 tablespoons apricot jam

2 tablespoons sugar

1/2 cup cream

6 tablespoons Mascarpone cheese


Preheat the oven to 375 degrees. Wash the apples, peel them about halfway down and remove the core with an apple corer or small knife, leaving about 1/2” on the bottom. Place the core and peel in a small saucepan with the water. Bring the mixture to a boil, lower the heat and simmer for 5 minutes. Strain the liquid and set it aside. Put the apples in a baking dish. Brush the peeled apple surfaces with the melted butter. Mix the brown sugar, raisins, dates and figs and stuff this mixture into the apple hollows. Top each stuffed hollow with equal amounts of the cut butter. Combine the almonds, lemon peel, jam and sugar and press the mixture onto the tops of the apples. Pour the reserved water into the baking dish. Bake the apples for 45-60 minutes, basting occasionally with the pan juices, or until the apples are tender. Remove the apples to a cutting board and let them cool. Cut the apples into bite size pieces and place the pieces with some of the stuffing and some of the nut crust into 4-6 parfait glasses or dessert dishes. Stir the cream into the baking pan fluids, reserve about 2 tablespoons and spoon equal amounts of the remaining fluid over each parfait. Mix the 2 reserved tablespoons of fluid with the Mascarpone cheese and garnish each parfait with some of the cheese.

Makes 4-6 servings