Blueberry Pie with Oat-Coconut Streusel

I find this very difficult to believe, but there are actually some people in my family who don’t like pie.Huh?For me, pie is the ultimate dessert. Tender, crumbly golden brown crust. Just a little sweet and with enough salt, fresh fruit and maybe a …

I find this very difficult to believe, but there are actually some people in my family who don’t like pie.

Huh?

For me, pie is the ultimate dessert. Tender, crumbly golden brown crust. Just a little sweet and with enough salt, fresh fruit and maybe a hint of seasoning. Pie isn’t fancy and doesn’t need to be.

So who could not like it?

Once I asked my husband Ed why he didn’t eat my pie. I thought maybe it was because he grew up in a cake-and-canned-fruit-for-dessert house.

But he told me that he doesn’t like the top crust. He would eat pie if it had a streusel top.

I made those of course, but the problem with a standard, flour-based streusel top is that if you don’t eat the pie right away — like in my case, I bake a half dozen at a time when I can get good fruit — and you freeze it, then the streusel gets all soggy. And unlike regular pie-crust pie, it never bakes back crumbly and crispy. It looks awful too.

Recently I figured out a way to make a pie with a streusel type top that you can actually refrigerate or freeze and it will stay (or reheat to) crisp and crumbly: use a mixture designed for a fruit crisp. These bake properly because they usually contain ingredients (like nuts and oats) that create a firm texture.

As this one did.

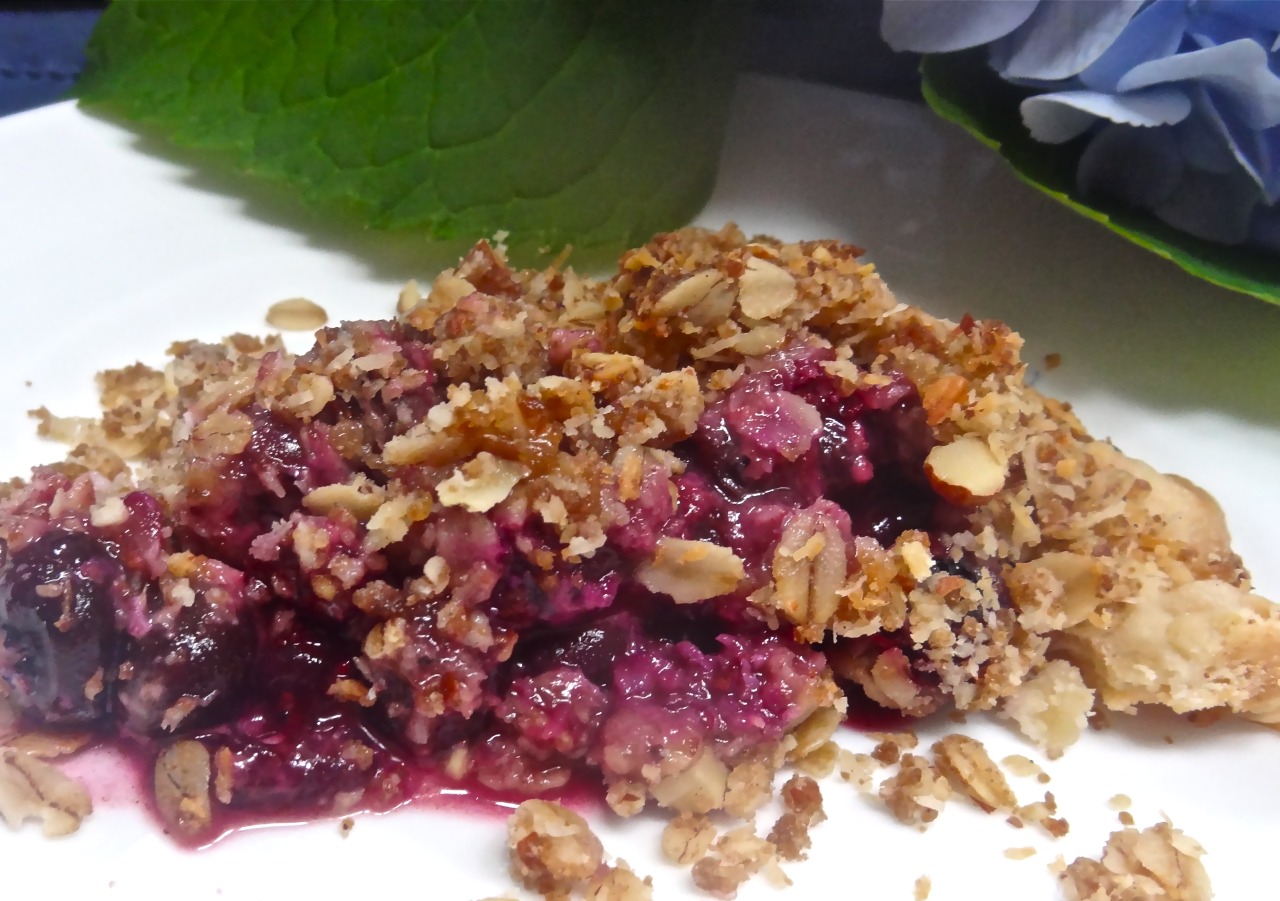
I made this blueberry pie with a top crust that I’ve used for fruit crisp. This pie is the best of both worlds: a bottom crust and pie shape for those of us who adore real pie and a top crunchy streusel crust that stays crispy for those who prefer fruit crisp.

Blueberry Pie with Oat-Coconut Streusel

  • 1 recipe Oat-Coconut Streusel (see below)

  • 5 cups blueberries

  • 1/2 cup sugar

  • 5 tablespoons flour

  • 3/4 teaspoon cinnamon

  • 1/4 teaspoon salt

  • 2 tablespoons lemon juice

  • 1 9-inch unbaked pie crust

Preheat the oven to 375 degrees. Prepare the Oat-Coconut Streusel and set aside. Mix the blueberries, sugar, flour, cinnamon, salt, and lemon juice in a large bowl. Pour the blueberry filling into the pie crust. Cover with the streusel. Bake about one hour or until top is golden brown.

Oat-Coconut Streusel

  • 1/2 cup flour

  • 1/2 cup grated coconut

  • 1/2 cup old fashioned oats

  • 1/2 cup chopped nuts

  • 1/4 cup brown sugar

  • 1/2 teaspoon cinnamon

  • 6 tablespoons melted butter 

Place the flour, coconut, oats, nuts, brown sugar and cinnamon in a bowl and toss ingredients to distribute them evenly. Pour in the melted butter. Mix until the dry the ingredients are covered with the melted butter. 


Watermelon Granita

I never would have made watermelon granita, not in my entire life.
BUT, when the Kosher Connection group of bloggers decided to do a recipe swap — prepare a recipe from someone else’s site — and some automatic machine or other chose whose site we ha…

I never would have made watermelon granita, not in my entire life.

BUT, when the Kosher Connection group of bloggers decided to do a recipe swap — prepare a recipe from someone else’s site — and some automatic machine or other chose whose site we had to get the recipe from, it turned out that the pick for me was Tribes-A-Dozen, run by the very talented Leah Hadad, whose specialty is baking.

In fact, her site promises (and delivers) recipes for “the kind of bread your great-grandmother used to make (she of the handed down recipe).”

Not only does Leah have some awesome recipes on her site, she now sells Voila! Hallah bread mixes.

I bake sometimes, usually pie or banana bread or muffins. Not yeast breads. That takes a special talent and time and I don’t have either. Except for maybe challah, which is also Leah’s ultimate specialty. 

My grandma did hand down a great, award-winning recipe for challah and frankly I can’t imagine making a different one. And I couldn’t make and match the other breads on her blog. So I searched around for something else and found her recipe for Watermelon Granita, which is not only lightly sweet and great tasting, it is also perfectly refreshing on a hot summer day, and if you live near me in the northeast and living it out in one of the worst heat waves ever, is a splendiferous thing to eat.

I followed Leah’s recipe for Watermelon Granita, but I changed her call for some vanilla sugar into a small amount of extract. I am also presenting it here edited in the style I use. This stuff is really a terrific treat, a summertime special and I’m kind of glad I went through this process to find, make and enjoy a recipe that I never otherwise would have made.

The recipe is below. And btw, if you want to enter a contest to win a beautiful and useful Emile Henry product (Bread Cloche OR Dutch Oven) that goes hand in hand with our recipe swap, click here.


Watermelon Granita (from Leah Hadad at Tribes-A-Dozen)

10 cups cubed watermelon (about 1-inch cubes)

2/3 cup sugar

2/3 cup water

1/4 cup lemon or lime juice

pinch kosher salt

1 teaspoon vanilla extract

Place the watermelon cubes in a food processor (you may have to do this in parts) and process until the fruit is pureed. Strain the puree through a sieve into a non-reactive bowl, pressing down to extract as much pulp as possible. Place the sugar and water in a saucepan, bring to a boil and stir to dissolve the sugar. Remove the pan from the heat. Stir in the juice and salt. Let cool and stir in the vanilla extract. Mix the watermelon and sugar mixture and pour into a pan about 14”x10”. Place the pan in the freezer. After 30 minutes, scrape the sides that have frozen slightly, to crush the ice particles. Repeat this every 30 minutes another 5-6 times or until the mixture is completely frozen into particles. Makes 12 servings

Ataulfo Mango Ice Cream

Quick, before the ataulfo mangoes disappear until next year, get yourself to a market and get some! These are too juicy and sweet to miss. And they aren’t fibrous and stringy like the more common Tommy Atkins mangoes. The flesh is like butter.…

Quick, before the ataulfo mangoes disappear until next year, get yourself to a market and get some! These are too juicy and sweet to miss. And they aren’t fibrous and stringy like the more common Tommy Atkins mangoes. The flesh is like butter.

If you don’t know what they are, or maybe you’ve been wondering what those small, flat, yellow and sort of oblong things in the bin are (the ones near the other, larger, green and red mangoes) — those are the Ataulfos. They turn from green to yellow as they ripen.

They are so worth buying. As anyone who has ever tasted one knows. 

Don’t waste these mangoes on chutney or pie. They are too delicious to combine with too many other textures and flavors or bury under a crust. Ataulfos (also called “champagne” mangoes because they are suitable for a celebration) should be eaten as is, peeled and nibbled out of hand like a ripe summer peach. Just as is, as they say.

Or in the simplest preparations, like mixed with plain yogurt for a smoothie. Or sprinkled with lime juice and and pinch of cayenne, mint or ginger for a refreshing treat.

Or made into ice cream. Can there be anything better on a hot summer day?


 Ataulfo Mango Ice Cream


2 ripe ataulfo mangoes

2-1/2 cups half and half

1/2 cup sugar

pinch of salt

1/2 teaspoon vanilla extract


Peel the mangoes and cut off as much flesh as possible. Place the mango flesh in a food processor and puree (it’s okay to leave small bits of pulp). Set it aside. Cook the cream and sugar together in a saucepan over medium heat, stirring constantly, for about 2 minutes or until the sugar has dissolved. Let cool. Add the mango puree, salt and vanilla extract. Refrigerate until thoroughly chilled. Mix in a commercial ice cream freezer according to manufacturer’s directions. Makes 5-6 cups


Frittata with Onions, Potatoes, Spinach and Cheese

Eggs are underrated as a dinner item. You really can’t get a better bargain in terms of nutritional value. They’re also easy to make. Most people always have some in the fridge. They’re filling. They’re tasty. They’re versatile — not only can you ma…

Eggs are underrated as a dinner item. You really can’t get a better bargain in terms of nutritional value. They’re also easy to make. Most people always have some in the fridge. They’re filling. They’re tasty. They’re versatile — not only can you make them several different ways all by themselves, but you can add a lot of stuff to them for omelets, frittatas and fancy things like Eggs Benedict.

Eggs are also a good go-to food if you are going to be fasting or going on a diet. Because they satisfy but don’t make you feel overstuffed and thinking about your stomach.

Ed and I have eggs occasionally for dinner. Recently I had a leftover baked potato and some spinach that was just about to wilt in the refrigerator, so I used them to make a frittata. I toasted some bread to go with it. I served some mango juice. In less than 30 minutes dinner was ready.


Frittata with Onions, Potatoes, Spinach and Cheese


1 medium baking potato

5 large eggs

3 tablespoons milk, cream or dairy sour cream

1 tablespoon chopped fresh parsley

salt and freshly ground black pepper to taste

1-1/2 tablespoons butter

1 medium onion, chopped

1/2 cup chopped fresh spinach

1/2 cup grated cheese such as Swiss, Cheddar, Mozzarella, Parmesan or a combination


Preheat the oven to 400 degrees. Bake the potato for about one hour or until tender. Remove the inside flesh to a bowl, crumble it slightly with a fork and set it aside to let cool slightly (or let the potato cool, peel and dice the insides). Lower the oven heat to 375 degrees. Beat the eggs and milk together, stir in the parsley and sprinkle in some salt and pepper. Set aside. Heat the butter in a sauté pan over medium heat. When the butter has melted and looks foamy, add the onion and cook for 2 minutes or until it has softened. Add the potato and cook for about 5 minutes or until they are lightly crispy, stirring occasionally. Add the spinach and cook for another minute, stirring occasionally. Pour in the eggs and turn the heat to low. Scatter the cheese on top. Stir once or twice, then cook undisturbed for 8-10 minutes, or until the bottom has set. Place the pan in the oven and bake for 8-10 minutes, until the eggs are set.

Makes 2-3 servings


Kale and Farro Salad with Avocado and Marcona Almonds

Kale is a big deal these days. Everyone knows that. So I wasn’t surprised the other day, when I went to lunch with my friend Liz Reuven at the Rive Bistro in Westport, to find a Kale and Farro Salad on the menu. We shared one, along with T…

Kale is a big deal these days. Everyone knows that. 

So I wasn’t surprised the other day, when I went to lunch with my friend Liz Reuven at the Rive Bistro in Westport, to find a Kale and Farro Salad on the menu. We shared one, along with Tuna Nicoise.

The salad was delightful, the kale fresh and bright green. The chef had added bits of dried apricots and crunchy marcona almonds and doused it all with sherry vinaigrette.

I kept thinking “I have to make this salad.”

The next day I went to my daughter Gillian’s house and guess what she had for lunch?

Mmmm hmmm. Kale Salad with Farro. She included avocado, not apricots and sliced carrots, not almonds.

The kale was bright green and crisp, the avocados smooth and rich and the carrots nicely crisp. Gillian also added some fresh mint, which was a wow, because it calmed down the kale, which can be bitter, and made it a perfect summer dish.

I kept thinking “I have to make this salad.”

So I did. A little of this one, a little of that one. I decided to nix the apricots and the carrots, but use avocados and marcona almonds. I had some scallions, so those went in too. Plus that wonderful mint.

You should make this salad.

Here’s the recipe:


Kale and Farro Salad with Avocado and Marcona Almonds

1 cup farro (or use wheatberries or spelt)

2 cups water

3 cups chopped fresh kale

1 avocado

2 tablespoons chopped fresh mint

2 tablespoons olive oil

juice of one large lemon (about 3-4 tablespoons juice)

1/3 cup chopped marcona almonds

Place the farro and water in a saucepan and bring the liquid to a boil over high heat. Lower the heat, cover the pan and cook for about 25-30 minutes or until the farro is tender but still chewy. Drain any water that has not been absorbed. Place the cooked farro in a large bowl and let cool. Add the kale and toss the ingredients. Cut the avocado into small chunks and add to the salad. Add the mint. Pour the olive oil over the ingredients and toss to distribute them evenly. Pour in the lemon juice and toss. Add the almonds, toss once more and serve.

Makes 6 servings


Challah French Toast

In the world of French Toast, the kind made with challah is by far the best and most delicious.
Don’t you agree?
I’ve tried this dish with so many different kinds of bread, I can’t even recount them all. Here’s what I’v…

In the world of French Toast, the kind made with challah is by far the best and most delicious.

Don’t you agree?

I’ve tried this dish with so many different kinds of bread, I can’t even recount them all. Here’s what I’ve learned:

Packaged white bread gets too soggy for French Toast. It falls apart; also it’s too thin.

Bakery white bread is fine, but uninspiring.

Multigrain bread has too many distracting extras, like seeds and stuff.

Whole wheat has a strong flavor so it competes with the vanilla-custardy taste that you want.

French bread is fabulous for French Toast, I grant you that. But it is crusty-firm and not everyone appreciates that.

Challah is #1. The champ. Because it is so dense (and absorbs the egg- milk-vanilla soak splendidly). And because it is so rich and eggy to begin with. (Brioche, which is almost exactly like challah, will do too.)

But make sure it isn’t pre-sliced challah, which is too thin. Slice the bread yourself using a serrated knife.        

This recipe is a winner at my house.

Challah French Toast

6 large eggs

1/2 cup whole milk

1/2 teaspoon vanilla extract

8 1-inch slices challah (or brioche)

1-1/2 tablespoons unsalted butter

maple syrup

Preheat the oven to 140°F. Beat the eggs, milk and vanilla extract in a large shallow pan until well blended. Add the bread slices and let them soak, turning them occasionally, until all of the liquid has been absorbed. Heat the butter in a large sauté pan over medium heat. When the butter has melted and looks foamy, add a few pieces of the soaked bread and cook for 2-3 minutes per side or until lightly browned and crispy. Don’t crowd the pan. When the slices are cooked, place them on a cookie sheet and keep them warm in the oven; repeat with remaining bread, adding more butter if needed. Serve with maple syrup. Makes 4 servings

Peanut Butter Cookies

July 4th brings out the all-American food fest. You know, hot dogs, hamburgers, cole slaw, potato salad and so on. Everybody’s cooking up a storm.My own American favorite: Peanut Butter Cookies. First brought to the country’s attention by George Was…

July 4th brings out the all-American food fest. You know, hot dogs, hamburgers, cole slaw, potato salad and so on. Everybody’s cooking up a storm.

My own American favorite: Peanut Butter Cookies. First brought to the country’s attention by George Washington Carver (1864-1943), Tuskegee Institute’s famous teacher and promoter of the peanut crop. He apparently included some recipes for peanut-based cookies in a bulletin he put together early on.

Have you ever wondered why peanut butter cookies always have criss-cross fork marks on top?

It’s because the dough is dense and doesn’t spread easily. The fork flattens the cookie so it bakes evenly and the outside has a bigger surface area for crisping.

I guess you could roll the dough and cut out peanut butter cookies and they would bake just as well.

But then they wouldn’t be American Peanut Butter Cookies, would they?

Here’s my mother’s recipe. It doesn’t get better than these. They are compellingly sweet and salty at the same time, an old-fashioned taste that peanut butter cookie aficionados understood and loved long before sea-salted caramels came along.

My Mom always made these with Skippy peanut butter. I’ve made them with all other kinds, commercial brands and organic-bulk.

Skippy’s the best there is for these.

Peanut Butter Cookies

2-1/2 cups all-purpose flour

2 teaspoons baking soda

1 teaspoon salt

1 cup white sugar

1 cup packed brown sugar

1 cup peanut butter

1 cup vegetable shortening

2 large eggs

Preheat the oven to 350 degrees. Lightly grease a cookie sheet. Combine the flour, baking soda, salt, white sugar and brown sugar in the bowl of an electric mixer (or use a handheld mixer and large bowl) and mix at medium speed for about 1 minute or until the mixture is uniform and the ingredients are evenly distributed. Add the peanut butter, shortening and eggs and beat the mixture for about 2 minutes, starting at low speed then gradually switching to medium until a uniform dough forms. Take off pieces of dough and shape them into balls about 1-1/2 inches in diameter. Flatten the balls between your palms. Place the cookies on the prepared sheet, leaving an inch of space between them. Press the top of each cookie with the flat, bottom side of a fork to make a crisscross design on top of each cookie. Bake for 16-20 minutes or until the cookies are richly browned and crispy. You can freeze these cookies for 6 months.

Makes about 8 dozen

Blueberry Crisp

We’ll have a July 4th holiday theme for the biweekly Tea I bake for (for cancer patients and their caregivers at Stamford Hospital). The women who coordinate these events, sponsored by Hadassah, have asked us (the bakers) to consider red, white and blue based desserts and confections.

I thought about the time one of my daughters volunteered me to do a red, white and blue dessert for her grade school class (I think that one was for Flag Day). What I came up with then was something in the shape of a sheet cake, but made of strips of watermelon and cream cheese; the star field was a bunch of blueberries piped on top with tiny cream cheese stars that I squeezed out of a pastry tube.

It looked like a flag all right. And the kids ate it all. But I really didn’t like the combination of soft, watery watermelon together with thick, dense cream cheese.

So, for the Tea I am going to stick to something much more mundane, but which I know is absolutely delicious, especially because local blueberries are now available and I just bought myself some.

Blueberry Crisp it is.

By the way, I looked up the word “biweekly” before I used it, wondering if it was actually every two weeks, as I thought, OR twice a week. Several dictionaries say it is BOTH meanings. Which might be fine if we are talking about baking a cake or something. But what if your doctor says “take these pills biweekly.” Do you take them every two weeks or twice a week?

Blueberry Crisp     

  • 2 pints fresh blueberries

  • 1/3 cup sugar

  • 5 tablespoons all-purpose flour

  • 1/4 teaspoon ground cinnamon

  • 2 tablespoons lemon juice

  • 1 cup bran flakes or raisin bran

  • 1/2 cup quick cooking or rolled oats

  • 1/2 cup chopped nuts such as almonds, cashews or pecans

  • 1/4 cup brown sugar

  • 1/2 teaspoon ground cinnamon

  • 6 tablespoons melted unsalted butter or margarine

Preheat the oven to 350 degrees. Combine the blueberries, sugar, flour, 1/4 teaspoon cinnamon and lemon juice in a 6-cup baking dish. Set aside. Crush the cereal flakes slightly and put them in a bowl. Add the oats, nuts, brown sugar and 1/2 teaspoon cinnamon and toss ingredients to distribute them evenly. Pour in the melted butter. Mix until the dry the ingredients are coated with the melted butter. Place the cereal mixture over the fruit. Bake for 30 minutes or until the crust is crispy and brown. Let cool slightly but serve warm (may be rewarmed). Serve plain or with cream, ice cream, whipped cream, or sorbet.

Makes 6–8 servings.

Salmon Salad with White Beans, Blue Cheese and Dried Cranberries

I love to cook, but even I don’t love to cook when the weather is hot and sticky and I’ve been out all day and all I want is a shower, a cool room and a quick dinner.On those days I grill something easy and fast, like a chicken breast or fish filet.…

I love to cook, but even I don’t love to cook when the weather is hot and sticky and I’ve been out all day and all I want is a shower, a cool room and a quick dinner.

On those days I grill something easy and fast, like a chicken breast or fish filet. Or I make a sandwich or sometimes even plain old scrambled eggs for dinner.

Sometimes I don’t cook at all. Like when I have leftovers and can mix them with the packaged ingredients that I always keep handy in my kitchen: canned beans, frozen peas, dried fruit and items like that. This is the stuff of a good summer salad.

This salmon salad is just one example of the kind of quick-to-fix food that I think is perfect for a hot summer day. And also if you lose power in a hurricane because if you don’t happen to have leftover salmon, you can use a 15-ounce can of salmon (don’t forget to keep a manual can opener in your miscellaneous equipment drawer).

The recipe is versatile of course. If you don’t have peas, use corn; no cranberries — use raisins; no white beans, use black. And so on.  


Salmon Salad with White Beans, Blue Cheese and Dried Cranberries


2 cups crumbled leftover cooked salmon (or 15-ounce can red salmon, drained)

2 cups cooked white beans (or 15-ounce can white beans, rinsed and drained)

1 cup thawed frozen peas

3/4 cup crumbled blue cheese

4 scallions, chopped

1/2 cup dried cranberries

1 tablespoon grated fresh orange peel

1 tablespoon chopped fresh dill

2 teaspoons chopped fresh mint

1/4 cup vegetable oil

2 tablespoons lemon juice

2 tablespoons orange juice

salt and freshly ground black pepper to taste

Place the salmon in a large bowl and break it up slightly. Add the beans, peas, cheese, scallions, cranberries, orange peel, dill and mint. Toss gently to distribute the ingredients evenly. In a small bowl mix the vegetable oil, lemon juice and orange juice. Pour over the ingredients and toss. Season to taste with salt and pepper. Let rest for at least 15 minutes before serving. Makes 4 servings


Real Whipped Cream

When I buy the first real, local summer strawberries of the season I remember what lawyer/writer William Allen Butler once said:"Doubtless God could have made a better berry, but doubtless God never did."I agree. Sometime in the middle of June I kno…

When I buy the first real, local summer strawberries of the season I remember what lawyer/writer William Allen Butler once said:

"Doubtless God could have made a better berry, but doubtless God never did."

I agree. Sometime in the middle of June I know these gems are coming to a market near me. I sniff them out. It’s easy, because they smell like cotton candy and I need some, immediately.

I bought two quarts of strawberries on Friday and ate an entire quart — and then some — all by myself, by Sunday. It’s like eating popcorn. Or potato chips. I can’t just have one.

Every year, when I finish feasting on the first strawberries of the season, I wonder why I buy the year ‘round kind sold in the supermarkets in plastic containers. Those gigantic things that look swell but that taste like nothing. They certainly don’t don’t taste like strawberries. And they’re as dry as a cardboard box to boot. 

I vow never to let these red wonders get me again. They’re fake. They’re sold to fool us into thinking that this is what strawberries are.

Don’t be fooled, ever again. Save yourselves for the real stuff. Find a farmer’s market or store that sells strawberries that haven’t been grown for long-distance travel. Honestly, there’s a reason why food experts suggest eating local produce. It tastes the way nature intended it to taste. 

By the way, you don’t have to do anything to strawberries (other than rinse them). They are dessert unto themselves. There’s no need for cobblers or tarts or anything.

No need for sugar either. Real strawberries are naturally sweet. Like cotton candy.

If you want something fancier, maybe a bit of whipped cream.

Real whipped cream, not too sweet. Like my mother use to make:


Real Whipped Cream


1 cup heavy cream

1 teaspoon sugar

1/2 teaspoon vanilla extract, optional

Place a large mixing bowl and mixer beaters in the refrigerator for about 30 minutes to chill them. Pour the cream into the cold bowl and mix, starting at slow speed with an electric mixer then gradually increasing the speed to high, for a minute or so until the cream thickens. Add the sugar and vanilla extract and continue to beat, starting at slow and continuing to high speed, until the mixture is thick. Makes about 2 cups