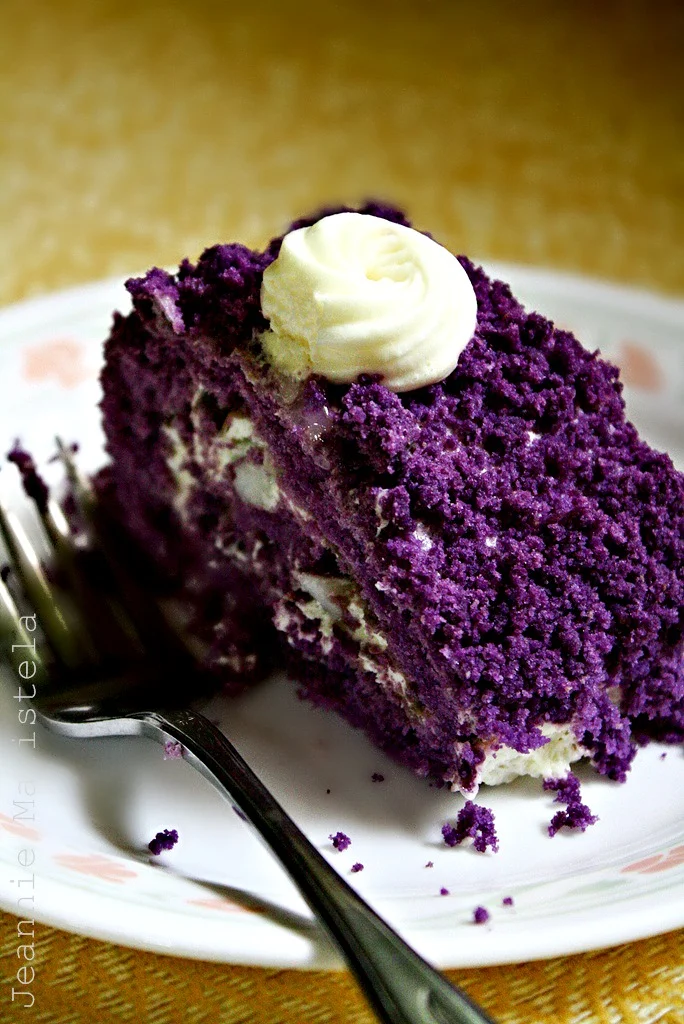
This is so gorgeous I had to reblog. Apparently it’s made as a jelly roll, from regular flour and purple sweet potato flour and it’s filled with vanilla buttercream and coconut. ohmyohmyohmy. Wish I had some for my coffee right now. If anyone has a recipe, please send it my way!Just A Slice Of The Colour Purple
In the pastry world, blue is just so faux pas, but purple and purple cake (purple sweet potato cake) to me is just wildly pretty and distinctively scrumptious enough, it can very well be the “Rock Star” of cakes.
Grilled Pineapple Salsa
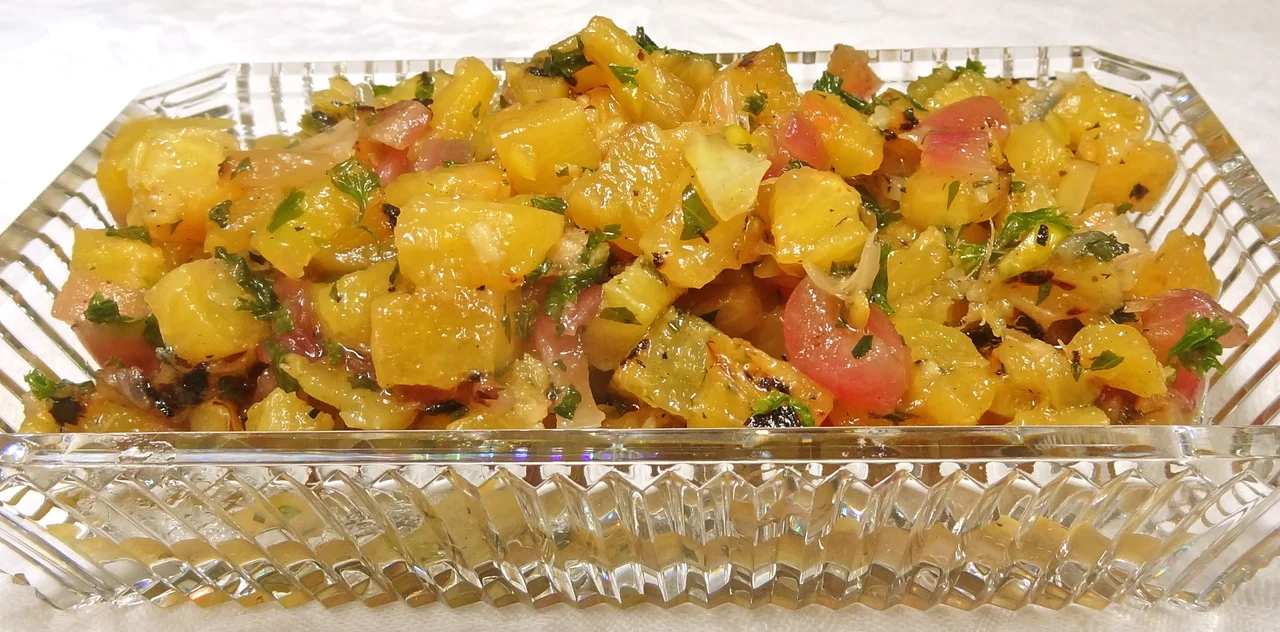
Remember that one chili pepper I was able to grow in my garden? Well, I don’t have much of a green thumb, but I did get a few more peppers this week, so I had to figure out ways to use them. I came up with this grilled pineapple salsa. I used it as a side dish for some grilled fish I made for dinner.
This salsa is just a bit hot and also is tangy (from the lime juice) and sweet, not just because of the honey, but also because grilling fruit brings out the sugars. And I have to add, that grilled pineapple tastes somewhat like rum, which is never a bad thing.
Grilled Pineapple Salsa
1/2 large pineapple, skin removed, cut into 1/2-inch thick slices
1 small red onion, peeled, cut into 1/2-inch thick slices
3 tablespoons vegetable oil
2 small chopped chili peppers (such as serrano), deseeded and chopped
2 tablespoons chopped flat leaf parsley
2 tablespoons chopped fresh mint
2 teaspoons chopped fresh ginger
2 tablespoons lime juice
1 tablespoon honey
1/2 teaspoon ground cumin
Preheat an outdoor grill (or use a grill pan). Brush the the pineapple and onion slices with some of the vegetable oil. Grill the slices for 2-3 minutes per side or until browned and softened. Remove the slices, chop them into small pieces and place them in a bowl (discard the hard fibrous pineapple core). Add the peppers, parsley, mint, ginger, lime juice, honey and cumin and toss ingredients to distribute the ingredients evenly. Let rest at least 15 minutes before serving. Good with fish. Makes about 2 cups
Banana Bread with Coconut Oil and Coconut Milk
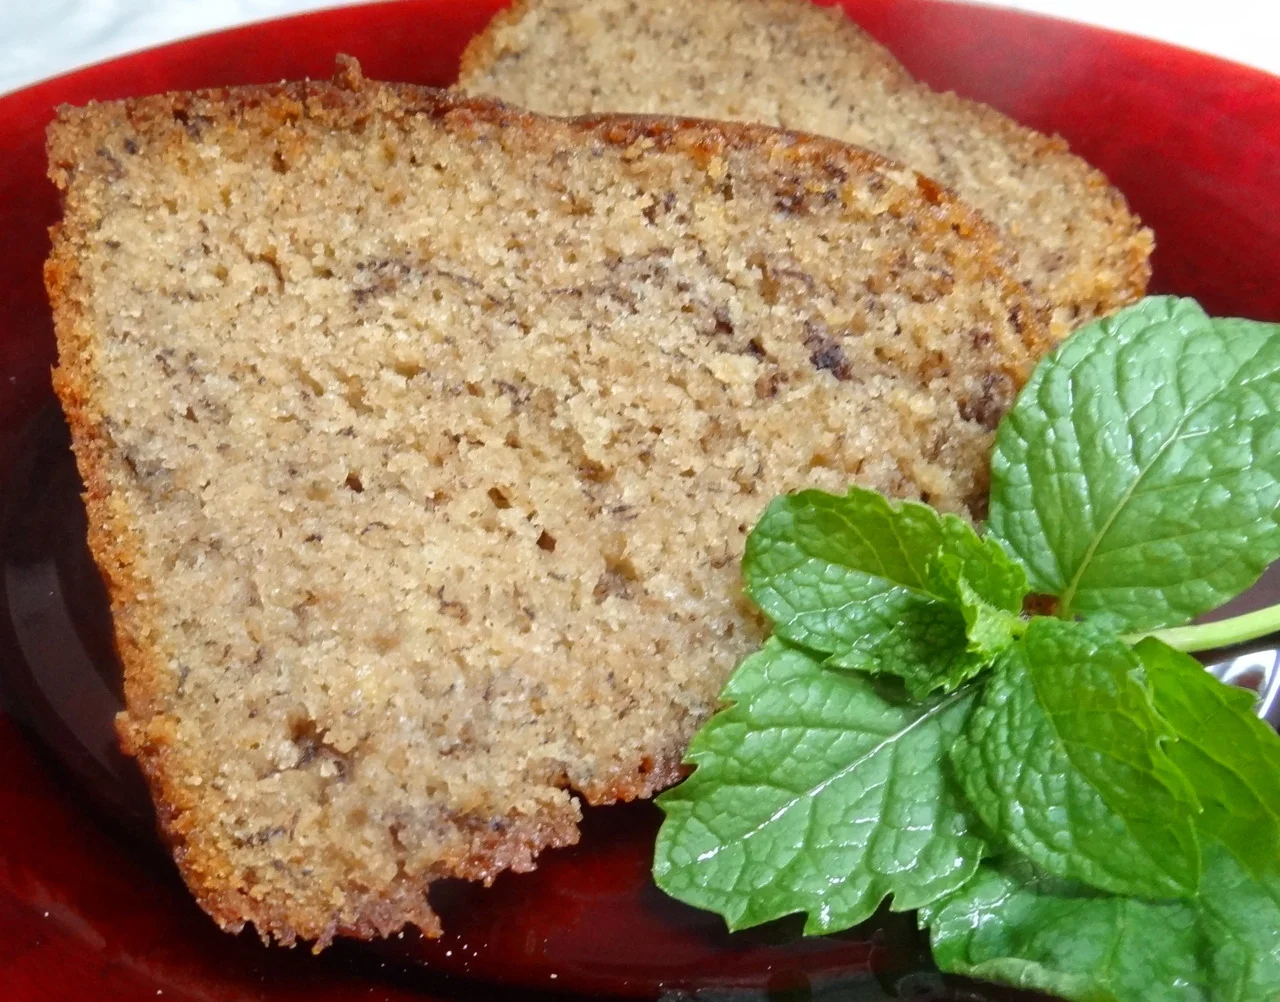
I used to think that I made banana bread because I always bought too many bananas and then had to do something with the leftover fruit that got too soft and brown to eat as is.
But I finally realized I buy too many bananas because I want to make banana bread.
The folks at the CIA — the Central Intelligence Agency, I mean, not the Culinary Institute of America — should learn to bake this because the aroma in the room with one of these in the oven is the kind of hypnotic thing that could pry information from prisoners.
Banana Bread with Coconut Oil and Coconut Milk
2-1/2 cups flour
1 teaspoon salt
2 teaspoons cinnamon
2 teaspoons baking soda
3/4 cup vegetable shortening
1/4 cup coconut oil
1-1/4 cups sugar
4 large very ripe bananas, mashed
3 eggs, slightly beaten
1/2 cup coconut milk
Preheat the oven to 350 degrees. Grease and flour a 10-inch (8-cup) bundt pan. Mix the flour, salt, cinnamon and baking soda together in a bowl. In the bowl of an electric mixer set at medium speed, beat the shortening, coconut oil and sugar until well blended. Add the bananas and blend in thoroughly. Add the eggs and coconut milk and beat well. Add the flour mixture and beat until batter is well blended. Pour into the prepared pan and bake for 60-70 minutes or until a cake tester inserted into the center comes out clean. Remove from the oven and let cool in the pan for 10 minutes. Remove to a cake rack to cool completely. Makes one bread, serving 16-18
Milk and Honey White Bread

Milk and Honey Bread
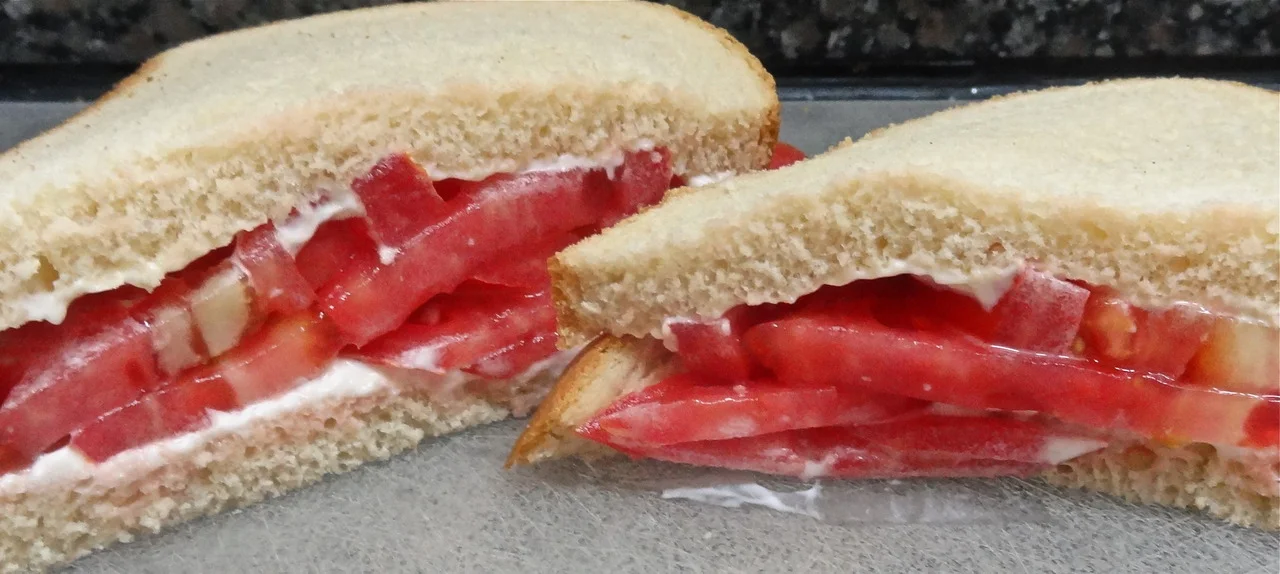
Sometimes I’m just bored with all food. It frequently happens after a summer’s worth of grilling and when roasting a turkey or making a hearty stew doesn’t seem right yet.
Also, the tomatoes are coming in now. Real tomatoes. Red, red ones. Aromatic, juicy, sweet, oozing seeds tomatoes. Late August tomatoes.
Then, for dinner, at least one night, I can make tomato sandwiches. Nothing special. I have no need for $40 olive oil or rare, aged Balsamic vinegar. No chili pepper additions. No teriyaki or hummus. No fusion version.
Just white bread, mayo and sliced tomatoes.
Nothing more. Life is sweet.
Packaged (not soft white) or bakery white bread will do. But if you like to bake and have a few moments, here’s a recipe for a spectacular bread that measures up to a good tomato.
Milk and Honey White Bread
1 package active dry yeast
1/4 cup warm water (105-110 degrees)
1/4 teaspoon sugar
4 cups all purpose flour, approximately
1-1/2 teaspoons salt
2 large eggs
2 tablespoons softened butter or vegetable oil
3/4 cup warm milk
2 tablespoons honey
In a small bowl, mix the yeast, water, sugar and 1/2 teaspoon flour. Stir, set aside and let rest for 5 minutes or until the mixture is bubbly. In a bowl of an electric mixer, combine the remaining flour and salt. Add the eggs, butter, milk and honey. Add the yeast mixture. Blend ingredients thoroughly, then knead using the kneading hook, for 4-5 minutes or until the dough is smooth and elastic (or knead by hand for about 10 minutes). Add more flour as necessary to keep the dough from being sticky. (Dough may be made in a food processor). Cover the bowl of dough and put it in a warm place to rise for about 1-1/2 hours or until doubled in bulk. Punch down the dough, cover the bowl and let rise again for about 30 minutes or until doubled. Lightly oil a 9” loaf pan. Place the dough in the pan. Let rise in a warm place for 30 minutes. Preheat the oven to 350 degrees. Bake for about 25 minutes or until firm and golden brown.
Makes one
Oreo Cookie Chocolate Chip Ice Cream

Oreo cookies may be 100 years old, but for folks who are kosher, this (probably most beloved) American packaged cookie is a mere sweet 15. It became kosher back in 1997.
That was a huge huge deal. Not just because now, at last, kosher-keepers could finally have a taste and share in the almost magical powers behind that thick disk of white icing sandwiched between two fudgy wafers. But also because koshering Oreos opened up avenues heretofore unexplored by Nabisco and hundreds of other food manufacturers.
Since that time there’s been a flood tide of products, thousands of them, with kosher certification. That’s good for business. And it also made it possible for people who like to branch out and cook creatively — and are also kosher — to do so.
I should also mention the benefit of that kosher label for those who are vegetarian, vegan, lactose intolerant or allergic. Because kosher canned, jarred and packaged good labels specify ingredients, and state whether they contain any meat or dairy ingredients.
Everyone wins.
There are all sorts of Oreo recipes of course and those are a good thing too. But last weekend when my family stayed over the one Oreo recipe my grandson Zev and his sister Nina wanted to make was Oreo Cookie Ice Cream. And so we did.
We also added chocolate chips because, the kids said, you can never have too much of a good thing.
Also, they wanted to include gummy bears, which we did, but discovered that those candies get too hard to eat when they’re frozen, so we know better for next time.
Here’s the recipe we used. I wanted to get a photo but it was all gone before I remembered the camera.
Oreo Cookie Chocolate Chip Ice Cream
2-inch piece vanilla bean (or use 2 teaspoons vanilla extract)
4 cups half and half cream
1/2 cup sugar
4 egg yolks
8 Oreo cookies, crushed
24 chocolate chips
Split the vanilla bean in half lengthwise, place it in a saucepan with the cream and cook over medium heat for a few minutes until hot (bubbles form around the sides of the pan). Remove the pan from the heat and set aside for 10 minutes. In the bowl of an electric mixer (or use a bowl and hand mixer) combine sugar and egg yolks and beat at medium speed for 4-5 minutes or until the mixture is thick and pale in color. Gradually pour the hot cream into the egg-sugar mixture and stir (use a wooden spoon or other similar utensil, not a whisk or beater) until the mixture is well blended. Return the mixture to the saucepan. Cook over low-medium heat, stirring occasionally, for about 10 minutes or until the mixture is thick enough to coat the back of a spoon. Remove the pan from the heat. Let cool, remove the vanilla bean and chill the mixture in the refrigerator. Freeze in an ice cream maker according to manufacturer’s instructions. When the mixture is thick and almost ice cream, add the crushed cookies and chips and continue to mix until very thick. Place in the freezer until firm. Makes about 1-1/2 quarts
Note: if you use vanilla extract, add it after the initial cooling, just before you refrigerate the mixture
Bread, Fried Chicken Cutlet Sandwich
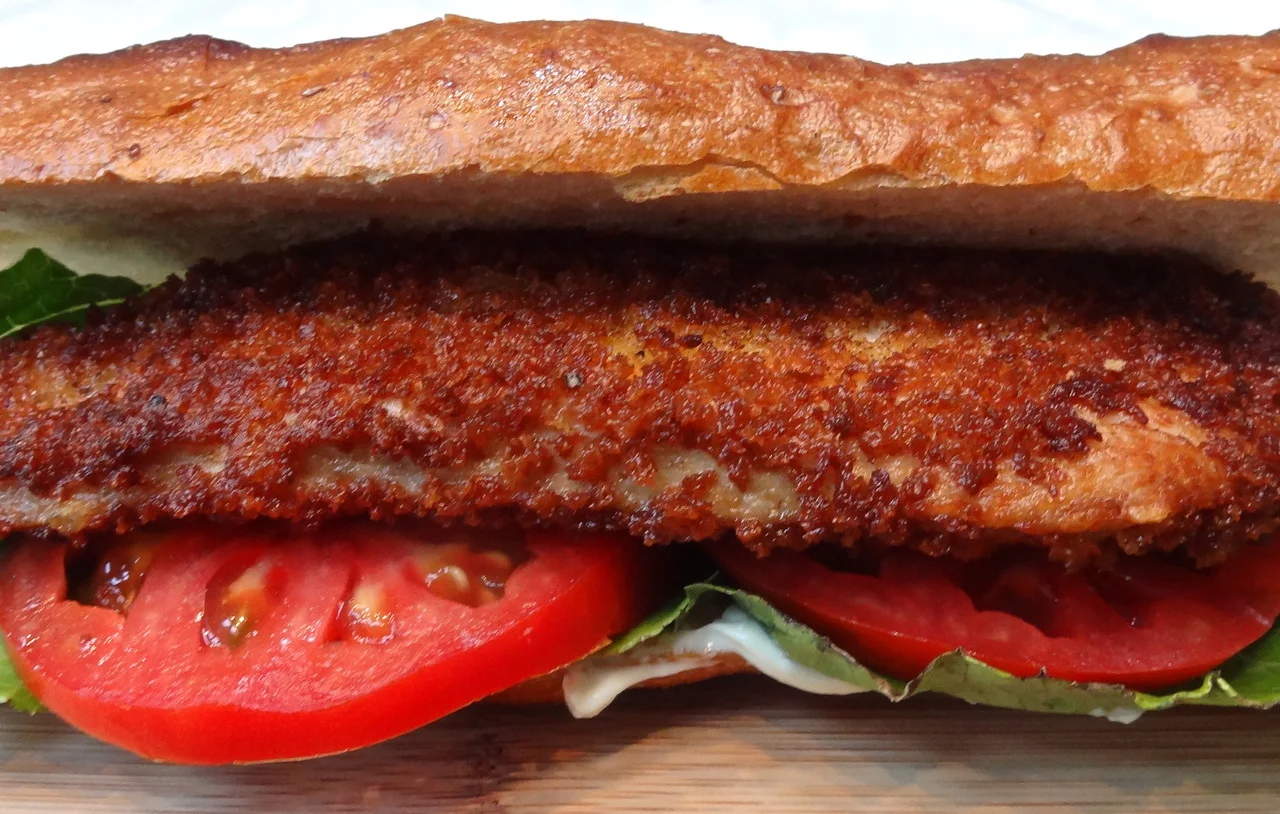
I don’t want to get all political on you but I have to say, if I wanted a breaded-and-fried chicken sandwich I wouldn’t take myself down to Chick-fil-A and wait on line with a horde of other people in the hot sun for one. I’d make it at home, where it’s fresher, cheaper, hotter and tastier. Also more comfortable to eat. Plus I know it hasn’t been cooked in a ton of oil that’s been used for a ton of chicken. Or thereabouts. And, so, that’s exactly what I did. We had these for dinner the other night. Couldn’t be better.
Breaded and Fried Chicken Filet Sandwich
- 1 large egg
- 3/4 cup panko
- salt, freshly ground black pepper, paprika, garlic powder
- 4 skinless, boneless chicken breast filets (16-20 ounces total)
- vegetable oil for frying
- 1 baguette bread
- 6-8 tablespoons mayonnaise
- lettuce, tomatoes
Beat the egg in a shallow pan or dish. Place the panko on a second dish. Add some salt, pepper, paprika and garlic powder to the panko and mix to distribute the spices. Immerse the chicken one piece at a time in the egg and turn to coat both sides. Then coat the chicken with the seasoned panko. Heat about 1/4-inch vegetable oil in a large saute pan over medium heat. Fry the filets — two at time if necessary to leave room in the pan between pieces. Cook the filets for 2-3 minutes per side or until crisped and cooked through. Drain on paper towels. Cut a baguette into four chunks. Slather with equal amounts of mayonnaise. Add lettuce and tomato slices, top with a chicken filet.
Makes 4 sandwiches
Peach Pie
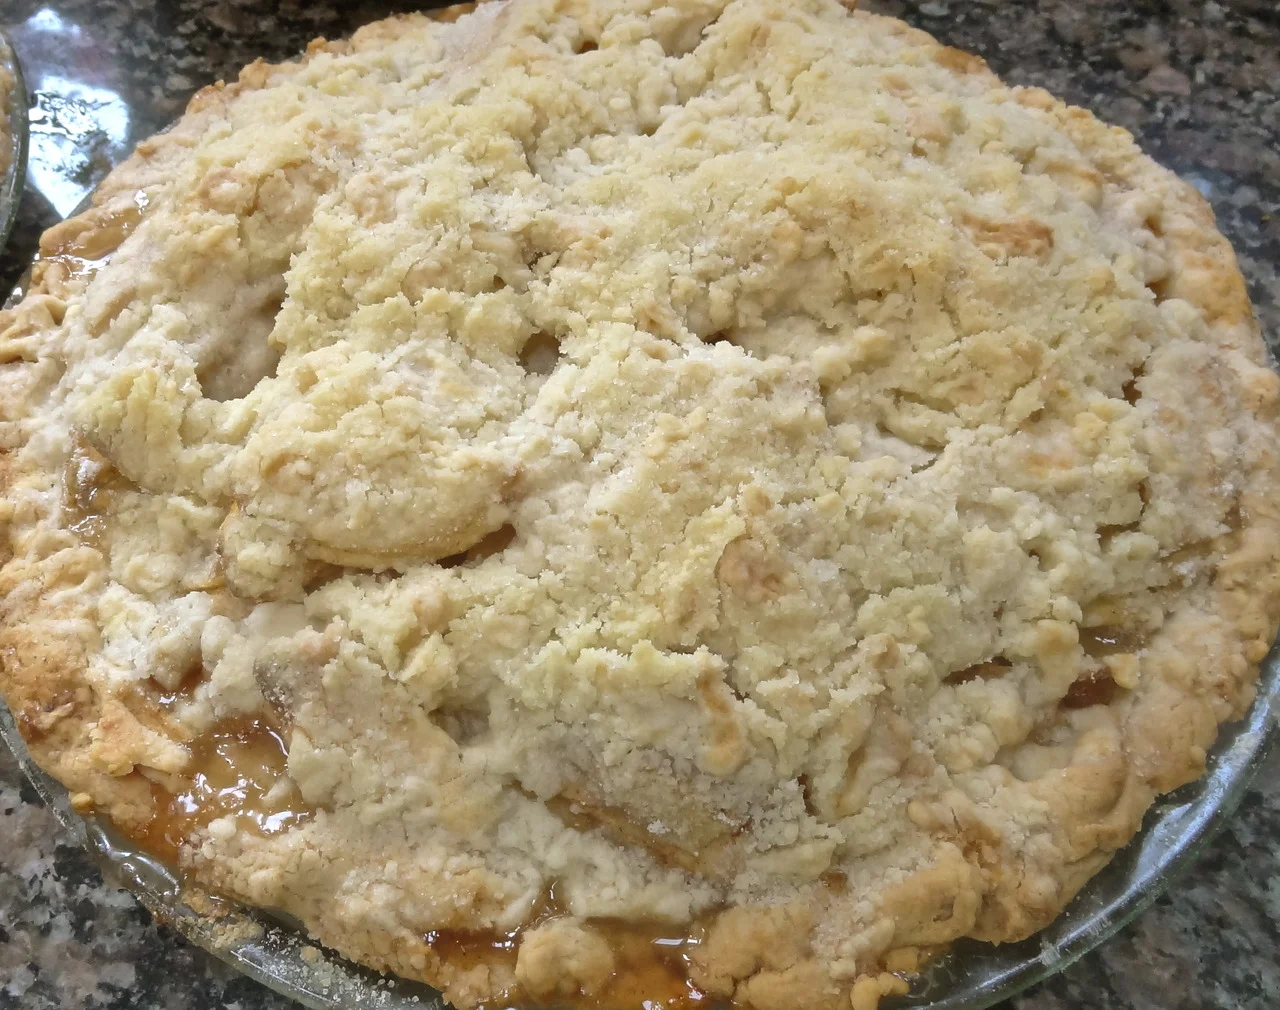
Is there a homier, more comforting, more luscious summer dessert than peach pie? Here’s an easy, easy version, straight from my Mom’s hand-written recipe.
She baked her pies with the peaches that grew in our backyard. Alas, I can barely get a chili pepper to grow, so I rely on stores and farmer’s markets.
Mmmmm. There were good peaches at the local Farmer’s Market a few days ago.
Ate some. Poached some. Grilled some.
The rest? You can see it here.
Peach pie. Just like Mom’s, although I used white peaches this time and she usually used yellow. No difference really. I just bought the ones that looked good and smelled fragrant.
Peach Pie
8 large, ripe peaches, peeled and cut into slices
3 tablespoons lemon juice
1/2 cup sugar
3 tablespoons minute tapioca
dash of salt
1/2 teaspoon cinnamon
1 unbaked 9-inch pie crust
streusel crust:
3/4 cup flour
1/3 cup sugar
1/2 teaspoon cinnamon
dash of salt
6 tablespoons cold butter, cut into small pieces
Preheat the oven to 375 degrees. Place peaches in a large bowl. Toss the peaches with the lemon juice. Add the sugar, tapioca, salt and cinnamon and toss ingredients to coat the peach slices. Pour the mixture into the unbaked pie crust.
To make the streusel: in another bowl, or in an electric mixer or food processor, combine the flour, sugar, cinnamon and dash of salt. Add the butter and work the pieces into the dry ingredients with hands or a pastry blender (or on low with a flat beater in a mixer, or on pulse with a food processor) until the mixture resembles coarse meal. Place the crumbs on top of the peach filling. Bake for about 45 minutes or until top is golden brown. Makes one 9-inch pie
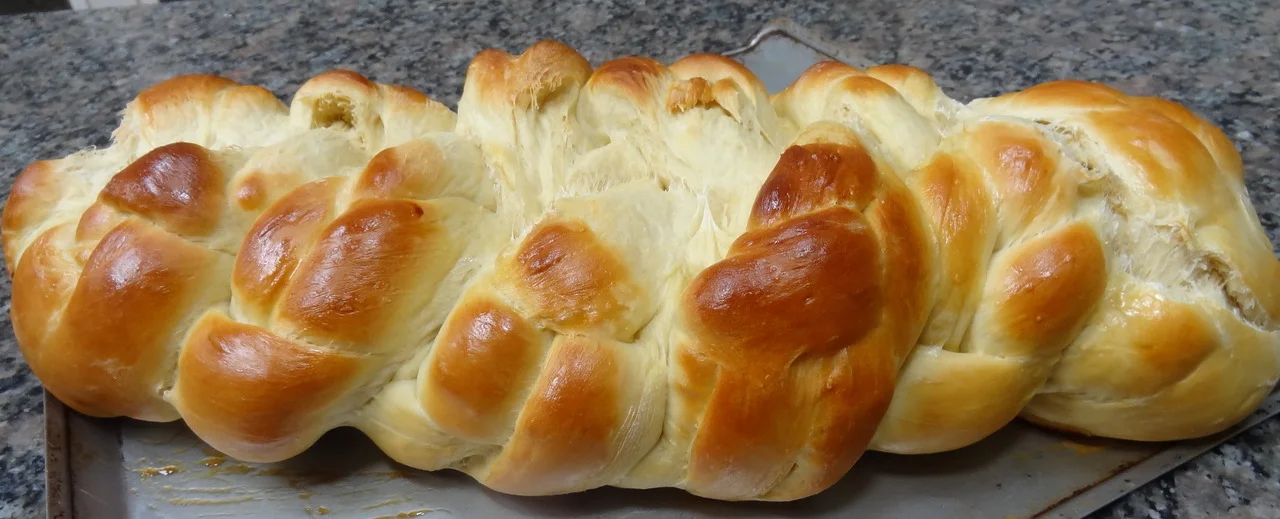
9-Braid Challah
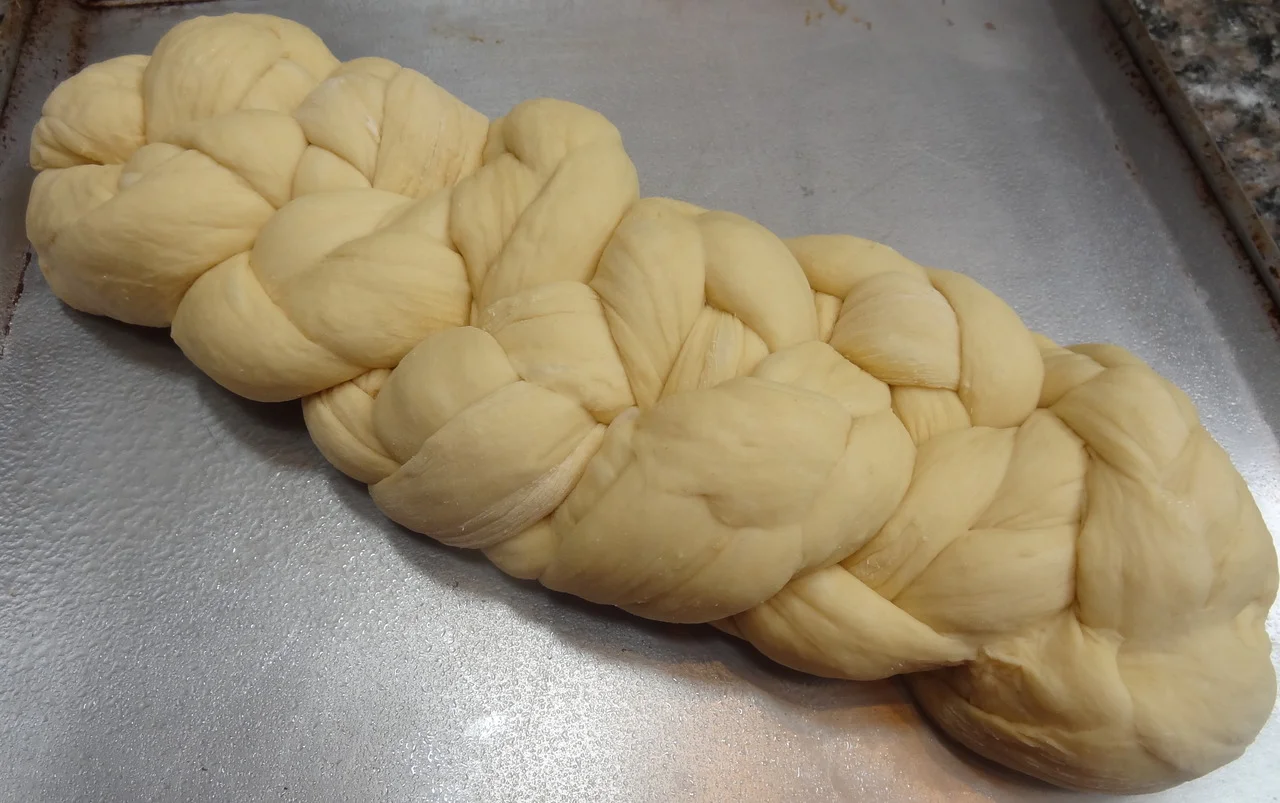
It’s been a crazy week at my house. For various reasons my kids and grandkids have been here, on and off, for a week.
I wouldn’t have it any other way, despite the chaos, the noise and the clutter. I should tell you that at one point my two-year old grandson looked into my refrigerator fruit bin and said “this is a mess. Grandma!”
Who cares! I love when they all come and we have dinner together and plates clatter and dishwashers dishwash and there is plenty of conversation and also lots of leftovers.
At one point, my 11-year old grand daughter, who bakes challah with me all the time, suggested that instead of the traditional 6-braid challah, or a bakery-style 4-braid challah or even an easy 3-braider, we do a 9-strand version. That is, braid three strands, like a classic braid, three times, and then braid those three braids together. That would make it a 9-strander, for sure. With that wonderful lumpy, bumpy surface that makes challah look so appealing.
Had to try that. So we did. The pre-baked challah looked perfect, and very interesting.
Alas, we didn’t braid the three 3-braiders tight enough and the bread opened up on top as it baked.
Still, it looked good to us. And even better, it tasted as wonderful as our usual challah.
And best of all, we had a good time working on it together.
Challah
For instructions on how to make a 6-braid challah, see: http://ronniefein.com/post/18188044789/baking-challah-i-posted-my-recipe-last-week-and
2 packages active dry yeast
1/2 cup warm water (105-110 degrees)
1/2 cup sugar
8-8-1/2 cups all purpose flour
1 tablespoon salt
5 large eggs
1/4 cup vegetable oil
1-1/2 cups lukewarm water (about 100 degrees)
1 teaspoon water
poppy seeds or sesame seeds, optional
Preheat the oven to 350 degrees. In a small bowl, mix the yeast, 1/2 cup warm water, 1/2 teaspoon of the sugar and a pinch of flour. Stir, set aside and let rest for 5 minutes or until the mixture is bubbly. In a bowl of an electric mixer, combine 7-1/2 cups flour with the remaining sugar and salt. In a small bowl, mix 4 of the eggs, the vegetable oil and the lukewarm water. Add to the flour mixture. Add the yeast mixture. Blend ingredients thoroughly. Using the kneading hook, knead for 4-5 minutes or until the dough is smooth and elastic, adding more flour as necessary to make sure the dough is not sticky. NOTE: you can make this dough in a food processor (halve the recipe). Cover the bowl of dough and put it in a warm place to rise for about 1-1/2 hours or until doubled in bulk. Punch down the dough, cover the bowl and let rise again for about 30 minutes or until doubled. Remove the dough to a floured surface. Cut dough in 3 or 6 pieces depending on whether you are making one large or two smaller loaves. Make long strands out of the pieces. Braid the strands. Place the braided dough on a lightly greased cookie sheet. Beat the last egg with the teaspoon of water. Brush this over the surface of the bread. Sprinkle with seeds if desired. Let rise again for 30 minutes. Bake for about 30 minutes for large loaf, 22-25 minutes for smaller ones (they should be firm and golden brown).
To make a 9-braider: cut the dough into 9 equal pieces and roll each piece into a very long strand. Braid three strands at a time into a traditional braid, then braid the three braided strands.
Baked Chicken with Fig-Orange-Balsamic Sauce
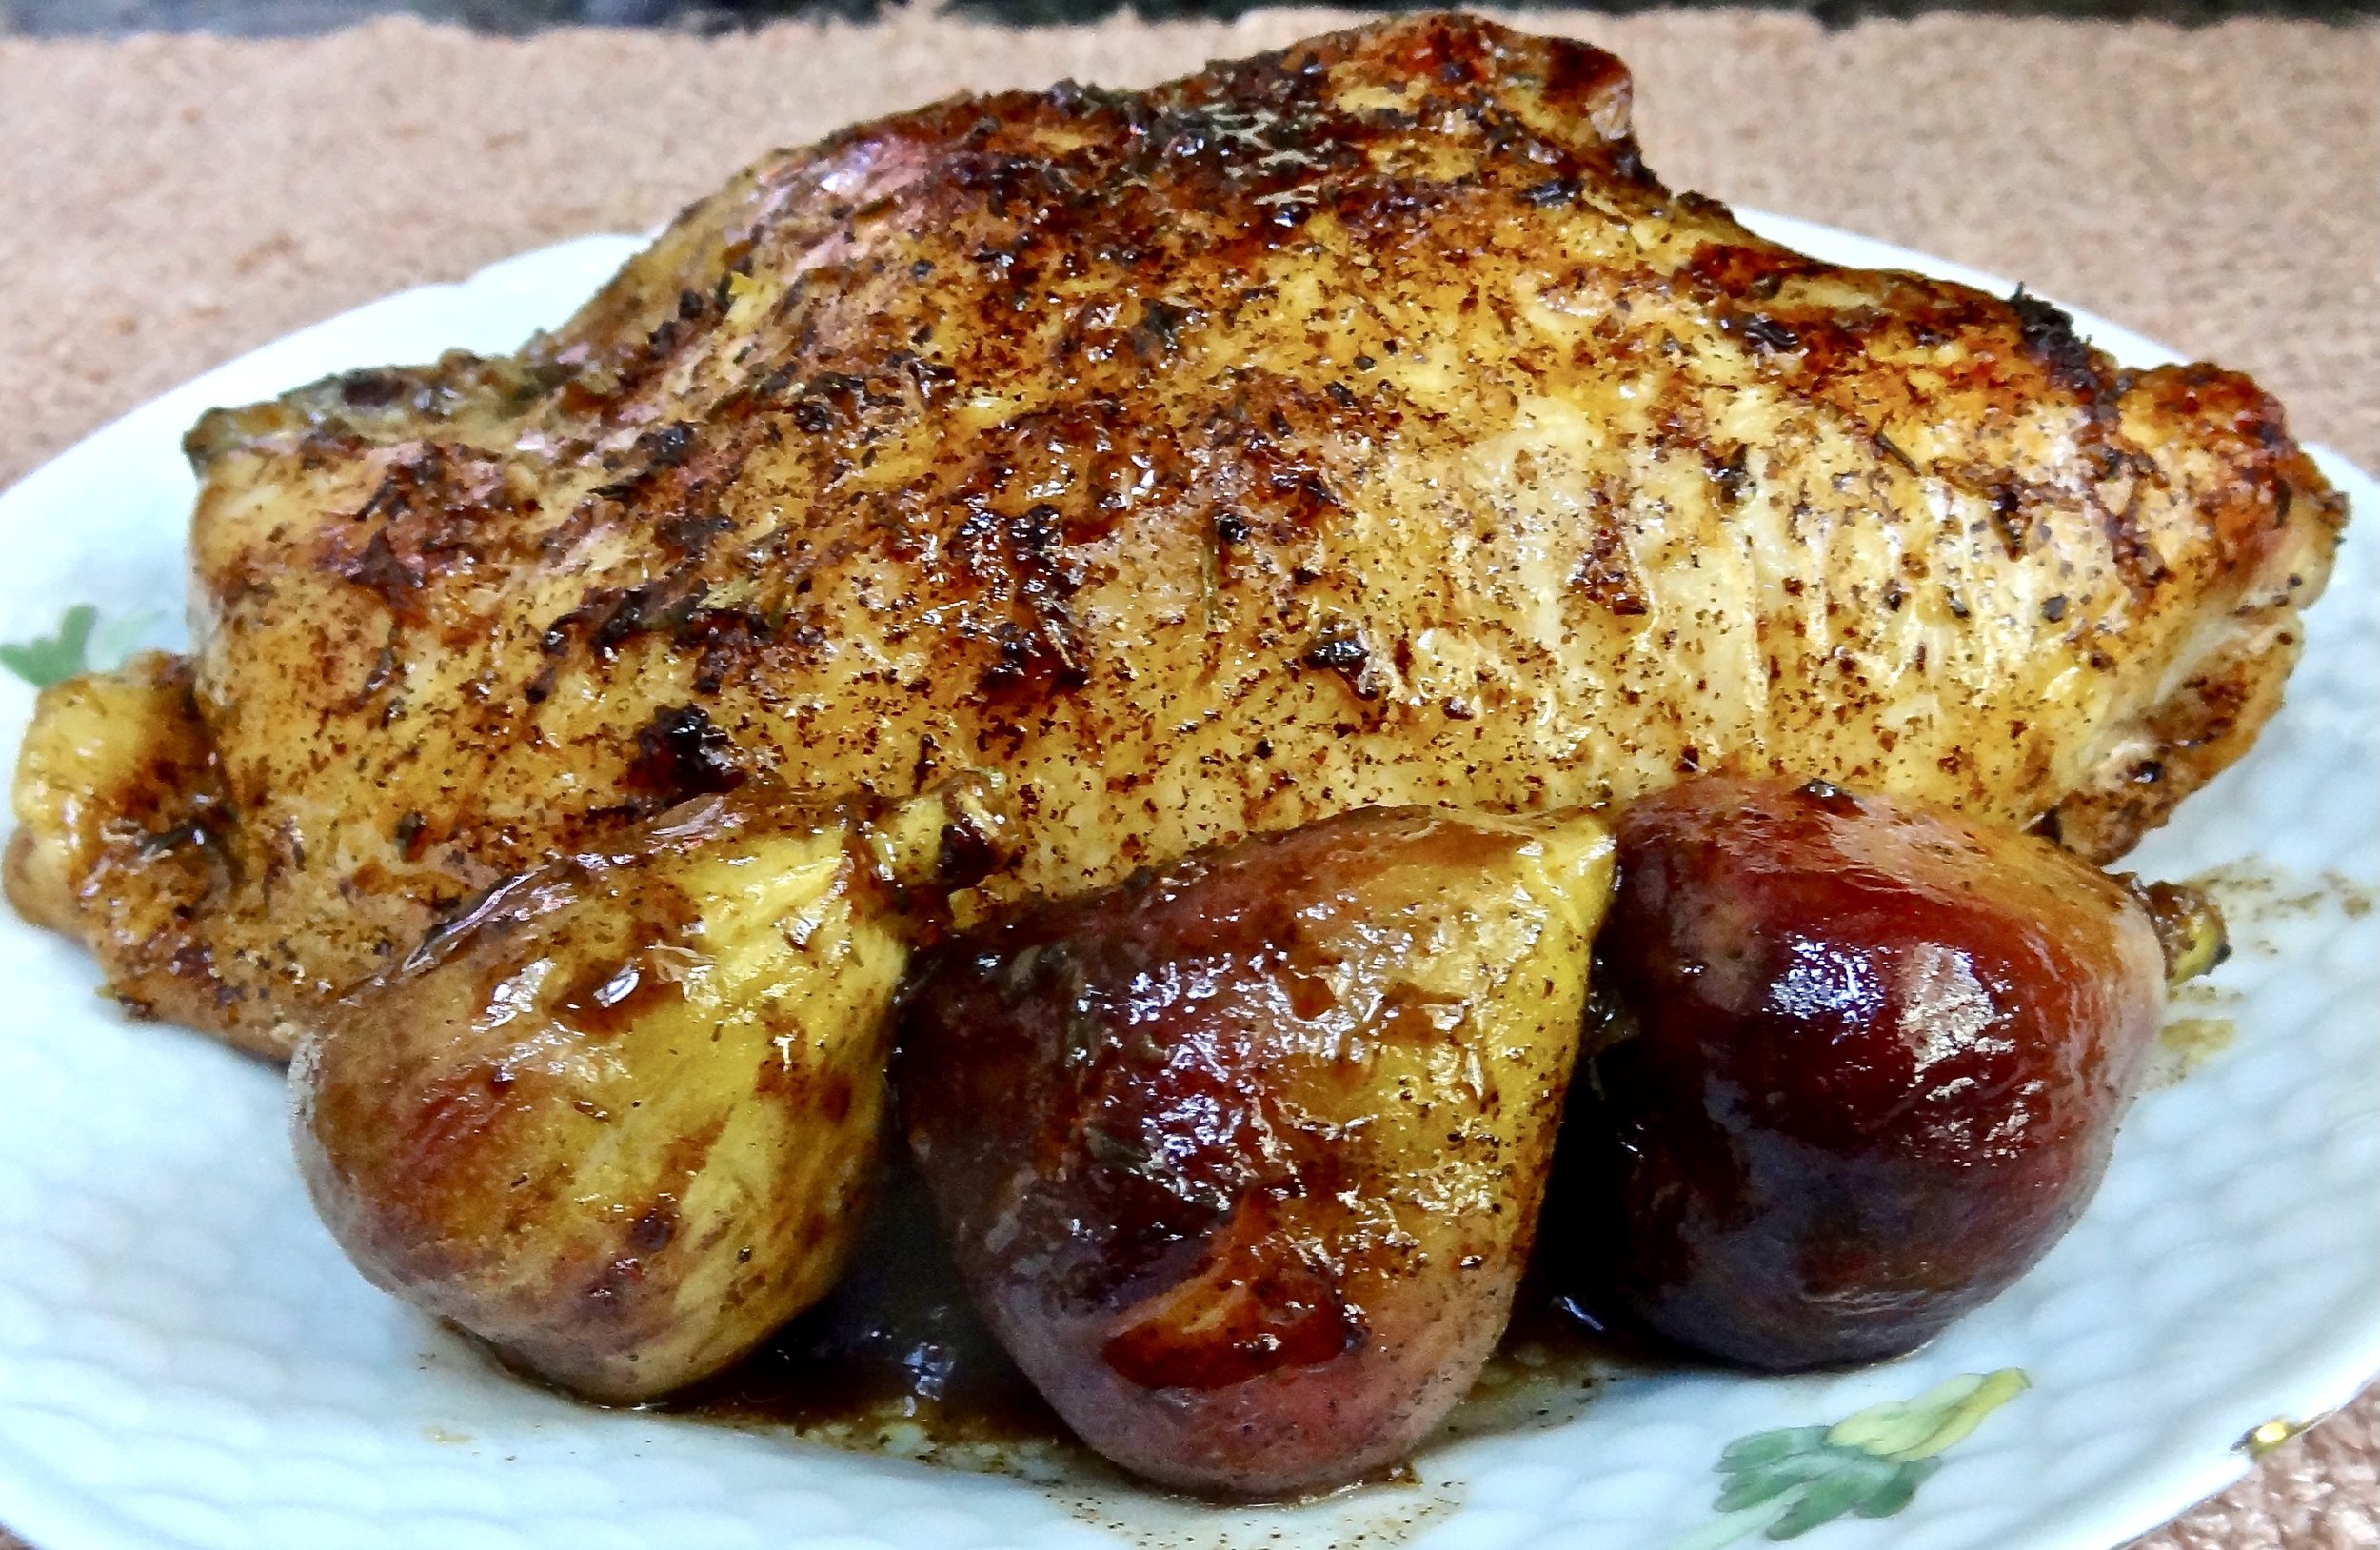
Baked Chicken with Fig-Orange-Balsamic Sauce
To me, chicken is the “basic black dress” of food. Because, like a basic black dress, you can do all sorts of things with it.
You can dress chicken up or play it down. Make it humble or fancy. Cook it plain or add all sorts of stuff, like stuffing, fruits or vegetables. Make it mild or with lots of seasonings.
Chicken is so basic it goes with lots and lots of herbs, spices, condiments and other flavorings. It’s good with gravy or without. It looks different and tastes different depending on all these variables.
So, the other day I made a very simple recipe using chicken breasts and figs.
Fresh figs are in the stores for a really short time, every summer and into the fall. And if you’re like me, and like figs, now is the time to buy and use them. I knew they’d be perfect with chicken.
After I bought the figs I poached some, used some for salad and then roasted chicken breasts and added some figs to the pan for the last several minutes. I had some fresh thyme too, so I included that, sweetened the dish up with a little orange juice and gave it a little tang with some Balsamic vinegar.
Look how dark and rich this dish looks! Lots of rich, tangy-sweet sauce, perfect for steamed rice, cooked noodles or polenta.
I still have a few fresh figs left. Think I might grill them. I’ll let you know how it goes.
Baked Chicken with Fig-Orange-Balsamic Sauce
4 large chicken breast halves (bone-in) or whole legs
Vegetable oil
Salt and freshly ground black pepper to taste
1/2 cup chicken stock
1/3 cup orange juice
3 tablespoons Balsamic vinegar
1 teaspoon grated fresh orange peel
1 teaspoon fresh thyme leaves
8 large fresh figs
Preheat the oven to 400 degrees. Wash and dry the chicken. Rub the skin with the vegetable oil. Sprinkle with salt and pepper if desired. Place the chicken in a roasting or baking pan. Immediately reduce the oven heat to 350 degrees and roast for 15 minutes (you preheat to 400 degrees to give the chicken an immediate blast of high heat, but it needs to cook at 350 degrees after that). While the chicken is cooking, mix the chicken stock, orange juice, Balsamic vinegar, orange peel and thyme leaves in a small bowl. After the 15 minutes are up, pour the sauce over the chicken. Continue to roast the chicken for another 10 minutes. Baste and roast for another 10 minutes. Place the figs in the pan. Baste with the pan fluids. Cook for another 10-15 minutes or until the chicken is cooked through. Remove the chicken and figs from the pan and keep them warm. Place the pan over high heat to boil the pan juices for 2-3 minutes until thickened slightly. Serve the chicken with pan fluids and roasted figs.
Makes 4 servings
Grilled Corn and Green Bean Salad
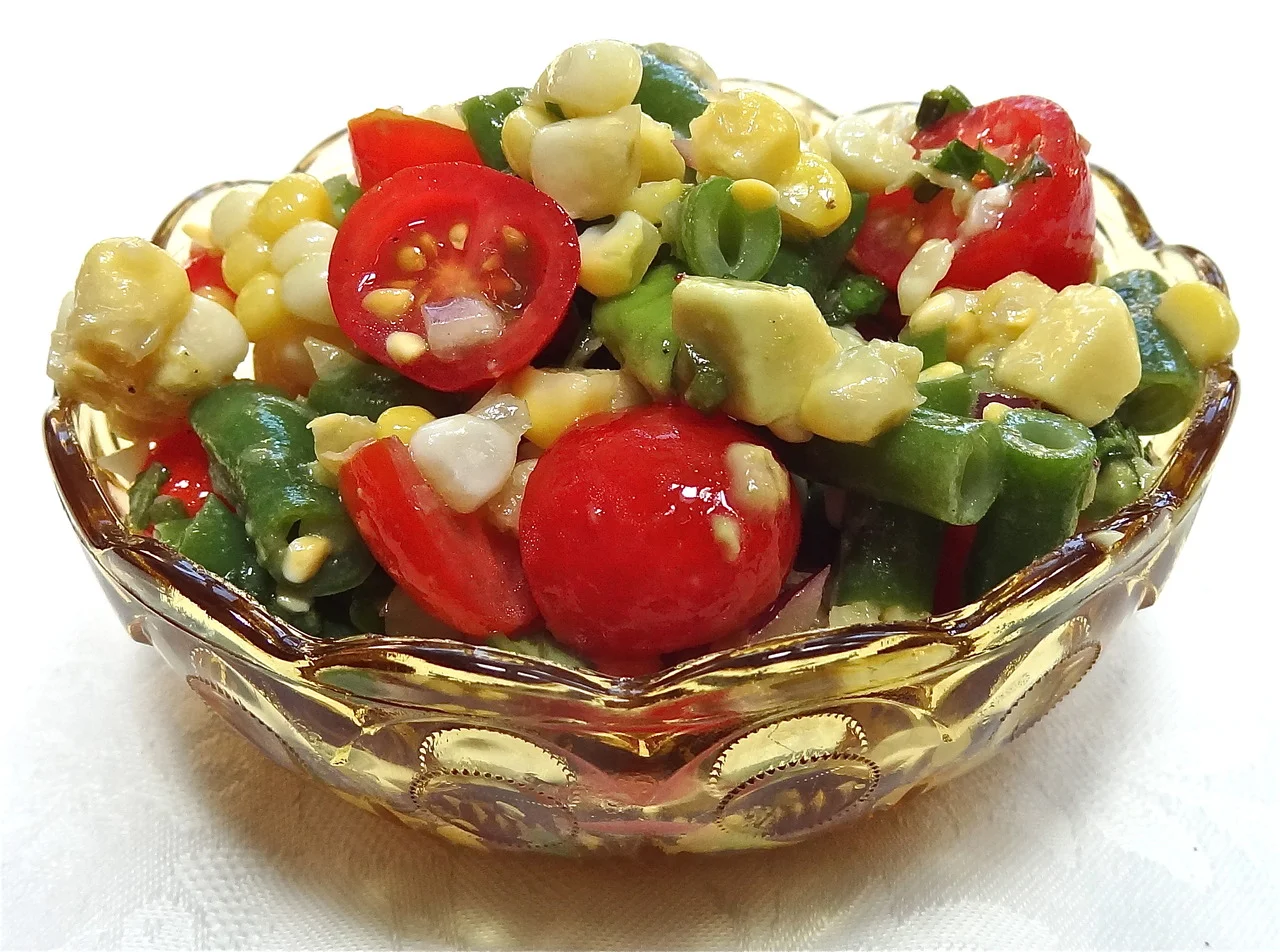
I’ve been reading so much about the drought in the west and the deteriorating corn crop and surging prices that I bought an armload of corn recently. I figured I’d get me some great sweet summer corn before there was none left. Unfortunately you can’t keep corn long. It turns from sweet to starchy over time. So I grilled whatever remained of my stash and made salad out of it.
Grilled Corn Salad is thrillingly bright and colorful. It is also very good to eat and goes with almost any entree or other side dish.
Grilled Corn and Green Bean Salad
3 cups corn kernels (from 2 large grilled ears of corn)
1 cup cut up cooked green beans
1 cup cut up tomatoes
1 avocado, peeled and diced
1/4 chopped red onion
1 small chili pepper, deseeded and chopped
3 tablespoons extra-virgin olive oil
2 tablespoons lime juice
1/4 cup chopped fresh basil
salt and freshly ground black pepper to taste
Place the corn kernels, green beans, tomatoes, avocado, onion and chili pepper in a bowl. Pour in the olive oil, lime juice and basil and toss. Season to taste with salt and pepper. Makes 6 servings