little LADIES WHO LUNCH: A Non-Food Valentine's Day Classroom Treat
This is a look back at last year’s Valentine’s Day post, when my friend Diane shared with me her family’s tradition of making a non-food Valentine favors for her children’s classmates.
She rightfully says it’s a great way to put old, cracked crayons to use. Bonus: her kids are now old enough to…
I love this! Going to try it with my grandkids next time they come for a visit.
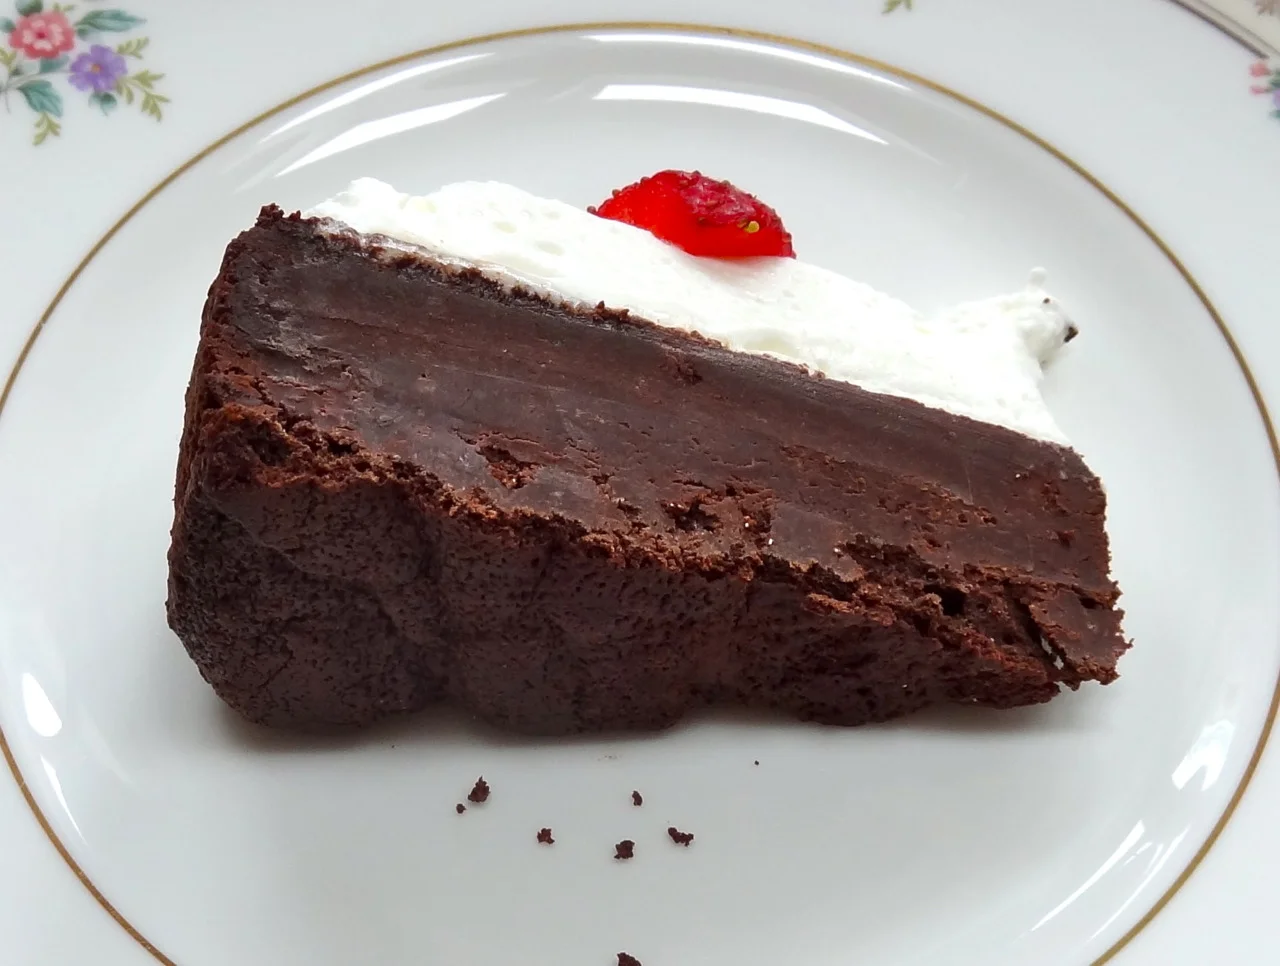
Chocolate Icebox Cake with Strawberries

One cake wasn’t nearly enough for my husband Ed’s birthday. We actually had three, all with a chocolate theme. Yesterday I mentioned the fudge cake, which was an enormous success (he’s still nibbling that one). And my daughter Meredith and her husband Greg brought a store-bought chocolate-marzipan cake that was not only delicious but also gorgeous.
But I also had to try one more, and decided on a Chocolate Icebox cake. I added a few strawberries this time, but they aren’t essential to the recipe.
This is an incredibly easy cake to make and you don’t even have to bake it, so there’s no oven time. You can put it together in about 10 minutes, breaking up chocolate graham crackers and making some whipped cream. The only time issue is that it has to set in the fridge for 5 hours, so this is one you have to plan ahead.
Still, it’s not too late for Valentine’s Day tonight, if you’re reading this in the morning or at around noontime. If not, do try it the next time you need a good dessert.
Chocolate Icebox Cake with Strawberries
2 cups heavy whipping cream
8 ounces mascarpone cheese
1/4 cup sugar
1 tablespoon vanilla extract
1/4 cup orange flavored or coffee flavored brandy or dark rum
2 tablespoons unsweetened cocoa powder
12 ounces chocolate graham crackers
1 quart strawberries, 2/3 sliced, the remainder left whole
Combine the whipping cream, mascarpone cheese, sugar, vanilla extract, brandy and cocoa powder in a bowl and beat using an electric mixer at medium speed for 2-3 minutes or until well combined and thick enough to stand in peaks. Set aside. Place 1/3 of the graham crackers on the bottom of a 9-inch springform pan. Break up cookies to fit into the unfilled spaces. Top with 1/3 of the whipped cream and 1/2 the sliced strawberries. Add another layer of cookies, whipped cream and the remainder of the sliced strawberries. Add a third layer of cookies, whipped cream and top with the whole berries. Refrigerate for 5 hours. Remove the sides of the springform pan and serve. Makes 8-10 servings
Chocolate Fudge Cake
Is it still cake if it’s dense, ultra-rich and more like fudge? That’s what I wondered about this recipe, a cake I made this past weekend for my husband Ed’s birthday. This cake is dark-chocolatey. The kind of dark-chocolatey that experts say is healthy to eat (can you imagine that?). I’ve baked it before and eaten it still warm, when it is lighter, more tender and more like cake.
And absolutely wonderful.
But because my kids and grandkids were coming for the birthday weekend, I made it in advance and kept it in the fridge and we ate it cold. It was thicker, felt richer on the tongue and with a more concentrated chocolate flavor, more like fudge.
And absolutely wonderful.
It’s a simple recipe, easy to make and just needs a little whipped cream to make it complete. Although probably vanilla ice cream would do just as well.
This made a festive birthday cake. But I can’t think of a better treat for Valentine’s Day.
Chocolate Fudge Cake
1 pound semisweet or bittersweet chocolate
10 tablespoons butter at room temperature
1 tablespoon all-purpose flour
1/4 teaspoon salt
4 large eggs, separated
1-1/2 teaspoons vanilla extract
1 tablespoon sugar
whipped cream
Preheat the oven to 425 degrees. Butter an 8-inch springform pan. Place a parchment or waxed paper circle on the bottom of the pan. Set aside. Melt the chocolate in the top part of a double boiler set over barely simmering water. Remove the top pan with the melted chocolate from the bottom pan. Add the butter, flour and salt and blend them in thoroughly. Add the egg yolks and vanilla extract and blend them in thoroughly. Beat the egg whites until they are foamy. Add the sugar and continue to beat until the egg whites are stiff, but the tips still lop over slightly. Add about 1/3 of the whites to the chocolate mixture and blend it in thoroughly. Add the remaining whipped whites and fold them in gently until the batter is a uniform color. Spoon the batter into the prepared pan. Bake for 15 minutes. Turn off the oven. Leave the door open. Let the cake cool in the oven. Remove the sides of the springform pan. Serve with whipped cream. Best the first day, slightly warm, but wonderful, denser and more fudgy when cold and a day old. Makes 8-10 servings
Banana Streusel Muffins
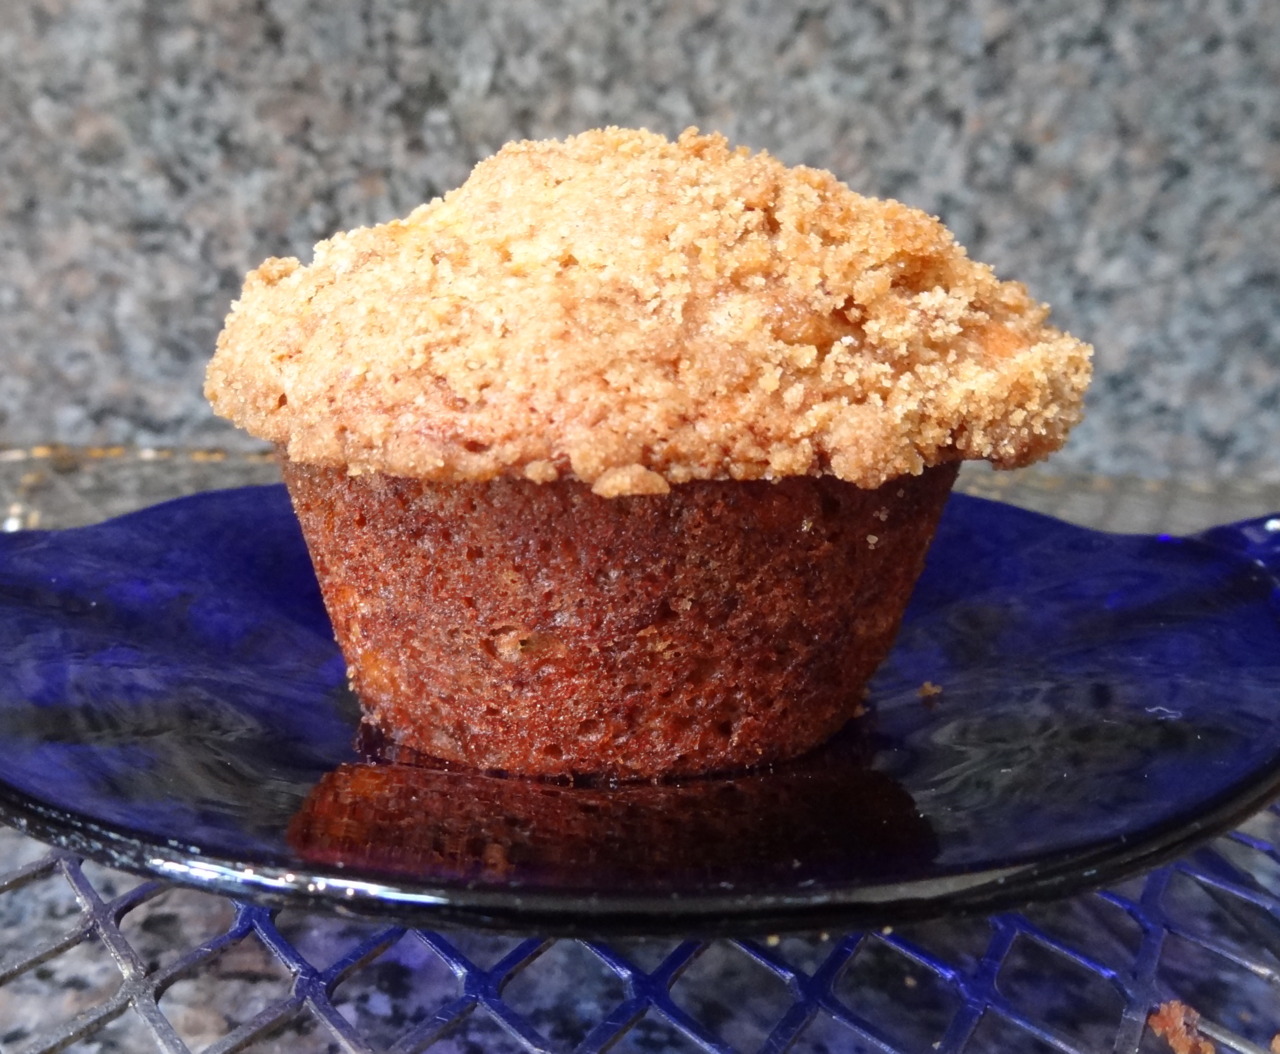
Selling your house may not be easy these days but I am going to recommend something that might help.
Bake banana muffins.
The aroma is so sweet and homey it makes it seem as if lots of good things happen in your house and people will want to live in it.
I baked some banana muffins the other day and didn’t want to leave my house because that banana perfume was keeping me there like a magnet to nails. For a few minutes I could still sniff a bit of it in my car because I suppose some of the baking vapors stuck to my clothes.
The reason I made banana muffins is because, as I said the other day, I buy way too many bananas. I can’t help myself. Even though I am allergic to bananas I buy lots of them. Frequently. Because I get a vicarious thrill watching other people eat them. And my husband Ed does eat a few, like a good soldier, but I always have too many leftover and have to find something to do with them.
This week I came up with these Banana Muffins. I gave a piece to my 19-month old grandson who looked at it a little skeptically and pushed it away. But then I told him it was a banana muffin and he grabbed it back with his little toddler fist and gobbled it down and then asked for more.
You can make these plain or add dried cranberries, nuts, chocolate chips, grated coconut and so on, to the batter (about 1/2 to 3/4 cup).
Banana Streusel Muffins
Streusel:
1/3 cup brown sugar
3 tablespoons all-purpose flour
1/8 teaspoon cnnamon
1 tablespoon butter
In a bowl, mix the brown sugar, four and cinnamon. Cut the butter into small pieces and work into the brown sugar mixture with your fingers until the mixture is crumbly. Set aside.
Muffins:
6 tablespoons butter
1-1/2 cups all-purpose flour
1 teaspoon baking soda
1 teaspoon baking powder
1/2 teaspoon salt
1/2 teaspoon cinnamon
3 large mashed bananas
1/2 cup sugar
1 large egg
1 teaspoon vanilla extract
1/2 to 3/4 cup chopped nuts, dried cranberries or chocolate chips, optional
Preheat the oven to 400 degrees. Lightly grease 10 muffin cups. Melt the butter and set aside to cool. Mix the flour, baking soda, baking powder, salt and cinnamon in a bowl. In another bowl mix the bananas, sugar, egg and vanilla extract until well blended. Stir in the melted butter and optional ingredients. Spoon the flour mixture into the banana mixture and stir until thoroughly blended. Spoon the batter into the prepared muffin cups. Top each muffin with equal portions of the streusel. Bake for about 18-20 minutes or until a cake tester inserted into the center comes out clean. Makes 10
Prune and Apricot Crumb Pie
Prunes used to be the laughing stock of fruit. Really. Kids used to snicker at the thought of them because, you know, prunes are supposed to be for old folks who, um, need the fiber.
Well, confession here — I always loved prunes. Plump, moist, sweet prunes. Great snack. And when I was much younger I ate Dannon’s Prune Yogurt at least twice a week. It was made with whole milk and had a thick, pureed, stewed prune layer at the bottom.
But I think I was only one of two people who loved that yogurt (the other was my husband Ed, which is probably why we knew we were going to click romantically from the start). Because Dannon stopped making that flavor yogurt long ago.
Yeah yeah, there are some new prune yogurts out there but they’re not the old full-fat, thick-as-lekvar prune layer yogurt I remember. The only way to get that is to add some prune lekvar to some yogurt (or stew some prunes and puree them yourself).
But some good news has come for people like me who actually like prunes and don’t think they are funny at all. And who eat prunes because we like them and not because we, um, need them.
Here’s an article that speaks to the benefits of prunes. A great snack, it says because prunes are filling, sweet and satisfying and they are also high in antioxidants as well as fiber.
Give some prunes to your kids and see how they react. Don’t tell them prunes are for senior citizens. Snacks this sweet are sure to please children and their parents too.
And if you want to try prunes in recipes, start with this old fashioned dessert. It’s a winner in all respects. Great warm with a little ice cream (but plain is terrific too).
Prune and Apricot Crumb Pie
3 cups mixed dried pitted prunes and dried California apricots
water
1/2 cup sugar
1 tablespoon cornstarch
1/4 teaspoon ground cinnamon
1/4 teaspoon freshly grated nutmeg
1/8 teaspoon salt
1/4 cup lemon juice
1 tablespoon butter
1 9-inch unbaked pie crust
Crumb Crust
Preheat the oven to 400 degrees. Place the prunes and apricots in a saucepan. Cover the fruit completely with water and bring the water to a boil over high heat. Lower the heat and simmer the fruit for about 10 minutes or until the fruit is softened. Drain the fruit but reserve the liquid (should be about 1/2 cup; add more if necessary to make 1/2 cup liquid). In a saucepan mix the sugar, cornstarch, cinnamon, nutmeg and salt. Add the 1/2 cup reserved liquid. Stir ingredients and cook over low-medium heat for 1-2 minutes or until thickened. Add the cooked fruit, lemon juice and butter. Stir ingredients until the butter has melted. Spoon the fruit mixture into the pie crust. Scatter the crumb crust on top. Bake for 35-40 minutes or until golden brown. Makes one pie serving 8 people
Crumb Crust:
3/4 cup all-purpose flour
1/3 cup sugar
6 tablespoons butter, cut into chunks
Mix the flour and sugar together in a bowl. Work the butter into the flour mixture using a pastry blender or your hands until the mixture is crumbly.
Scones
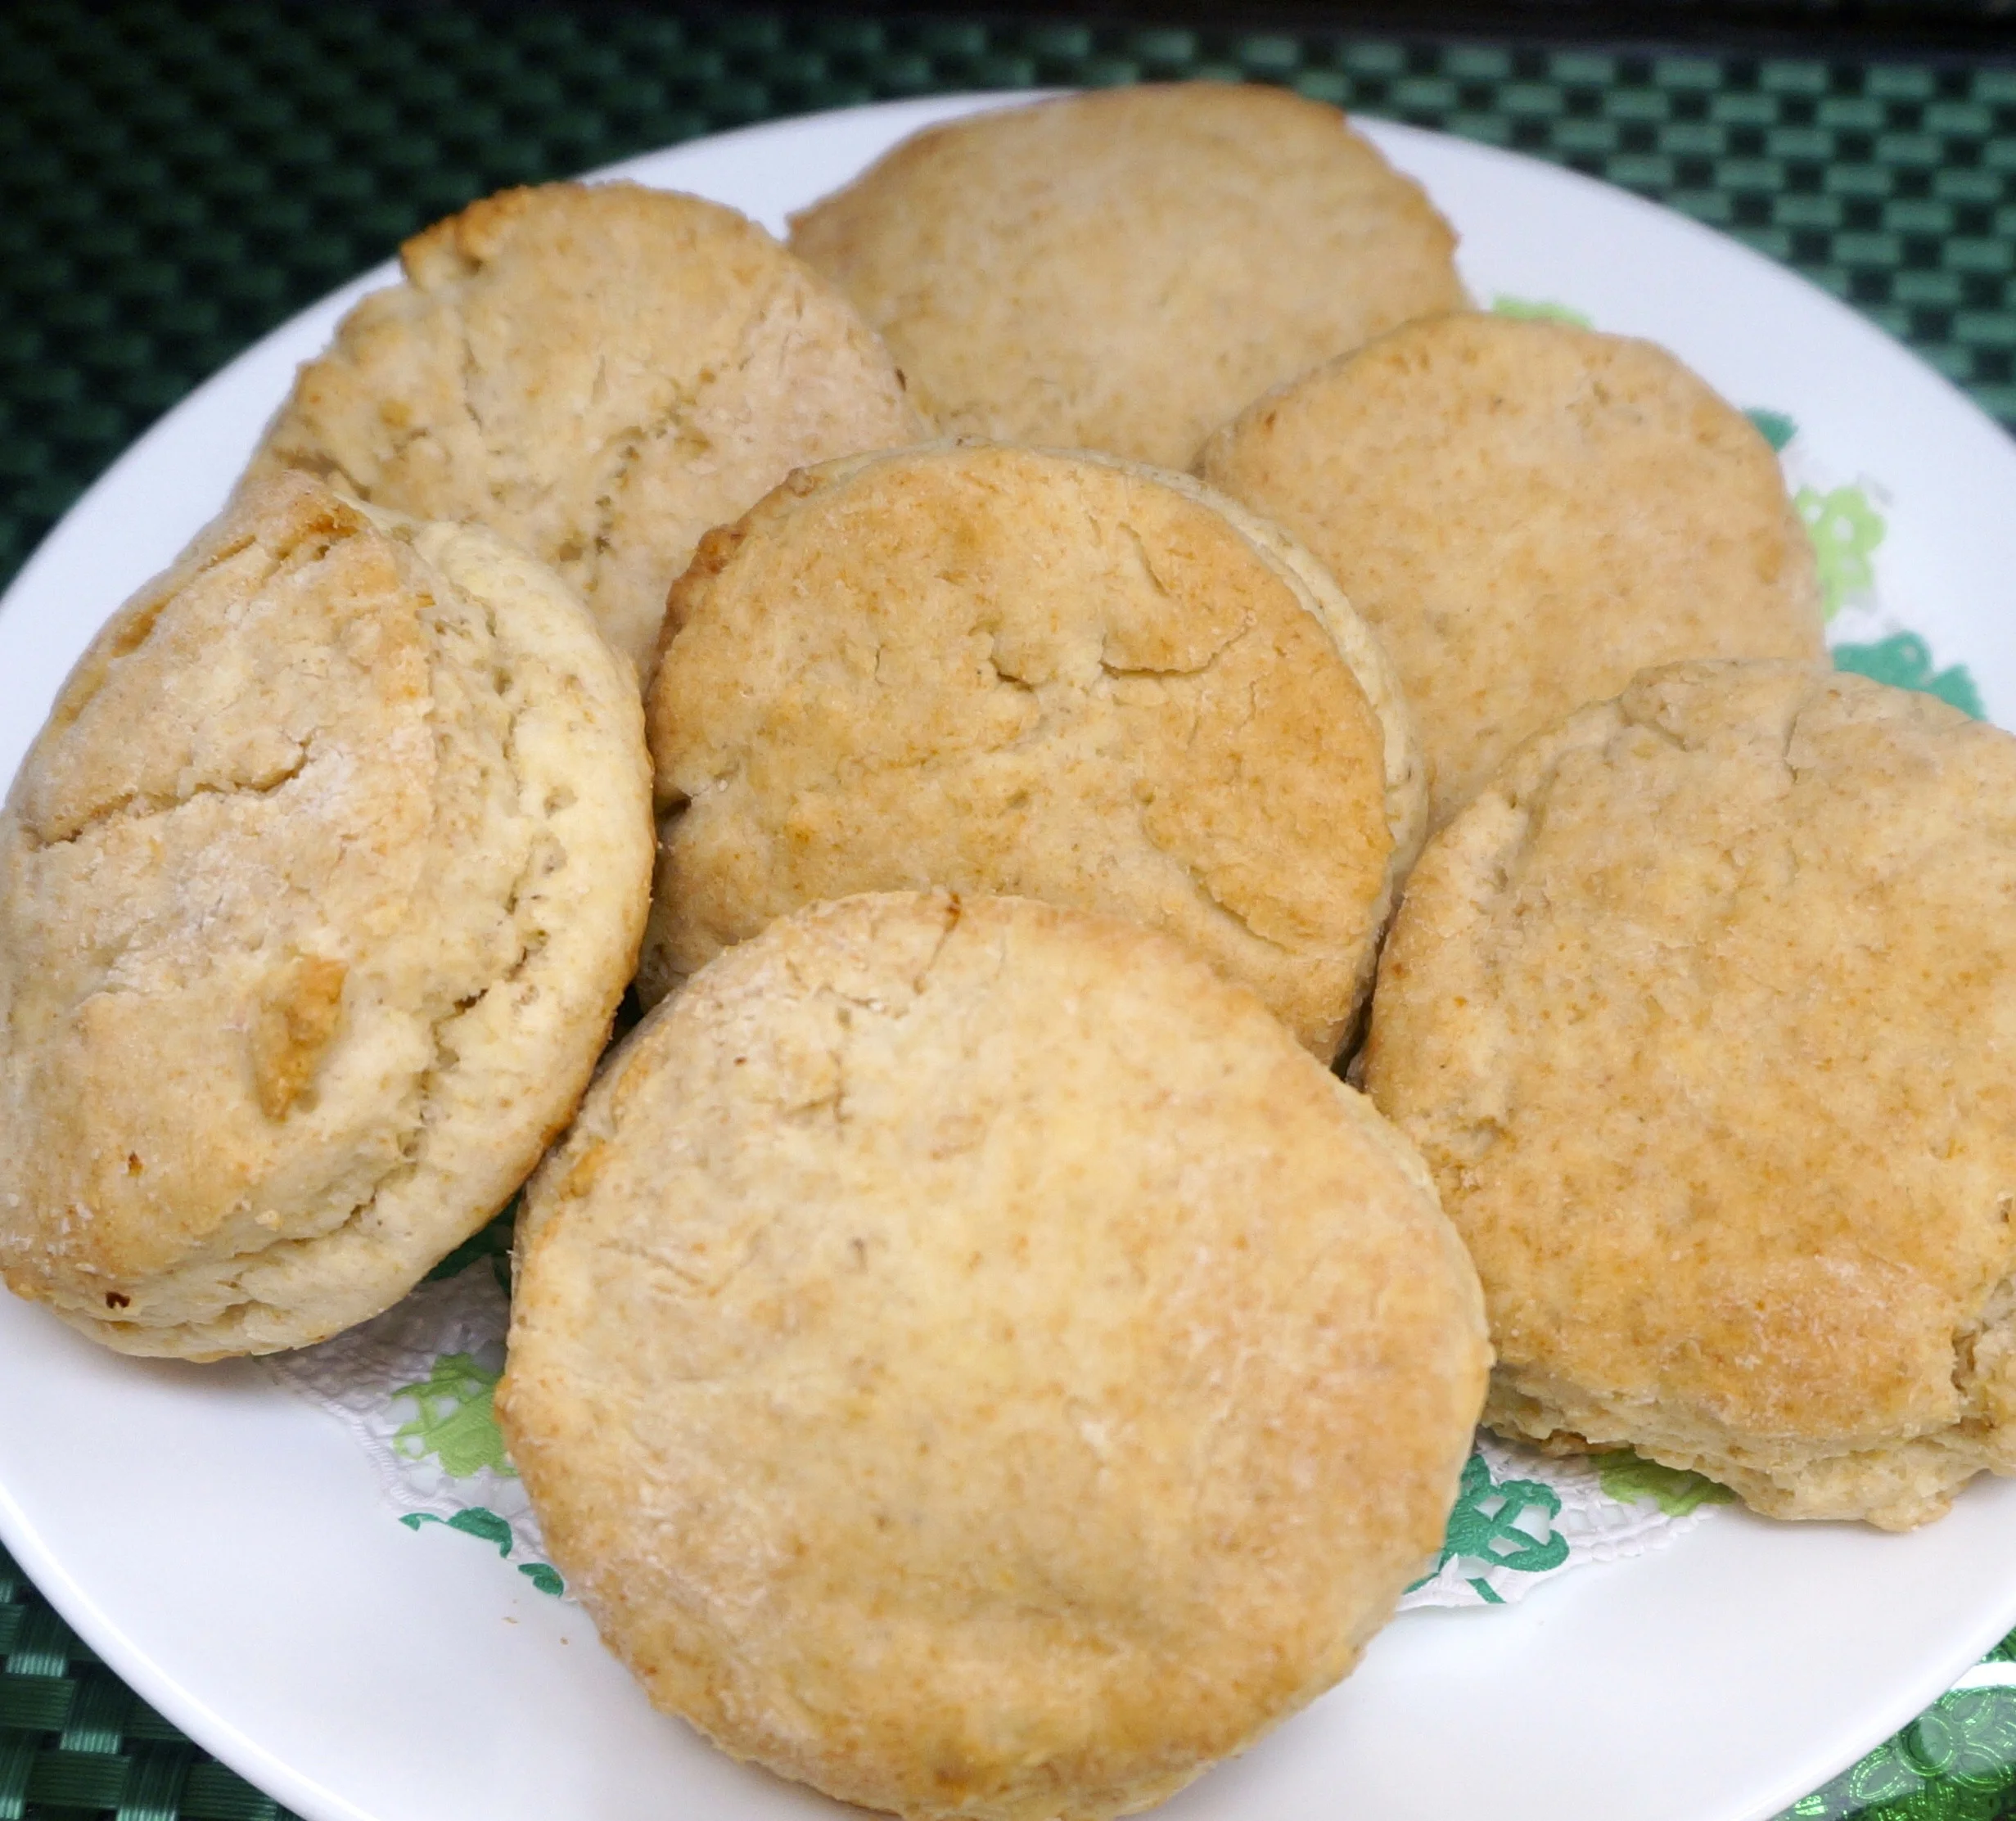
Happy Birthday Charles Dickens! It’s your 200th. And even though you lived long ago and wrote about what was happening back then, in the 19th century, what you had to say still seems fresh, new and relevant today.
You spoke out for social justice. You showed how unfairly balanced your society was between the haves and the have-nots. You wrote about how poor children were made to work and beg. And your stories portrayed how people can speak in high moral tones about “good values” and yet be mean-spirited and behave like brutes.
It rings true even now, in the 21st century.
I raise my tea cup to you.
And for anyone who loves the writings of Charles Dickens, here’s a recipe for scones to go with that tea, a fitting way to celebrate the birthday of the great English master storyteller.
Scones
2 cups sifted all-purpose flour
2 tablespoons sugar
2-1/4 teaspoons baking powder
3/4 teaspoon baking soda
1/2 teaspoon salt
1/2 teaspoon grated fresh lemon peel
6 tablespoons butter
1 large egg
1/2 cup buttermilk
Preheat the oven to 425 degrees. Lightly grease a cookie sheet. Combine the flour, sugar, baking powder, baking soda, salt and lemon peel in a bowl. Add the butter in chunks and work into the flour mixture with a pastry blender or your fingers until the mixture is crumbly. Mix the egg and buttermilk together in a bowl. Pour into the flour mixture. Mix into a soft, uniform dough. Roll the dough on a lightly floured surface to a thickness of 1/2-inch. Cut out circles with a cookie cutter. Place the circles on the cookie sheet. Bake for 12-15 minutes or until the scones are browned and well risen. (You can also cut the dough in half, roll each half to 1/2-inch thickness and cut each into 6 wedges, for triangular shape scones).
Makes about 12
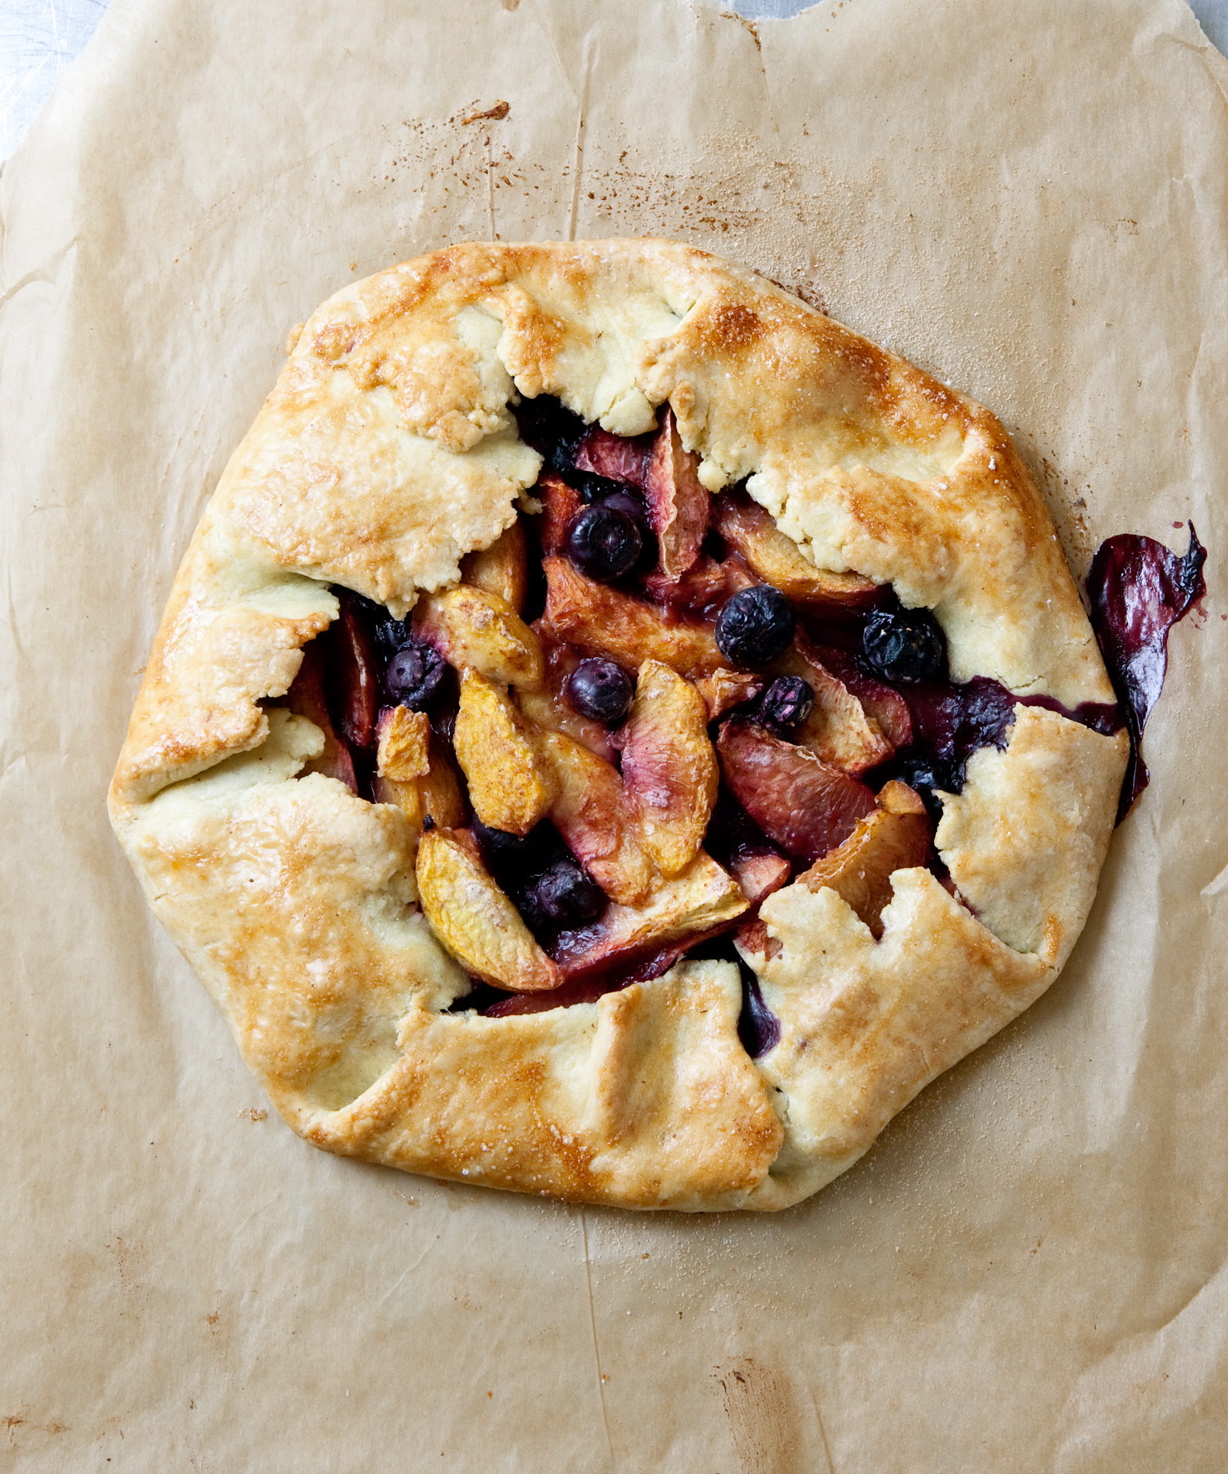
Paula Shoyer’s Fruit Galette
Want to lose weight? Or at least not gain any?
People give you all sorts of advice. And there are zillions of diet plans and books out there. And after a day like yesterday, eating awful, salty, fattening foods while watching the Superbowl, I could sure use some help in this area, as I am sure zillions of others can.
So I think I will follow some advice I heard a few days ago that made such good sense I have to pass it on.
The advice was from, of all people, a professional baker: cookbook author, Paula Shoyer, who wrote “The Kosher Baker: Over 160 Dairy-free Recipes from Traditional to Trendy.” She was talking about desserts but the philosophy applies universally. Here’s what she said:
"Desserts need to be so good that you’re satisfied."
Food, anything you eat, needs to be so good that you’re satisfied. If it isn’t good you keep eating, even if you’re not hungry, because your mouth, tongue, brain are waiting for something the food isn’t giving you.
Food has to have the right balance of ingredients, the right taste and texture, it has to taste natural and satisfy all your senses and if it does, it is good and you feel fulfilled, gratified, content and without need for more because what you have already eaten is enough. It’s like a good book whose plot and characters keep you interested and the story moves along as it should until at last there’s a plausible and appropriate way to finish things and it’s time for The End and you don’t need more than the memory of the good read you just had.
Paula mentioned this fabulous bit of wisdom in the context of her children scoffing down an entire package of store-bought cookies. They would never have eaten as many of their Mom’s well-made, tasty, additive-free, home-made cookies.
"They were still looking for that buzz," she said. Which they never got from the packaged cookies, which lacked that balance, that goodness, that special quality that would have satisfied.
So friends, eat well. Follow Paula’s advice. Don’t eat an entire bag of chips or cookies looking for the buzz. Make something homemade, judiciously seasoned, gently sugared, light on the fat and salt. Real stuff — butter and sugar but less of it, with just enough salt to bring out the best in the other ingredients, not to mask flavor of inferior goods.
Like this fruit galette (btw, Shoyer uses margarine to keep her desserts pareve for use with meat meals, but you can use butter for dairy or vegetarian meals or if you aren’t kosher):
Paula Shoyer’s Fruit Galette
dough:
1-1/4 cups flour
1/4 teaspoon salt
6 tablespoons cold pareve margarine, (frozen for at least 30 minutes) cut into 6 pieces
1 large egg, separated
3 tablespoons ice water, divided
Filling:
3 cups fresh fruit (berries, plums, peaches or apricots cut into 1/2-inch pieces)
3 tablespoons sugar
2 teaspoons cornstarch
1 teaspoon sugar for top of galette
To make the dough: place the flour, salt and margarine into the bowl of a food processor fitted with the metal blade. Pulse 10 times or cut the margarine into the flour and salt by hand using two knives or a pastry cutter. Add the egg yolk and one tablespoon ice water. Pulse 5 times or mix gently by hand. Add another tablespoon ice water and pulse 5 times or mix again. Add the last tablespoon of water, a little at a time, pulsing or lightly mixing the dough for 10 to 15 seconds until it looks like clumps of couscous. The dough does not have to come completely together. Gather the dough into a ball. Take a large piece of plastic wrap and sprinkle some flour on top. Place the dough on the floured plastic, wrap the plastic around it and then flatten. Place the dough in the freezer for 20 minutes.
Preheat the oven to 425 degrees. Place the rack on the lowest shelf of your oven.
Take a large piece of parchment and sprinkle it with some flour. Remove the dough from the plastic wrap and place it on top of the parchment. Sprinkle some flour on the dough and place a second piece of parchment on top. Roll out the dough until it is 12-13 inches wide, trying your best to keep the shape round. Peel back the top parchment and sprinkle some more flour once or twice while you are rolling. Place the dough round on a baking sheet.
To make the filling: place the fruit in a medium bowl. In a separate bowl, mix together the sugar and cornstarch. Sprinkle on top of the fruit and mix gently. Place the fruit in the center of the circle and spread it outward, leaving a 2 or 3 inch border on the outside. Take one small section of the dough border, about 2 inches and fold it over the fruit, leaving the fruit-filled center open. Pick up another 2 inch section of the border and repeat, pressing one section into the next to seal it, so you end up with dough pleats.
Beat the reserved egg white and brush it all over the dough. Sprinkle with the remaining teaspoon sugar. Bake for 30 minutes. Move the galette to the middle rack in the oven and bake another 10 minutes. Let cool for 20 minutes. Makes 8 servings
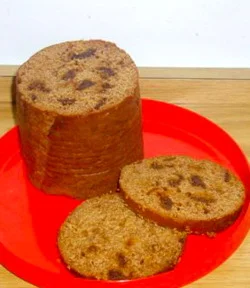
Mom’s Date-Nut Bread
Why was old-fashioned Date-Nut Bread baked in a round pan?
Yesterday, when I posted about my cousin’s Date-Nut Bread, I mentioned that her mother and mine made this stuff inside a coffee can or other, smaller cans. And then I remembered that even the commercial loaves were cylindrical, so the slices came out round.
Why was that?
When you make Banana Bread or Lemon-Cranberry Bread it’s usually in a loaf pan. I use a bundt pan for a big recipe.
Anyone know why Date-Nut Breads are cylindrical?
Anyway, I also mentioned yesterday that my mother had a great recipe for Date-Nut Bread. I searched my files and — I found it! This bread was sooooooo delicious. She made me sandwiches using this as the bread and a layer of cream cheese in the middle. Oh, do I wish I had some right now.
Although my mother baked Date-Nut Bread in a one-pound coffee can the batter also fits nicely inside a standard 9”x5”x3” loaf pan. It is a terrific snack for anytime, and makes a perfect treat for Tu B’Shevat.
Mom’s Date-Nut Bread
- 2-1/2 cups all-purpose flour
- 1 cup sugar
- 2 teaspoons baking soda
- 1 teaspoon salt
- 1 cup golden raisins
- 1 cup chopped dates
- 1 cup chopped nuts
- 2 tablespoons melted butter, margarine or vegetable oil
- 2 tablespoons Madeira, Port or Sherry wine
- 1 large egg
- 1 cup boiling water
- cream cheese, optional
Preheat the oven to 350 degrees. Grease a 9’x5”x3” loaf pan (or a one-pound coffee can). Sift the flour, sugar, baking soda and salt into a bowl. Add the raisins, dates and nuts and toss the ingredients to coat the fruit with the flour mixture. In another bowl, combine the melted butter, Madeira and egg. Pour the boiling water into the fruit-flour mixture and mix thoroughly. Add the egg mixture and blend it in thoroughly. Spoon the batter into the prepared loaf pan. Bake for about 50 minutes or until a cake tester inserted into the center comes out clean. Let the bread cool in the pan for 10 minutes. Invert onto a cake rack to cool completely. Slice and serve plain or with cream cheese.
Makes one loaf
Marlene's Date-Nut Bread
If your mother baked Date-Nut Bread when you were a kid you’re probably over “that certain age.” Not that I’m sure what that age is, but I am at it, for sure and so is my second-cousin Marlene, who lives in Haifa, Israel.
Both our mothers (who were first-cousins) made Date-Nut Bread and it wasn’t a dessert. It was for “just in case company comes.” Or for school lunch sandwiches, 2 slices smeared with a fat layer of cream cheese.
I have no idea why Date-Nut Bread fell out of favor. Just one of those 20th century popular things that came and went like Jello Mold and Beef Wellington.
I never baked one for my children, which is too bad, because after my cousin sent me the recipe and I thought about the sandwiches from the old days, I remembered how delicious those lunches were.
My mother always baked Date-Nut Bread in a coffee can. Marlene uses smaller cans. She baked up a batch for Tu B’Shevat, which falls this year next Wednesday, February 8th. It is customary on this minor Jewish holiday to cook and eat foods that contain one or more of the Seven Species that were abundant in Israel in biblical times.
Like dates.
Which makes old-fashioned Date-Nut Bread perfect for this holiday. Or anytime really.
Marlene says that her recipe began with one in The Elegant But Easy Cookbook by Marian Fox Burros and Lois Levine. I don’t have a copy of that book, but Marlene has also changed the recipe somewhat. Here it is as she gave it to me, with changes noted in the ingredient list.
I’ll have to scout out my Mom’s recipe and compare it.
Date-Nut Bread
1 large orange
boiling water
2 tablespoons shortening or melted margarine or vegetable oil
1 teaspoon baking soda
1 teaspoon baking powder
1/4 teaspoon salt
1 cup sugar
1 teaspoon vanilla extract
1 large egg, beaten
2 cups all-purpose flour
1/2 cup chopped dates (or use one full cup)
1/2 cup chopped walnuts (leave out if using 1 cup chopped dates)
Preheat the oven to 350 degrees. Grease a 9”x5”x3” loaf pan. Grate the peel of an orange into a bowl. Squeeze the juice from the orange into a measuring cup and add enough boiling water to make one cup. Pour into the bowl with the peel. Stir in the shortening, baking soda, baking powder, salt and sugar and stir until the shortening has melted. Beat in the egg. Add the flour and stir to blend ingredients. Fold in the dates and nuts. Spoon the batter into the loaf pan. Bake for 45-50 minutes or until a cake tester inserted into the center comes out clean. If you use round cans, add batter to the halfway mark and time the bread according to the can size. Makes one loaf