
It wouldn't be a proper Break-the-Fast without these cookies. My mother made them so
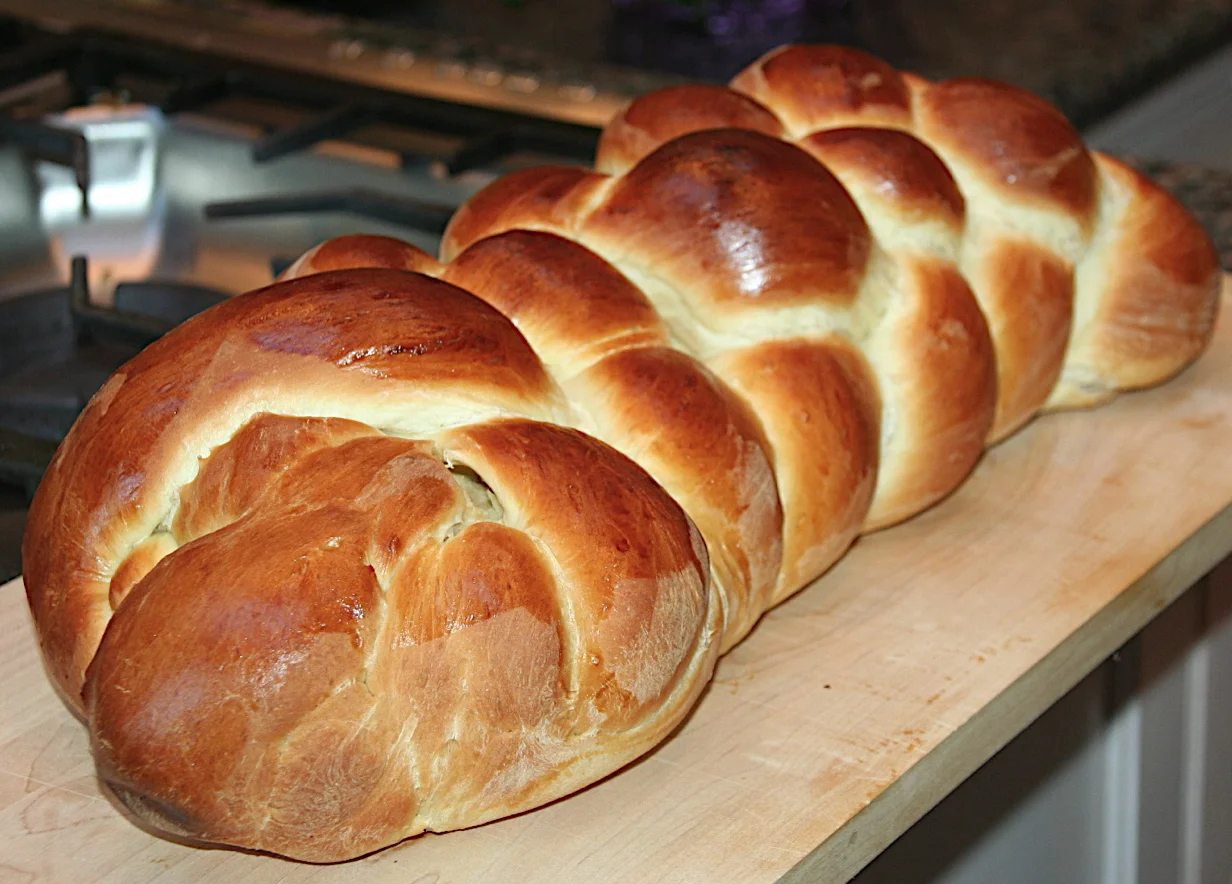
The Family Challah Recipe
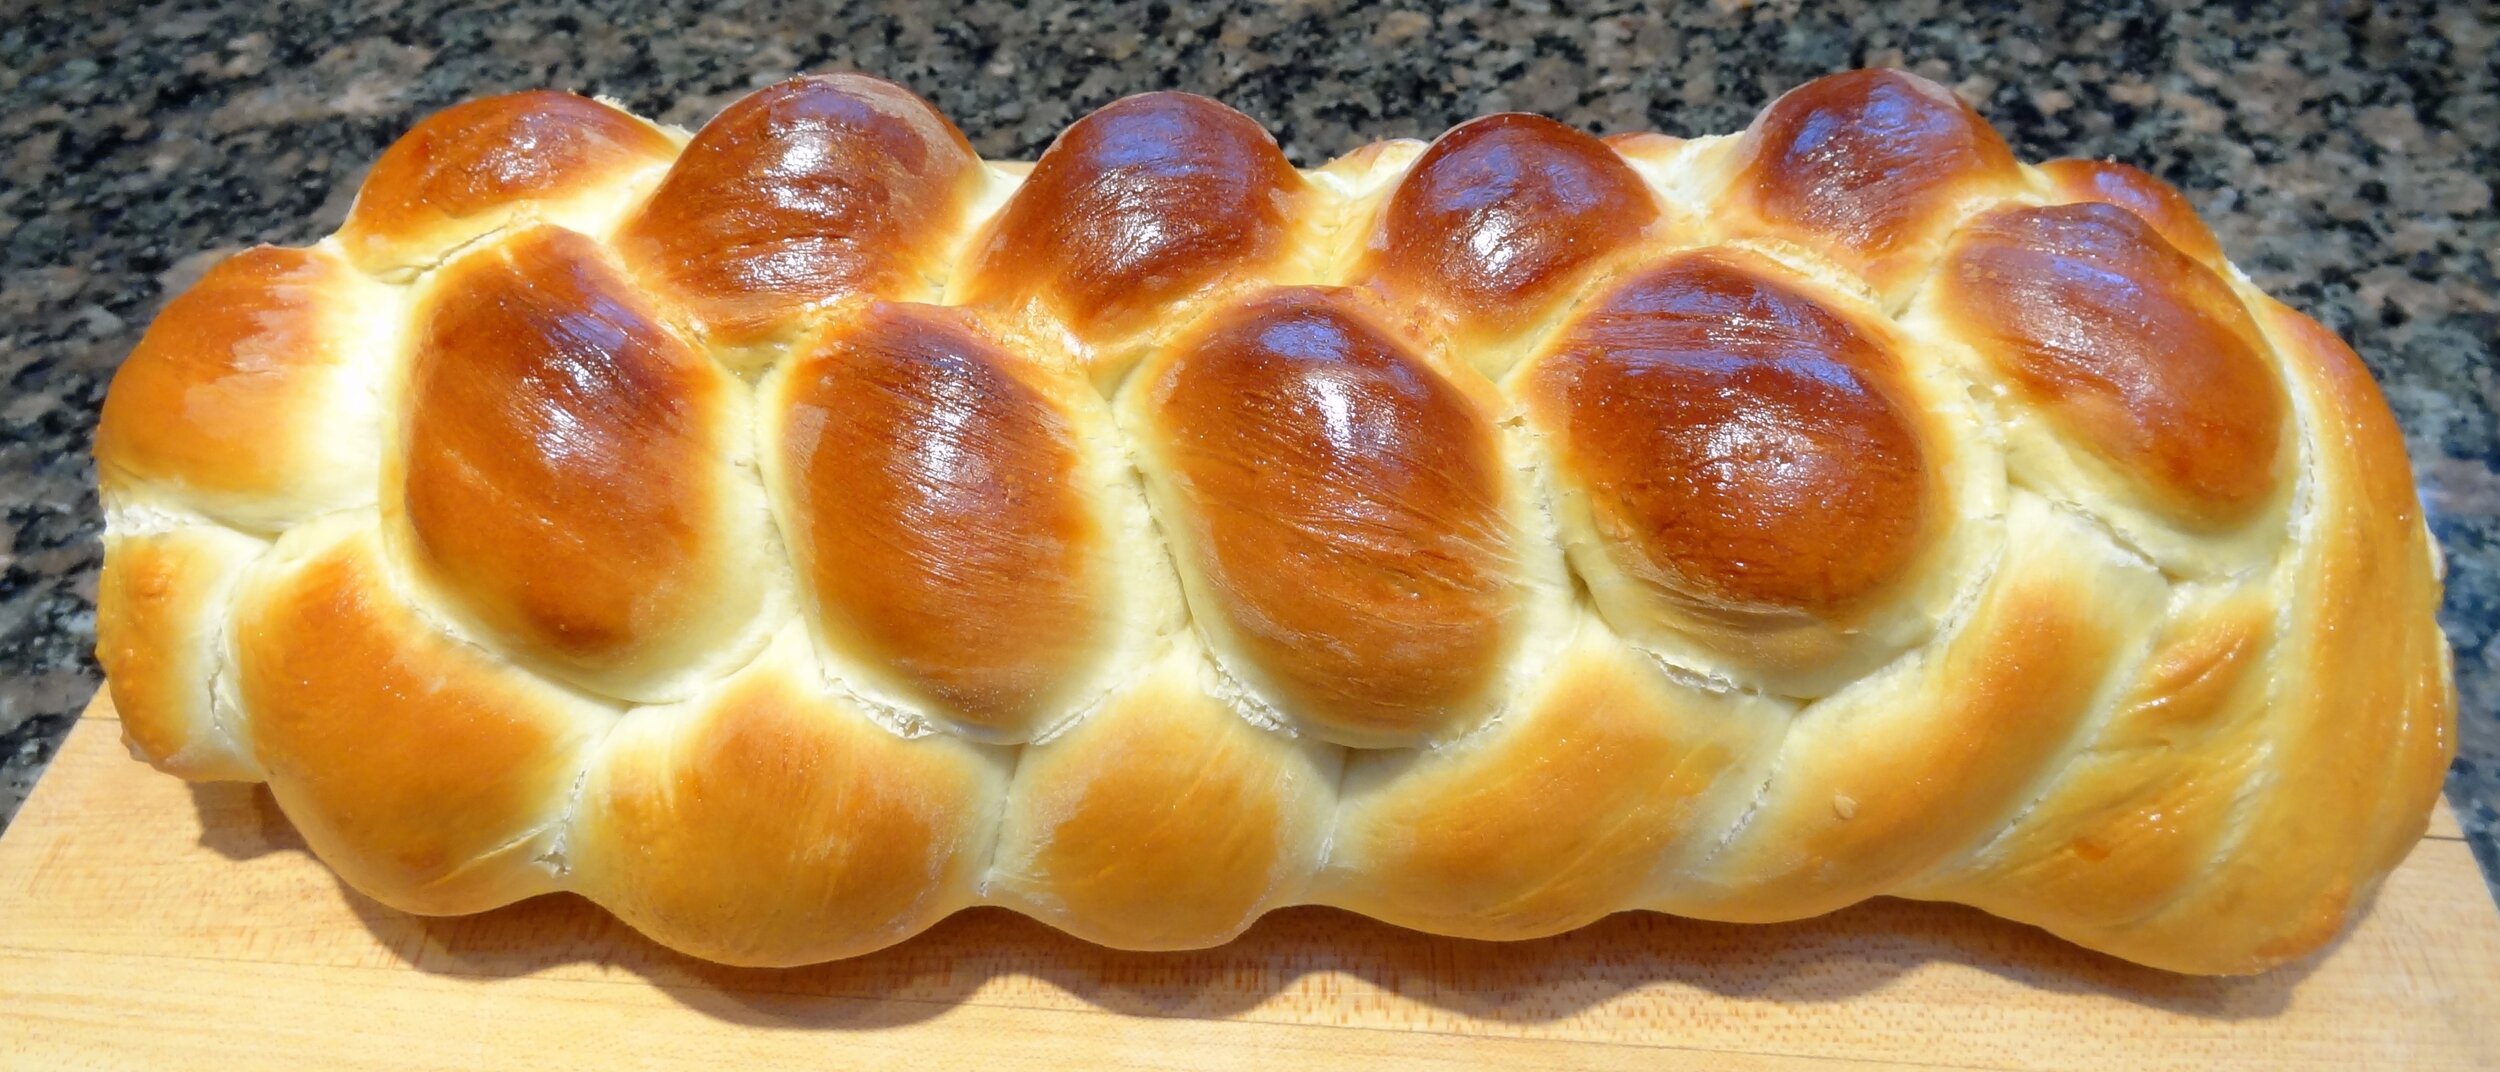
I know a round challah is traditional for the Jewish holidays but I will still make braided ones because after years and years of making an easy 3-braid bread, I have finally learned how to make the more professional-looking 6-braider and I want to practice until I can do it in my sleep, like butter cookies or apple pie.
Thanks to the internet, I learned the secrets of the 6-braider from a YouTube video. My eldest grandchild and I watched, stopped the video from time to time to write down what the woman was saying. The first one took us at least 10 minutes to braid because we had to go back a few times to figure out what she was saying and also to undo some of our missteps. Also to dust off my computer, which unfortunately was a bit too close to the floured work surface.
My mom, who was a good baker, nevertheless never baked a homemade challah. She baked butter cookies and apple pie and taught me how do do those which is why I could make them without even thinking about what I’m doing. But she did reminisce often about my grandmother’s challah. That would be my father’s mother, who my mother always said was a terrible cook but did make one terrific challah.
She gave me my grandmother’s recipe. In those days women didn’t really write down recipes. If someone wanted to learn they had to watch and learn by example. My mother wrote down the basic ingredients on a card. The one she gave me. No instructions, just amounts.
Sort of.
The recipe card called for 8 hands of flour. 1/2 hand sugar. Like that.
I have big hands. I don’t know about my grandmother’s hands though.
And I had no idea what to do with the dough after it was done.
So I experimented and tried and tried to get it right, which I finally did and I have to say it’s fabulous challah. There’s never enough of it and everyone loves it.
Recently I had lunch with a cousin who I had not seen in 40 years. He was brought up by my grandmother and one of the things he reminisced about over lunch was how delicious her challah was. I told him about my adventures with her recipe and he seemed really happy about the family challah recipe put to good use. He even told me that once, years before I was born, there was a charity auction for my grandmother’s synagogue. She baked a challah and it sold for $100!!! A huge amount of money today, for a bread, but can you imagine what that meant in the 1930s??
When challah is good, it’s really really good. Look for my recipe posted yesterday.
Ask Ronnie a question: http://ronniefein.com/ask
To comment: http://ronniefein.com/submit
Grandma's Challah
Why do challah recipes always tell you the yield in loaves, not how many a loaf serves?
My guess is that an 8-cup-of-flour challah is supposed to be enough for at least 12 people. But when a challah’s really good you never know! In my family I sometimes think I need a personal challah for everyone (and in fact when I bake challah with my grandchildren I give them each a lump of dough and they actually do get their own personal challahs).
My challah recipe yields 2 regular size or one enormous loaf. But one eight cup of flour recipe is never enough for 6 adults and 3 kids, especially when there’s going to be a break-the-fast for 17 adults plus several more children. I make at least two of these and only sometimes are there any leftovers for French toast the next day.
I really should think about three. That’s my task for tomorrow. Thanks to a big freezer.
Here’s the recipe:
CHALLAH
2 packages active dry yeast
1/2 cup warm water (about 105 degrees; feels slightly warm to touch)
1/2 cup sugar
8 cups flour, approximately
1 tablespoon salt
5 large eggs
1/4 cup vegetable oil
1-1/2 cups warm water (about 105 degrees)
poppy seeds or sesame seeds, optional
In a small bowl, mix the yeast, 1/2 cup water, 1/2 teaspoon sugar and a pinch of flour. Stir and set aside for about 5 minutes or until the mixture is bubbly. While the yeast is resting, place 7-1/2 cups flour with the remaining sugar and salt in the bowl of an electric mixer with a dough hook. Add 4 of the eggs, the vegetable oil and the 1-1/2 cups water. Mix using the dough hook until well combined. Add the yeast mixture and blend in thoroughly. Knead (at medium-high speed) until the dough is smooth and elastic (3-4 minutes). Add more flour as needed to make the dough smooth and soft, but not overly sticky. Cover the bowl and let the dough rise in a warm place for about 1-1/2 hours or until doubled in bulk. Punch the dough down, cover the bowl and let rise again for about 45 minutes or until doubled in bulk. Remove the dough to a floured surface. Cut the dough into 3 or 6 pieces depending on whether you are going to make one large or two smaller loaves. Make long strands out of each piece. Braid the strands and seal the ends together by pressing on the dough. Place the bread(s) on a lightly greased cookie sheet. Beat the last egg. Brush the surface with some of the egg. Sprinkle with seeds if desired. Let rise in a warm place for 30 minutes. While the dough is in the last rise, preheat the oven to 350 degrees. Bake for about 30 minutes for one large bread, 22-25 minutes for two smaller breads. They should be firm and golden brown. Makes one large or two smaller challahs
NOTE: you can make the dough in a food processor — cut the recipe in half
Ask Ronnie a question: http://ronniefein.com/ask
To comment: http://ronniefein.com/submit
Cranberry-Orange Noodle Kugel
KUGEL CHALLENGE II
Just because Rosh Hashanah is over doesn’t mean I’m no longer thinking about kugel. Good food memories linger and besides, I always serve kugel for my Yom Kippur break-the-fast — the Linda/Susan recipe I mentioned last week — so I still have noodle pudding on the brain.
I know that ultra-rich and crunchy topped version is coming next Saturday night, so in the meantime, in between holidays, I like to tinker with different recipes.
My mother was an “if a recipe works why fix it?” person. But I can’t help myself. I experiment a lot to see what happens if you add this or that. Not necessarily to make it better. Just different.
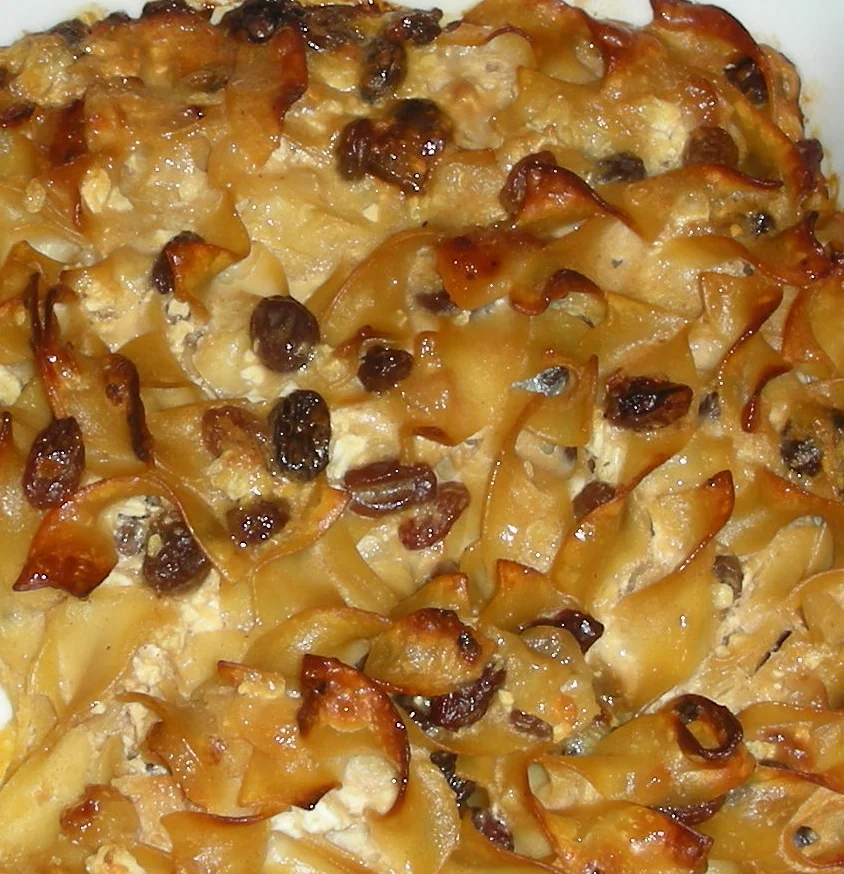
I came up with this one, Cranberry-Orange, a traditional kugel with a contemporary twist. It’s sweet, tender in the middle and crunchy on top.
Cranberry-Orange Noodle Kugel
1 cup dried cranberries
1/4 cup orange juice
1 pound wide egg noodles
1/4 pound butter, melted
6 large eggs
2 cups cottage cheese
1-1/2 cups dairy sour cream
1/3 cup sugar
1 teaspoon ground cinnamon
2 teaspoons grated fresh orange rind
1/8 teaspoon salt
Place the cranberries in a bowl and pour the orange juice over them. Let soak for at least 30 minutes. Set aside. Preheat the oven to 350 degrees. Butter a 9”x13” baking dish. Cook the noodles al dente (not quite done). Drain the noodles and place them in a large bowl. Pour in the melted butter and stir to coat all the noodles with the butter. In a separate bowl, combine the eggs, cottage cheese, sour cream, sugar, cinnamon, orange rind and salt. Mix thoroughly. Spoon the cheese mixture over the noodles and toss to coat all the noodles. Add the cranberries and any remaining juice. Mix in. Place the mixture into the prepared baking dish. Bake for about 40 minutes or until the top is browned and crunchy. Makes 8-10 servings
Ask Ronnie a question: http://ronniefein.com/ask
To comment: http://ronniefein.com/submit
Mom’s Apple Pie
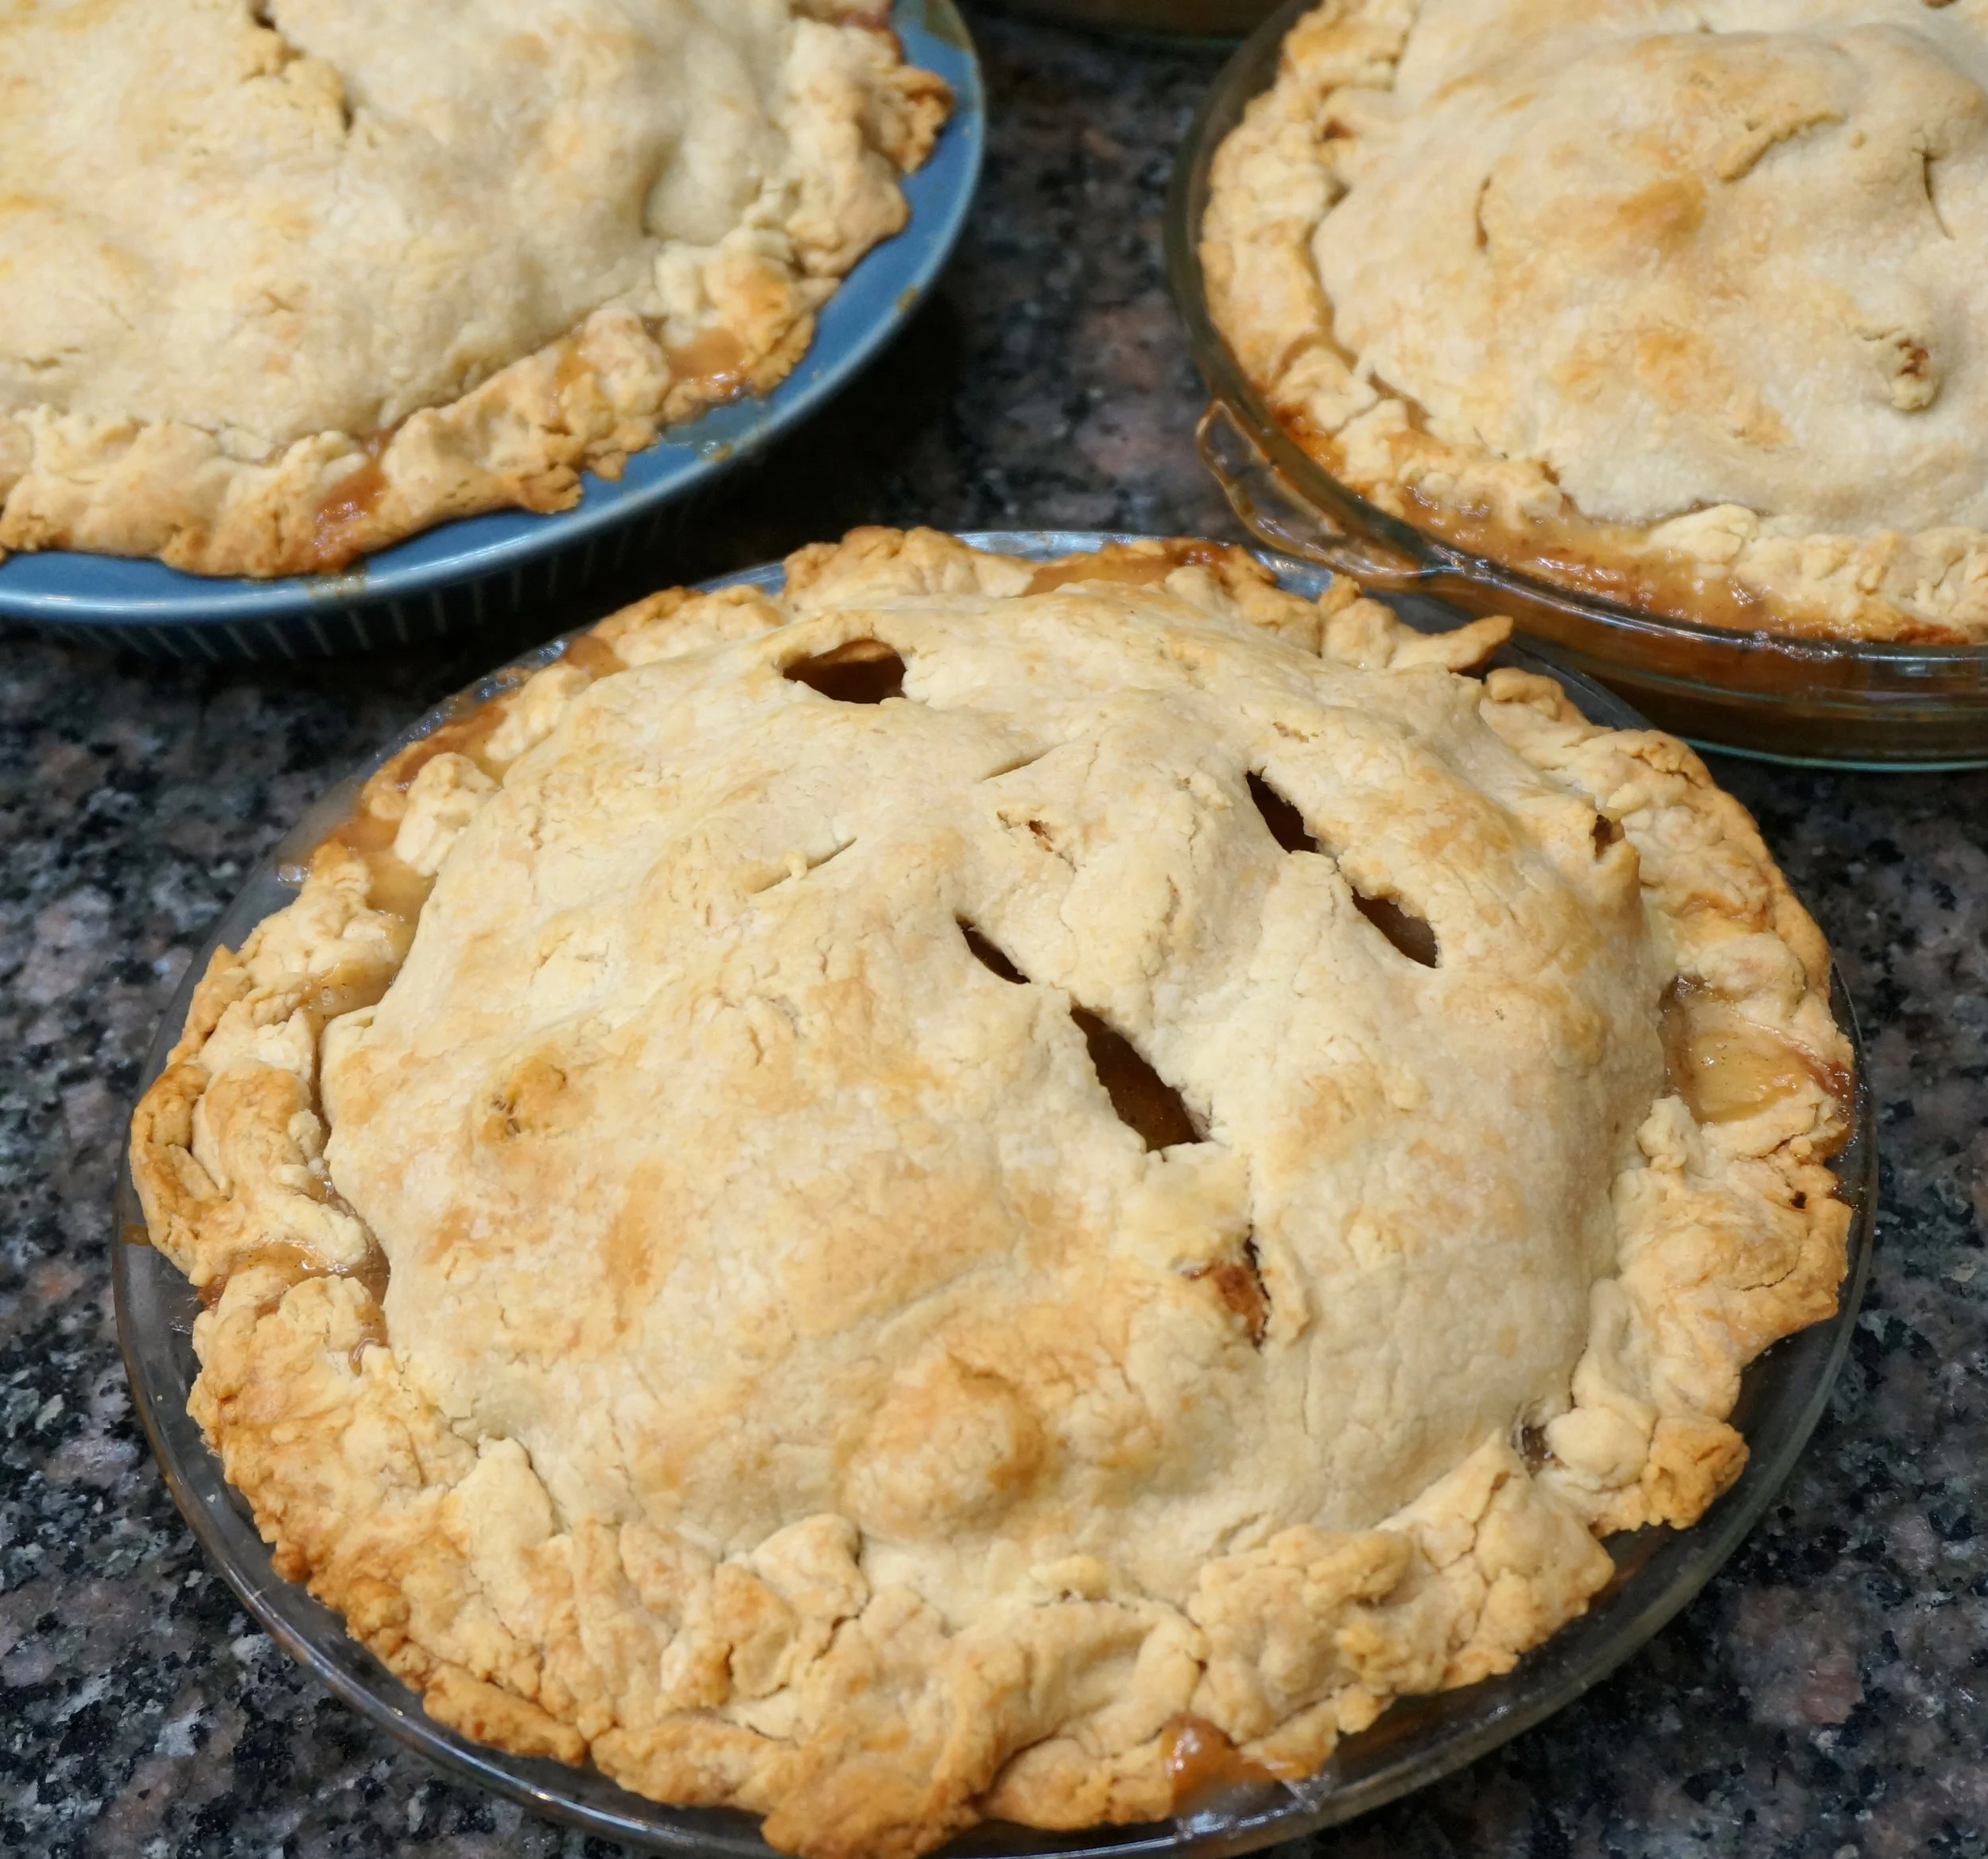
Apple Pie
Election season is now in high gear. Fortunately, so is apple season, so we can drown out the candidates and the nonsense with a big slice of homemade apple pie.
Besides, election season ends. But you can freeze an apple pie for up to a year.
My mother, who made fabulous apple pie, taught me the tricks to perfect pie crust. First, she said, use as little liquid as possible for the dough, because that’s what makes the crust so flaky.
She also didn’t use ice water, like most recipes say to. She used milk or sour cream and sometimes orange juice or even melted vanilla ice cream. The crust was incredibly delicate, crumbly and rich.
She also had this important caveat:”don’t kill the dough!” and I hear her warning every time I roll some out. She meant, roll the dough gently, don’t press too hard or bang it. It’s dough, not clay so you don’t have to batter it to death to get it smooth.
Warning in mind, every September I make an annual trek to a nearby farm to get the kind of apples she always used: Rhode Island Greenings. I’ve tried to make a pie as good as hers using other apples but nothing can compare to these. Unfortunately, you have to search them out. Stores do not carry them as a rule. I’m lucky that I only have to travel about 45 minutes to get my annual load — a bushel. I make about a dozen pies and a few other goodies like Apple Brown Betty.
The pies last almost the entire year in the freezer. We always eat one just after the first one cools down from baking. The next one at Thanksgiving, then New Year’s. The rest depend on who’s coming to my house and when.
Here’s my Mom’s recipe. If you can’t get Greening apples, use Newtown Pippin, Northern Spy, Idared, Stayman, Winesap or Jonathan. Or a mixture of any of these. Golden Delicious are fine, but a little sweet. If you use Golden Delicious, cut back a tablespoon or two of sugar. Lots of people use Granny Smith apples, but I don’t like the texture of these apples when they’re cooked.
Mom’s Apple Pie
Crust:
2-1/2 cups all-purpose flour
1 teaspoon sugar
3/4 teaspoon salt
1/2 cup cold butter, cut into chunks
1/3 cup cold vegetable shortening
4-5 tablespoons liquid (water, milk, yogurt, juice, etc.)
Combine the flour, sugar and salt in a bowl. Add the butter and shortening and work the fats into the flour using your fingers or a pastry blender (or pulse in a food processor). Add the minimum quantity of liquid and work into the ingredients to form a dough, using the remaining liquid if necessary (or pulse in the food processor until a ball of dough forms). Wrap the dough in plastic wrap and let rest for at least 30 minutes before rolling. Makes enough for 2-crust 9 or 10-inch pie
Apple Pie Filling
3 pounds pie apples, peeled, cored and sliced
2 tablespoons lemon juice
1/2 cup sugar
3/4 teaspoon ground cinnamon
2 tablespoons all-purpose flour
1 tablespoon butter, cut into pieces
2 tablespoons milk, optional
Preheat the oven to 350 degrees F. Place the apples in a large mixing bowl and sprinkle with the lemon juice. Add the sugar, cinnamon and flour and toss the ingredients to mix them evenly. Roll out half the dough and fit into a 9 or 10-inch pie pan, leaving an excess overhanging the edge. Spoon the filling into the pan. Dot the apples with the bits of butter. Roll out the remaining dough and place it on top of the apple filling. Gather the top and bottom crusts at the edge of the pan and either press them with a fork to seal them together, or roll them slightly and press down to seal the edges, then flute the edge using your index finger and thumb. Cut holes in the dough using the tip of a sharp knife. Brush the surface of the top with the milk, if you like a darker crust. Bake for 50-60 minutes or until the crust is golden brown.
Makes 8 servings
Ask Ronnie a question: http://ronniefein.com/ask
To comment: http://ronniefein.com/submit
Tagged: apple pie, pie, apple recipes, dessert
Share
Poached Plums, a Quick Dessert for the Holidays or Whenever
Italian style prune plums are now bountiful at the market and I am thrilled about that even though whenever I see the first batch I know that summer is really over.
These plums are just okay to eat our of hand but give their all if you cook them. Fortunately, you can make them into some fabulous dessert in less than 20 minutes. So, even though tonight is a holiday for me, I am off to the local farmer’s market at 10:00 this morning to get a few pounds and poach them.
Prune plums aren’t around for long. Only through September. My Mom used to love them, especially if they were stewed and served with a thick syrup. Her mother served that dish frequently when we came to visit and my mother always wondered how she could find the plums to cook. It wasn’t until years went by that my grandma confessed she just opened a can of Del Monte’s.
I also LOVE stewed prune plums. Plain or with ice cream or sorbet. Here’s a recipe. You can see how easy it is and how good this is as a last-minute dessert. It’s easy for me to find lemongrass, so I use that as a seasoning, but orange or lemon slices make a nice substitute. Here’s the recipe from my book, Hip Kosher.
By the way, if you have the time, strain the poaching fluid and boil it down until it is thick and syrupy. Great “sauce” for the plums.
Clove and Lemongrass Poached Plums
1/2 cup sugar
16 whole cloves
outer leaves from 1 large stalk lemongrass OR 1 slice fresh orange or lemon
2 pounds Italian prune plums
Place the sugar, 1-1/2 cups water, cloves and lemongrass leaves in a large saucepan. Bring the liquid to a boil over high heat. Lower the heat and simmer the ingredients for 10 minutes. Add the plums. Cook for 8-10 minutes or until the fruit skins split and the plums are tender. Let the plums cool in the syrup. Serve plums plain, with some of the poaching liquid (strain it first) or with ice cream or sorbet. Makes 4-6 servings
Ask Ronnie a question: http://ronniefein.com/ask
To comment: http://ronniefein.com/submit
Cooking a Whole Brisket
In the world of Jewish holidays, September means brisket. It’s what’s for dinner.
At least that’s what I hear from most of the Jewish people I know and what I read in the papers.
My mother wanted to make brisket but none of us liked brown meat. We are steak eaters and, when it comes to beef, the rarer, the better. So she gave up on brisket and made a turkey during the High Holidays.
My kids — and their kids — won’t eat brown meat either. UNLESS it’s barbecued. Then there’s never enough of it. So I make brisket, Texas style, grilled and crispy-edged.
The problem with brisket is that even though it’s high on flavor, it can be TOUGH if you don’t cook it right. Most of the recipes I’ve seen say to braise it in the oven at 350 degrees.
Okay, there’s the usual fight about whether to put the meat in the oven or on the cooktop, but I don’t want to get into that one.
Either way, the best way to come out with meat that’s soft, but not mushy, firm enough but not chewy is this: brown the meat first if you like (I never do), season it to taste (I use garlic, black pepper and paprika), smother it with sweet onions (I use Vidalias but common yellow onions are fine). Seal the top with a lid (I use aluminum foil) and place it in a cold oven. Turn the heat to 225 degrees. Go to sleep. Wake up and it’s done. The meat cooks magically while you are in bed.
I love the smell of brisket in the morning.
Of course, this is good only if the brisket is large. I buy a WHOLE one, both first and second cuts, because it feeds a lot of people and has much more flavor. It also has more fat, which bastes the meat and makes it tender and even more flavorful (you can get rid of the fat after you cook the meat). And it is less expensive per pound. A large one also holds together a lot better on an outdoor grill.
If you only buy the flat, first cut, follow the same procedure but don’t let it cook for 7-8 hours. Maybe 4 or 5.
The point is: COOK IT SLOW AT A LOW TEMPERATURE.
For brisket lovers, you don’t have to do anything else, though it’s better to cook the meat the day before, separate the meat from the gravy and refrigerate everything. The fat comes to the top and you can remove and discard it. Then slice the meat, put it into a baking dish, cover it with the sauce and onions and heat it through.
For my family, I brush the meat with barbecue sauce and cook it slowly on the grill until it’s crispy on the outside.
Ask Ronnie a question: http://ronniefein.com/ask
To comment: http://ronniefein.com/submit
Great review!
This was a terrific review, Ronnie. Made us want to run right over to Restaurant Jean-Louis. And we’re in California! My food memory of lemon sorbet “intermezzo” was from our 1965 wedding. I don’t actually remember any of the food at our wedding (after someone would come over to congratulate me or look at my ring or just schmooze, I’d turn around and the plate that had been set in front of me was gone). But I clearly remember the lemon sorbet intermezzo. Probably the only thing I got to eat! Would have remembered squab leg intermezzo, but that was then, and this (Restaurant Jean-Louis) is definitely NOW…
Submitted by Carol Selkin (carol_selkin@sbcglobal.net):
Kugel Challenge
Rosh Hashanah = kugel. Really, old fashioned, traditional kugel has got to be one of the most popular dishes for the Jewish holidays, even for people who on all other days would prefer things like crispy fish with yuzu dipping sauce or grilled chicken with kumquat and papaya relish.
But what kind? Kugels come all ways.
Basically though, they’re either sweet or savory.
My mother always told me that sweet, dairy kugels weren’t very good. In our house the kugels were salty and crispy and filled with juicy mushrooms and soft, golden onions. I never had a sweet kugel until I was fully grown and married and went to my friend Susan’s house and tasted one. OH MY GOODNESS it was so good that when I woke up the next morning, before I even poured my coffee I called my mother to yell at her.
What was she thinking?! This stuff is really really really delicious.
I published Susan’s recipe in several of my food articles over the years, attributing it to her of course, although I have since learned that Susan got it from Linda, who got it from someone else … The recipe hasn’t exactly gone viral on YouTube, but it is well known throughout my community.
Hear this, anyone who likes egg noodles and stuff like cream cheese with sugar and butter and sour cream and crispy cornflake crunchy toppings — try this and let me know if you’ve ever tasted a better kugel!
If you have, can you please send me the recipe??
Susan/Linda’s Sweet Noodle Kugel
- 1 pound wide egg noodles
- 1 8-ounce package cream cheese at room temperature
- 1/4 pound unsalted butter at room temperature
- 1 cup sugar
- 2 cups dairy sour cream
- 6 large eggs
- 1 teaspoon cinnamon
- 1 cup raisins, optional
- 2 cups crushed frosted corn flakes (or plain corn flakes)
- 4 tablespoons melted butter
Preheat the oven to 350 degrees. Cook the noodles in lightly salted water until al dente (not quite done). Drain and set aside. In an electric mixer, beat the cream cheese and butter until thoroughly blended. Add the sour cream and blend it in completely. Add the eggs one at a time, beating after each addition. Stir in the cinnamon and raisins, if used. Pour the mixture over the noodles and toss to coat all the noodles. Place in a 9”x13” baking dish. Combine the frosted flakes and melted butter. Sprinkle the coated flakes on top of the noodle mixture. Bake for about 40 minutes or until the top is crispy. Makes 8 servings
Ask Ronnie a question: http://ronniefein.com/ask
To comment: http://ronniefein.com/submit
judging cheesecakes
Submitted by summer47
Thank you so much for you response. It is very helpful. The contest is on Monday, Labor Day.
To Summer47: Are you a judge?
I’d love to hear about it. Good luck!