snack

Carrot Bread with Raisins for Rosh Hashanah

Somehow Labor Day is over and the food thoughts in my head go straight from tomato salad and grilled chicken to pumpkin soup and baked apples

Of course there's still time to enjoy the last of the summer fruits and vegetables, still time for outdoor-cooked grilled, marinated steak

But I'm thinking forward. It's almost a new season and -- yikes! -- the High Holiday season is only two weeks away.

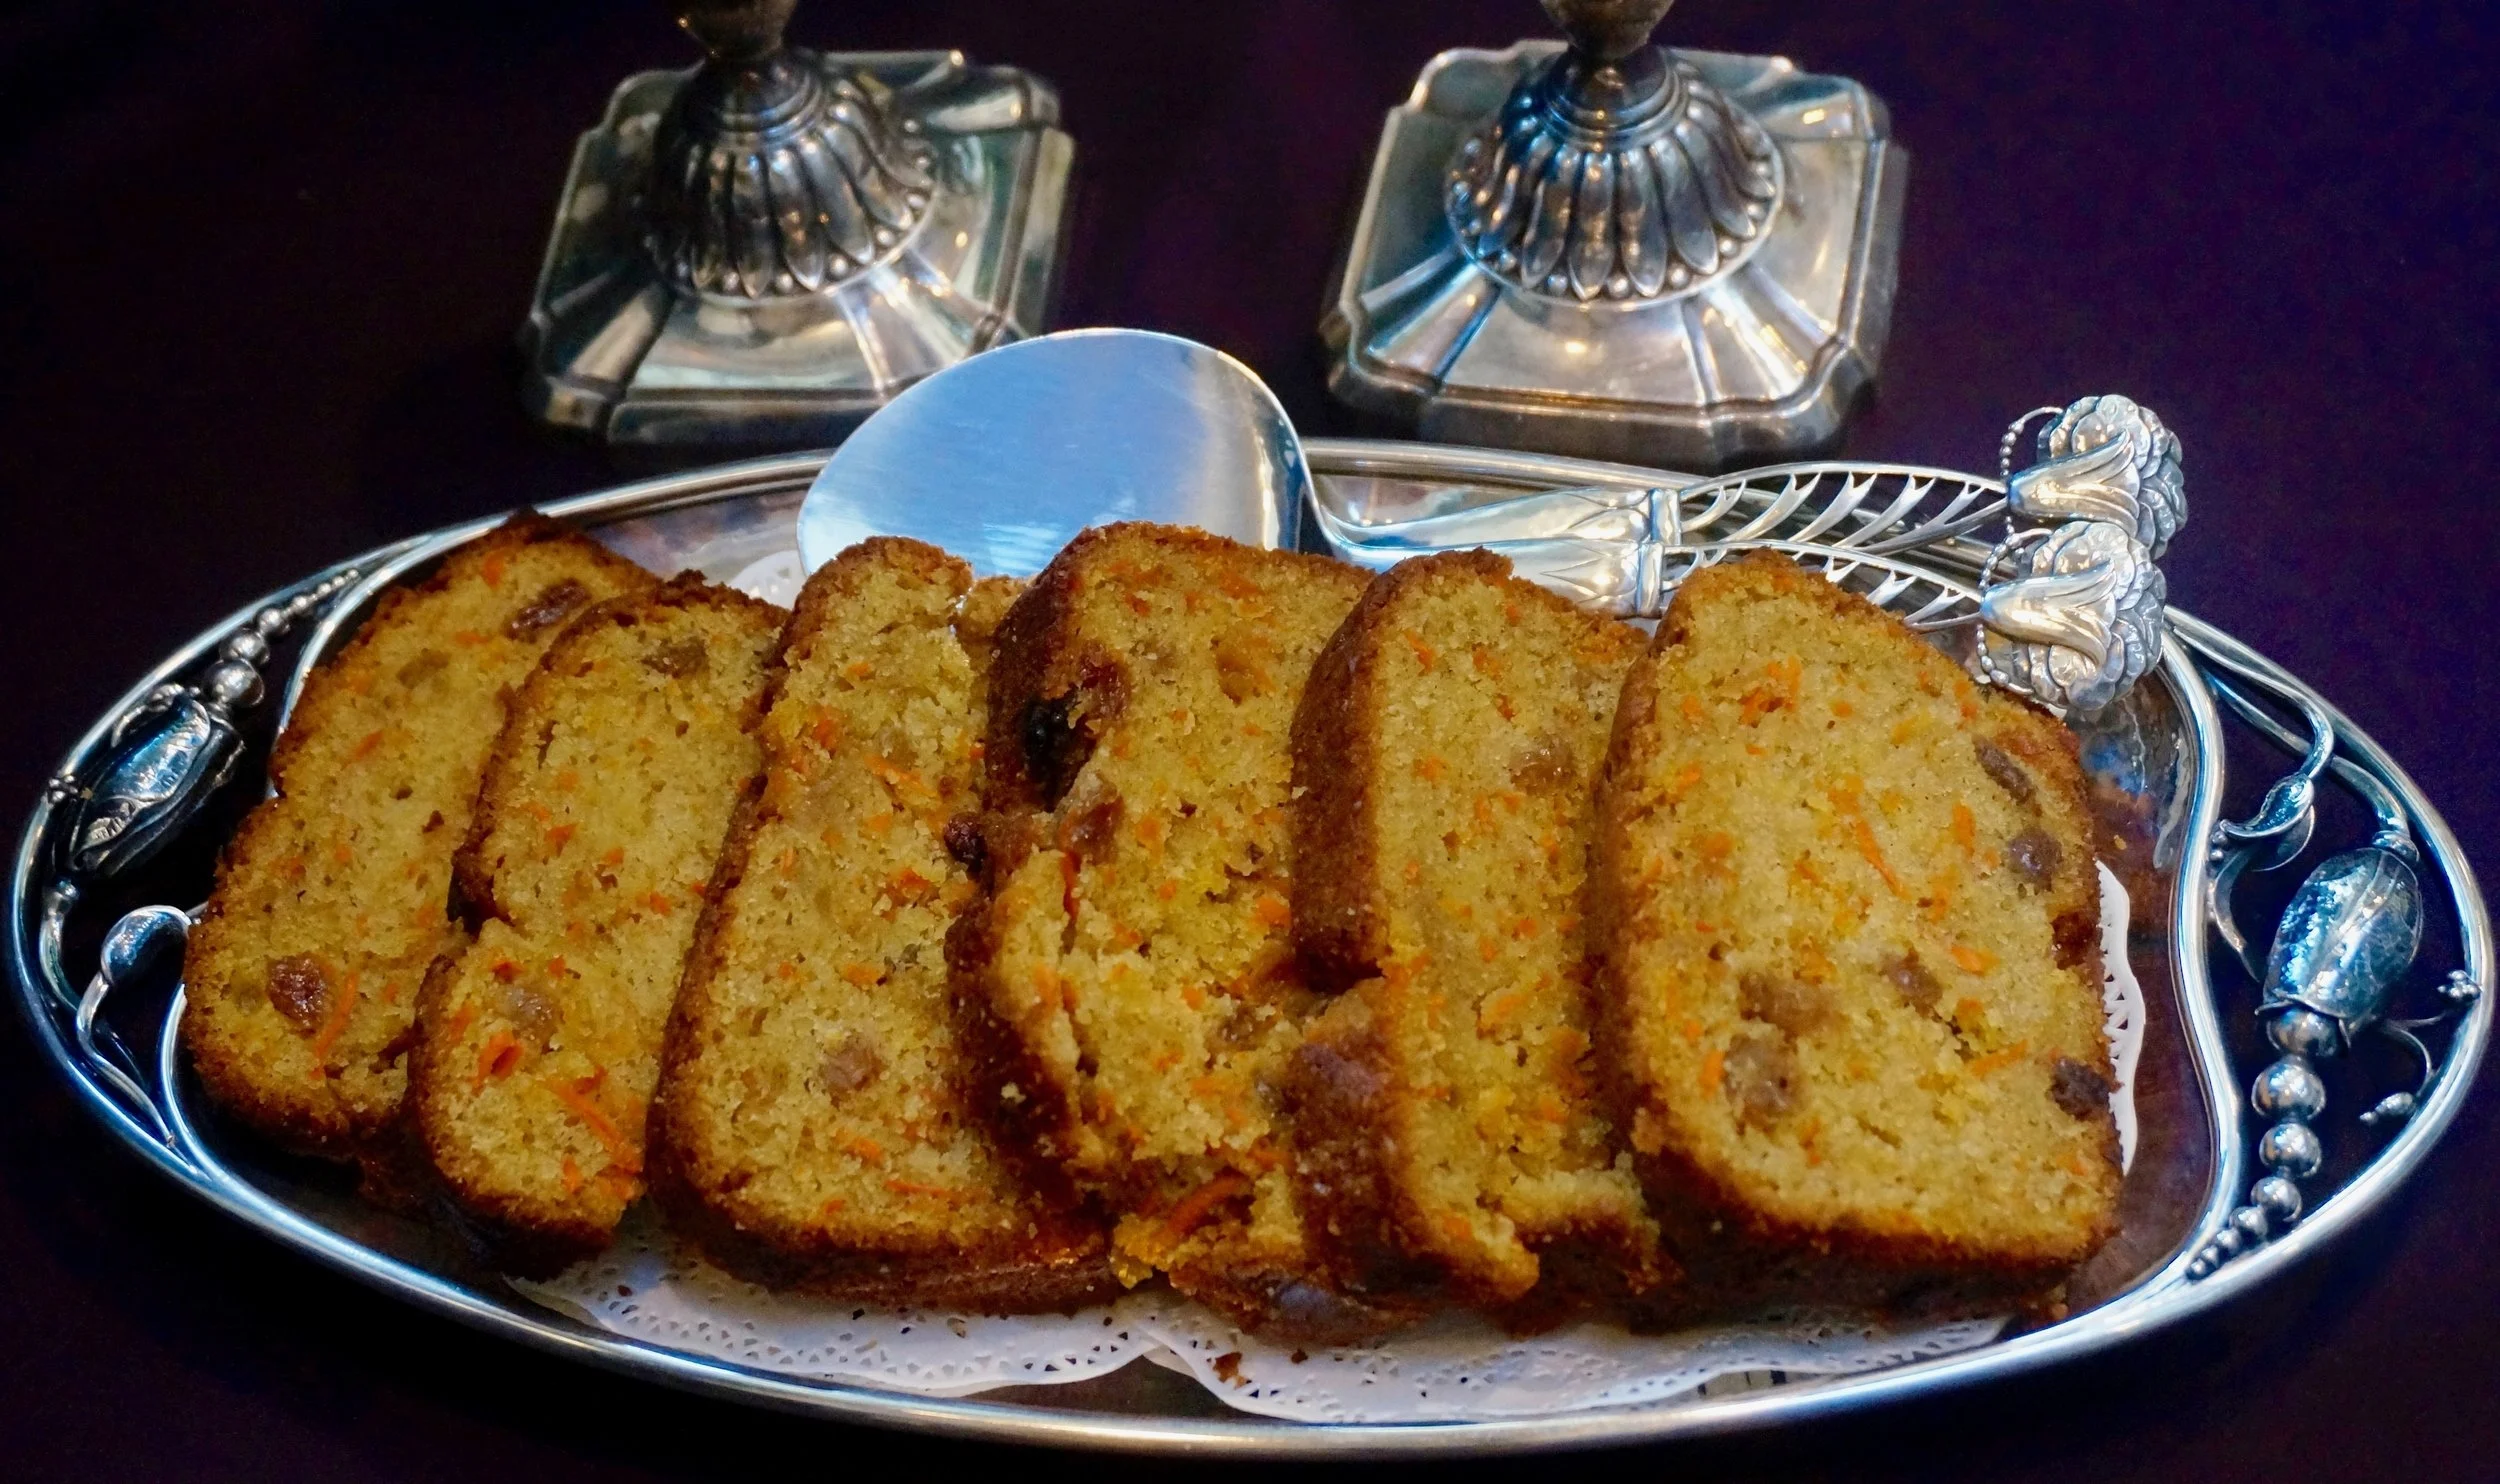
Which leads toady's food thoughts to: carrots, because carrots are traditional during Rosh Hashanah. I usually cook them in soup -- one version or another. But last year I decided to experiment with a few recipes for carrot quick bread.

This is the one we like best. It's moist and sweet, so it can be dessert, and because it is parve, it is a good choice after a traditional holiday meat meal.

But also makes a good snack either by itself or smeared with cream cheese (softened is best and maybe even mixed with some lemon juice).

CARROT BREAD(P)

  • 1-1/2 cups all-purpose flour
  • 2-1/2 teaspoons baking powder
  • 1 teaspoon salt
  • 1 teaspoon cinnamon
  • 1/2 teaspoon nutmeg
  • 1/2 cup brown sugar
  • 1/3 cup white sugar
  • 1 cup vegetable oil
  • 3 large eggs
  • 1 tablespoon lemon juice
  • 1-1/2 teaspoons grated lemon peel
  • 1-1/2 cups grated carrots
  • 1/2 cup golden raisins

Preheat the oven to 350 degrees. Grease an 8-1/2”x4-1/2” loaf pan. Mix the flour, baking powder, salt, cinnamon and nutmeg into a bowl. Set aside. Beat the brown sugar, white sugar and vegetable oil in the bowl of an electric mixer set at medium speed for 2-3 minutes, or until well blended. Add the eggs, one at a time, beating after each addition. Stir in the lemon juice and peel. Add the dry ingredients and blend them into the egg mixture. Fold in the carrots and raisins. Pour the batter into the loaf pan. Bake for about 50 minutes or until a cake tester inserted into the center comes out clean. Let cool in the pan for 10 minutes, then invert onto a rack to cool completely. 

Makes one loaf  

Ah! Summer Blueberries!

_DSC9863.jpg

It's impossible to lose weight during the summer. Not when there is so much glorious fruit around and it tastes so good just out-of-hand but SO SO delicious in crisps, pies, muffins, galettes and quickbreads.

Like this blueberry bread. Spiked with orange.

A nice snack all by itself. Sliced for sandwiches smeared with cream cheese. Dessert when topped with ice cream.

Blueberry Bread

  • 2 cups all-purpose flour
  • 1 cup sugar
  • 1-1/2 teaspoons baking powder
  • 1/2 teaspoon baking soda
  • 1 teaspoon salt
  • 2 teaspoons grated fresh orange peel
  • 1 teaspoon vanilla extract
  • 1/4 cup coconut oil
  • 1 large egg
  • 3/4 cup orange juice
  • 1 cup fresh blueberries

Preheat the oven to 350 degrees. Lightly grease a 9”x5” loaf pan. Mix the flour, sugar, baking powder, baking soda, salt, orange peel and vanilla powder together into a bowl. Add the coconut oil in chunks and cut it into the dry ingredients with your fingers or a pastry blender. If you use an electric mixer, set it at low-medium speed. In a second bowl, beat the egg and orange juice together until well blended (if you use vanilla extract, add it here). Add to the flour mixture and stir to blend ingredients. Fold in the blueberries. Pour the batter into the prepared pan. Bake for 55-60 minutes or until a cake tester inserted into the center comes out clean.

Makes one loaf

Fresh Tomato Puff Pastry Pizza

_DSC0079.jpg

Year after year I failed at growing tomatoes. They bloomed too late because I planted them too late, so by the time the tomatoes on the vine were big and green, a frost would come and everything was ruined. 

Last year I decided to plant them earlier than usual. Also in a different spot in my garden.

Perfecto!

So this year I did the same.

Perfecto again!

I got lots and lots of tomatoes! Enough for salad and sandwiches. Enough for homemade sauce.

And also these fabulous puff pastry pizzas.

So easy, such a good lunch, brunch or even hors d'oeuvre (cut smaller). 

Fresh Tomato Puff Pastry Pizza

  • 3 large or 4 medium tomatoes, sliced about 1/4-inch thick

  • salt

  • 1 sheet puff pastry, thawed

  • 2 cups shredded mozzarella cheese

  • 2 tablespoons grated Parmesan cheese

  • 3 tablespoons finely chopped basil

  • 1 tablespoon olive oil

Preheat the oven to 425 degrees. Line a baking sheet with parchment paper. Place the tomatoes slices on a board, sprinkle with salt and let rest for about 30 minutes. Wipe the slices dry. Roll the puff pastry slightly thinner on a floured surface. Cut lengthwise once and widthwise twice to make 6-8 smaller pieces (or leave in one piece for a whole tart). Place the pieces on the baking sheet. Sprinkle with equal amounts of the mozzarella cheese, leaving a border of about 1/2-inch. Top with equal amounts of tomato slices. Sprinkle with equal amounts of Parmesan cheese. Sprinkle with equal amounts of basil. Drizzle with olive oil. Refrigerate for about 20 minutes. Bake for about 20 minutes or until golden brown.

Makes 6-8 servings


Banana Marble Cake

fullsizeoutput_828e.jpeg

Whenever my mother had leftover sour cream that was still safe to eat but had been hanging around the fridge for too long for it to taste fresh, she would use it to bake something. Like her marble cake. 

That cake was a simple wonder. Tender, vaguely sweet, with just enough melted chocolate swirling through the vanilla crumb. Rarely frosted, we ate it like coffee cake, just as is.

I've made that cake many times, and for the same reasons. Leftover sour cream (I also use leftover plain Greek yogurt when I have some). I've made it the original way and with coconut oil in place of shortening. 

Recently I had sour cream and yogurt leftover, the not exactly new kind.

I also had bananas left over. I always have bananas left over. I usually make banana bread with the leftover bananas.

So I took a cue from my mother and decided to bake marble cake. Using bananas.

So good.

Banana Marble Cake

  • 4 ounces semisweet chocolate
  • 2-1/2 cups all-purpose flour
  • 1 teaspoon salt
  • 2 teaspoons baking powder
  • 1/2 teaspoon baking soda
  • 1 cup sugar
  • 3 large eggs
  • 1 teaspoon vanilla extract
  • 1/2 cup vegetable oil
  • 4 very ripe medium bananas, mashed
  • 1 cup dairy sour cream or plain Greek yogurt 

Preheat the oven to 350 degrees. Grease and flour a (10-inch) 8-cup bundt pan. Melt the chocolate and set it aside. Mix the flour, salt, baking powder and baking soda together in a bowl and set aside. In the bowl of an electric mixer set at medium speed, beat the sugar and eggs for 2-3 minutes or until well blended. Add the vanilla extract and vegetable oil and beat for 1-2 minutes or until thoroughly blended. Add the bananas and sour cream and beat them in. Add the flour mixture and beat for 1-2 minutes or until the batter is well blended. Pour half the batter into the prepared pan. Pour in half the melted chocolate and swirl it into the batter using a knife or wooden spoon. Repeat with the remaining batter and melted chocolate. Bake for 50-60 minutes or until a cake tester inserted into the center comes out clean. Remove from the oven and let cool in the pan for 10 minutes. Remove to a cake rack to cool completely.

Makes one bread, serving 12-16


Banana Cupcakes with Brown Sugar Frosting

I am allergic to bananas, so I never eat them or any food that contains banana.

BUT, I buy bananas all the time. Ed eats some and the grandkids eat some. But mostly I buy them because I love the fragrance of a peeled banana and love cooking with bananas just so that I can have a whiff or two.

Over the years I've developed quite a number of banana bread and banana cake recipes, including some dairy-free, some with chocolate chips, some with dried fruit, some with chocolate flavored batter, some with coconut, some with mango, some with streusel. You get the point. I enjoy these goodies vicariously as I watch other people eating them. 

A few days ago, as usual, I had a few unused bananas. I am also trying to use up all the flour in my cabinet before Passover. So there was a double purpose to creating some new banana concoction and the result was cupcakes. My tasters have told me that the cake part is delicious. I tasted the thick and creamy frosting and give it two thumbs up.


Banana Cupcakes with Brown Sugar Frosting(P)

  • 2 cups all-purpose flour
  • 1 teaspoon baking soda
  • 1/2 teaspoon baking powder
  • 1/2 teaspoon salt
  • 1 teaspoon grated fresh orange peel
  • 1 cup sugar
  • 1/2 cup vegetable oil
  • 2 large eggs
  • 3 medium very ripe bananas
  • 1/4 cup orange juice
  • 3/4 teaspoon vanilla extract
  • Brown Sugar Frosting

Preheat the oven to 350 degrees. Lightly grease 12-15 muffin tins (or line them with cupcake papers). Combine the flour, baking soda, baking powder, salt and orange peel in a bowl and set it aside. Beat the sugar and vegetable oil with a handheld or electric mixer set at medium speed for 2-3 minutes or until the mixture is light and fluffy. Add the eggs one at a time, beating after each addition. Mash the bananas and add them to the sugar mixture. Beat thoroughly until the ingredients are well blended. Add the flour mixture, stirring only enough to moisten the dry ingredients and blend them in. Stir in the orange juice and vanilla extract. Pour the batter into the prepared tins. Bake for 20-25 minutes or until a cake tester inserted into the centers comes out clean. Let cool for about 10 minutes. Then remove the cupcakes from the pan and cool on a cake rack. Frost with Brown Sugar Frosting.

Makes 12 large or 15 medium cupcakes

Brown Sugar Frosting (P)

  • 1/4 cup Earth Balance Buttery Spread or pareve margarine
  • 1/4 cup coconut oil
  • 6 tablespoons brown sugar
  • 1-1/3 cups confectioner’s sugar
  • 1/2 teaspoon vanilla extract
  • orange juice (1-2 tablespoons)

In a large bowl or an electric mixer, beat the buttery spread, coconut oil, brown sugar, confectioner’s sugar and vanilla extract together at medium speed for 3-4 minutes or until smooth and thoroughly blended. Gradually add orange juice, using enough to make the mixture spreading consistency.

Banana Bread with Dates and Figs

_DSC2355.jpg

Every Purim I try new hamantaschen from different bakeries. I've also made my own hamantaschen using a variety of recipes.

But so far, after years and years of buying this one and that one, my favorites are the (parve) ones I get at The Bakery, in Plainview, NY. For me, they are the enduring treats of childhood, never failing to please, never changing, even in a world where innovation is honored.

And so -- I will buy my hamantaschen this year. Old fashioned flavors: prune and apricot. At The Bakery.

Which means that for Purim, instead of creating a completely new hamantaschen recipe or even trying a new pastry recipe with old fashioned filling, I am going to bake banana bread as mishloach manot gifts.

I have a zillion recipes for banana bread. Some with streusel. Some dairy-free. Some loaded with chocolate chips, some with coconut. Some all chocolate-y. Some spicy. And on and on.

This is my most recent banana bread recipe, one I came up with while revising my mother's date-nut bread recipe. 


Banana Bread with Figs, Dates and Nuts

  • 2-1/2 cups all-purpose flour
  • 1 teaspoon salt
  • 2 teaspoons cinnamon
  • 2 teaspoons baking soda
  • 1 cup vegetable shortening
  • 1-1/2 cups sugar
  • 4 large very ripe bananas, mashed
  • 4 large eggs
  • 1 cup chopped dried figs
  • 1/2 cup chopped dried dates
  • 1/2 cup chopped toasted almonds

Preheat the oven to 350 degrees. Grease and flour a 10-cup bundt pan. Mix the flour, salt, cinnamon and baking soda together in a bowl. In the bowl of an electric mixer set at medium speed, beat the shortening and sugar until well blended. Add the bananas and beat them in thoroughly. Add the eggs and beat them in thoroughly. Add the flour mixture and beat for a minute or so until the batter is well blended. Fold in the figs, dates and nuts. Pour the batter into the prepared pan and bake for about one hour or until a cake tester inserted into the center comes out clean. Remove from the oven and let cool in the pan for 15 minutes. Remove to a cake rack to cool completely.

Makes one bread, serving 16-18


Mom's Date-Nut Bread

Tu B'Shevat is one of the lesser known Jewish holidays, but also one of the more delicious ones. From my childhood I remember it as a time when my mom would buy dried figs that came in a wreath of sorts, the figs tied together with string.

I ate dozens of them.

It was also when she made her fabulous Date-Nut Bread. She served the slices like a sandwich, with cream cheese slathered between the layers. 

I ate dozens of those too.

My cousin reminded me that her mother and mine baked Date-Nut bread in a coffee can. Yes, of course! Because our mothers were married young women during WWII, when metal -- and therefore loaf pans and other assorted baking equipment -- was in short supply. So they kept the cans from ground coffee and other foods such as fruit cocktail and used those instead.

I recently made a batch of date-nut bread using my mom's recipe. I used a loaf pan and was a little disappointed. Not in the pan. In the bread. It seemed dry. Maybe I over baked it. Not sure, but I always loved this recipe, so I tried again but made a few changes.

I used less flour.

I also thought it might be a good idea to include some figs (or, frankly, any other dried fruit) with the dates and I also thought the flavor would perk up a bit with a small amount of fresh orange peel. 

My mother added Madeira or sherry, but because I had a lovely sample of Cherry Heering that I got at Kosherfest, I used that instead. She also mixed in walnuts but because of allergies, I replaced them with toasted almonds.

Of course, the bread was completely different with all these changes.

I loved it.

Especially when sliced and slathered with cream cheese.


Mom’s Date-Nut Bread New Version

  • 1-3/4 cups all-purpose flour
  • 1 cup sugar
  • 2 teaspoons baking soda
  • 1 teaspoon salt
  • 1 cup chopped dates
  • 1 cup chopped dried figs, apricots, cranberries, cherries, prunes or raisins
  • 1 cup chopped toasted almonds
  • 2 teaspoons grated fresh orange peel
  • 2 tablespoons vegetable oil
  • 2 tablespoons Orange brandy, cherry Heering, Madeira, Port or Sherry wine
  • 1 large egg
  • 1 cup boiling water
  • cream cheese, optional

Preheat the oven to 350 degrees. Grease a 8”x4-1/2”x3” loaf pan (or a one-pound coffee can). Mix the flour, sugar, baking soda and salt into a bowl. Add the fruits and nuts and toss the ingredients to coat the fruit with the flour mixture. In another bowl, combine the vegetable oil, wine and egg. Pour the boiling water into the fruit-flour mixture and mix thoroughly. Add the egg mixture and blend it in thoroughly. Spoon the batter into the prepared loaf pan. Bake for about 50 minutes or until a cake tester inserted into the center comes out clean. Let the bread cool in the pan for 10 minutes. Invert onto a cake rack to cool completely. Slice and serve plain or with cream cheese.


Makes one loaf


PuPu Platter Chicken Wings

What I am about to say may acknowledge me as a dinosaur but here it is: I remember the time before there was a Superbowl. 

I remember the first Superbowl. 1967.

I didn't watch. It was sort of a big deal, but not nearly the kind of nationwide (worldwide?) event it is today.

I can't recall what people served at Superbowl get-togethers. Or even if there were Superbowl get-togethers.

But I do remember that over the course of time, people everywhere used the occasion not only to watch football or bet, or both, but as time for a relaxed day with good friends and casual food. Like chicken wings.

I can remember before Buffalo Wings became a thing. And that after they did, wings of all sorts became one of the popular Superbowl foods.

For me -- wings were always a thing. The best part of the chicken. My mother told me they were the best part mostly because of the soft soft meat between the two narrow bones in the middle part of the wing.

She made chicken wings for us often.

I have made chicken wings often too. My mother was right. They are the best part of the chicken! Whether or not you serve them for Superbowl.

But if you do, how about these?


PuPu Platter Chicken Wings

  • 15 chicken wings
  • 1/2 cup red wine
  • 1/2 cup soy sauce
  • 2 tablespoons brown sugar
  • 1 tablespoons crushed crystallized ginger
  • 1 teaspoon lemon juice
  • 1 large clove garlic, finely chopped
  •  

Cut the chicken wings at the joints, wash and dry the pieces and set them aside. Combine the red wine, soy sauce, brown sugar, crystallized ginger, lemon juice and garlic in a large container. Add the wing pieces and let marinate for at least 2 hours. Preheat the oven to 400 degrees. Place the wings in a single layer on a baking sheet. Bake for 15-18 minutes. Turn the wings and bake for another 15-18 minutes or until crispy.

Makes 30 pieces


Smoked Salmon and Avocado Toasts

At the end of each year food professionals discuss fads and popular trends in the culinary world and often make predictions about what's to come.

I don't know what's coming but I can say that as far as I know, one food trend this year was: avocado toast. Which is basically guacamole sandwich. Which is basically mashed avocado with some lime or lemon juice and anything else you might want in your guacamole, like tomatoes or chili pepper and so on.

I also know this: there's a good reason that avocado toasts became a thing. They're scrumptious. They're easy to prepare. They are incredibly versatile, as in you can use them as a base for a whole host of hors d'oeuvre, which might come in handy for New Year's get togethers.

For example: these avocado toasts on melba rounds topped with chopped salmon and some seasonings. 

Honestly, it couldn't get much easier than this and they do look pretty don't they?

They're on my menu for my New Year pre-dinner cocktail hour.

And btw, I buy salmon "scraps" that (fortunately) my local supermarket sells -- the leftover but still good pieces of salmon that the lox cutter cuts away to get those perfect slices. Because you chop this salmon up, so why not buy the cheap stuff?


SMOKED SALMON AND AVOCADO TOASTS

  • 24 toast rounds (or packaged Melba rounds)

  • 2 small avocados, peeled and chopped

  • 1 tablespoon plus 1-1/2 teaspoons olive oil

  • 2 tablespoons finely chopped scallion

  • 2-3 tablespoons lime juice

  • salt and freshly ground black pepper to taste

  • 1/4 pound smoked salmon pieces

  • 1 tablespoon chopped chives

  • pinch or two of cayenne pepper

If using bread, cut out small circles with a cookie cutter, or use packaged Melba rounds. In a bowl, mash the avocados. Add one tablespoon olive oil, the scallion, 2 tablespoons lime juice and salt and pepper to taste. Mix thoroughly and add more lime juice if desired. Spread the avocado mixture evenly over the bread. Chop the smoked salmon, add the remaining 1-1/2 teaspoons olive oil, the chives and some cayenne pepper and mix ingredients thoroughly. Spread equal amounts of the salmon mixture on top of the avocado mixture.

Makes 24


Winter Squash and Cranberry Muffins Perfect for Sleepovers

It's December already and I am still sorting through summer clothes and several newspaper articles from last March and April that I was going to read when I had more time.

Why am I always so far behind?

I should be posting about Hanukkah. But somehow I am more focused on New Year's weekend. Probably because I made some unbelievably delicious winter squash muffins recently.

That really isn't a non sequitur. I thought of these muffins because every year we celebrate the coming new year with my brother and sister-in-law and my cousins. The cousins sleep over for a few days. We watch a lot of movies. Watch a lot of British mystery tv (Morse, Endeavor, Foyle's War, etc.). We sit around and enjoy each other's company.

We used to drink a lot of wine but have slowed down over the years.

We used to eat much more too.

(You get older, you can't keep going quite the same way, the same amount, the same speed.)

Still, there are meals to consider.

Breakfasts are usually smoked fish, bagels and stuff like that. 

But every once in a while I like to break up the monotony and have at least one different something for breakfast.

This year: those squash muffins I mentioned. I made a few batches recently and I can honestly say that they are the best muffins I ever ate. I've given some out as samples to my usual "tasters." Most of them also said they were the best muffins they ever ate. 

You'll see.

WINTER SQUASH-CRANBERRY MUFFINS

  • 1-3/4 cups all-purpose flour
  • 1 teaspoon baking soda
  • 1/2 teaspoon baking powder
  • 3/4 teaspoon salt
  • 3/4 teaspoon ground cinnamon
  • 1/2 teaspoon ground nutmeg
  • 1/4 teaspoon ground cloves
  • 1/4 teaspoon ground ginger
  • 2/3 cups sugar
  • 1/2 cup vegetable oil
  • 2 large eggs
  • 1/3 cup orange juice
  • 1 cup mashed cooked squash (or canned squash or pumpkin)
  • 3/4 cup fresh cranberries

Preheat oven to 400 degrees. Lightly grease 12 muffin tins. Combine the flour, baking soda, baking powder, salt, cinnamon, nutmeg, cloves and ginger and whisk the ingredients to distribute them evenly. Set aside. Beat the sugar and vegetable oil in the bowl of an electric mixer set at medium for a minute or so or until well combined. Add the eggs and beat them in. Add the orange juice and squash and blend them in thoroughly. Add the dry ingredients to the squash mixture and stir gently until just blended. Fold in the cranberries. Pour the mixture into the prepared tins. Bake for about 20 minutes or until a toothpick inserted into the centers comes out clean.

Makes 12 muffins